Contents
hide
DEFA 411794 Heating Element Engine Preheater System
Product Information
Specifications
- Brand: DEFA
- Model: 411794
- Power: 230V/550W
Safety Instructions
Find your vehicle in the table in this installation guide.
- If mounting on your vehicle requires separate mounting kit, mounting is described in instructions supplied with the mounting kit.
- If your vehicle is not listed in the table, scan the QR code for updated instructions, or see ‘Find your heater’ on www.defa.com. Instructions for other DEFA products must also be read carefully.
- Mounting of engine heater on vehicles or engines that are NOT listed in the table in the engine heater installation instructions, is done at your own risk and is not covered by warranty.
- Do not connect the heater electrically until the correct type of coolant is refilled, and the system is bled according to the car manufacturer’s specifications. DEFA’s power inlet cable must be acquired separately or as a component in the DEFA WarmUp system. Only connect the heater to an earthed mains socket. Check for earth connection between the mains socket, the heater’s body and the chassis.
- DEFA denies liability for any damage related to the use of unoriginal hoses, fitting which is not according to instructions or other modifications. Claims according to consumer laws. Please retain your receipt.
- Products installed in the vehicle’s engine compartment shall be installed by an authorized workshop.
- Engine heater must only be connected to the original DEFA extension cable or PlugIn contact on the inlet cable. Power Off and On will either be controlled via WarmUp control unit or manually using Connection cable.
- When connecting the connection cable the MiniPlug must always be connected first to the car before finally connecting schuko to an approved point of contact in the fixed network.
- DEFA engine heaters are dimensioned for “normal use”. DEFA defines Normal use as 3 connections for 3 hours pr. 24 hours based upon 150 users days pr. year (5 months a year).
- If the engine heater is used in emergency vehicles or power supplies where the heater is continuously connected or when the vehicle is not in use, the following annual service must be performed:
- Check the engine heater function and possibly replace the heater if it is defective (Not covered by warranty).
- Use of the engine heater in pulse controlled garages where the heater is switched on and off x number of times per hour will reduce engine heater’s life dramatically. Use of engine heater in such facilities is not recommended and is not covered by the product warranty.
- Only DEFA connection cable must be used for DEFA WarmUp system.
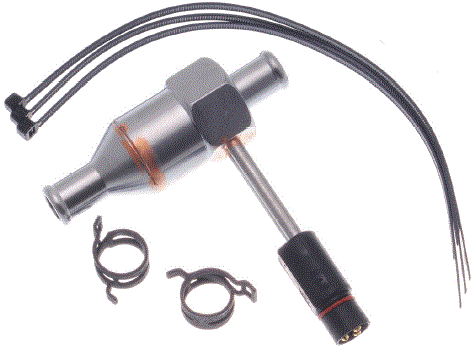
NOTE! Paragraph (1), (2), (3) and (4) applies ONLY if DEFA pump is NOT used. When installing engine heater with pump, the enclosed instructions for the pump solution must be followed. Drain off the coolant. Fit the heater as low down as possible.
It is very important to ensure:
- The heater element plate with circlip is always lowest (A)
- The hoses slope evenly up from the heater (A)
- The heater is not to be fitted horizontally (B), but sometimes DEFA has described this to be done.
- The hoses are not excessively bent, and may buckle (C)
- The hoses are not too long, and air locks may form (C)
- The hoses do not touch hot or movable parts such as turbo, exhaust pipes, cooling fan etc.
- That the hoses are fitted all the way in on the pipe stubs and make sure the hose clamps are mounted straight and behind the flange of the pipe stub. Tighten the screw clamps with 2 Nm.
Use only the car’s original hoses or hoses supplied by DEFA. These hoses are tested and of approved quality. Other hoses may dry out, crack and leak. 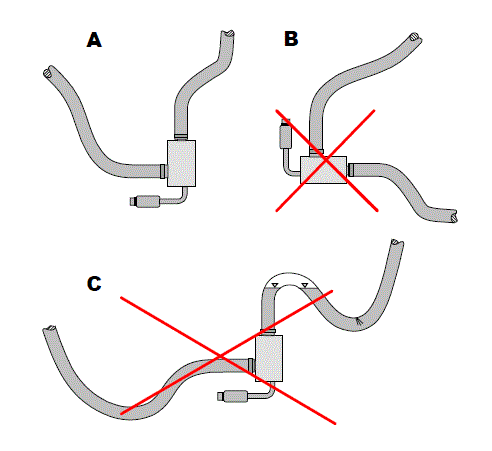
Technical data
Model
| u | v | w | x | y | z | { |
 |
||||||
| AUDI | ||||||
| A3 1.9 TDI Manual | 2008> | BLS | H | 1 | ||
| FORD | ||||||
| RANGER 2.2TDCi (Only for vehicles sold in Scandinavia) | 2012> | DURATORQ | 3 | |||
| RANGER 3.2TDCi Manuel (Only for vehicles sold in Scandinavia) | 2012> | DURATORQ | 3 | |||
| RANGER 3.2TDCi Automat(Only for vehicles sold in Scandinavia) | 2012> | DURATORQ | 7 | |||
| TRANSIT CUSTOM 2.0 TDCi FWD 136Hk | 2023> | EcoBlue/Panther | H | 8 | ||
| TRANSIT CUSTOM 2.0 TDCi AWD 136Hk | 2023> | EcoBlue/Panther | H | 8 | ||
| TRANSIT CUSTOM 2.0 TDCi FWD 170Hk | 2023> | EcoBlue/Panther | H | 8 | ||
| u | v | w | x | y | z | { |

|
||||||
| FORD | ||||||
| TRANSIT CUSTOM 2.0 TDCi AWD 170Hk | 2023> | EcoBlue/Panther | H | 8 | ||
| JCB | ||||||
| 515-40 | 2012> | KOHLER | 4 | |||
| MITSUBISHI | ||||||
| PAJERO 3.2 DI-D original 2- seater | 2014> | 4M41 | 5 | |||
| NISSAN | ||||||
| NV 400 2.3 dCi | 2012> | M9T | 2 | |||
| RENAULT | ||||||
| MASTER 2.3 dCiFront WD | 2012> | M9T | 2 | |||
| SEAT | ||||||
| IBIZA 1.9 TDI | 2009> | BLS | H | 1 | ||
| LEON 1.9 TDI | 2010> | BLS | H | 1 | ||
| SKODA | ||||||
| FABIA 1.9 TDI | 2008> | BLS | H | 1 | ||
| OCTAVIA 1.9 TDI | 2008> | BLS | H | 1 | ||
| ROOMSTER 1.9 TDI | 2008> | BLS | H | 1 | ||
| SUPERB 1.9 TDI | 2009> | BLS | H | 1 | ||
| SSANGYONG | ||||||
| TIVOLI 1.6Automat | 2015> | G16DF | H | 6 | ||
| VOLKSWAGEN | ||||||
| CADDY 1.9 TDI | 2008> | BLS | H | 1 | ||
| GOLF 1.9 TDI | 2008> | BLS/BXJ | H | 1 | ||
| JETTA 1.9 TDI | 2008> | BLS | H | 1 | ||
| PASSAT 1.9 TDI | 2008> | BLS | H | 1 | ||
| TOURAN 1.9 TDI | 2008> | BLS | H | 1 | ||
| VOLKSWAGEN | ||||||
| TOURAN 1.9 TDI | 2009> | BXJ | H | 1 | ||
| TRANSPORTER2.0 TDI 4Motion DSG 150Hk | 2025> | DZJ* | H | 8 | ||
Instructions for use
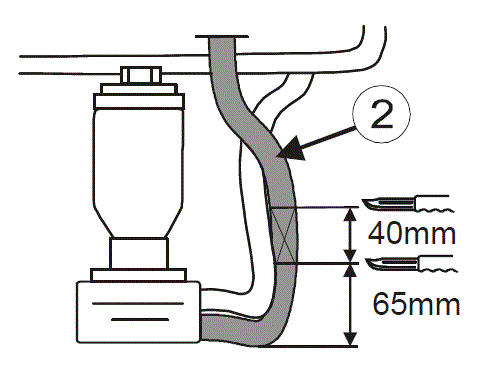
- Remove the cover on the top of the engine. Cut/separate the two hoses using a sharp knife (1).
- Note! Do NOT cut any of the hoses. Cut the hose (2) going from the outer oil cooler pipe stub and into the engine 65mm from the lower side of the hose.
- Cut of 40mm of the hose who is going into the engine as shown on the drawing below.
- Fit the heater (5) between the cutted hoses letting the hexagon on the heater pointing downwards.
- Fit the hose (3) from the oil cooler onto the lower heater pipe stub (5).
- Fit the hose (4) from the engine onto the top pipe stub on the top of the heater (5).
- Note! Ensure that there is a constant gradient on the hose going from the top of the heater to the engine.
- Cut/slit the cutted 40mm hose and use it to cover the hose (6) as a heat protection.
- Fasten the heater using cable ties and ensure its hoses do not touch any rotating or movable engine parts.
- Note! Make sure that the heaters connector plug does not touch the cooler fan.
- Top up with the coolant specified by the car manufacturer, and bleed the cooling system in accordance with the car manufacturers instruction book. Check for leakages.

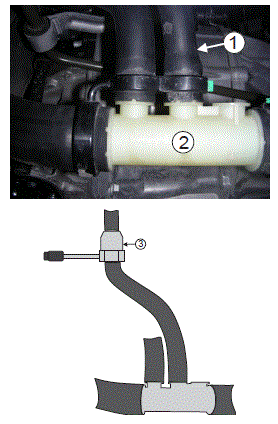
Cable Connection
- The heater is to be mounted in the hose (1) going from the plastic housing (2) in front of the gear box to the heat exchanger.
- Remove the protection from the hose and cut away a 40mm part of the hose (1) in the vertical area
- Fit the heater (3) between the cut hoses with the hexagon part pointing downwards.
- Note! Ensure that neither the contact nor the cable touches any sharp or rotating engine parts.
- Top up with the coolant specified by the car manufacturer, and bleed the cooling system in accordance with the vehicle/car manufacturer’s specifications.
- Check for leakages.
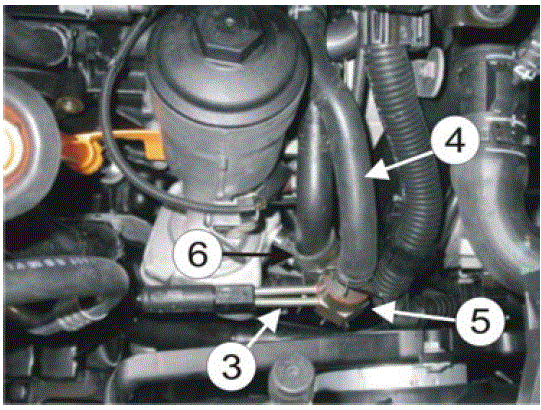
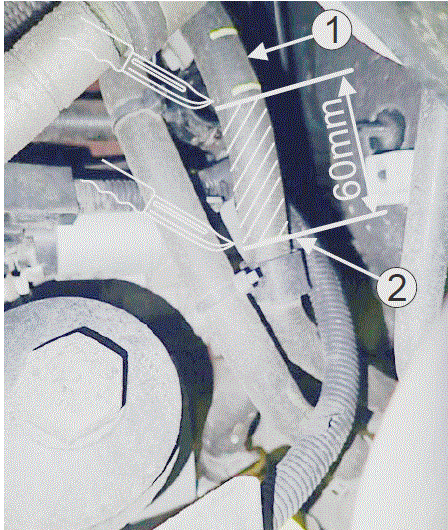
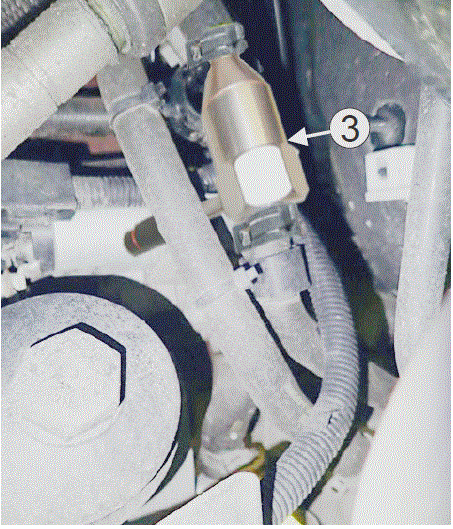
Installation
- Install the heater in the oil cooler hose (1).
- Cut away a 60mm part of the hose (1) in the middle of the straight part (2).
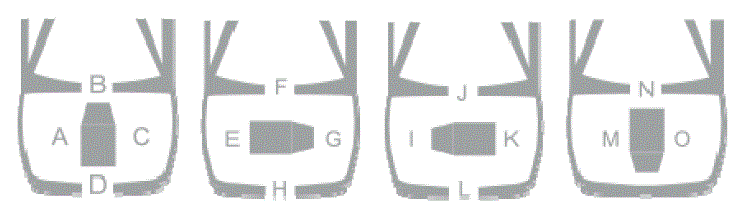
- Fit the heater (3) between the cut hoses with the contact pointing forwards, as shown in the picture.
- Note! Make sure that the hoses are fitted all the way in on the pipe stubs and make sure the hose clamps are mounted straight and behind the flange of the pipe stub.
- Tighten the hose clamps with 2 Nm.
- Note! Ensure that neither the contact nor cable is placed close to sharp or movable parts.
- Top up with the coolant specified by the car manufacturer, and bleed the cooling system in accordance with the car manufacturer’s instruction book.
- Check for leakages.
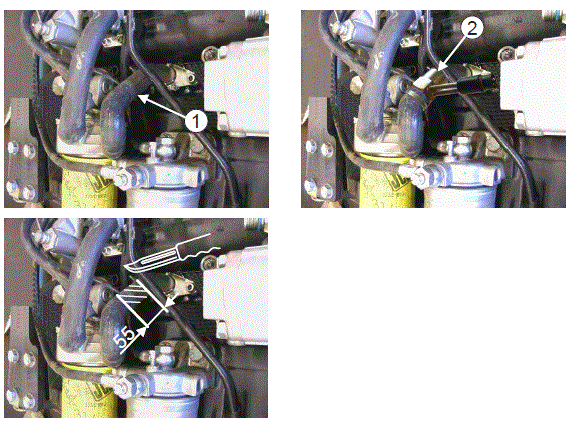
- Install the heater in the hose (1) going from the oil cooler to the engine.
- Cut away 55mm of the hose (1) in the middle of the straight part (ref. picture).
- Fit the heater (2) between the cut hoses with the conical part upwards, as shown in the picture.
- Note! Make sure that the hoses are fitted all the way in on the pipe stubs and make sure the hose clamps are mounted straight and behind the flange of the pipe stub.
- Tighten the hose clamps with 2 Nm.
- Top up with the coolant specified by the car manufacturer, and bleed the cooling system in accordance with the car manufacturer’s instruction book.
- Check for leakages.
Maintenance
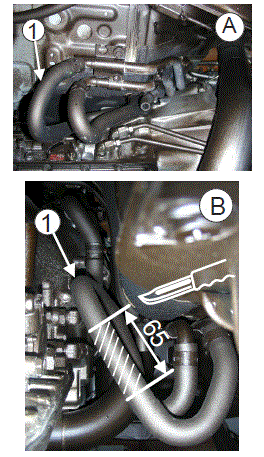
- The heater is to be mounted in the rear heater device hose (1) on the right side by the gear box, as shown in picture A, seen obliquely from below.
- Cut away 65mm in the middle of the straight, ascending part of the hose (1), picture B seen from behind.
- Fit the heater (2) with the conical end upwards and with the contact pointing forward, as shown in picture C.
- Note! Make sure that the hoses are fitted all the way in on the pipe stubs and make sure the hose clamps are mounted straight and behind the flange of the pipe stub.
- Fasten the cable with cable ties to avoid contact with any other parts, picture D seen from below. Top up with the coolant specified by the car manufacturer, and bleed the cooling system in accordance with the car manufacturer’s instruction book.
- Check for leakages.
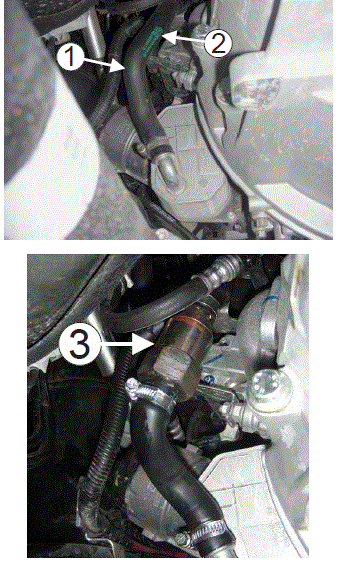
Check Electrical Connection
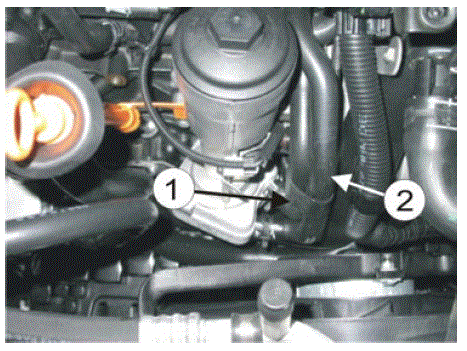
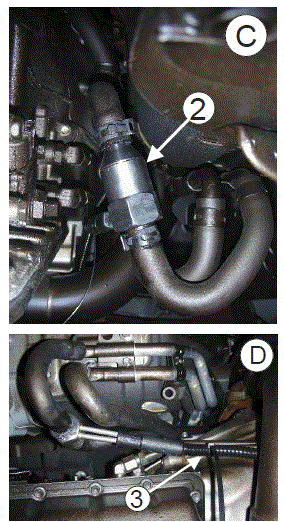
- The heater is to be mounted in the right hose (1) from the oil cooler (2) to the automat gear box.
- Cut away 65mm in the middle of the straight part of the hose (1). (Ref. the hatched area in picture)
- Fit the heater (3) between the cut hoses with the hexagon part pointing downwards.
- Note! Make sure that the hoses are fitted all the way in on the pipe stubs and make sure the hose clamps are mounted straight and behind the flange of the pipe stub.
- Note! Make sure that neither the contact nor cable comes in contact with sharp or movable parts.
- Top up with the coolant specified by the car manufacturer, and bleed the cooling system in accordance with the car manufacturer’s instruction book.
- Check for leakages.

Product Care and Cleaning
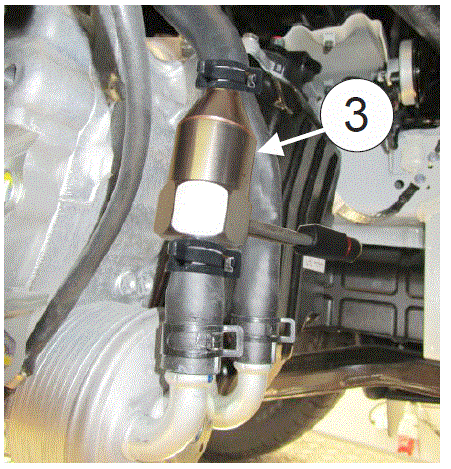
- For easier access, dismount the front left wheel and install the engine heater through the inner mudguard.
- Install the heater in the straight part (2) of the oil cooler hose (1).
- Cut away 60mm from the middle of the straight part of the hose (1). Install the heater (3) letting the black PlugIn connector pointing forward.
- NOTE! Make sure that the hose fits well and tight on the pipe tubs and that the hose clamps is properly connected.
- Note! Ensure that neither the black DEFA PlugIn contact nor the cable touches any sharp or rotating engine parts.
- Top up with the coolant specified by the vehicle manufacturer, and bleed the cooling system in accordance with the engine manufacturer’s specifications.
- Check for leakages.
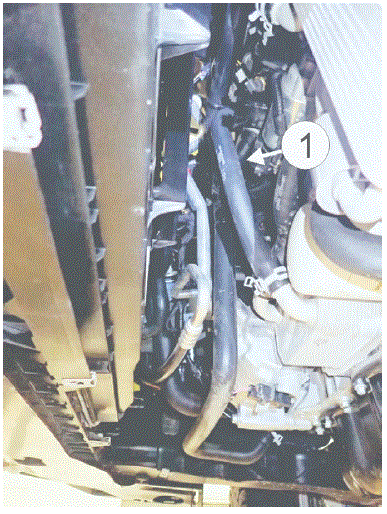
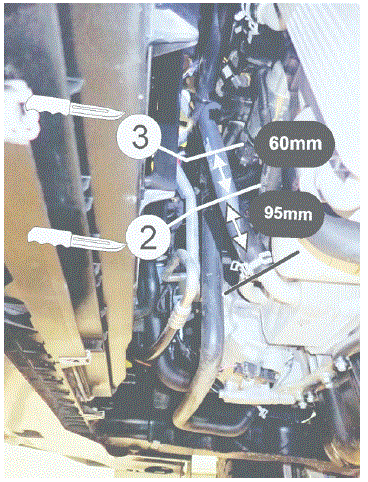
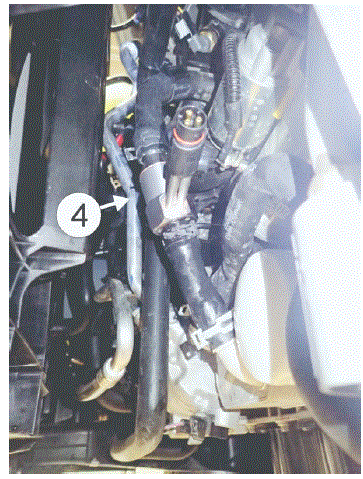
Operation
- Install the heater in the oil cooler hose (1).
- Cut the hose (1) at the marking (2) 95mm from the connection on the oil cooler.
- Cut the hose (1) at the marking (3) 60mm from the marking (2). Install the heater (4) between the cutted hose (2) and (3).
- NOTE! Ensure that the hose ends fits correct at tight on the coolant connectors and that the spring clamps are positioned correct on the hose connectors.
- Note! Avoid the heater and spring clamps to touch the other oil cooler hose.
- Top up with the coolant specified by the manufacturer and bleed the cooling system in accordance with the manufacturer’s specifications. Check for leakages.
FAQ
- Q: Can I install the engine heater on my own?
- A: Engine heaters should be installed by an authorized workshop to ensure proper installation and warranty coverage.
- Q: What type of coolant should I use?
- A: Refill with the correct type of coolant recommended by the car manufacturer before connecting the heater electrically.
- Q: How often should I service the engine heater for continuous use?
- A: Annual service is recommended for emergency vehicles or power supplies where continuous connection is required.
Documents / Resources
 |
DEFA 411794 Heating Element Engine Preheater System [pdf] Instructions 411794, 411794 Heating Element Engine Preheater System, Heating Element Engine Preheater System, Element Engine Preheater System, Engine Preheater System, Preheater System |