Wichtige Sicherheitsinformationen
- Read all instructions before operating the incubator.
- Ensure the incubator is placed on a stable, level surface away from direct sunlight, drafts, or extreme temperature fluctuations.
- Do not immerse the incubator or its electrical components in water or other liquids.
- Außerhalb der Reichweite von Kindern und Haustieren aufbewahren.
- Unplug the incubator from the power outlet before cleaning or performing any maintenance.
- Verwenden Sie ausschließlich das mitgelieferte Netzteil und Zubehör.
- Belüftungsöffnungen nicht blockieren.
Produkt überview
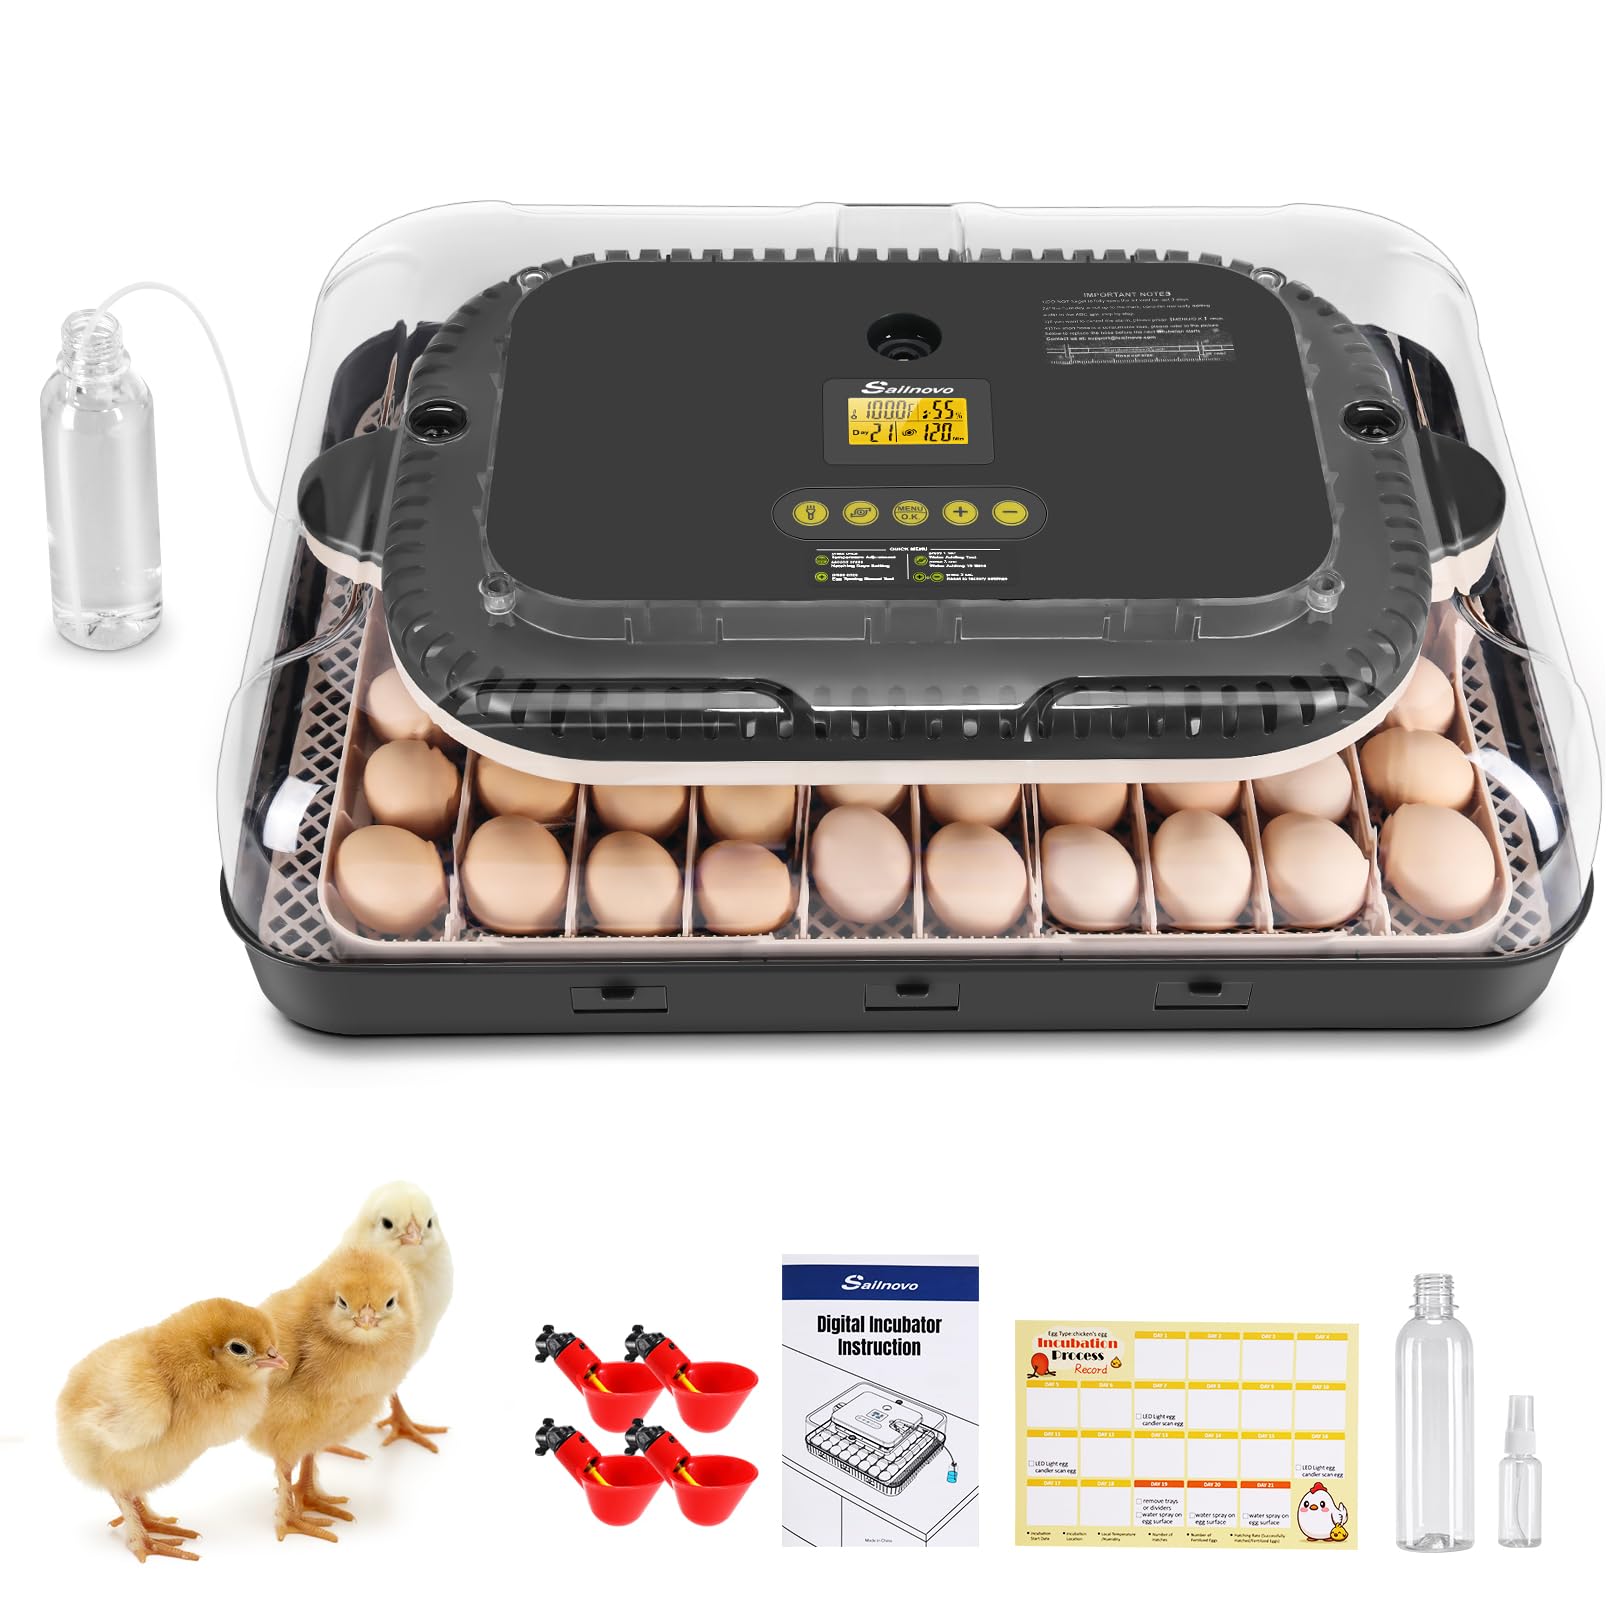
The Sailnovo 70-Egg Incubator is designed for efficient and controlled hatching of various poultry eggs. It features automatic temperature and humidity regulation, automatic egg turning, and an integrated LED candling light to support successful incubation.
Hauptmerkmale:
- Temperature Control & Stability: Allows temperature presets for specific egg species with rapid heating and stable maintenance. Includes a styrofoam cover for enhanced insulation.
- Intelligent Humidity System: Utilizes an external automatic water system with a connected bottle. Manual water addition and ventilation adjustments are also available.
- Automatische Eierwende: Eggs are rotated automatically every 2 hours, stopping 3 days before the expected hatch date.
- Built-in LED Candling: Observe egg development and check fertility without disturbing the incubation process.
- Digital Monitoring & Alerts: LED display shows temperature, humidity, incubation day, and turning status. An alert system notifies of deviations, with options to silence or disable.
- Transparent Lid Design: Provides full observation of the hatching process.
- Große Kapazität: Accommodates up to 70 eggs with adjustable trays for various sizes (chicken, duck, goose, quail).
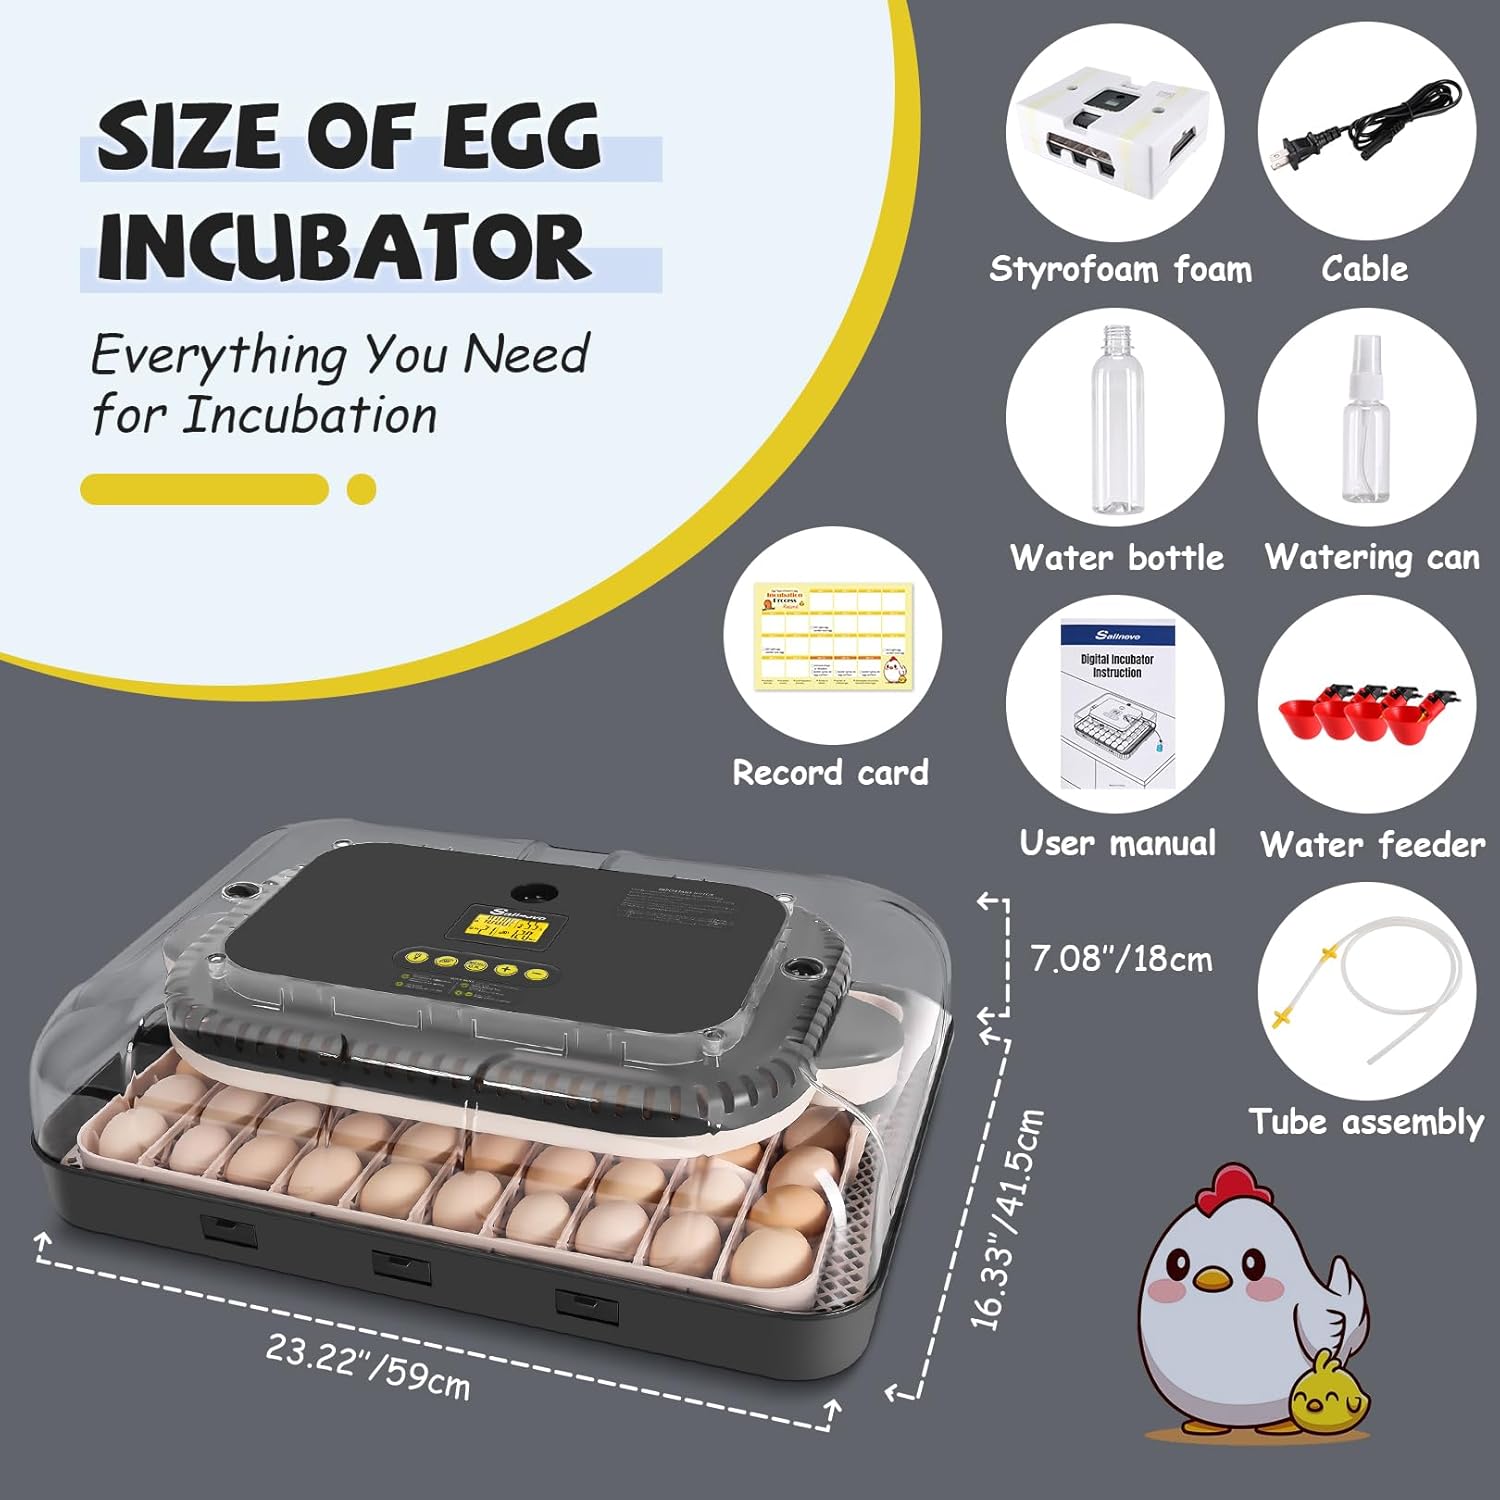
Packungsinhalt
Überprüfen Sie, ob alle Komponenten im Paket vorhanden sind:
- Egg Incubator Unit
- Styrofoam Foam Cover
- Stromkabel
- Water Bottle (for external humidification)
- Watering Can (for manual water addition)
- Record Card
- Benutzerhandbuch (dieses Dokument)
- Wasserzufuhr
- Tube Assembly (for external water system)
Komponentenidentifikation
Machen Sie sich mit dem Bedienfeld und seinen Funktionen vertraut:

- Heizungsanzeige: Blinks when the heating element is active.
- Feuchtigkeitsanzeige: Blinks when water is being added to maintain humidity.
- Auto Turning Indicator: On indicates automatic turning every two hours. Blinks when turning is active. Off indicates automatic turning is stopped for the last 3 days of incubation.
- Egg Candler Button: Press to activate the built-in LED egg candler to observe egg development.
- Water Adding Button: Press for 1 second to test the water adding function. Press and hold for 3 seconds to add water for 10 minutes.
- Menu Button (O.K.): Press once to set the temperature range. Press a second time to display the days to hatch.
- Schaltfläche „Erhöhen“ (+): Press to set the temperature range or press for 3 seconds to test the egg turner function.
- Verringern-Schaltfläche (-): Press to set the temperature range or cancel an alarm.
Aufstellen
1. Platzierung
Place the incubator on a flat, stable surface in a room with a consistent ambient temperature, ideally between 20-25°C (68-77°F). Avoid areas with direct sunlight, drafts, or significant temperature fluctuations.
2. Stromanschluss
Connect the power cable to the incubator and then plug it into a suitable electrical outlet. The digital display will illuminate.
3. Egg Tray Installation
Ensure the egg trays are correctly positioned within the incubator. The adjustable rails can accommodate various egg sizes.
4. Initial Water Filling (Humidity)
For automatic humidification, connect the provided tube assembly to the incubator's water inlet and place the other end into the water bottle filled with distilled water. Ensure the bottle is positioned lower than the incubator for proper siphoning. Alternatively, use the watering can to manually add water to the water ports on the incubator base.

5. Styrofoam Cover (Optional)
For enhanced insulation, especially in cooler environments, place the provided styrofoam cover over the incubator. This helps maintain stable internal temperatures.

Betrieb
1. Power On and Initial Warm-up
After connecting power, the incubator will begin to warm up. Allow it to run for at least 2-3 hours to stabilize temperature and humidity before placing eggs inside.
2. Temperatureinstellung
Press the 'Menu' button once. Use the '+' and '-' buttons to adjust the desired temperature. Press 'Menu' again to confirm the setting. Refer to the 'Incubation Reference Table' for recommended temperatures for different egg types.
3. Humidity Management
The external automatic water system will primarily maintain humidity. Monitor the humidity display. If adjustments are needed:
- Manual Water Addition: Use the watering can to add water directly to the water ports on the incubator base.
- Belüftungseinstellung: Open or close the air vents on the incubator lid to regulate airflow and humidity levels.
4. Automatic Egg Turning
The incubator automatically rotates eggs every two hours. This simulates natural hatching conditions. The turning function will automatically stop 3 days before the expected hatch date to prepare for hatching. To manually test the egg turning, press and hold the '+' button for 3 seconds.

5. Egg Candling
Press the 'Egg Candler' button to activate the built-in LED light. This allows you to observe the embryo's development and check for fertility without opening the incubator, thus maintaining stable conditions.

6. Digital Display & Alerts
The LED display shows current temperature, humidity percentage, incubation day counter, and egg turning status. An alert system activates if temperature or humidity deviates from optimal ranges. Press the 'Menu' key to temporarily silence alerts for 30 minutes. The entire alarm cycle can be disabled if manual monitoring is preferred or for dry incubation methods.
7. Airflow System
The incubator utilizes a fan-assisted induced airflow system to ensure stable temperature circulation throughout the incubation chamber, promoting even heating for all eggs.

8. Incubation Reference Table
Use the following table as a general guide for incubation parameters. Optimal conditions may vary slightly based on specific breeds and environmental factors.

| Eierart | Hatching Days | Incubation Temp (°F ± 0.5) | Incubation Humidity (%) | Hatching Temp (°F ± 0.5) | Hatching Humidity (%) | Egg Weight (G) |
|---|---|---|---|---|---|---|
| Huhn | 21 | 100.0 (37.8 °C) | 55-70 | 99.5 (37.5 °C) | 65-85 | 50-60 |
| Ente | 28 | 100.0 (37.8 °C) | 60-75 | 99.1 (37.3 °C) | 65-85 | 80-100 |
| Gans | 30 | 99.7 (37.6 °C) | 60-80 | 98.8 (37.1 °C) | 65-85 | 100-120 |
| Wachtel | 18 | 101.3 (38.5 °C) | 55-70 | 100.0 (37.8 °C) | 65-85 | 30-40 |
Wartung
Reinigen des Inkubators
After each hatching cycle, it is important to clean the incubator thoroughly to prevent bacterial growth and ensure optimal performance for future use.
- Stecker ziehen: Trennen Sie vor der Reinigung immer die Stromversorgung.
- Zerlegen: Remove egg trays and any removable components.
- Waschen: Clean all surfaces with a mild disinfectant solution and a soft cloth. Ensure no water enters electrical components.
- Spülen und Trocknen: Rinse thoroughly with clean water and allow all parts to air dry completely before reassembly or storage.
- Wassertanks: Clean the water tanks and tubes to prevent algae or bacterial buildup.
Lagerung
When not in use, store the clean and dry incubator in its original packaging or a protective container in a cool, dry place, away from direct sunlight and extreme temperatures.
Fehlerbehebung
If you encounter issues with your incubator, refer to the following common problems and solutions:
| Problem | Mögliche Ursache | Lösung |
|---|---|---|
| Temperatur nicht stabil oder falsch | Incubator placed in a drafty area; lid not sealed properly; ambient temperature too low/high; incorrect setting. | Relocate incubator; ensure lid is securely closed; use styrofoam cover; verify temperature setting. |
| Die Luftfeuchtigkeit ist zu niedrig | Water bottle empty or improperly connected; water ports dry; air vents too open. | Refill water bottle and check connection; add water manually; close air vents slightly. |
| Luftfeuchtigkeit zu hoch | Too much water added; air vents too closed. | Reduce water level; open air vents slightly. |
| Die automatische Eierwendefunktion funktioniert nicht. | Power issue; motor connection loose; turning function stopped for hatching phase. | Check power connection; press '+' button for 3 seconds to test turner; verify incubation day (turning stops 3 days before hatch). |
| Alarms sounding frequently | Temperature or humidity outside set parameters; alarm sensitivity. | Adjust temperature/humidity; press 'Menu' to silence for 30 minutes; consider disabling alarms if manual monitoring is preferred. |
Sollte das Problem nach Anwendung dieser Lösungsansätze weiterhin bestehen, wenden Sie sich bitte an den Kundendienst.
Technische Daten
- Modell: 70-Egg Incubator
- Marke: Segelnovo
- ASIN: B0GPWM4K6L
- Kapazität: Up to 70 standard chicken eggs (adjustable for various sizes)
- Abmessungen (L x B x H): Ungefähr 23.2" x 16.3" x 7.1" (59 cm x 41.5 cm x 18 cm)
- Leistung: 85 W
- Merkmale: Automatic Egg Turning, Automatic Humidification, Temperature Control, LED Egg Candler, Digital Display
Garantie und Support
For warranty information, technical support, or service inquiries, please refer to the documentation included with your purchase or visit the official Sailnovo webBewahren Sie Ihren Kaufbeleg als Kaufnachweis auf.