1. Einleitung
This manual provides detailed instructions for the safe and efficient operation of your Sailnovo SL-56ADA23S 56-Egg Incubator. This intelligent incubator is designed for hatching various poultry eggs, featuring stable temperature control, automatic humidification, automatic egg turning, and an integrated LED egg candler. Please read this manual thoroughly before use to ensure optimal hatching results and product longevity.
2. Produktüberschreitungview
The Sailnovo SL-56ADA23S incubator is equipped with advanced features to simplify the egg hatching process. Its transparent design allows for easy observation of egg development.
Hauptmerkmale:
- Stable Temperature & Auto-Humidification: Advanced heating technology and a powerful motor-driven fan ensure consistent temperature and humidity. External water addition and automatic humidification minimize temperature fluctuations.
- Large 56-Egg Capacity: Adjustable egg trays accommodate various poultry eggs including chicken, duck, goose, quail, pigeon, and turkey eggs.
- Automatic Egg Turner & LED Candler: Eggs are rotated every two hours to promote healthy development. Turning stops three days before hatching. A built-in LED candler allows observation of embryo development.
- Einfache Bedienung: An LED digital display monitors and adjusts temperature, humidity, incubation days, and egg-turning countdown. An alarm system alerts to temperature or humidity issues.
- Klare Sicht: The transparent ABS cover provides a 360-degree view, ideal for educational purposes.
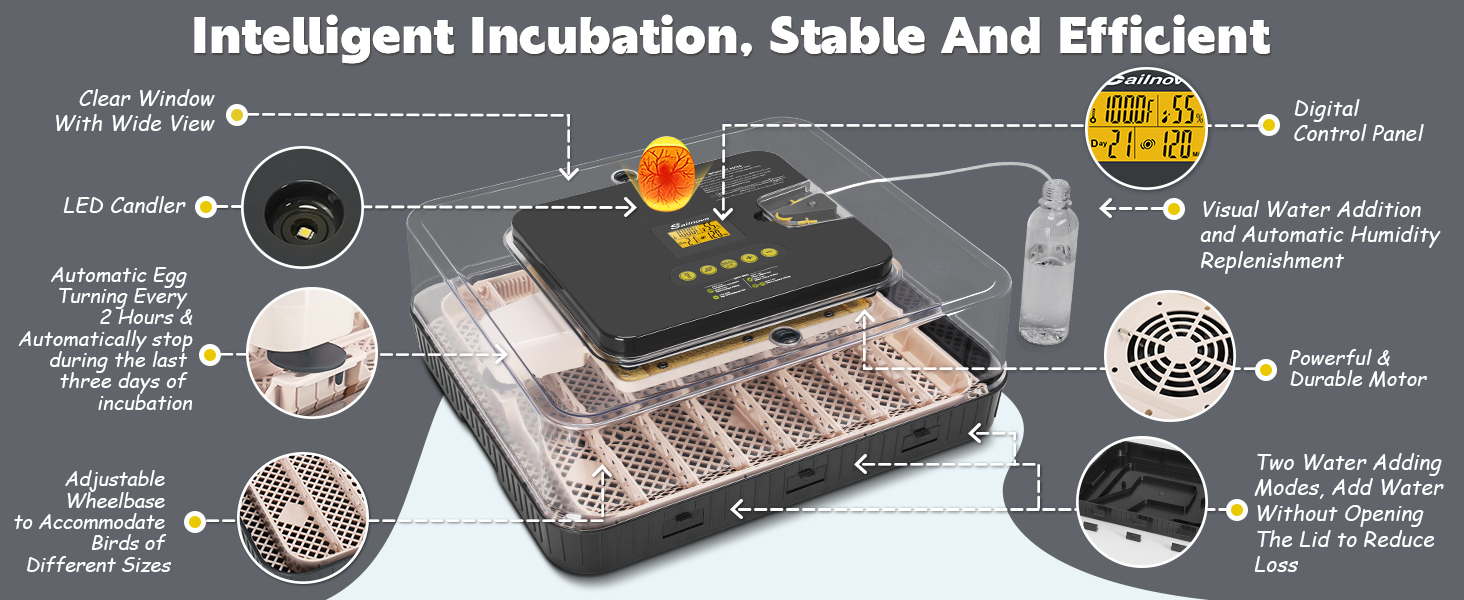
Figure 2.1: Intelligent Incubation, Stable and Efficient - Overview of incubator features.
3. Lieferumfang
Prüfen Sie beim Auspacken, ob alle Komponenten vorhanden und unbeschädigt sind:
- Sailnovo 56-Egg Incubator Unit
- Stromkabel
- Wasserflasche
- Gießkanne
- Styrofoam Foam (for insulation)
- Record Card
- Bedienungsanleitung
- Wasserzufuhr

Figure 3.1: Contents of the Sailnovo 56-Egg Incubator package.
4. Einrichtungsanweisungen
Follow these steps to assemble and prepare your incubator for use:
- Install the A/B/C Water Tank: Securely place the water tank components into the base of the incubator.
- Place the Matting: Position the matting grid in the bottom of the incubator base.
- Install Egg Card Strips: Insert the egg card strips into the designated slots on the matting.
- Align Motorized Card Shaft: Carefully align the motorized card shaft with the egg strips. This is crucial for the automatic egg turning function to work correctly.
- Install Water-Adding Device: Open the transparent protective cover vertically upwards. Install the completed hose assembly for external water addition. Ensure the short tube is tightened.
Video 4.1: This video demonstrates the step-by-step installation of the Sailnovo incubator and its water-adding device, including assembling the base, egg trays, and connecting the external humidification system.

Figure 4.2: Automatic External Water Addition system.
5. Bedienungsanleitung
Familiarize yourself with the control panel and basic operations.
Systemsteuerung überview:

Figure 5.1: Digital Control Panel Introduction.
- Heizungsanzeige: Blinks when heating.
- Feuchtigkeitsanzeige: Blinks during water adding.
- Auto Turning Indicator: On (auto-turning every two hours), Blink (auto-turning off for last 3 days).
- Egg Candler Button: Press to observe egg development.
- Water Adding Button: Press 1 sec to test water adding, press 3 sec to add water for 10 mins.
- Menü-/OK-Taste: Press once to set temperature range, press second time to display days to hatch.
- Schaltfläche „Erhöhen“ (+): Press to set temperature range or press 3 sec to test egg turner function.
- Verringern-Schaltfläche (-): Press to set temperature range or cancel the alarm.
Setting Up Incubator Functions:
Video 5.2: This video guides you through setting up the incubator's functions, including temperature, hatching days, water adding, egg turning test, and factory reset.
- Einschalten: Plug in the incubator. The display will show current temperature and humidity.
- Temperatureinstellung: Press the MENU/OK button once. The temperature value will flash. Use the (+) or (-) buttons to set the desired temperature. Press MENU/OK again to confirm.
- Hatching Days Setting: Press the MENU/OK button a second time. The hatching days value will flash. Use the (+) or (-) buttons to set the desired number of hatching days. Press MENU/OK again to confirm.
- Water Adding: Press the Water Adding button for 3 seconds to activate the automatic water adding function for 10 minutes. You can also manually add water to the A/B/C water tank if humidity is low.
- Egg Turning Test: Press the (+) button for 3 seconds to test the egg turner function.
- Eierkerzen: Press the Egg Candler button to activate the built-in LED light for observing embryo development.
- Vents Usage: During pre-incubation, close the vents to stabilize temperature and humidity. Keep vents open for the last three days of incubation. Close vents if ambient temperature is too low.

Figure 5.3: Automatic Egg Rotation Every Two Hours.
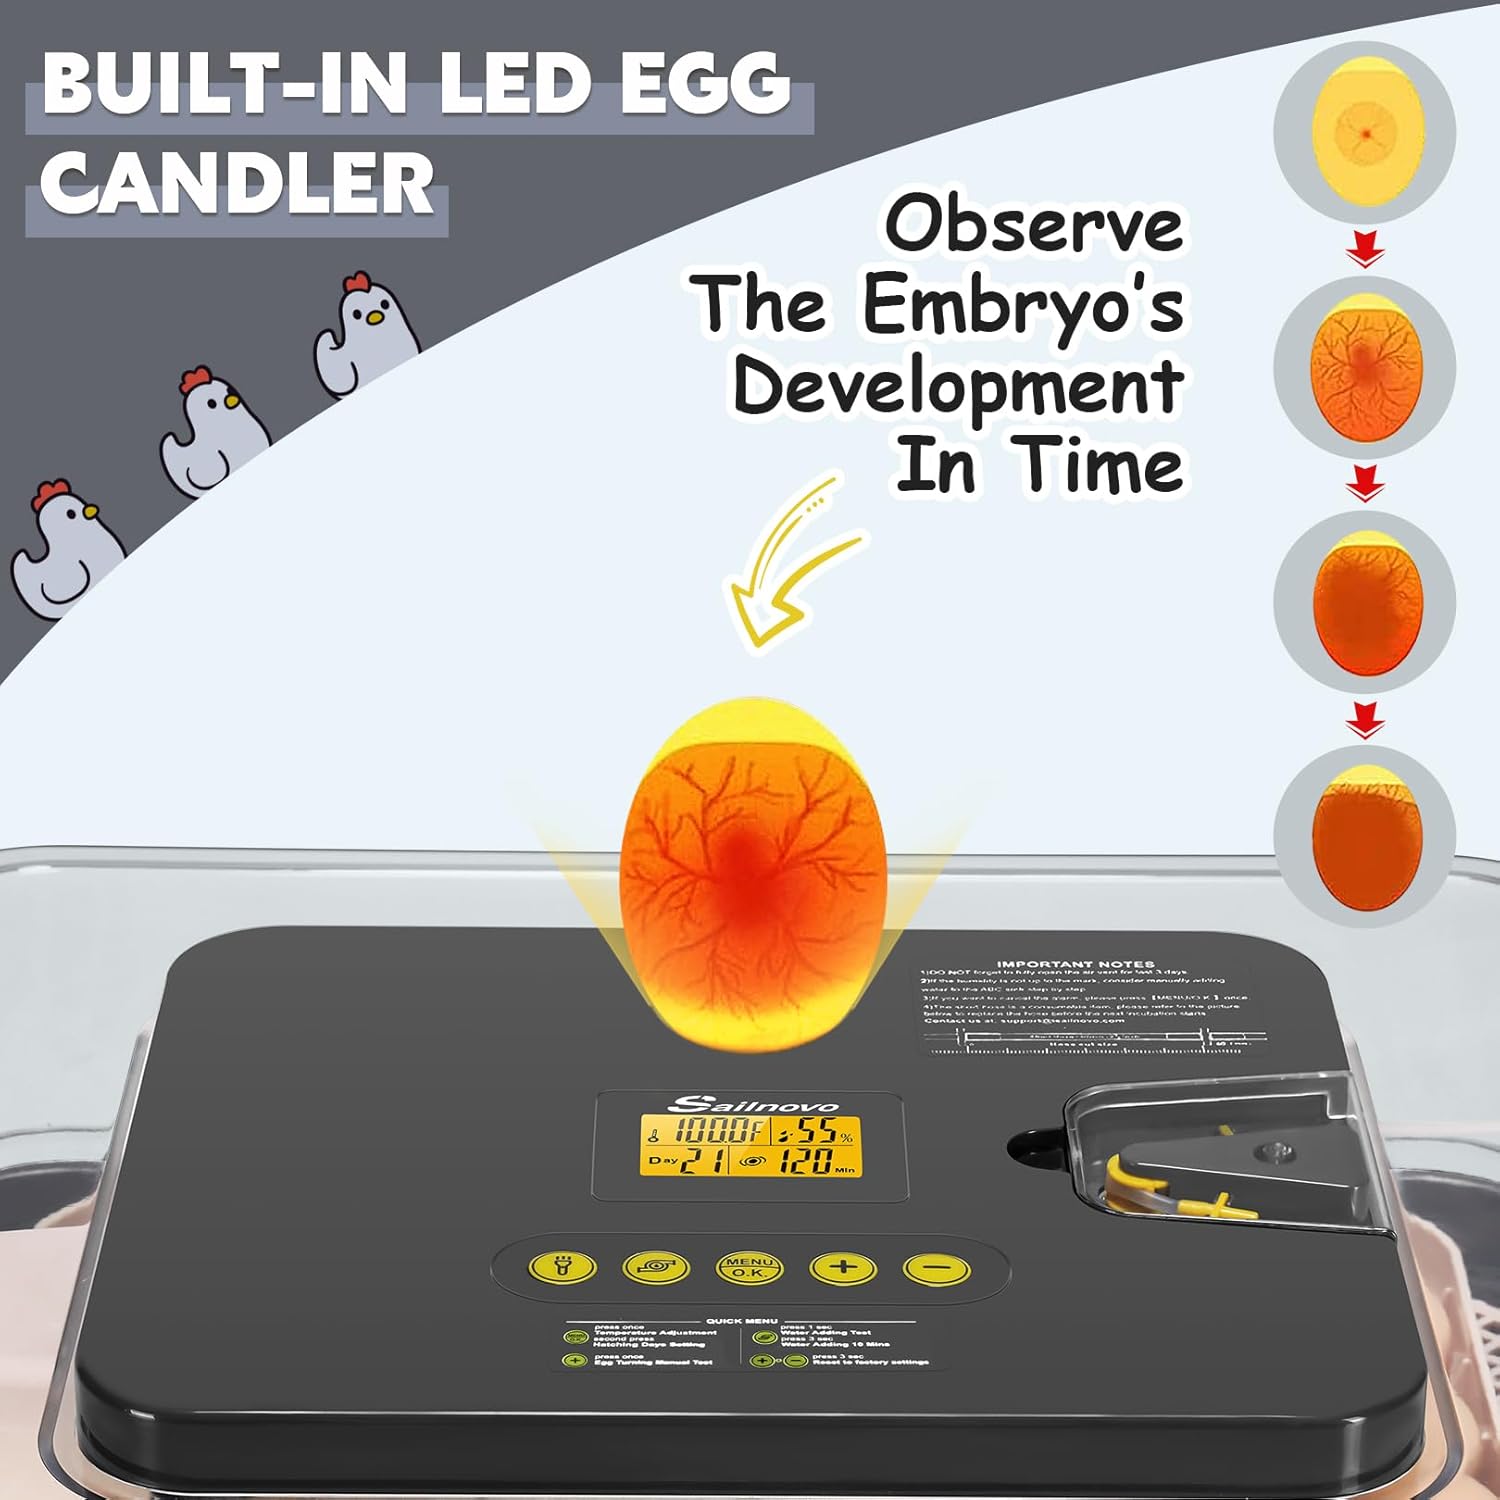
Figure 5.4: Built-in LED Egg Candler for observing embryo development.
6. Hatching Cycle
To begin a hatching cycle, ensure the incubator is properly set up and preheated. Refill the water in advance.
- Eiablage: Gently place freshly fertilized eggs into the egg trays in the bottom of the incubator.
- Incubation Monitoring: Record daily temperature, humidity, and incubation operations. Increase humidity or adjust vents as needed. Consider adding Polytron and taking insulation measures if necessary.
- Final Days Preparation: During the last 3 days of incubation, remove the egg card strips to prevent chicks from being pinched upon hatching. Sprinkle water on the egg surface daily to help soften the eggshell.
Video 6.1: This video provides instructions on how to start a hatching cycle, including egg placement, monitoring, and preparation for the final days of incubation.
Incubation Reference Table:
The following table provides general guidelines for different egg types. Optimal conditions may vary slightly.

Figure 6.2: Incubation Reference Table for various egg types.
7. Wartung
Proper maintenance ensures the longevity and hygiene of your incubator.
- Reinigung: The bottom part of the incubator is washable. The top motivation part (control unit) is recommended to be wiped with a cloth. Ensure all parts are dry before reassembly or next use.
- Lagerung: When not in use, clean the incubator thoroughly and store it in a dry, cool place away from direct sunlight.

Figure 7.1: Cleaning the washable bottom tray of the incubator.
8. Fehlerbehebung
If you encounter issues with your Sailnovo incubator, please refer to the following general advice:
- Alarmfunktion: The incubator features an alarm that alerts you to temperature or humidity level issues. Address the cause of the alarm promptly.
- Automatische Eierwende: Ensure the motorized card shaft is correctly aligned with the egg strips. If the egg turning function is not working, check the alignment as shown in the setup instructions.
- Humidity Issues: Verify the external water addition system is properly connected and the water bottle is filled. Manually add water to the A/B/C water tank if needed.
- Temperaturschwankungen: Ensure the incubator lid is securely closed and the unit is placed in a stable environment away from drafts or direct heat sources.
- Werkseinstellungen zurückgesetzt: If functions are not responding as expected, a factory reset can be performed by long pressing the (+) and (-) buttons simultaneously.
For further assistance, please contact Sailnovo customer support or refer to the contact information provided with your product packaging.
9. Spezifikationen
| Attribut | Wert |
|---|---|
| Modellnummer | SL-56ADA23S |
| Kapazität | 56 Eier |
| Abmessungen (ca.) | 18.7'' x 16.14'' x 6.3'' (47.5 cm x 41 cm x 16 cm) |
| Merkmale | Automatic Egg Turning, Auto Humidification, Temperature Control, LED Egg Candler, Alarm System |
| Hersteller | Segelnovo |
| Zuerst verfügbar | 10. November 2025 |
10. Garantie und Support
For warranty information and customer support, please refer to the documentation included with your product or visit the official Sailnovo webWebsite. Bewahren Sie Ihren Kaufbeleg für Garantieansprüche auf.


