1. Sicherheitshinweise
Read and understand all safety warnings and instructions before installing, operating, or maintaining this vehicle lift. Failure to follow these instructions may result in serious injury or death.
- Only qualified personnel should install and operate this equipment.
- Ensure the installation site has a level concrete floor of adequate thickness and strength.
- Tragen Sie stets geeignete persönliche Schutzausrüstung (PSA), einschließlich Schutzbrille und Handschuhe.
- Never exceed the rated lifting capacity of 10,000 lbs.
- Ensure the vehicle is properly centered and balanced on the lift arms before raising.
- Always engage safety locks before working under the vehicle.
- Halten Sie Hände und Füße während des Betriebs von beweglichen Teilen fern.
- Do not modify the lift in any way. Use only genuine replacement parts.
2. Produktüberschreitungview
The KATOOL KT-H100Y is a heavy-duty 2-post vehicle lift designed for professional and home garage use. It features a robust 10,000 lb lifting capacity, suitable for a wide range of vehicles from compact cars to light-duty trucks and SUVs. The lift incorporates a Double S Design column for enhanced strength and a Double Point Safety Lock System for secure operation.
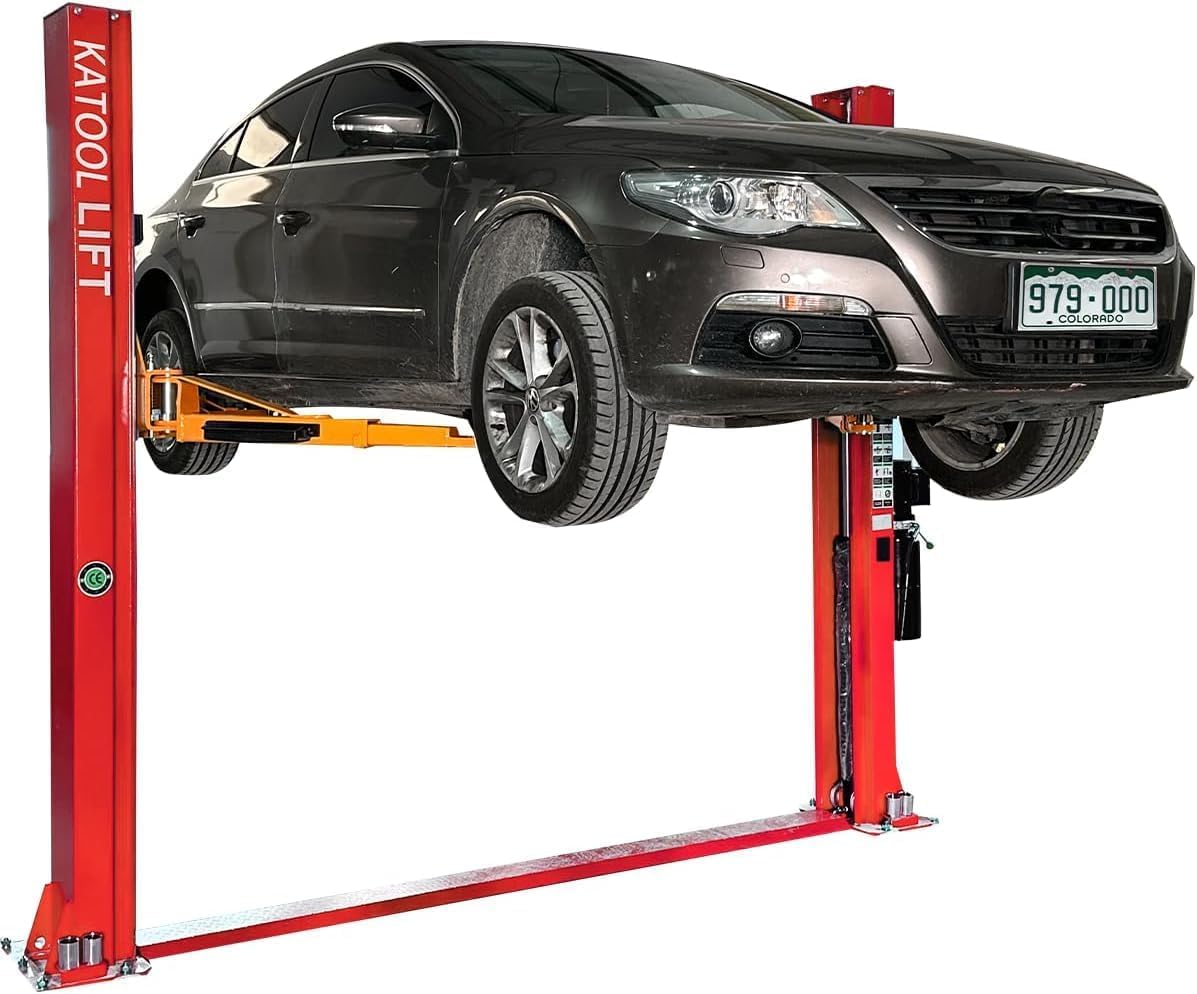
Figure 2.1: KATOOL KT-H100Y 2-Post Vehicle Lift with 10,000 lb capacity.

Figure 2.2: Close-up of the Double S Design column, indicating enhanced strength and a 220V/60HZ/2.2KW power unit for stronger carriage.
3. Komponentenliste
Vor Beginn der Installation prüfen Sie bitte, ob alle Komponenten vorhanden und unbeschädigt sind.
- Main Columns (2)
- Lifting Arms (4) - Two-stage and Three-stage
- Hydraulic Power Unit (1) - 220V 1 HP
- Stahlseile (2)
- Floor Plate & Cover
- Ölschläuche
- Height Extension Adapters / Screw Pads
- Door Guards
- Anchor Bolts and Fasteners

Abbildung 3.1: Überview of the KATOOL 2-Post Lift components, including columns, arms, power unit, and various accessories.
4. Installationsanweisungen
Proper installation is crucial for safe and efficient operation. Refer to the detailed installation video below for visual guidance.
4.1 Auspacken und Vorbereitung
- Untersuchen Sie die Verpackung auf Beschädigungen.
- Carefully open the package and remove all accessories.
- Remove the side base plate and screws from both ends of the main frame.
- Organize all components in the installation area.
4.2 Column Placement and Anchoring
- Use lifting equipment to carefully stand the columns upright.
- Precisely position the columns in the desired installation location, ensuring proper spacing and alignment.
- Secure each column with at least one anchor bolt initially to prevent tilting.
- Drill holes for the expansion bolts, insert them, and tighten with a wrench.
4.3 Steel Cable Routing
- Remove the steel wire from the column and organize it.
- Remove side guards from pulleys and thread the steel wire through the pulleys as shown in the diagram (refer to video).
- Ensure the pulley notch faces the top surface when inserting the wire, then rotate to prevent it from coming out.
- Thread the steel wire downward from the yellow hole inward, ensuring it's on the same side as the front end of the wire.
- Führe den Stahldraht an beiden Seiten des Öltrogs entlang zur anderen Seite.
- Fädeln Sie den Faden von unten in das gelbe Loch ein.
4.4 Lifting Arm Installation
- Entfernen Sie die Federhalterung am unteren Ende des Stifts und nehmen Sie den Stift heraus.
- Beim Einbau der Hebearme ist auf die Ausrichtung zu achten: Die Rückseite verfügt über zweiteilige Hebearme, die Vorderseite über dreiteilige Hebearme, die der Ausrichtung der Antriebseinheit und der Fahrzeugfront entsprechen.
- Insert the pin. If the pin gets stuck, lift the gear lock and slightly wiggle the lifting arm.
- Nach dem Einsetzen des Stifts wird der Federring montiert.
- Nehmen Sie den Federhalter von der Unterseite der Ablage ab und setzen Sie ihn in die vordere Öffnung der Halterung ein. Achten Sie darauf, dass die Kerbe mit dem Block übereinstimmt.
4.5 Hydraulic Power Unit Setup
- Adjust the screw depth on the main frame, then hang the power unit on the bracket and tighten the screws.
- Connect the electrical wiring: Ground Wire (green), Neutral Wire (white), Live Wire (black). Consult a qualified electrician if unsure.
- Tauschen Sie die Schnittstellen und Stecker auf beiden Seiten des Netzteils. Achten Sie darauf, die Unterlegscheiben beizubehalten.
- Den Ölleitungsverschluss an der Seite der Hauptsäule entfernen, die Staubkappe von der Ölleitung abnehmen und den Ölauslass des Aggregats mit dem Ölleitungsanschluss des Hauptrahmens verbinden.
- Add hydraulic oil to the reservoir, ensuring it does not exceed the maximum level mark.
4.6 Tension Adjustment and Test Run
- Passen Sie die Spannung der Bewehrungsstäbe auf beiden Seiten an: Lösen Sie die oberen Schrauben, heben Sie die Stäbe mit einem Brecheisen an und ziehen Sie die unteren Schrauben fest, bis beide Seiten im Gleichgewicht sind. Kontern Sie anschließend beide Schrauben.
- Perform a test run by raising and lowering the lift several times without a vehicle.
- Wenn sich die Hebebühne nach oben bewegt und gleichzeitig ein "Klick"-Geräusch zu hören ist, bedeutet dies, dass die Kräfte auf beiden Seiten gleichmäßig verteilt sind und die Sicherheitsvorrichtung eingerastet ist.
Video 4.1: BILT HARD 11,000 lbs 2 Post Car Lift Installation Video. This video provides a comprehensive guide to the installation process, from unpacking to final adjustments.
5. Bedienungsanleitung
Follow these steps for safe and effective operation of your KATOOL KT-H100Y lift.
5.1 Preparing the Vehicle
- Position the vehicle between the lift columns, ensuring it is centered.
- Adjust the lift arms to contact the vehicle's designated lifting points. The lift includes two-stage arms for the rear and three-stage arms for the front, allowing for versatile vehicle positioning.
- Use the provided height adjustment pads/screw pads as needed to ensure proper contact and stability.

Figure 5.1: Close-up of a lift arm, showing the adjustable screw pad for precise vehicle contact.
5.2 Anheben des Fahrzeugs
- Ensure all personnel are clear of the lift and vehicle.
- Press and hold the 'UP' button on the hydraulic power unit to raise the vehicle.
- Monitor the vehicle as it rises, ensuring it remains stable and level.
- Once the desired height is reached, lower the lift slightly until the safety locks engage with an audible 'click'. This secures the vehicle at the chosen height.
5.3 Fahrzeug absenken
- Ensure the area beneath the vehicle is clear of obstructions and personnel.
- Heben Sie den Lift leicht an, um die Sicherheitsverriegelungen zu lösen.
- Pull the safety lock release mechanism (typically a lever or cable) on both columns.
- Slowly lower the vehicle by operating the release lever on the hydraulic power unit.
- Once the vehicle is fully lowered and the arms are clear, carefully drive the vehicle off the lift.
Video 5.2: WEIZE 11000lbs 2 Post Car Lift. This video demonstrates the lift in operation, highlighting features like door guards, reinforced support arm pads, and truck adapters.
6. Wartungs- und Pflegehinweise
Regular maintenance ensures the longevity and safe operation of your KATOOL vehicle lift.
6.1 Täglicher Gebrauch
- Check daily if the safety device can lock into place and if the linkage is functioning properly. If there are any potential hazards, repair or replace them promptly.
6.2 Weekly Inspection
- Prüfen Sie den Stahldraht auf Lockerheit oder gebrochene Litzen.
- Prüfen Sie die Gleitblöcke auf der inneren Plattform der Säulen und fetten Sie sie bei Bedarf ein. Wenn der Verschleiß auf einer Seite 20 % übersteigt, wird der Block nicht mehr sicher von den Säulen gehalten und muss umgehend ausgetauscht werden.
6.3 Bi-Weekly Check
- Prüfen Sie alle Hydraulikschlauchverbindungen auf Undichtigkeiten oder Beschädigungen und reparieren oder ersetzen Sie diese gegebenenfalls.
6.4 Monatliche Wartung
- Prüfen Sie, ob alle Schrauben und Muttern fest angezogen sind. Ziehen Sie nach einem Probelauf alle Schrauben und Muttern erneut fest.
7. Fehlerbehebung
This section provides solutions to common issues you might encounter with your lift.
| Problem | Mögliche Ursache | Lösung |
|---|---|---|
| Der Lift fährt nicht hoch. | No power; Low hydraulic fluid; Motor fault; Obstruction | Check power supply; Add hydraulic fluid; Consult technician; Remove obstruction |
| Ungleichmäßiges Heben | Uneven cable tension; Unbalanced load; Hydraulic issue | Adjust cable tension; Reposition vehicle; Inspect hydraulic system |
| Lift lowers slowly or not at all | Obstruction; Hydraulic valve issue; Low fluid | Check for obstructions; Inspect/replace hydraulic valve; Add fluid |
| Übermäßiger Lärm während des Betriebs | Low hydraulic fluid; Loose components; Worn parts | Check/add fluid; Tighten fasteners; Inspect for worn parts |
8. Spezifikationen
Key technical specifications for the KATOOL KT-H100Y 2-Post Vehicle Lift.
| Besonderheit | Spezifikation |
|---|---|
| Modell | KT-H100Y |
| Tragfähigkeit | 10,000 kg |
| Maximale Hubhöhe | 70.8 Zoll (1800 mm) |
| Drive-Through Width | 94.5 Zoll (2400 mm) |
| Antriebseinheit | 220V, 1 HP Hydraulic |
| Material | Kohlenstoffstahl |
| Artikelgewicht | 1200 kg |
| Fahrzeug-Servicetyp | Car, Light-Duty Truck, SUV |

Figure 8.1: Detailed dimensions diagram for the KATOOL 2-Post Lift.
9. Garantie und Support
For warranty information, technical support, or to order replacement parts, please contact KATOOL customer service. Keep your purchase receipt and product model number handy for faster service.
Besuchen Sie die KATOOL Store Für weitere Produkte und Informationen.