
1. Einleitung
This manual provides detailed instructions for the safe installation, operation, and maintenance of your Philips LED 4-Inch Slim Downlight. This product features a canless design, dimmable functionality, and offers five selectable color temperatures (CCTs) to suit various lighting needs. Please read this manual thoroughly before installation and retain it for future reference.

Figure 1: Philips LED 4-inch slim downlight showing its canless design, dimmable function, 5 CCT options, and suitability for damp Standorte.
2. Sicherheitshinweise
WARNUNG: Brand- oder Stromschlaggefahr.
- Vor Installation oder Wartung muss immer die Stromzufuhr am Sicherungsautomaten unterbrochen werden.
- Dieses Produkt muss gemäß den geltenden Installationsvorschriften von einer Person installiert werden, die mit der Konstruktion und Bedienung des Produkts und den damit verbundenen Gefahren vertraut ist.
- Stellen Sie sicher, dass alle elektrischen Anschlüsse sicher sind und den örtlichen Vorschriften und Verordnungen entsprechen.
- Die Verkabelung nicht verändern, verlegen oder entfernen, lamp Halterungen oder andere elektrische Bauteile.
- Geeignet für damp locations. Do not use in areas with direct water exposure.
- IC-bewertet für direkten Kontakt mit Isolierung.
3. Packungsinhalt
Vergewissern Sie sich vor Beginn der Installation, dass alle Komponenten vorhanden sind:
- Philips LED 4-Inch Slim Downlight (quantity as per pack)
- Junction Box (one per downlight)
- Bedienungsanleitung (dieses Dokument)
4. Installationsanweisungen
- Strom ausschalten: Vor Beginn der Arbeiten muss sichergestellt werden, dass die Stromzufuhr zum Installationsbereich am Sicherungsautomaten abgeschaltet ist.
- Deckenöffnung vorbereiten: Cut a circular hole in the ceiling at the desired location. Refer to the product specifications for the exact hole size (typically 4.25 inches or 108 mm for a 4-inch downlight). Ensure there are no obstructions behind the ceiling before cutting.
-
Anschlussdose verdrahten: Open the junction box cover. Connect the household electrical wires (live, neutral, ground) to the corresponding wires inside the junction box using the provided screwless connectors. Ensure all connections are secure. Close the junction box cover.

Figure 2: Screwless junction box wiring for easy connection.
-
Farbtemperatur (CCT) auswählen: Before inserting the downlight into the ceiling, locate the CCT selection switch on the side of the junction box or the downlight itself. Choose your desired color temperature (2700K, 3000K, 3500K, 4000K, or 5000K) by sliding the switch to the appropriate setting.

Figure 3: CCT selection switch on the junction box.
- Connect Downlight to Junction Box: Plug the downlight's connector cable into the corresponding receptacle on the junction box. Ensure a firm connection.
-
Einbauleuchte: Gently push the spring clips on the downlight upwards and insert the downlight into the prepared ceiling opening. The clips will secure the fixture in place. Ensure the downlight is flush with the ceiling surface.
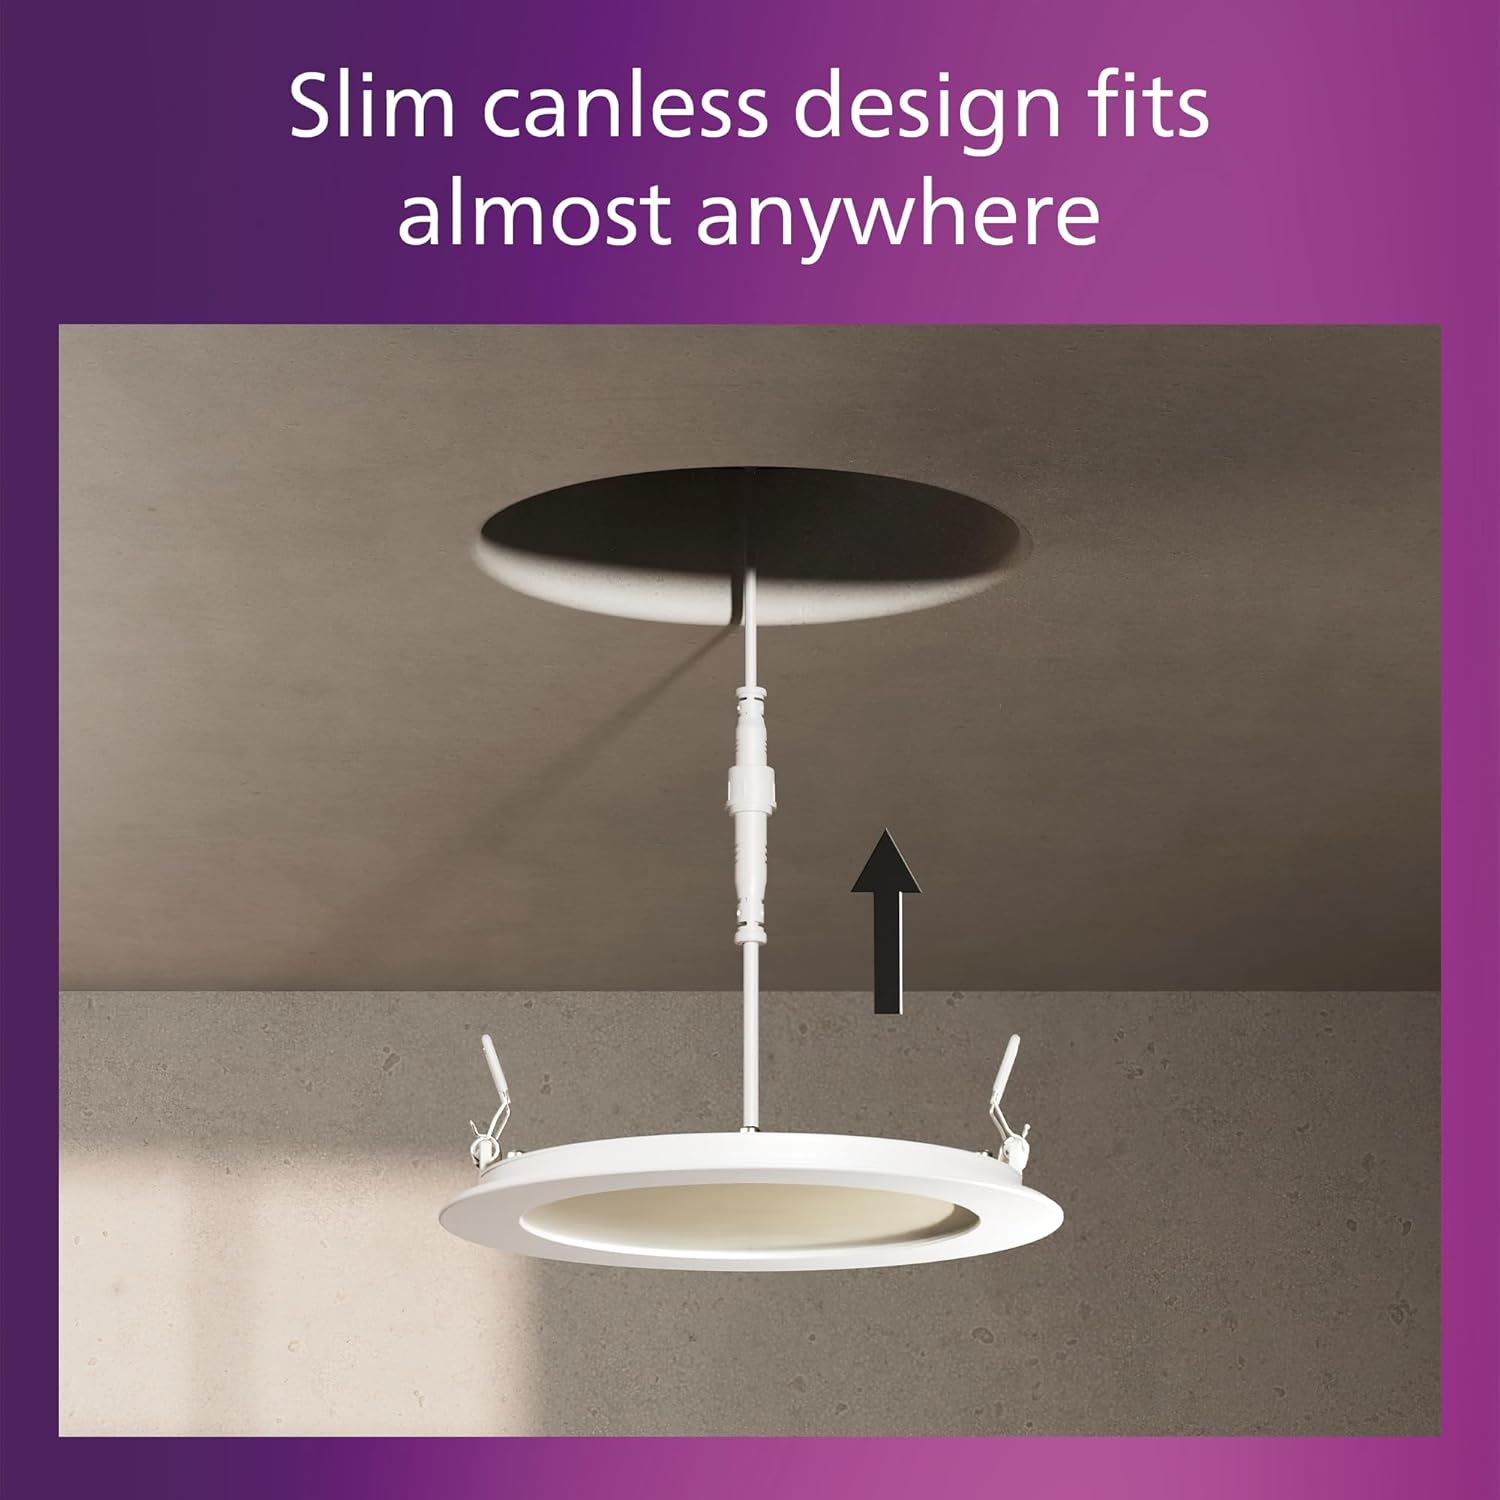
Figure 4: Installing the slim canless downlight into the ceiling.
- Strom wiederherstellen: Sobald die Installation abgeschlossen ist, stellen Sie die Stromversorgung am Leistungsschalter wieder her.
The Philips LED Slim Downlight is IC rated, meaning it is suitable for direct contact with insulation, providing safe installation in various ceiling types.

Figure 5: IC rated for safe installation in insulated ceilings.
5. Bedienungsanleitung
The Philips LED Slim Downlight is designed for simple operation:
- Ein-/Ausschalten: Use your standard wall switch to turn the downlight on or off.
-
Dimmen: This downlight is dimmable from 100% down to 5% brightness. Use a compatible dimmer switch (sold separately) to adjust the light output to your preferred level. Refer to the troubleshooting section for dimmer compatibility information.

Figure 6: Smooth dimming capability from 100% to 5% brightness.
- Farbtemperatur: The color temperature is set during installation using the switch on the junction box. It cannot be changed during normal operation without accessing the junction box.
6. Wartung
The Philips LED Slim Downlight requires minimal maintenance:
- Stellen Sie vor der Reinigung sicher, dass der Strom ausgeschaltet ist.
- Wischen Sie die Armatur mit einem weichen, trockenen oder leicht feuchten Tuch ab.amp Tuch. Keine Scheuer- oder Lösungsmittel verwenden.
- No user-serviceable parts inside. Do not attempt to open or repair the fixture.
7. Fehlerbehebung
| Problem | Mögliche Ursache | Lösung |
|---|---|---|
| Licht geht nicht an. |
|
|
| Das Licht flackert oder dimmt unregelmäßig. |
|
|
| Falsche Farbtemperatur. |
|
|
Dimmer-Kompatibilitätstabelle
For optimal dimming performance, use dimmers listed in the compatibility chart below. Performance may vary with other dimmer models.

Figure 7: Dimmer compatibility chart.
8. Spezifikationen
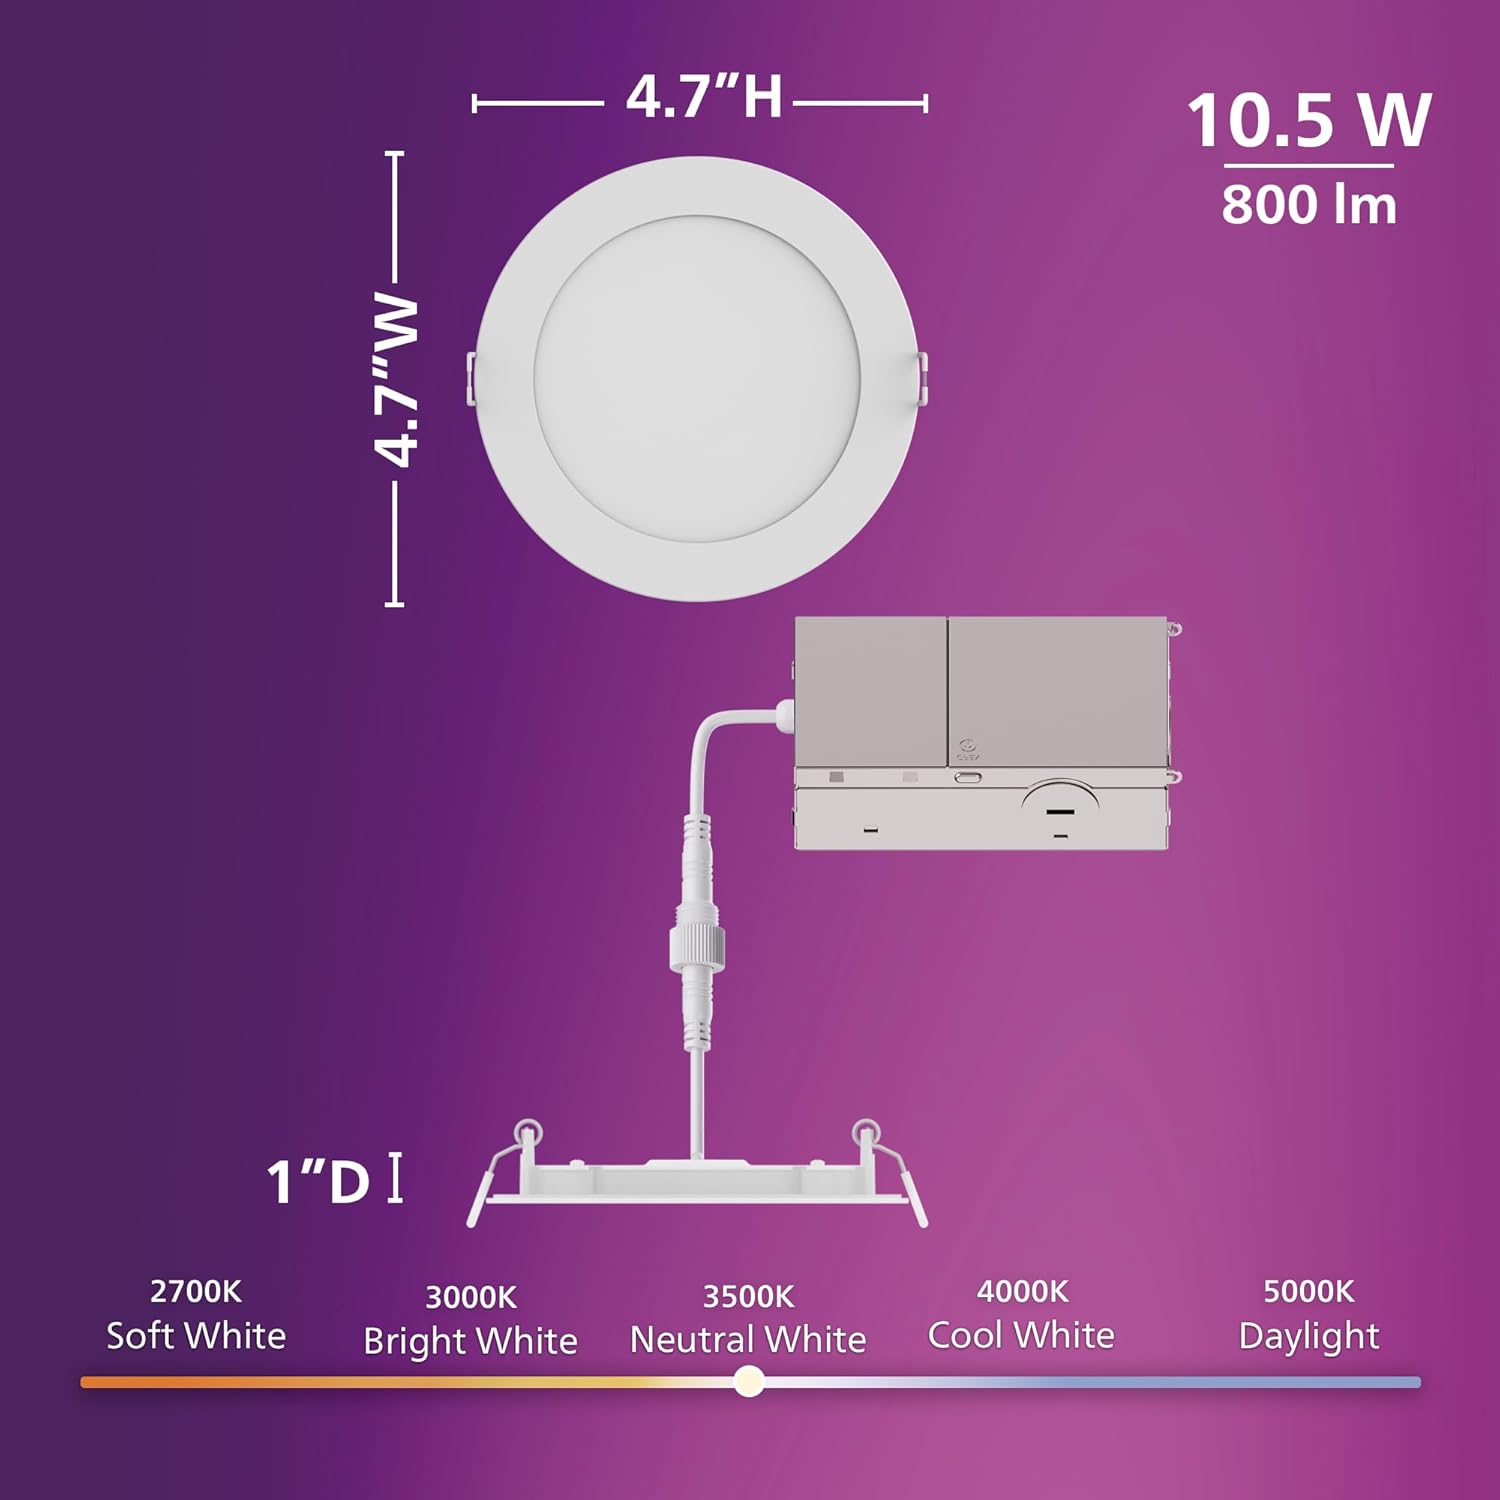
Figure 8: Product dimensions and CCT switch location.
| Besonderheit | Detail |
|---|---|
| Modellnummer | 608869 |
| Marke | PHILIPS |
| Lichtquelle | LED |
| Wastage | 10.5 Watt |
| Helligkeit | 800 Lumen |
| Bandtage | 120 Volt |
| Farbtemperatur (CCT) | 2700K, 3000K, 3500K, 4000K, 5000K (wählbar) |
| Dimmbar | Ja (bis zu 5 %) |
| Lebensstunden | 25,000 Stunden |
| Installationstyp | Flush Mount, Canless Design |
| Zimmertyp | Innenbereich |
| Material | Plastik |
| Technische Daten | 11.9L x 11.9W x 11.9H centimetres (approx. 4.7 x 4.7 x 4.7 inches) |
| Wasserbeständigkeit | Wasserabweisend (Geeignet für damp Standorte) |
| Zertifizierungen | IC Rated, ETL, FCC certified |
9. Garantieinformationen
This Philips LED 4-Inch Slim Downlight is covered by a 2 Jahr Herstellergarantie Diese Garantie gilt ab Kaufdatum und deckt Material- und Verarbeitungsfehler bei normalem Gebrauch ab. Bitte bewahren Sie Ihren Kaufbeleg für Garantieansprüche auf.
The warranty does not cover damage caused by improper installation, misuse, abuse, accidents, or unauthorized modifications.
10. Kundendienst
If you have any questions, require technical assistance, or need to make a warranty claim, please contact Philips customer support. Refer to the product packaging or the official Philips webDie aktuellsten Kontaktinformationen finden Sie auf dieser Webseite.
Weitere Informationen finden Sie unter: www.philips.com