1. Einleitung
This manual provides essential instructions for the installation, operation, and maintenance of your EDECOA Hybrid Inverter 7000VA/6200W. This device integrates an inverter, an MPPT solar charger, and a battery charger into a single unit, designed to provide reliable power for various applications. Please read this manual thoroughly before installation and use to ensure proper function and safety.
2. Sicherheitshinweise
Beachten Sie stets die folgenden Sicherheitsvorkehrungen, um das Risiko von Stromschlag, Brand oder Verletzungen zu verringern:
- Die Installation muss durch qualifiziertes Personal durchgeführt werden.
- Stellen Sie sicher, dass alle Kabel korrekt angeschlossen und fest befestigt sind.
- Der Wechselrichter darf nicht zerlegt werden. Er enthält keine vom Benutzer wartbaren Teile.
- Halten Sie den Wechselrichter von brennbaren Materialien fern und sorgen Sie für ausreichende Belüftung.
- Tragen Sie während der Installation und Wartung geeignete persönliche Schutzausrüstung (PSA).
- Disconnect all power sources (AC, PV, and battery) before performing any maintenance or wiring.
- This inverter is designed for indoor use in a controlled environment. Avoid exposure to water, high humidity, or extreme temperatures.
3. Produktüberschreitungview
3.1 Hauptmerkmale
- Reine Sinuswellenausgabe: Liefert eine saubere und stabile Stromversorgung, die für empfindliche Elektronik geeignet ist.
- Integrierter MPPT-Solarladeregler: 110A maximum PV current for efficient solar energy harvesting.
- Ladegerät: 80A maximum AC charging current.
- Breiter PV-Eingangsbereich: Adaptable to various solar panel types and sizes.
- Mehrere Betriebsmodi: 4 charging modes and 3 output modes for flexible power management.
- Batteriekompatibilität: Supports FLD, AGM, Gel, and LiFePo4 battery types, configurable via LCD.
- Sicherheitsschutz: Schutz vor Überlastung, Überhitzung und Kurzschluss.
- Energiesparmodus: Reduced power consumption (< 15 W) to prevent battery wear.
- Kommunikationsanschlüsse: Includes RS232/RS485+BMS for monitoring and control (WiFi module compatible).
3.2 Produktkomponenten und Abmessungen
The EDECOA Hybrid Inverter combines multiple functionalities in a compact design. Below are the general dimensions and a diagram of its main components and connection ports.

Abbildung 3.2.1: Product dimensions. The inverter measures approximately 423mm (16.65 inches) in height, 300mm (11.81 inches) in width, and 105mm (4.13 inches) in depth.

Abbildung 3.2.2: Vorder- und Rückwand überview. The front panel features an LCD display, touchable buttons, and RGB LED indicators. The rear panel includes terminals for Battery In (+/-), PV In (+/-), AC EPS Out Port, AC Main Out Port, AC In Port, Ground Terminal, RS232/RS485+BMS Comm Port, and an ON/OFF Switch.
4. Einrichtung und Installation
4.1 Wechselrichter montieren
- Wählen Sie einen geeigneten Standort, der trocken, gut belüftet und vor direkter Sonneneinstrahlung und Feuchtigkeit geschützt ist.
- Sorgen Sie für ausreichend Freiraum um den Wechselrichter herum, um eine ordnungsgemäße Luftzirkulation und Wärmeableitung zu gewährleisten.
- Montieren Sie den Wechselrichter senkrecht an einer stabilen Wand mit geeigneten Befestigungsmitteln.
4.2 Kabelverbindungen
Refer to Figure 3.2.2 for port locations. All wiring must comply with local electrical codes.
- Batterieanschluss: Connect the battery bank (48V DC) to the 'Batt. In (+)' and 'Batt. In (-)' terminals. Ensure correct polarity.
- PV-Anlagenanschluss: Connect the solar panel array to the 'PV In+' and 'PV In-' terminals. Observe correct polarity and ensure the PV input voltage and current are within the inverter's specifications (max 110A PV).
- AC-Eingangsanschluss: Connect the AC utility grid or generator to the 'AC In Port'.
- AC-Ausgangsanschluss: Connect your loads to the 'AC Main Out Port' and 'AC EPS Out Port'.
- Erdung: Connect the ground terminal to a reliable earth ground.
Wichtig: Always connect the battery first, then the PV array, and finally the AC input. When disconnecting, reverse the order.
5. Bedienungsanleitung
5.1 Erstes Einschalten
- Nachdem alle Verbindungen hergestellt sind, schalten Sie den Batterieschutzschalter ein.
- Schalten Sie den PV-Anlagen-Leistungsschalter ein.
- Schalten Sie den Wechselstrom-Eingangsschalter ein.
- Finally, turn on the inverter's ON/OFF switch. The LCD display will illuminate.
5.2 LCD-Display und Einstellungen
The LCD provides real-time system status and allows configuration of various parameters.
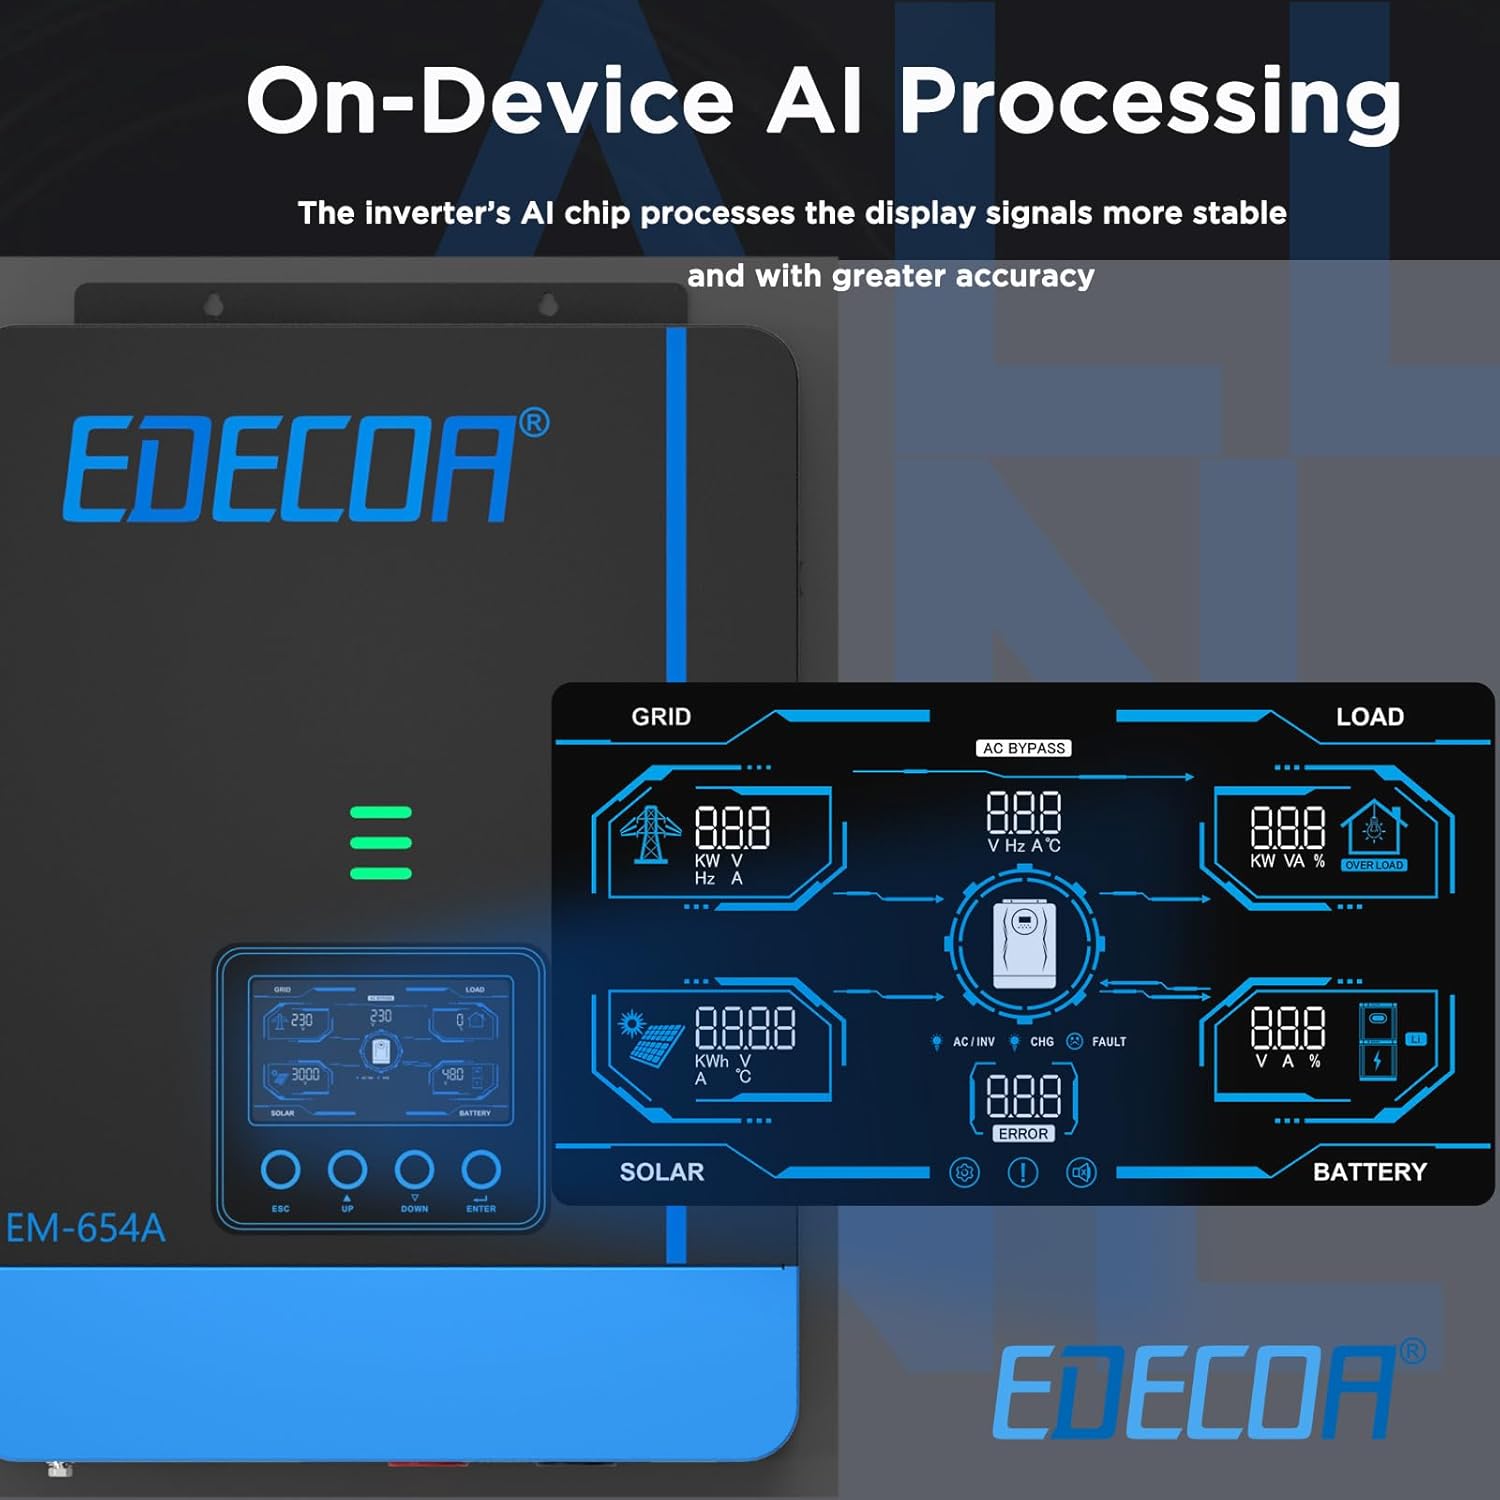
Abbildung 5.2.1: LCD display interface. The display shows detailed information for Grid, Load, Solar, and Battery, including voltage, current, power, frequency, and error indicators.
Use the touchable buttons (ESC, UP, DOWN, ENTER) to navigate menus and adjust settings. Key settings include:
- Akku-Typ: Select the correct battery type (FLD, AGM, Gel, LiFePo4) to ensure optimal charging and discharge cycles.
- Ladestrom: Adjust the maximum charging current from AC and PV sources.
- Ausgangsvolumentage/Häufigkeit: Configure AC output parameters.
5.3-Betriebsmodi
The inverter offers flexible operating modes to optimize power usage.

Abbildung 5.3.1: Output and Charging Modes. This diagram illustrates how the inverter prioritizes power sources for both load and battery charging.
5.3.1 Output Modes (for Load)
- SBU Mode (Solar > Battery > Utility): Solar power is prioritized for the load, then battery power, and finally utility power if solar and battery are insufficient.
- SUB Mode (Solar > Utility > Battery): Solar power is prioritized for the load, then utility power, and finally battery power if solar and utility are insufficient.
5.3.2 Charging Priority Options
- OSO (nur Solar): Die Batterien werden ausschließlich durch Solarenergie geladen.
- CSO (Solarpriorität): Solar power is prioritized for charging, with utility power used only if solar is unavailable or insufficient.
- SNU (Solar + Utility): Sowohl Solarstrom als auch Netzstrom werden gleichzeitig zum Laden der Batterien verwendet.
5.4 ECO-Modus
The ECO mode reduces the inverter's self-consumption to less than 15 W, helping to preserve battery life when the inverter is idle or under light load conditions.
5.5 Remote Monitoring and Control (WiFi Module Compatible)
The inverter supports remote monitoring and control via a compatible WiFi module (sold separately) and a dedicated mobile application. This allows users to personalize settings, view real-time system sensors, analyze data, and retrieve system error guidelines.

Abbildung 5.5.1: EDECOA App for Intelligent Control. The app provides a user-friendly interface for monitoring and managing the inverter's performance.
6. Wartung
Regelmäßige Wartung gewährleistet die Langlebigkeit und optimale Leistung Ihres Wechselrichters.
- Reinigung: Reinigen Sie die Außenseite des Wechselrichters regelmäßig mit einem trockenen Tuch. Achten Sie darauf, dass die Lüftungsöffnungen frei von Staub und Schmutz sind.
- Verbindungen: Überprüfen Sie jährlich alle elektrischen Verbindungen auf festen Sitz und Anzeichen von Korrosion.
- Batterieinspektion: Bei Verwendung von Blei-Säure-Batterien überprüfen Sie bitte den Elektrolytstand und die Anschlussbedingungen gemäß den Richtlinien des Batterieherstellers.
- Umfeld: Stellen Sie sicher, dass die Installationsumgebung innerhalb der vorgegebenen Temperatur- und Feuchtigkeitsbereiche bleibt.
Warnung: Disconnect all power sources before performing any cleaning or inspection.
7. Fehlerbehebung
Dieser Abschnitt bietet Hilfestellung bei häufig auftretenden Problemen. Bei komplexen Problemen wenden Sie sich bitte an den technischen Support.
| Problem | Mögliche Ursache | Lösung |
|---|---|---|
| Wechselrichter schaltet sich nicht ein | Keine Batterieverbindung; Batteriespannungtage too low; Inverter switch off | Check battery connections; Charge battery; Turn on inverter switch |
| Kein AC-Ausgang | Überlastung; Kurzschluss; Wechselrichterfehler | Reduce load; Check for short circuits; Restart inverter; Contact support if fault persists |
| Akku wird nicht geladen | PV input too low; AC input not connected; MPPT fault; Incorrect battery settings | Check PV array; Verify AC connection; Check MPPT status on LCD; Adjust battery type settings |
| Warnung vor Übertemperatur | Insufficient ventilation; Ambient temperature too high; Overload | Ensure clear airflow; Move to cooler environment; Reduce load |
8. Spezifikationen
Technical specifications for the EDECOA Hybrid Inverter 7000VA/6200W:
| Marke | EDECOA |
| Modellname | Hybrid-Wechselrichter |
| Modellnummer | EDECOA-7000VA-6200W |
| Empfohlene Produktverwendungen | Heim |
| Stromquelle | Solarbetrieben |
| Leistung (Nennleistung) | 6200 Watt |
| Inverter Power (VA) | 7000 VA |
| Spitzenleistung | 5600 Watt |
| Eingangslautstärketage | 48 Volt (DC) |
| Ausgangsvolumentage | 230 Volt (Wechselstrom) |
| Electrical Output Waveform | Rein Sinus |
| Batteriekapazität (empfohlen) | 200 Ampvor-Stunden |
| Anzeigetyp | LCD |
| Artikelabmessungen (L x B x H) | 42L x 30B x 12H Zentimeter |
| Energy Specifications Met | CE |
9. Garantie und Support
9.1 Garantieinformationen
This EDECOA Hybrid Inverter comes with a 2 Jahr HerstellergarantieBitte bewahren Sie Ihren Kaufbeleg für Garantieansprüche auf. Die Garantie deckt Material- und Verarbeitungsfehler bei normalem Gebrauch ab. Sie deckt keine Schäden ab, die durch unsachgemäße Installation, Missbrauch, Unfälle oder unbefugte Änderungen verursacht wurden.
9.2 Technischer Support
For technical assistance, troubleshooting beyond this manual, or warranty inquiries, please contact EDECOA customer support. Refer to the product packaging or the official EDECOA webWebsite für aktuelle Kontaktinformationen.