1. Einleitung
The EARU Automatic Voltage Protector (Model EARU-1005) is an advanced electrical safety device designed to protect your valuable home and office appliances from damaging power fluctuations. This device offers comprehensive protection against over-voltage, unter-voltage, and overcurrent conditions, ensuring the longevity and safe operation of your electrical equipment. It features adjustable thresholds and an auto-reconnect function for convenience and continuous protection.
2. Hauptmerkmale
- All-in-One Protection: Safeguards appliances from power surges, over-voltage (above 275V), under-voltage (below 175V), and adjustable overcurrent (1A-63A).
- Präzisionseinstellung: Customizable cut-off thresholds for over-voltage (200V-275V) and under-voltage (175V-200V) to suit specific grid conditions and appliance needs.
- Auto-Reset-Funktion: Automatically restores power within 60-300 seconds once grid voltage stabilizes within the set safe range, eliminating manual intervention.
- Überlegene Leitfähigkeit: Constructed with 100% pure copper conductors for minimal resistance, efficient operation, and enhanced long-term reliability under heavy 63A loads.
- DIN-Schieneninstallation: Designed for easy and secure integration into standard 2-Pole, 36mm width DIN Rail electrical panels.
- Umfassende Sicherheit: Provides robust protection for an entire household against unpredictable voltage Schwankungen und Spitzen.
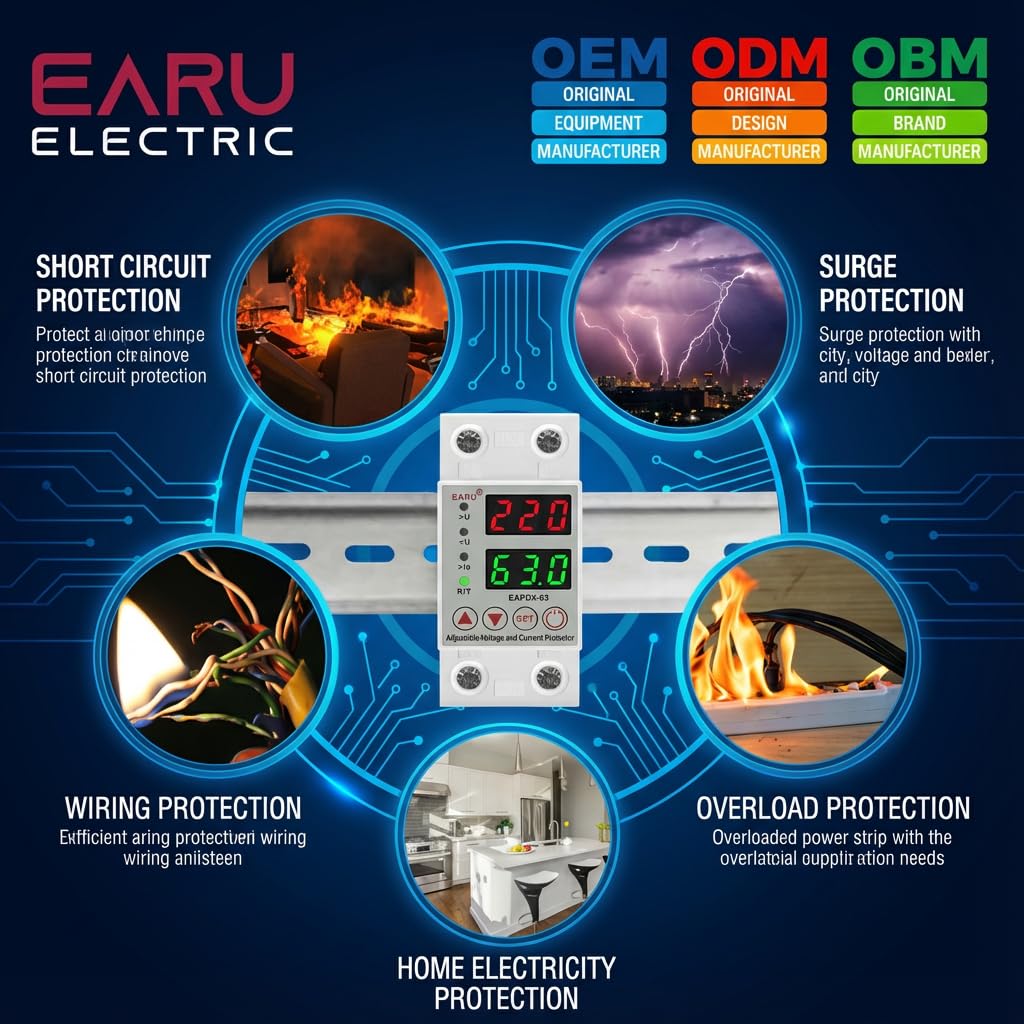
Bild 2.1: Überview of the protection capabilities of the EARU Automatic Voltage Beschützer.
3. Sicherheitshinweise
Please read and understand all safety instructions before installing or operating the device. Failure to do so may result in electric shock, fire, or serious injury.
- Die Installation darf nur von einem qualifizierten Elektriker gemäß den örtlichen Elektrovorschriften und -bestimmungen durchgeführt werden.
- Vor Beginn jeglicher Installations- oder Wartungsarbeiten muss die Hauptstromversorgung unterbrochen werden.
- Das Gerät darf nicht in Betrieb genommen werden, wenn es beschädigt erscheint oder Feuchtigkeit ausgesetzt war.
- Verify correct wiring connections (Line and Neutral) to prevent malfunction or damage.
- Das Gerät ist nur für den Innenbereich bestimmt.
- Die maximale Stromstärke von 63 A darf nicht überschritten werden.
4. Produktüberschreitungview
4.1. Komponenten und Anzeige
The EARU Automatic Voltage Protector features a clear digital display and intuitive control buttons for easy monitoring and adjustment.
- Bandtage Anzeige: Shows the current line voltage.
- Aktuelle Anzeige: Shows the current load in Amperes.
- Kontrollleuchten:
>U: Überlauttage Indikator.<U: Unterlautstärketage Indikator.>Ie: Overcurrent indicator.R/T: Reset/Time indicator.
- Bedientasten:
- Up Arrow (▲) / Down Arrow (▼): Dient zur Anpassung von Parameterwerten.
- Set-Taste: Press and hold for 3 seconds to enter setting mode.
- Ein- / Ausschalter: Toggles power to the protected circuit.
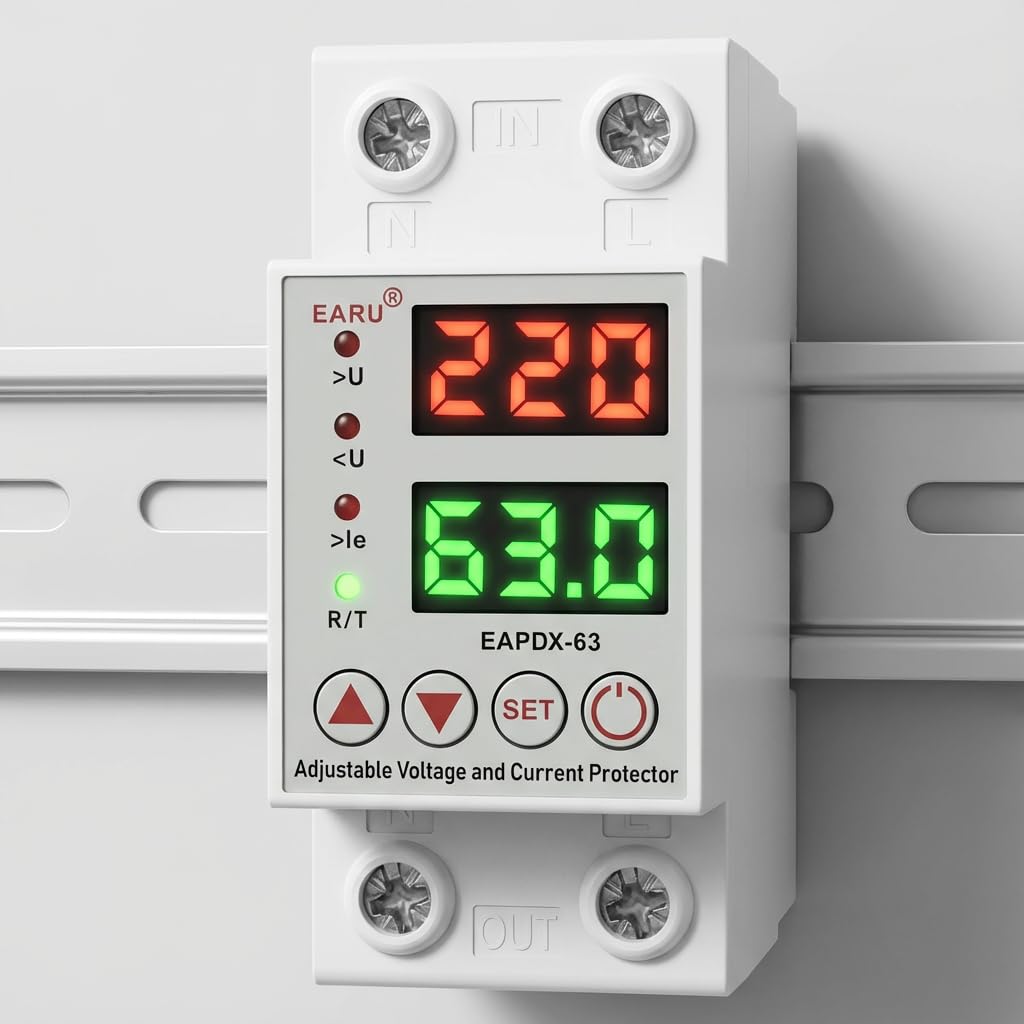
Bild 4.1: Vorderseite view of the EARU Automatic Voltage Protector, highlighting its digital display and control buttons.
5. Einrichtung und Installation
The EARU Automatic Voltage Protector is designed for DIN Rail mounting. Ensure proper wiring and secure installation.
5.1. Montage
Mount the device onto a standard 36mm width DIN Rail within your electrical panel. Ensure it is securely clipped into place.
5.2. Schaltplan
Connect the incoming power supply (Line and Neutral) to the "IN" terminals and the outgoing load to the "OUT" terminals. Refer to the diagram below for correct wiring.

Abbildung 5.1: Beispielample wiring configuration for DIN Rail installation.

Image 5.2: Device dimensions for installation planning.
6. Bedienungsanleitung
The device allows for precise adjustment of protection parameters. Follow these steps to configure your voltage Beschützer.
6.1. Parameter Setting Mode
- Stellen Sie sicher, dass das Gerät eingeschaltet ist.
- Halten Sie die SATZ button for approximately 3 seconds until the display changes to show "P-1" or a similar setting indicator. This indicates you are in parameter setting mode.
- Verwenden Sie die Pfeil nach oben (▲) Und Pfeil nach unten (▼) buttons to navigate through the different parameters (P-1 to P-6).
- Once you have selected a parameter, press the SATZ button briefly to enter its adjustment mode.
- Verwenden Sie die Pfeil nach oben (▲) Und Pfeil nach unten (▼) Tasten, um den Wert zu ändern.
- Drücken Sie die SATZ button again to confirm the value and move to the next parameter, or wait a few seconds for the device to automatically save and exit the setting mode.
6.2. Parameterbeschreibungen
| Parameter | Beschreibung | Einstellbereich |
|---|---|---|
| P-1 | Überlautstärketage Einstellung | 240V - 300V (or OFF) |
| P-2 | Untervolumentage Einstellung | 140V - 200V (or OFF) |
| P-3 | Overcurrent setting | 1A - 40A / 63A / 80A (depending on model) |
| P-4 | Reset-/Startverzögerung | 1s - 300s |
| P-5 | Relay recovery delay | 1s - 300s |
| P-6 | Overcurrent recovery delay | 1s - 300s |
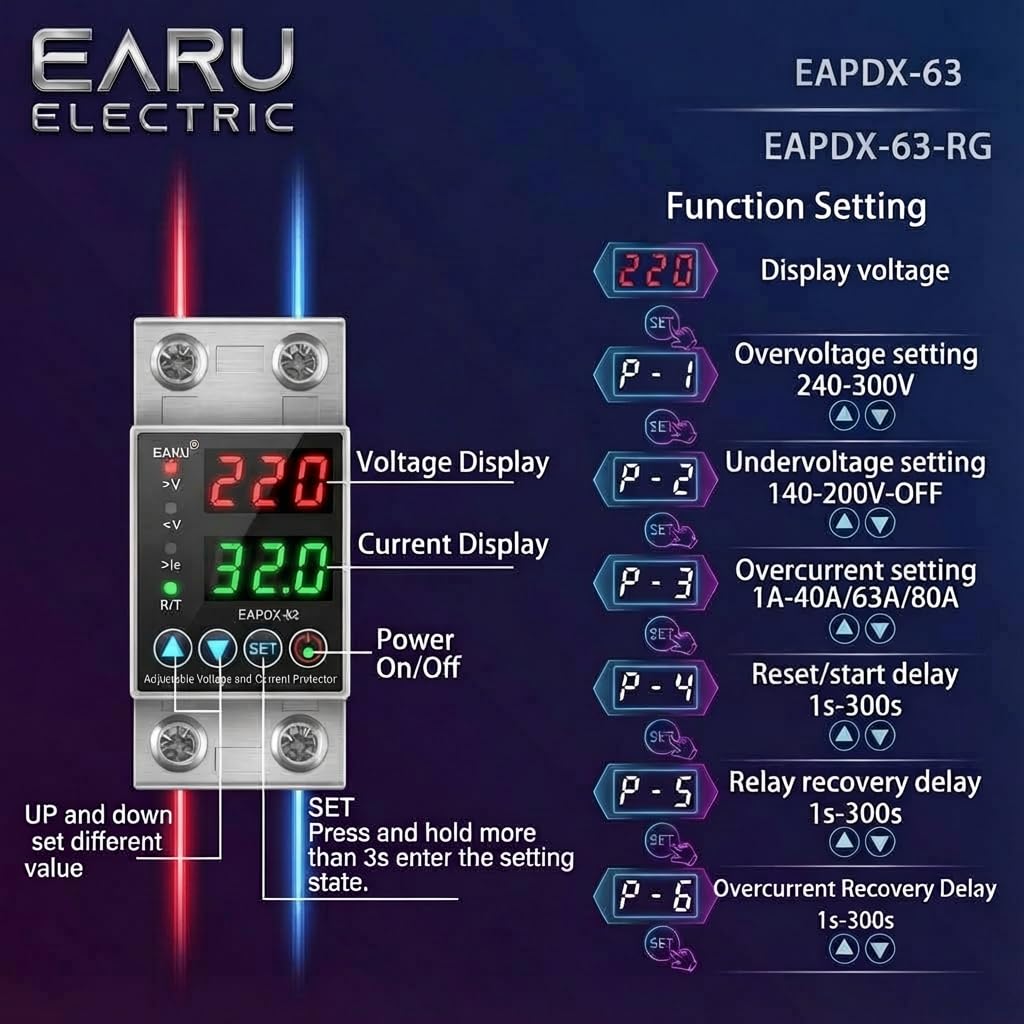
Image 6.1: Function setting guide for the device.
6.3. Video Guide: Setting Parameters
Video 6.1: This video demonstrates how to adjust the over-voltage, unter-voltage, overcurrent, and recovery delay settings on the EARU Automatic Voltage Protector. It shows the step-by-step process of entering the setting mode and modifying each parameter.
7. Wartung
The EARU Automatic Voltage Protector requires minimal maintenance. Regular checks can ensure optimal performance.
- Periodically inspect the device for any visible damage or loose connections.
- Um eine Überhitzung zu vermeiden, achten Sie darauf, dass die Lüftungsschlitze frei von Staub und Schmutz sind.
- Reinigen Sie die Außenseite mit einem trockenen, weichen Tuch. Verwenden Sie keine flüssigen Reiniger oder Lösungsmittel.
- Versuchen Sie nicht, das Gerät selbst zu öffnen oder zu reparieren. Wenden Sie sich zur Wartung an qualifiziertes Fachpersonal.
8. Fehlerbehebung
If you encounter issues with your EARU Automatic Voltage Protector, refer to the following common troubleshooting steps:
| Problem | Mögliche Ursache | Lösung |
|---|---|---|
| Gerät lässt sich nicht einschalten | Keine Eingangsspannung; falsche Verkabelung; interner Fehler. | Überprüfen Sie die Hauptstromversorgung. Kontrollieren Sie die Kabelverbindungen. Sollte das Problem weiterhin bestehen, wenden Sie sich bitte an den Support. |
| Stromausfälle häufig | Bandtage/current outside set thresholds; unstable grid. | Check current voltage/current readings. Adjust P-1, P-2, P-3 settings if necessary. Monitor grid stability. |
| Device does not auto-reconnect | Recovery delay (P-4, P-5, P-6) set too long; persistent fault. | Verify recovery delay settings. Ensure grid conditions have stabilized. Manually reset if safe to do so. |
| Falsche Lautstärketage/aktueller Messwert | Calibration issue; faulty sensor. | Wenden Sie sich für Hilfe an den Kundendienst. |
9. Spezifikationen
| Besonderheit | Detail |
|---|---|
| Marke | EARU |
| Modell | EARU-1005 |
| Produktabmessungen (L x B x H) | 7.7 x 3.5 x 6.5 cm |
| Artikelgewicht | 450 g |
| Eingangslautstärketage | 230 Volt AC |
| Maximal Watttage | 13800 Watt |
| Max Current | 63 Amperes |
| Überlautstärketage Schutzbereich | Adjustable 200V-275V (Cut-off above 275V default) |
| Untervolumentage Schutzbereich | Adjustable 175V-200V (Cut-off below 175V default) |
| Auto-Reconnect Delay | Einstellbar 60-300 Sekunden |
| Montagetyp | DIN Rail (2-Pole, 36mm width) |
| Leitermaterial | 100% Pure Copper |
| Ursprungsland | Indien |
10. Garantie und Support
The EARU Automatic Voltage Protector (Model EARU-1005) is backed by a 1-Year Manufacturer Warranty. This warranty covers defects in materials and workmanship under normal use.
- For warranty claims or technical support, please contact EARU customer service.
- Bewahren Sie Ihren Kaufbeleg als Kaufnachweis für die Inanspruchnahme der Garantie auf.
- Durch nicht autorisierte Reparaturen oder Änderungen erlischt die Garantie.