Einführung
This manual provides comprehensive instructions for the installation, operation, and maintenance of your Fantini Cosmi CH180WIFIRL IntelliComfort Wall-Mounted Multi-zone Chronothermostat. Please read this manual carefully before using the device to ensure proper functionality and safety.
Sicherheitshinweise
- Elektrische Sicherheit: Installation should only be performed by qualified personnel in accordance with local electrical codes. Ensure power is disconnected before installation or maintenance.
- Platzierung: Install the thermostat away from direct sunlight, drafts, and heat sources to ensure accurate temperature readings.
- Reinigung: Verwenden Sie zur Reinigung ein weiches, trockenes Tuch. Verwenden Sie keine Scheuer- oder Lösungsmittel.
- Entsorgung: Das Gerät und seine Komponenten sind gemäß den örtlichen Umweltvorschriften zu entsorgen.
Produkt überview
The Fantini Cosmi CH180WIFIRL is an advanced wall-mounted chronothermostat designed for multi-zone heating and cooling systems. It features WiFi and LoRa radio connectivity for remote control and integration into smart home systems. The device provides a clear temperature display and intuitive controls for programming and adjustment.

Bild 1: Vorderseite view of the Fantini Cosmi CH180WIFIRL chronothermostat, highlighting its digital display and connectivity features.
Hauptmerkmale:
- Wandgestaltung
- Multi-zone control capability
- WiFi and LoRa radio connectivity
- 230V Netzteil
- Clear digital temperature display
- Programmable settings for optimal comfort and energy saving
Maße
Refer to the diagram below for the physical dimensions of the chronothermostat.
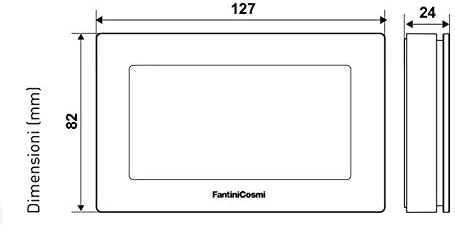
Image 2: Dimensional drawing of the chronothermostat, indicating its width, height, and depth for installation planning.
Setup und Installation
Installation should be carried out by a qualified electrician. Ensure the main power supply is turned off before beginning installation.
- Montage: Choose a suitable wall location, away from direct heat sources, drafts, or direct sunlight. Mount the backplate securely to the wall.
- Verdrahtung: Connect the 230V power supply wires to the designated terminals on the backplate. Connect the heating/cooling system wires as per your system's requirements and the wiring diagram provided in the full installation guide (not included in this manual).
- Thermostat anschließen: Carefully attach the chronothermostat unit to the mounted backplate.
- Einschalten: Restore power to the system. The thermostat display should light up.
- Ersteinrichtung: Follow the on-screen prompts to set the current date and time.
Bedienungsanleitung
The chronothermostat offers various modes and settings to manage your home's climate efficiently.
Grundlegende Bedienung:
- Temperaturanzeige: The main screen displays the current room temperature.
- Temperatur einstellen: Use the up/down arrows on the device to manually adjust the desired temperature.
- Modusauswahl: Press the 'MODE' button to cycle through available operating modes (e.g., Auto, Manual, Off).
Programmpläne:
The device comes with pre-set weekly programs. You can customize these programs to fit your lifestyle.
- Zugriff auf das Programmmenü: Press the 'PROG' button to enter the programming menu.
- Tag auswählen: Use the navigation buttons to select the day of the week you wish to program (Day 1 typically corresponds to Monday).
- Ho . einstellenurly Temperatures: For each hour of the day, assign one of the three available temperature levels (T1, T2, T3) according to your preference.
- Speichern: Confirm your settings to save the custom program.
Connectivity: WiFi and LoRa
The CH180WIFIRL supports both WiFi and LoRa radio connectivity, allowing for advanced control and integration.
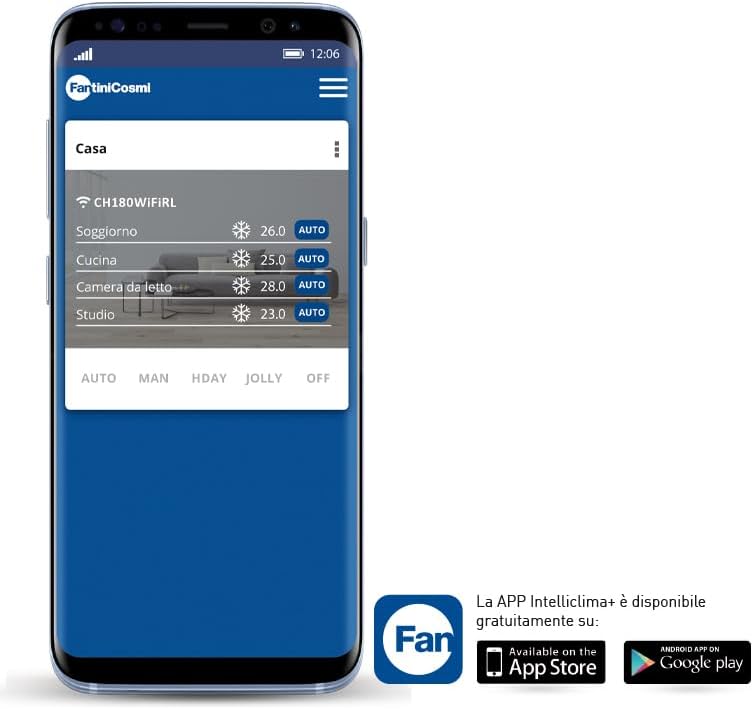
Image 3: The IntelliClima+ mobile application interface, showing multi-zone temperature management.
WiFi Verbindung:
- Refer to the dedicated Fantini Cosmi IntelliClima+ app manual for detailed instructions on connecting your thermostat to your home WiFi network.
- The app allows remote control, advanced programming, and monitoring of multiple zones.
LoRa Radio Connectivity:
- LoRa provides long-range, low-power communication for robust multi-zone setups.
- Consult your system integrator or the full technical manual for LoRa network configuration.

Bild 4: Überview of the Fantini Cosmi smart heating ecosystem, including the chronothermostat, smart valve, and mobile app.
Wartung
- Reinigung: Reinigen Sie regelmäßig das Display und die Oberfläche.asing with a soft, dry cloth. Avoid using liquids or sprays directly on the device.
- Firmware-Updates: Ensure your device's firmware is up to date through the IntelliClima+ app for optimal performance and new features.
- Batteriewechsel (falls zutreffend): If your model uses backup batteries, replace them annually or when a low battery indicator appears.
Fehlerbehebung
| Problem | Mögliche Ursache | Lösung |
|---|---|---|
| Anzeige ist leer | Keine Stromversorgung oder lose Verbindung. | Check power supply to the thermostat. Ensure all wiring is secure. If battery-powered, replace batteries. |
| Falsche Temperaturanzeige | Thermostat placed near heat source/draft, or sensor issue. | Relocate thermostat if possible. Ensure no obstructions. Contact support if issue persists. |
| Kann keine WLAN-Verbindung herstellen | Incorrect WiFi password, weak signal, or router issue. | Verify WiFi password. Move thermostat closer to router. Restart router. Follow app's connection guide. |
| Heating/Cooling not responding | Wiring issue, system fault, or incorrect mode. | Check thermostat mode. Verify wiring connections. Consult a qualified technician for system inspection. |
Technische Daten
| Marke | Fantini Cosmi |
| Modellname | Intellicomfort CH180WIFIRL |
| Farbe | Weiß |
| Technische Daten | 2.4 x 12.7 x 8.2 cm |
| Artikelgewicht | 280 Gramm |
| Wastage | 5 Watt |
| Bandtage | 230 Volt |
| Material | Plastik |
| Besondere Merkmale | Temperature display, Multi-zone, WiFi, LoRa |
Garantie und Support
For warranty information and technical support, please refer to the official Fantini Cosmi webBesuchen Sie die Website oder kontaktieren Sie direkt den Kundenservice. Bewahren Sie Ihren Kaufbeleg als Kaufnachweis auf.