GOODaaa PN-W22PLUS
GOODaaa Solarladegerät Powerbank PN-W22PLUS Benutzerhandbuch
Model: PN-W22PLUS
Einführung
This manual provides comprehensive instructions for the safe and efficient use of your GOODaaa Solar Charger Power Bank, Model PN-W22PLUS. This portable power bank features a high-capacity 36800mAh battery, five integrated solar panels for supplemental charging, built-in charging cables, wireless charging capability, and dual LED flashlights. Designed for outdoor enthusiasts, it offers multiple charging options for various electronic devices.

Image: The GOODaaa Solar Charger Power Bank PN-W22PLUS, showcasing its five unfolded solar panels, built-in cables, wireless charging pad, and illuminated dual LED flashlights. The device is black with orange accents.
Produktkomponenten
Familiarize yourself with the various parts of your power bank:
- Hauptstrombankeinheit: Contains the 36800mAh battery, wireless charging pad, and control buttons.
- Faltbare Solarmodule: Five integrated panels for solar energy collection.
- Built-in Output Cables: Includes Lightning, USB-C, and Micro USB cables for direct device charging.
- USB-Ausgangsanschlüsse: Additional USB-A and USB-C ports for external cable connections.
- Eingangsanschlüsse: USB-C and Lightning input ports for charging the power bank itself.
- Doppelte LED-Taschenlampen: Located on the front edge for illumination.
- Netzschalter: Aktiviert das Gerät und steuert die Taschenlampenmodi.
- LED-Batterieanzeige: Displays remaining battery capacity and charging status.
- Karabinerhaken: For attaching the power bank to backpacks or gear.

Image: A detailed diagram illustrating the various components of the power bank, including the wireless charging area, built-in Lightning, USB-C, and Micro USB output cables, USB input cable, USB output port, Type-C input/output port, Micro USB input port, LED lights, LED battery indicator, and solar panels.
Aufstellen
Erstladung der Powerbank
Laden Sie die Powerbank vor dem ersten Gebrauch vollständig mit einem Netzteil auf. Dies gewährleistet eine optimale Akkuleistung.
- Locate the input ports on the side of the power bank, protected by a silicone cover.
- Connect a compatible USB-C or Lightning cable (a USB-C to USB-C cable is included) to the power bank's input port.
- Connect the other end of the cable to a wall adapter (not included) and plug it into a power outlet.
- The LED battery indicator lights will illuminate, showing the charging progress. All indicator lights will be solid when fully charged.
Note: Solar charging is primarily for emergency use and to maintain battery charge. For a faster and more efficient initial charge, always use a wall adapter.

Image: The power bank illustrating two charging methods: USB charging from a wall outlet using a USB-C cable, and solar charging with its five panels unfolded under sunlight.
Bedienungsanleitung
Charging External Devices (Wired)
The power bank offers multiple options for wired charging:
- Verwendung der integrierten Kabel: Pull out the appropriate built-in cable (Lightning, USB-C, or Micro USB) and connect it directly to your device.
- Verwendung der USB-Ausgangsports: Connect your device's charging cable to one of the USB-A or USB-C output ports on the power bank.
The power bank can charge up to five devices simultaneously using a combination of built-in cables and external ports.

Image: The power bank connected to several mobile phones and tablets via its integrated cables (Lightning, USB-C, Micro USB) and external USB ports, demonstrating its multi-device charging capability.
Charging External Devices (Wireless)
For devices that support wireless charging:
- Place your wireless-charging-compatible device directly onto the wireless charging pad located on the power bank's surface.
- Ensure the device is centered on the pad for optimal charging. The power bank will automatically begin wireless charging.

Image: A smartphone placed on the wireless charging pad of the power bank, indicating active wireless charging with a visual effect.
Solar Charging the Power Bank
The five foldable solar panels allow for supplemental charging when a wall outlet is unavailable:
- Unfold all five solar panels completely.
- Place the power bank in direct sunlight. The green LED indicator will light up, confirming that solar charging is active.
- For best results, position the panels perpendicular to the sun's rays.
Important: Solar charging is slower than wall charging and is intended for emergency power or to extend battery life during prolonged outdoor activities. It may take 8-10 hours in direct sunlight to fully charge the power bank via solar panels. Cloud cover will significantly reduce charging efficiency.

Image: The power bank with its five solar panels fully extended, placed outdoors on a rock to maximize exposure to sunlight for charging.
Using the Dual LED Flashlights
The integrated flashlights provide illumination in low-light conditions:
- Ein-/Ausschalten: Halten Sie den Netzschalter etwa 3 Sekunden lang gedrückt.
- Um die Modi durchzuschalten: Once the flashlight is on, short press the power button to cycle through different modes (e.g., High, Medium, Low, Strobe, SOS).
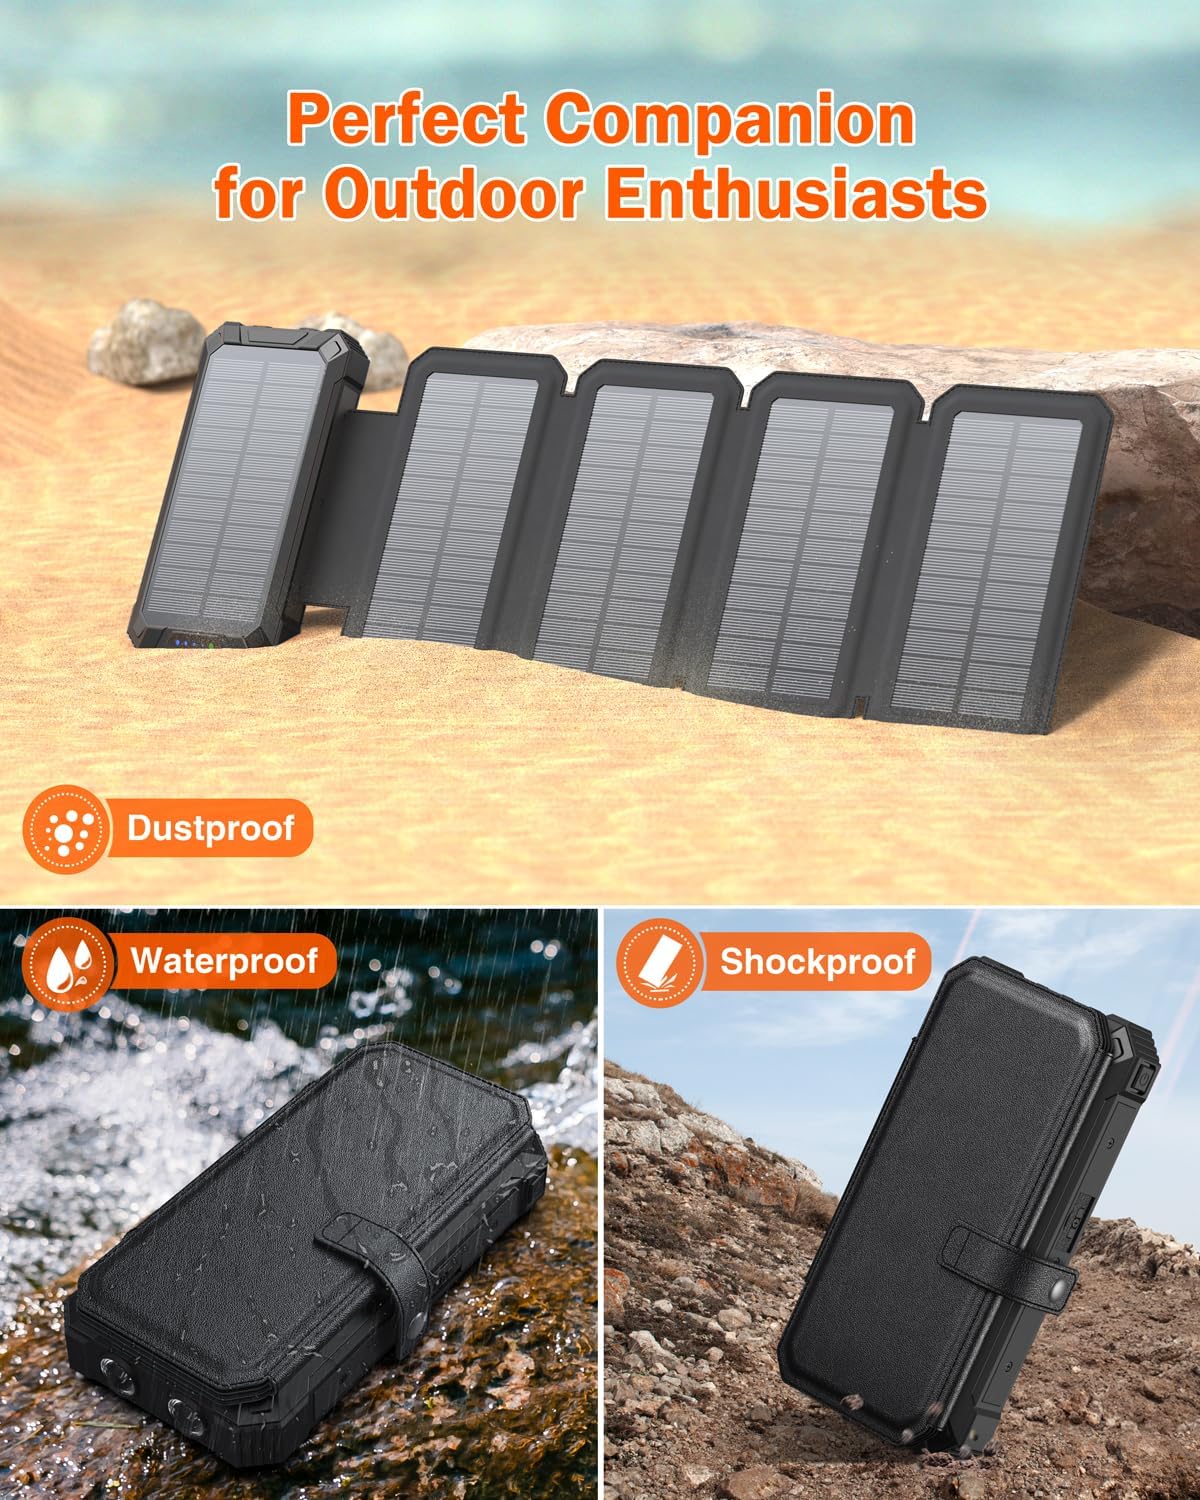
Image: The power bank's dual LED flashlights providing strong illumination in a dark environment, with smaller inset images showing its practical applications during camping, reading, and hiking.
Wartung
Proper care ensures the longevity and performance of your power bank:
- Reinigung: Reinigen Sie das Gerät mit einem weichen, trockenen Tuch. Vermeiden Sie die Verwendung von scharfen Chemikalien oder scheuernden Materialien.
- Lagerung: Store the power bank in a cool, dry place away from direct sunlight and extreme temperatures. If storing for extended periods, ensure it is charged to about 50-75% capacity.
- Batteriepflege: To prolong battery life, avoid fully discharging the power bank regularly. Recharge it before it completely runs out of power.
- Schutz: The power bank features silicone covers for its ports, offering resistance against drops, dust, and water. Ensure these covers are properly sealed when not in use to maintain protection.
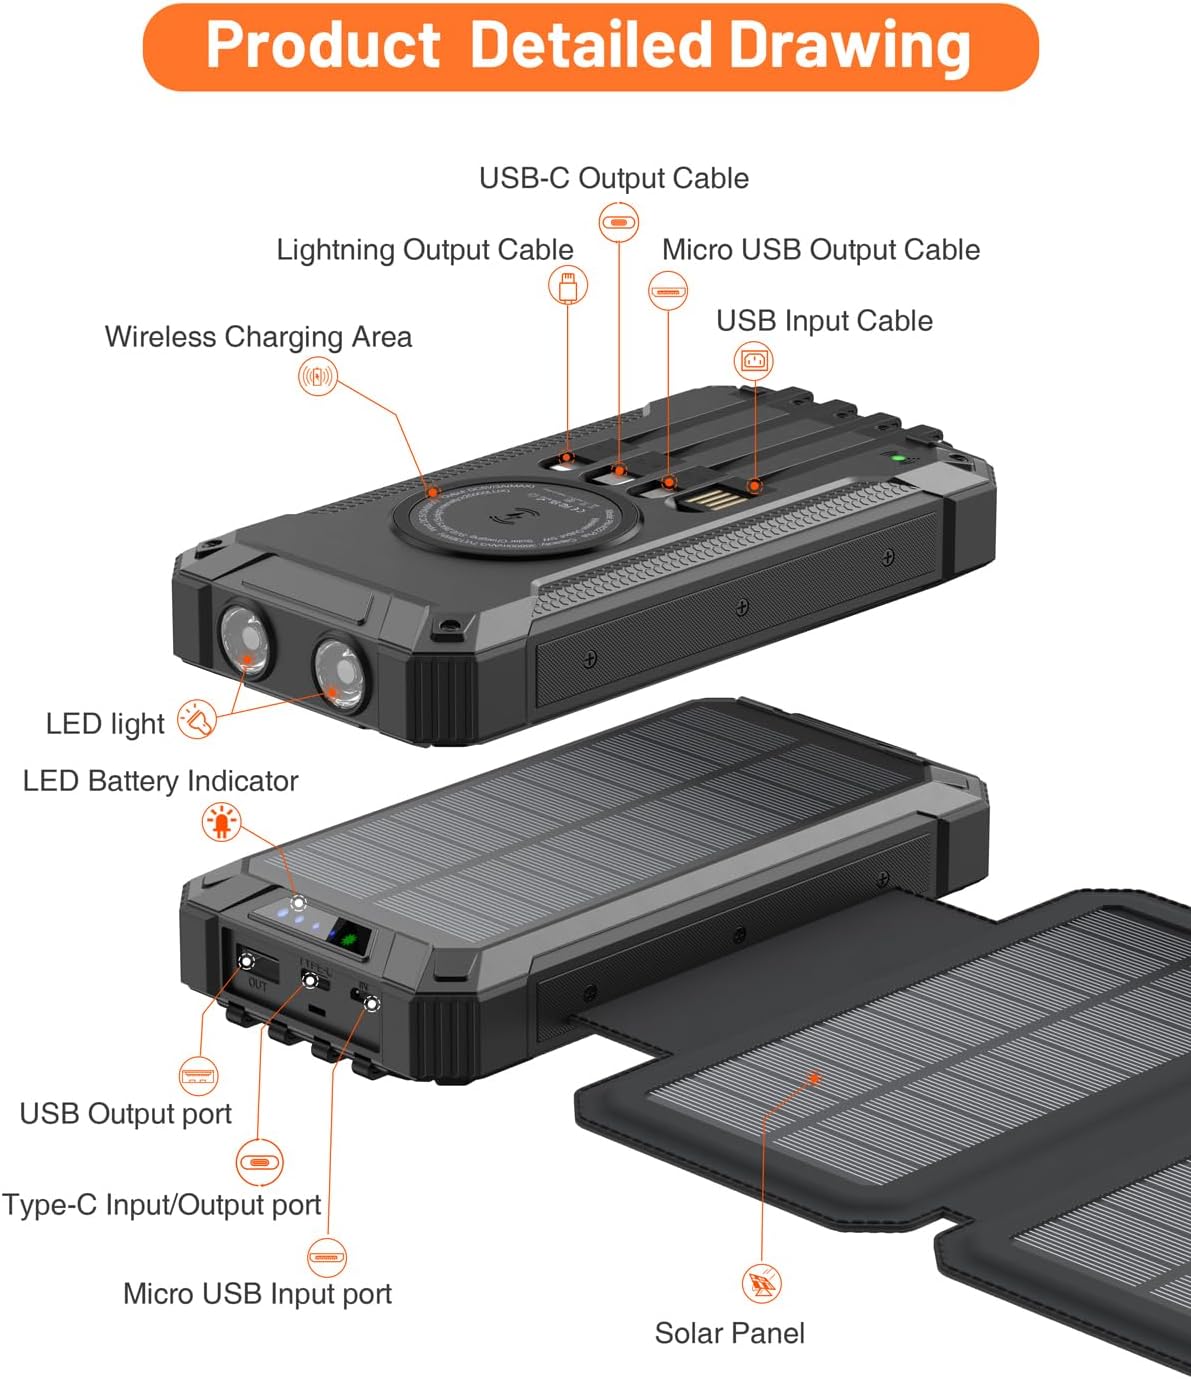
Abbildung: Ein zusammengesetztes Bild zeigtasing the power bank's robust design, including its shockproof casing, water resistance (splashed with water), and dustproof features, suitable for outdoor use.
Fehlerbehebung
Sollten Sie Probleme mit Ihrer Powerbank haben, beachten Sie bitte die folgenden gängigen Lösungsansätze:
- Gerät wird nicht geladen:
- Ensure the power bank is sufficiently charged. Check the LED battery indicators.
- Vergewissern Sie sich, dass das Ladekabel sowohl mit der Powerbank als auch mit Ihrem Gerät fest verbunden ist.
- If using built-in cables, ensure they are fully extended and properly seated in your device's port.
- If using wireless charging, ensure your device is compatible and correctly positioned on the charging pad.
- Try a different charging cable or port to rule out a faulty connection.
- Langsames Solarladen:
- Solar charging is inherently slower than wall charging. Ensure the panels are in direct, unobstructed sunlight.
- Angle the panels directly towards the sun for maximum efficiency.
- Cloudy weather, shade, or indoor lighting will significantly reduce solar charging speed. Solar charging is best used for supplemental power or emergency situations, not as a primary charging method.
- Taschenlampe funktioniert nicht:
- Stellen Sie sicher, dass die Powerbank ausreichend geladen ist.
- Press and hold the power button for 3 seconds to activate the flashlight. If it doesn't turn on, try charging the power bank.
Technische Daten
| Marke | GUT |
| Modellnummer | PN-W22PLUS |
| Batteriekapazität | 36800 Milliamp Stunden (mAh) |
| Technische Daten | 7.48 x 4.56 x 2 Zoll |
| Artikelgewicht | 1.3 Pfund |
| Steckertyp | USB Typ A, USB Typ C |
| Besondere Merkmale | Flashlight, Wireless Charging, Five Solar Panels, Built-in Cables (Lightning, USB-C, Micro USB), Water/Dust/Shock Resistant |
| Farbe | Schwarz |
| Batterien erforderlich | 2 12V-Batterien (im Lieferumfang enthalten) |
Garantie und Support
Your GOODaaa Solar Charger Power Bank PN-W22PLUS comes with a 3 Jahre Ersatzgarantie. For any product inquiries, technical support, or warranty claims, please contact GOODaaa customer service through the retailer's platform or visit the official GOODaaa webWebsite für Kontaktinformationen.
Bitte bewahren Sie Ihren Kaufbeleg zur Überprüfung der Garantie auf.
Ask a question about this manual
Ask about setup, troubleshooting, compatibility, parts, safety, or missing instructions. Manuals+ will review the question and use this page’s manual context to help answer it.