1. Einleitung
Thank you for choosing the FAHEFANA 20V Brushless Cordless Drill. This manual provides essential information for the safe and efficient operation, maintenance, and troubleshooting of your new tool. Please read this manual thoroughly before first use and keep it for future reference.

Image 1.1: The FAHEFANA 20V Brushless Cordless Drill with included accessories, including two batteries, charger, and various drill bits and screwdriver bits.
2. Sicherheitshinweise
Beachten Sie beim Umgang mit Elektrowerkzeugen stets die grundlegenden Sicherheitsvorkehrungen, um das Risiko von Bränden, Stromschlägen und Verletzungen zu verringern.
Allgemeine Sicherheitshinweise für Elektrowerkzeuge:
- Sicherheit am Arbeitsplatz: Halten Sie Ihren Arbeitsbereich sauber und gut beleuchtet. Unordnung oder Dunkelheit erhöhen die Unfallgefahr. Betreiben Sie Elektrowerkzeuge nicht in explosionsgefährdeten Bereichen, z. B. in der Nähe von brennbaren Flüssigkeiten, Gasen oder Stäuben.
- Elektrische Sicherheit: Vermeiden Sie Körperkontakt mit geerdeten oder geerdeten Oberflächen. Setzen Sie Elektrowerkzeuge keinem Regen oder Nässe aus.
- Persönliche Sicherheit: Tragen Sie stets eine Schutzbrille. Verwenden Sie bei längeren Arbeiten einen Gehörschutz. Achten Sie auf angemessene Kleidung; vermeiden Sie weite Kleidung und Schmuck. Binden Sie lange Haare zusammen.
- Werkzeuggebrauch und -pflege: Wenden Sie keine Gewalt an. Verwenden Sie das für Ihren Anwendungszweck geeignete Elektrowerkzeug. Trennen Sie den Akku vom Elektrowerkzeug, bevor Sie Einstellungen vornehmen, Zubehör wechseln oder Elektrowerkzeuge lagern.
- Verwendung und Pflege des Akkus: Laden Sie den Akku nur mit dem vom Hersteller angegebenen Ladegerät auf. Verwenden Sie die Akkus nicht mit anderen Elektrowerkzeugen.
3. Packungsinhalt
Prüfen Sie beim Auspacken, ob alle Artikel vorhanden sind:
- FAHEFANA 20V Brushless Cordless Drill
- 2 x 2000mAh Lithium-Ionen-Akkus
- 1 x Schnellladegerät
- 4 x Schraubendreher-Bits
- 3 x Spiralbohrer
- 3 x Flachbohrer
- 9 x Steckschlüssel
- 1 x Steckdosenadapter
- 1 x Hex Screwdriver Mandrel
- 1 x Schraubendreher mit flexibler Welle
- Bedienungsanleitung

Image 3.1: A visual representation of the drill, two batteries, charger, and all 25 accessories included in the package.
4. Produktüberschreitungview
Familiarize yourself with the components and features of your FAHEFANA 20V Brushless Cordless Drill.
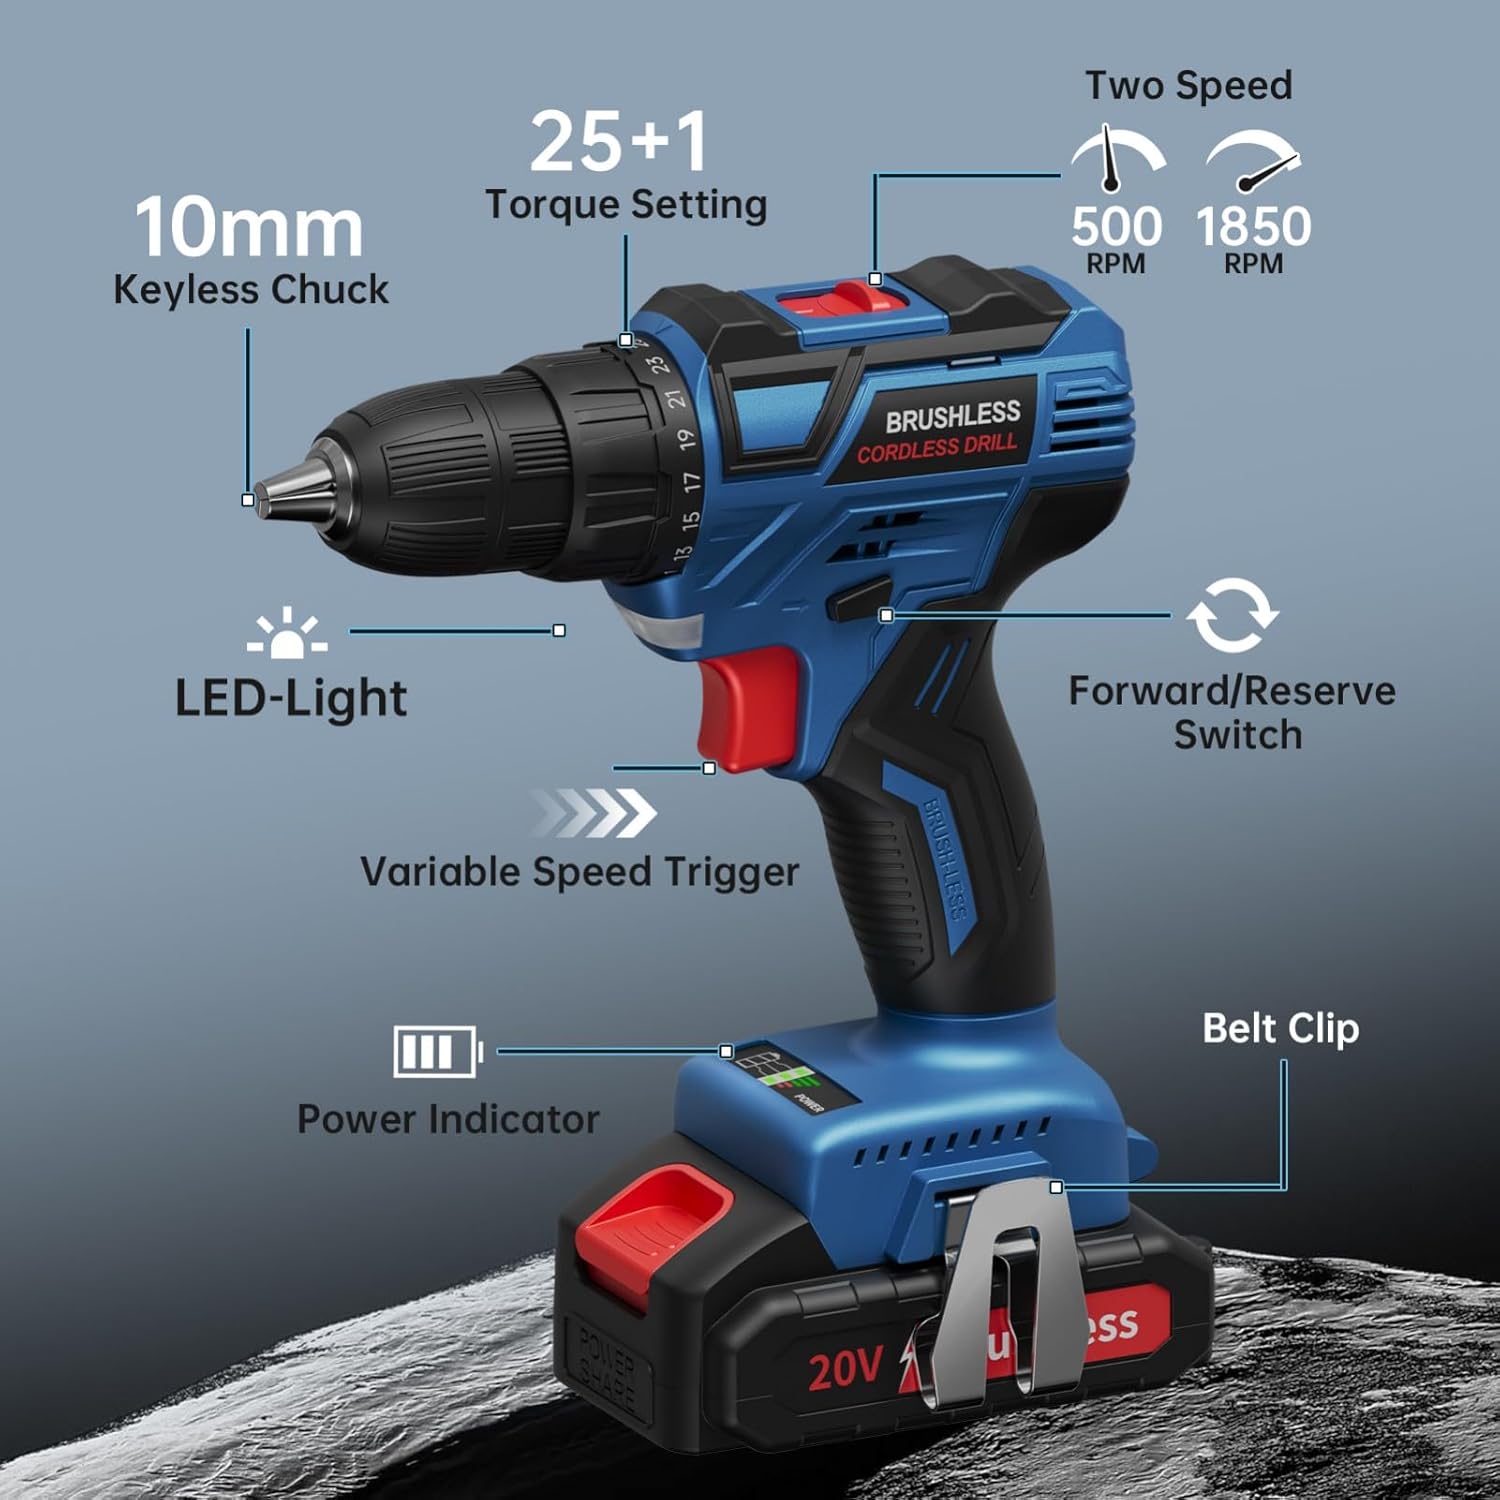
Image 4.1: A detailed diagram highlighting key components of the drill, including the 10mm Keyless Chuck, LED Light, Variable Speed Trigger, Power Indicator, Forward/Reverse Switch, Two Speed Selector, 25+1 Torque Setting, and Belt Clip.
Hauptmerkmale:
- Bürstenlosen Motor: Provides up to 60 Nm of torque, enhancing safety and power output compared to traditional brushed motors.
- Doppeltes Batteriesystem: Includes two 2000mAh Lithium-ion batteries for extended operation and a quick charger for minimal downtime.
- Zweiganggetriebe: Offers low speed (0-500 RPM) for driving and high speed (0-1850 RPM) for drilling.
- 25+1 Drehmomenteinstellungen: Allows precise torque adjustment to prevent damage to materials and fasteners.
- LED-Arbeitslicht: Beleuchtet den Arbeitsbereich und sorgt so für bessere Sichtverhältnisse bei schlechten Lichtverhältnissen.
- 10-mm-Schnellspannfutter: Ermöglicht einen schnellen und einfachen Bitwechsel.
- Kompaktes Design: Measures approximately 17.2 cm in length and 22 cm in height, making it suitable for various tasks.

Image 4.2: An internal cutaway view of the drill illustrating the brushless motor, emphasizing its compact design and efficient power delivery.

Image 4.3: A visual representation of the drill's compact size, with dimensions of 17.2cm in length and 22cm in height, demonstrating its suitability for various tasks.
5. Einrichtung
5.1. Laden des Akkus
- Ensure the battery is securely inserted into the charger.
- Stecken Sie das Ladegerät in eine normale Steckdose.
- The charging indicator light on the charger will show the charging status. A full charge typically takes approximately one hour.
- Sobald der Akku vollständig aufgeladen ist, nehmen Sie ihn aus dem Ladegerät.

Image 5.1: The FAHEFANA 20V Brushless Cordless Drill in use, with a spare 2000mAh Lithium-ion battery and charger visible in the background, illustrating the dual battery system.

Image 5.2: A visual of two batteries, one actively charging via the quick charger and another ready for immediate use, highlighting the continuous operation capability.
5.2. Attaching and Removing Accessories
- To attach a drill bit or screwdriver bit, rotate the chuck counter-clockwise to open the jaws.
- Insert the desired accessory into the chuck.
- Rotate the chuck clockwise to tighten the jaws securely around the accessory. Ensure the bit is centered and firmly held.
- To remove, rotate the chuck counter-clockwise until the jaws open sufficiently to release the accessory.
6. Bedienungsanleitung
6.1. Geschwindigkeit auswählen
The drill features two speed settings, controlled by a switch located on top of the tool:
- Geschwindigkeit 1 (0-500 U/min): Ideal for driving screws and applications requiring higher torque and slower speed.
- Geschwindigkeit 2 (0-1850 U/min): Suitable for drilling and applications requiring higher speed.

Image 6.1: A visual comparison demonstrating the drill operating at low speed (0-500 RPM) for driving screws and high speed (0-1850 RPM) for drilling.

Image 6.2: The drill being used for a screwdriver application, indicating the recommended 0-500 RPM setting for such tasks.

Image 6.3: The drill being used for a drilling application, indicating the recommended 0-1850 RPM setting for such tasks.
6.2. Drehmoment einstellen (Kupplungseinstellungen)
The 25+1 torque ring allows you to adjust the amount of torque applied. This prevents over-tightening screws or stripping screw heads, and helps avoid damage to the workpiece.
- Rotate the torque adjustment ring to select the desired setting. Lower numbers are for smaller screws and softer materials, while higher numbers are for larger screws and harder materials.
- The drill setting (indicated by a drill bit icon) bypasses the clutch for maximum torque, suitable for drilling applications.
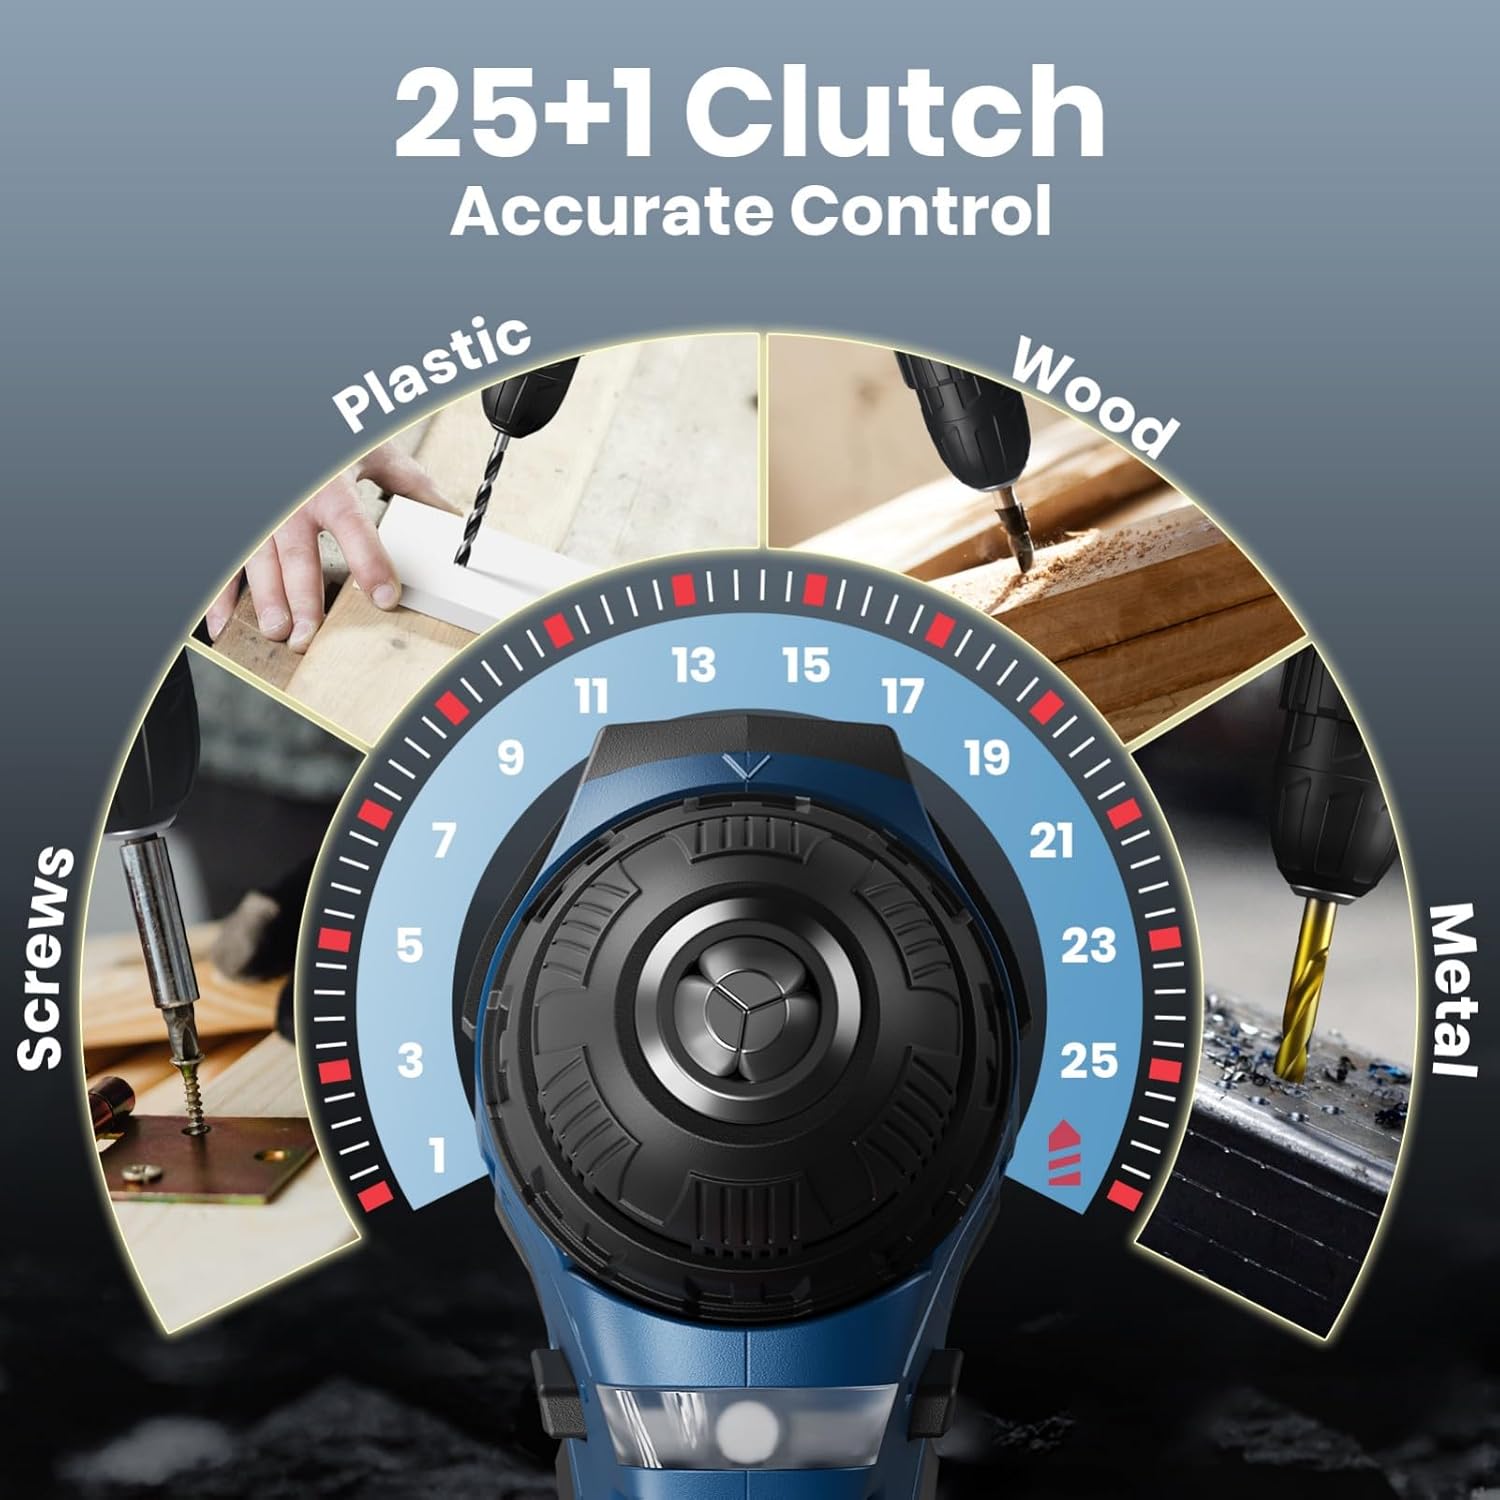
Image 6.4: A visual guide to the 25+1 clutch settings, showing recommended settings for different materials like plastic, wood, metal, and for driving screws.

Bild 6.5: Eine Nahaufnahme view of the drill's 25+1 torque adjustment ring, illustrating the infinitely variable speed control and precise torque settings.
6.3. Vorwärts/Rückwärts-Schalter
The forward/reverse switch, located above the trigger, controls the direction of rotation. Push it to the left for forward rotation (driving screws/drilling) and to the right for reverse rotation (removing screws/backing out bits). Center position locks the trigger for safety.
6.4. Trigger mit variabler Geschwindigkeit
The trigger allows for variable speed control. Pressing the trigger further increases the speed. This provides precise control for starting holes or driving screws.
6.5. LED-Arbeitslicht
The integrated LED light automatically illuminates when the trigger is pressed, providing visibility in dark or confined work areas.
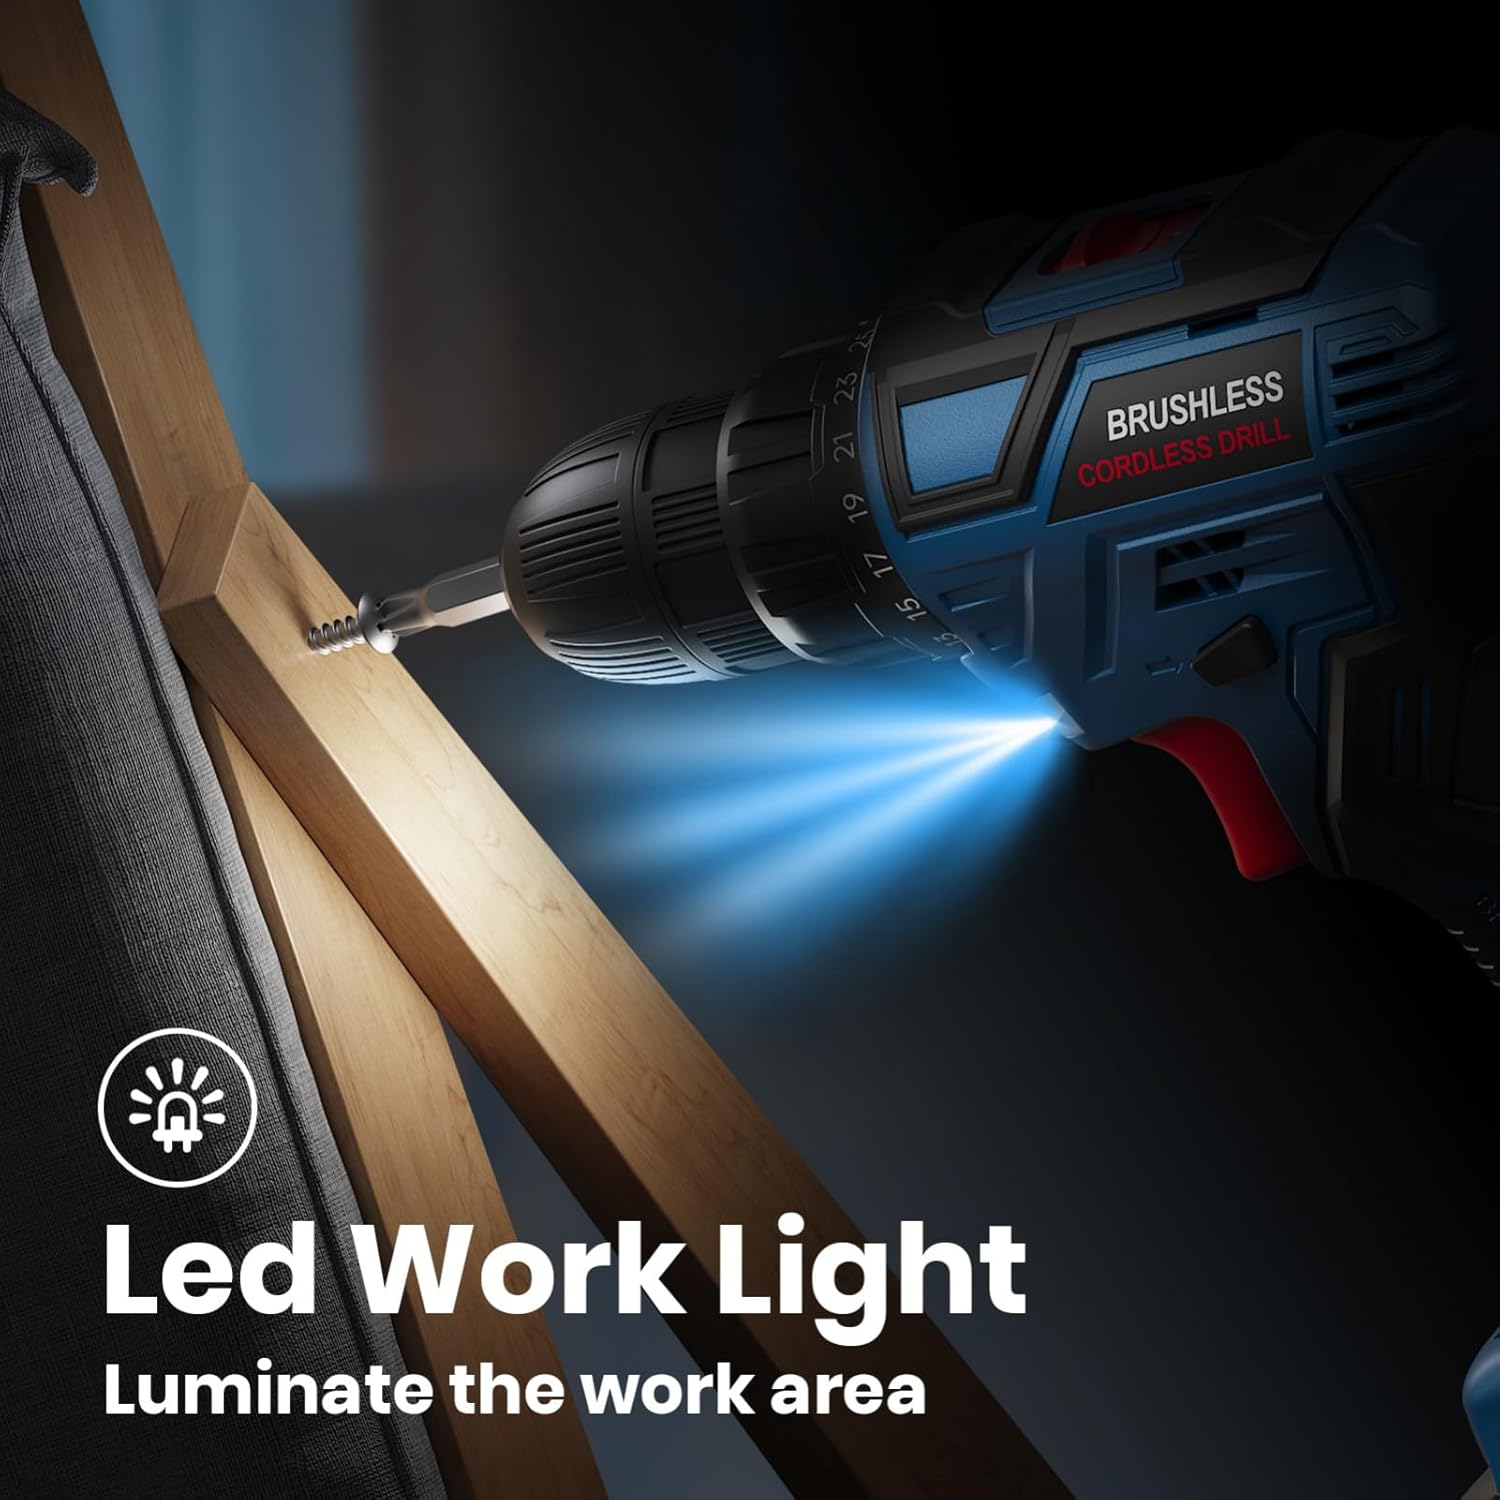
Image 6.6: The drill's LED work light actively illuminating the area where a screw is being driven into wood, enhancing visibility.

Image 6.7: A user operating the drill with the flexible shaft attachment, demonstrating how the LED light aids in working in dark and confined spaces.
7. Wartung
7.1. Reinigung
- Vor der Reinigung immer den Akku abklemmen.
- Verwenden Sie ein sauberes, damp Verwenden Sie ein Tuch, um die Außenseite des Werkzeugs abzuwischen. Verwenden Sie keine scharfen Chemikalien oder Scheuermittel.
- Um eine Überhitzung zu vermeiden, sollten die Lüftungsöffnungen frei von Staub und Schmutz gehalten werden.
7.2. Batteriepflege
- Lagern Sie Batterien an einem kühlen, trockenen Ort, geschützt vor direkter Sonneneinstrahlung und extremen Temperaturen.
- Batterien sollten nicht über längere Zeit im entladenen Zustand gelagert werden. Laden Sie sie regelmäßig auf, wenn sie nicht verwendet werden.
- Vermeiden Sie es, Batterien fallen zu lassen oder Stößen auszusetzen.
8. Fehlerbehebung
| Problem | Mögliche Ursache | Lösung |
|---|---|---|
| Bohrer startet nicht | Batterie nicht geladen oder falsch eingesetzt. Vorwärts-/Rückwärtsschalter in Mittelstellung (verriegelt). | Charge battery and ensure it is fully inserted. Move forward/reverse switch to forward or reverse position. |
| Insufficient power/torque | Battery low. Torque setting too low. Incorrect speed setting. | Recharge battery. Increase torque setting. Select higher speed for drilling or lower speed for driving. |
| Bit wobbles or falls out | Chuck not tightened properly. Bit shank damaged. | Spannfutter wieder fest anziehen. Beschädigten Bohrer ersetzen. |
| Überhitzung | Verstopfte Lüftungsschlitze. Kontinuierliche starke Beanspruchung. | Lüftungsschlitze freihalten. Werkzeug abkühlen lassen. Belastung reduzieren. |
9. Spezifikationen
| Besonderheit | Spezifikation |
|---|---|
| Marke | FAHEFANA |
| Modellnummer | 20VDZ |
| Bandtage | 20 V |
| Maximaler Drehmoment | 60 Nm |
| Leerlaufdrehzahl (niedrig) | 0-500 U/min |
| Leerlaufdrehzahl (Hoch) | 0-1850 U/min |
| Drehmomenteinstellungen | 25+1 |
| Chuck Größe | 10 mm (3/8") schlüssellos |
| Akku-Typ | Lithium-Ionen |
| Batteriekapazität | 2000 mAh |
| Stromquelle | Batteriebetrieben |
| Technische Daten | 21 x 8 x 25 cm |
| Artikelgewicht | 2.56 kg |
| Material | Metall |
| Besondere Merkmale | Compact, Quick-release chuck, Adjustable mode, Speed lock button, LED Light |
10. Garantie und Support
For warranty information or technical support, please refer to the documentation included with your purchase or contact FAHEFANA customer service through the retailer where the product was purchased. Keep your proof of purchase for any warranty claims.