1. Einleitung
Thank you for choosing the Vormooi Digital Voice Recorder. This device is designed for high-quality audio recording, offering features such as ultra-long continuous recording, voice activation, and versatile input options. With its substantial 96GB memory capacity and advanced noise reduction technology, it is an ideal tool for lectures, interviews, meetings, and personal notes. This manual provides detailed instructions to help you set up, operate, and maintain your device for optimal performance.
2. Packungsinhalt
Bitte kreuzen Sie das Kästchen für die folgenden Elemente an:
- 1 x Vormooi Digital Voice Recorder (32GB built-in memory)
- 1 x 64 GB TF-Karte (vorinstalliert oder separat)
- 1 x 3.5-mm-externes Mikrofon
- 1 x 3.5-mm-Line-In-Kabel
- 1 x USB-C-Kabel
- 1 x Benutzerhandbuch
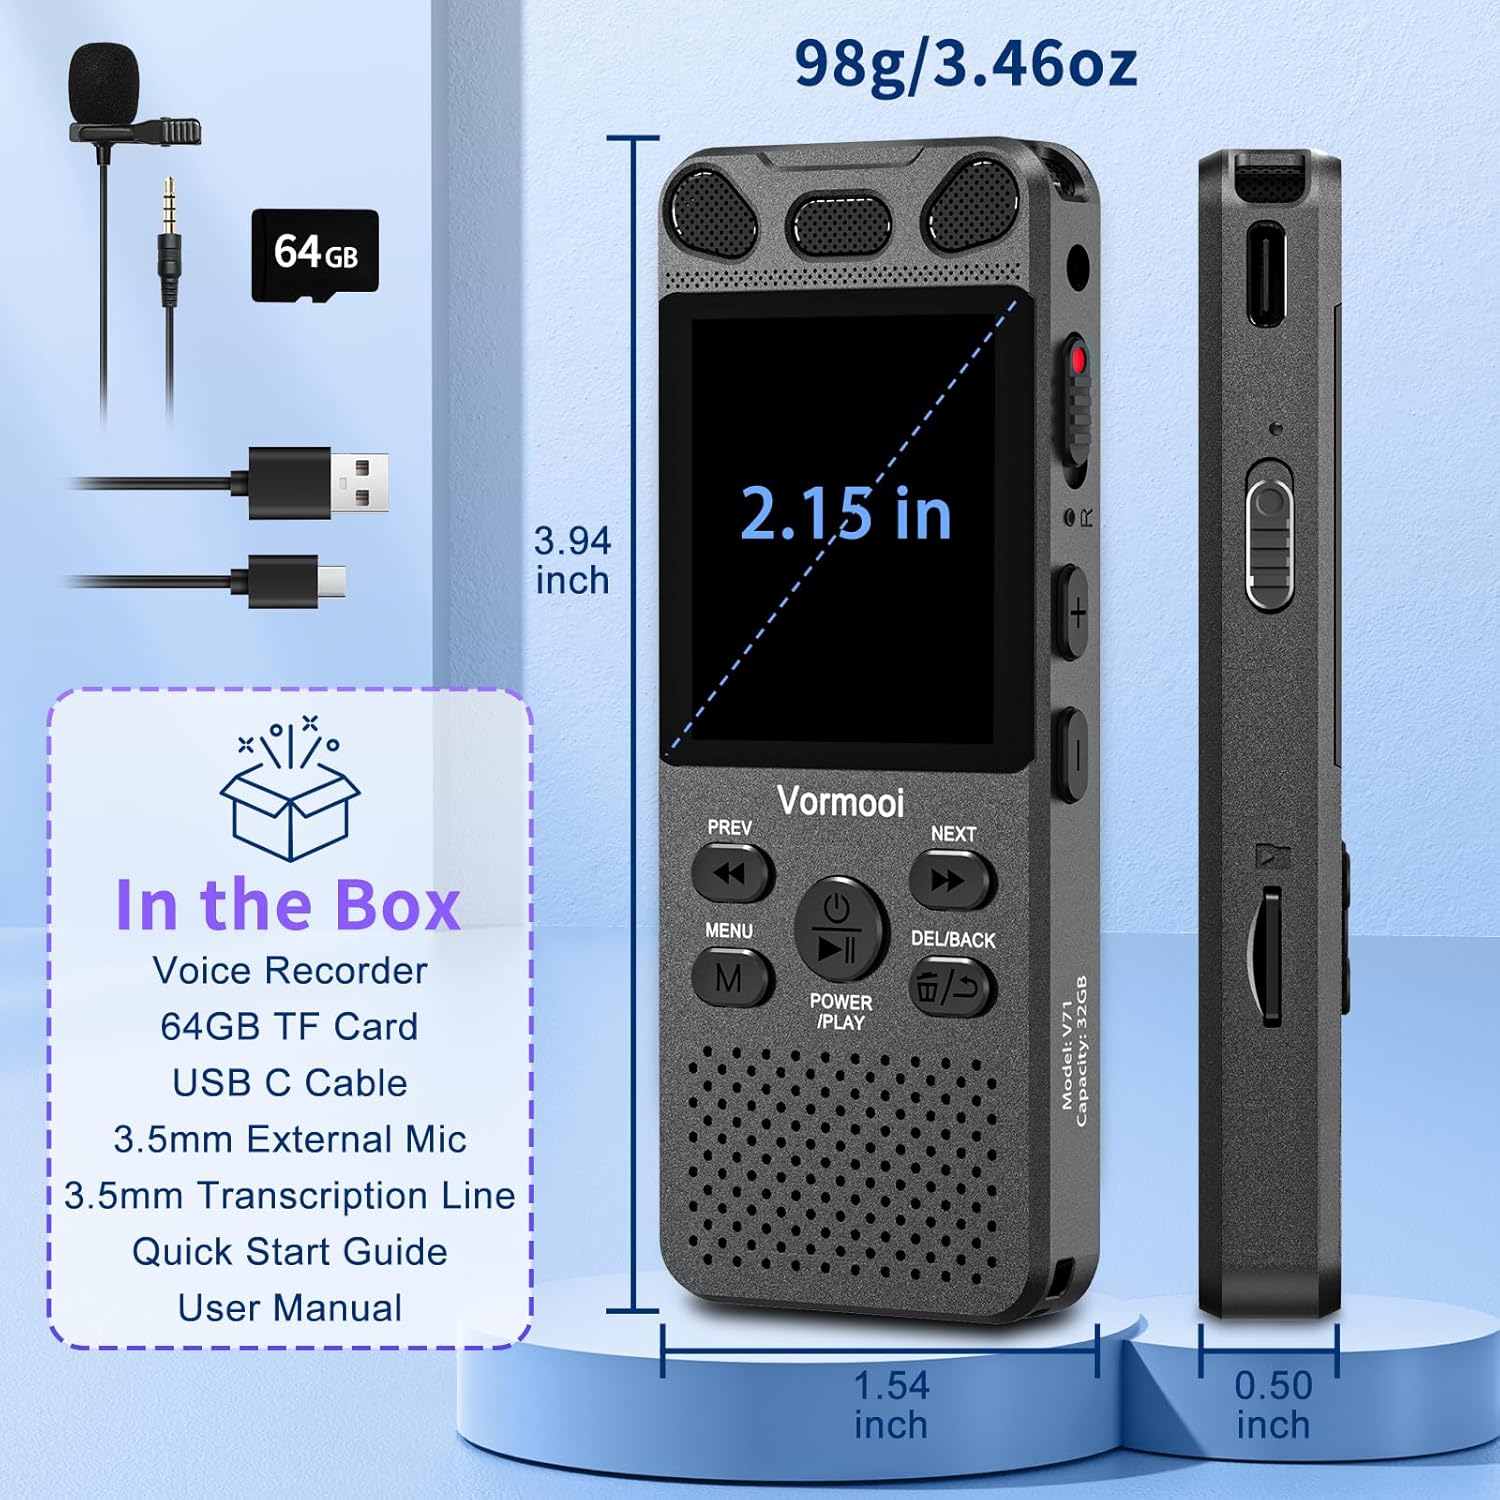
Image: The Vormooi Digital Voice Recorder and its included accessories, such as the external microphone, USB-C cable, and 64GB TF card.
3. Produktüberschreitungview
Familiarize yourself with the various parts and controls of your Vormooi Digital Voice Recorder.

Image: Labeled diagram of the Vormooi Digital Voice Recorder highlighting its USB C Port, Lock/Unlock switch, Previous Song/Fast Rewind button, TF-Card Slot, Menu button, Power/Play/Pause/OK button, 3.5mm Jack, Record/Save (REC) switch, Reset button, Volume +/- buttons, Next Song/Fast Forward button, and Back/Delete Files-Taste.
Schlüsselkomponenten:
- Bildschirm: 2.15-inch color screen for navigation and information display.
- Eingebaute Mikrofone: For omni-directional recording.
- Lautsprecher: For playback of recordings.
- REC Switch: Zum Starten der Aufnahme nach oben wischen, zum Speichern nach unten wischen.
- Sperrknopf: Locks all buttons to prevent accidental operation during recording.
- USB-C-Anschluss: Zum Aufladen und Anschließen an einen Computer.
- 3.5-mm-Buchse: Zum Anschluss eines externen Mikrofons oder Kopfhörers.
- TF-Kartensteckplatz: For inserting the 64GB TF card to expand memory.
4. Einrichtung
4.1 Aufladen des Geräts
Before first use, fully charge the voice recorder.
- Verbinden Sie das mitgelieferte USB-C-Kabel mit dem USB-C-Anschluss des Rekorders.
- Verbinden Sie das andere Ende des USB-C-Kabels mit einem USB-Netzteil (nicht im Lieferumfang enthalten) oder einem USB-Anschluss Ihres Computers.
- Das Akkusymbol auf dem Bildschirm zeigt den Ladestatus an. Eine vollständige Ladung dauert etwa 2 Stunden.
Notiz: A fully charged battery provides up to 110 hours of continuous recording.
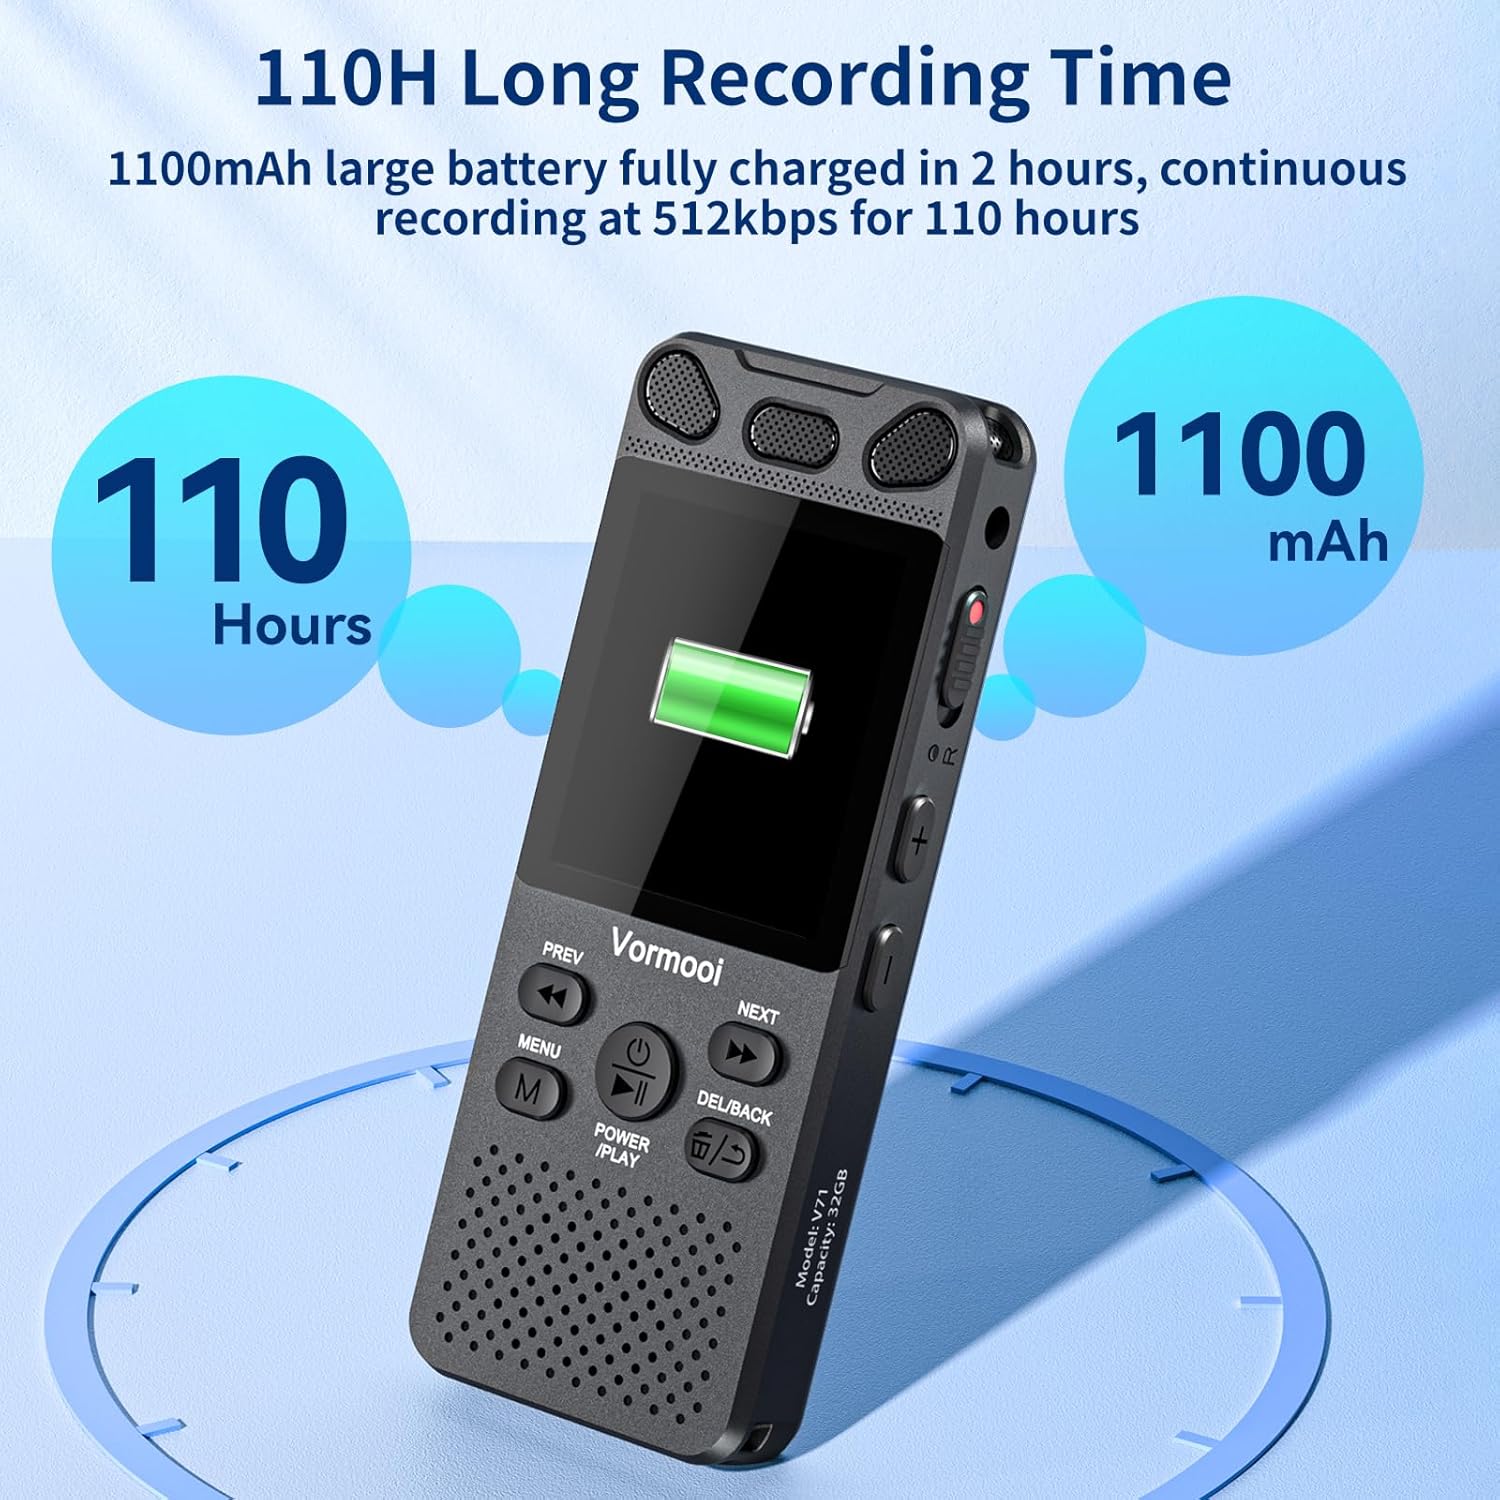
Image: The recorder's screen displaying battery status and highlighting its 110-hour long recording capability and 1100mAh battery.
4.2 Einlegen der TF-Karte
The device comes with 32GB built-in memory and an additional 64GB TF card for expanded storage.
- Locate the TF-Card Slot on the side of the recorder.
- Gently insert the 64GB TF card into the slot until it clicks into place. Ensure the card is oriented correctly.
- Zum Entfernen die Karte vorsichtig nach innen drücken, bis sie herausspringt.

Image: Visual representation of the recorder's 96GB storage, composed of 32GB internal memory and an expandable 64GB TF card, capable of storing over 7000 hours of 32kbps recordings.
4.3 Ein-/Ausschalten
- Einschalten: Halten Sie die POWER/PLAY/PAUSE/OK button for a few seconds until the screen lights up.
- Ausschalten: Halten Sie die POWER/PLAY/PAUSE/OK Drücken Sie die Taste so lange, bis sich der Bildschirm ausschaltet.
5. Bedienungsanleitung
5.1 Grundlegende Aufnahmefunktionen
The Vormooi recorder features a convenient one-touch recording function.
- Um die Aufnahme zu starten, schieben Sie den Schieberegler. AUFNAHME switch upwards. The recording indicator will light up, and the screen will show recording in progress.
- Um die Aufnahme zu speichern, schieben Sie den Schieberegler. AUFNAHME Schalter nach unten drücken. Die Aufnahme wird automatisch gespeichert.

Image: The recorder's one-touch record/save switch, demonstrating its ease of use, alongside icons representing 1536K clear sound quality and an intelligent noise cancellation chip.
5.2 Wiedergabe
- From the main menu, navigate to "Recordings Library" or "Folders".
- Verwenden Sie die VORHERIGE Und NÄCHSTE Wählen Sie mit den Tasten die gewünschte Aufnahme aus.
- Drücken Sie die POWER/PLAY/PAUSE/OK Taste, um die Wiedergabe zu starten.
- Drücken Sie während der Wiedergabe POWER/PLAY/PAUSE/OK pausieren/fortsetzen.
- Verwenden Sie die VORHERIGE Und NÄCHSTE buttons for fast rewind/fast forward.
- Stellen Sie die Lautstärke mit ein Lautstärke +/- Schaltflächen.
5.3 Sprachaktivierte Aufzeichnung (VAR)
The VAR function allows the recorder to start recording automatically when sound is detected and pause when silence occurs, saving memory space.
- Gehen Sie zum Menü „Einstellungen“.
- Select "VAR Mode" or "Voice Activated".
- Choose your desired sensitivity level (e.g., Level 1-7, where 7 is most sensitive).
- Exit the menu. The recorder will now record only when sound is present.

Image: A composite image illustrating key functionalities: Voice Activated Recording, 110-hour battery life, password protection, A-B repeat for specific section playback, and variable speed playback.
5.4 External Microphone Recording
For more precise audio capture, especially in interviews, use the included external microphone.
- Plug the 3.5mm jack of the external microphone into the recorder's 3.5mm jack.
- Ensure the microphone is positioned correctly for optimal sound pickup.
- Proceed with recording as usual using the AUFNAHME switch. The device will automatically switch to external microphone input.

Image: The Vormooi recorder connected to its external 3.5mm microphone, showing the setup for enhanced audio recording.
5.5 Line-in Recording (Transcription)
The line-in function allows you to record audio directly from other devices like cell phones, MP3 players, or computers.
- Connect one end of the 3.5mm Line-in Cable to the audio output of your external device (e.g., headphone jack of a phone).
- Connect the other end of the 3.5mm Line-in Cable to the recorder's 3.5mm jack.
- Start playback on your external device and then slide the AUFNAHME switch upwards on the recorder to begin recording.

Image: Setup for line-in recording, showing the recorder connected to a smartphone via a 3.5mm cable, enabling direct audio capture from other devices.
5.6 Rauschunterdrückung
The Vormooi recorder is equipped with an advanced noise reduction chip and adjustable noise reduction levels (7 levels).
- Öffnen Sie das Menü „Einstellungen“.
- Find the "Noise Reduction" or "DSP" option.
- Adjust the level to minimize environmental noise during recording. Higher levels provide more aggressive noise reduction.

Abbildung: Ein interner view highlighting the 2159 Intelligent Noise Reduction Chip (DSP) responsible for minimizing environmental noise and enhancing audio clarity.
5.7 Sperrtaste
To prevent accidental interruption or loss of recording due to unintentional button presses, use the LOCK button.
- Schieben Sie den SPERREN button (usually on the side) to the "locked" position. All buttons will become unresponsive.
- Slide it back to the "unlocked" position to regain control of the buttons.

Image: The lock switch on the side of the recorder, showing its "UP: Locked" and "DOWN: Unlock" positions, designed to prevent accidental button presses during recording.
5.8 Verbindung zum Computer herstellen
You can transfer recordings to your Windows or macOS computer.
- Verbinden Sie den Rekorder mit Ihrem Computer mithilfe des mitgelieferten USB-C-Kabels.
- Der Rekorder wird auf Ihrem Computer als Wechseldatenträger angezeigt.
- You can then drag and drop audio files zum und vom Gerät.
6. Wartung
- Reinigung: Reinigen Sie das Gerät mit einem weichen, trockenen Tuch. Verwenden Sie keine flüssigen Reiniger oder Lösungsmittel.
- Lagerung: Bewahren Sie das Gerät an einem kühlen, trockenen Ort fern von direkter Sonneneinstrahlung und extremen Temperaturen auf.
- Batteriepflege: Um die Lebensdauer des Akkus zu verlängern, vermeiden Sie häufiges vollständiges Entladen. Laden Sie ihn regelmäßig auf, auch wenn er längere Zeit nicht benutzt wird.
- Datensicherung: Sichern Sie wichtige Aufnahmen regelmäßig auf Ihrem Computer, um Datenverlust zu vermeiden.
7. Fehlerbehebung
| Problem | Mögliche Lösung |
|---|---|
| Gerät lässt sich nicht einschalten. |
|
| Kann nicht aufnehmen. |
|
| Schlechte Aufnahmequalität. |
|
| Gerät wird vom Computer nicht erkannt. |
|
8. Spezifikationen
| Besonderheit | Detail |
|---|---|
| Modellnummer | O1 |
| Speicherkapazität | 96 GB (32GB Built-in + 64GB TF Card) |
| Aufnahmequalität | Up to 1536Kbps HD |
| Akkulaufzeit | Up to 110 hours continuous recording |
| Bildschirmgröße | 2.15 Zoll |
| Technische Daten | 1.54"T x 3.94"B x 4.96"H |
| Artikelgewicht | 5.3 Unzen |
| Kopfhöreranschluss | 3.5 Millimeter |
| Unterstützte Formate | MP3 Audio, WAV (also FLAC, OGG, APE, WMA for playback, as per A+ content image) |
| Hardware-Schnittstelle | USB Typ C |
| Kompatible Geräte | Windows-/macOS-Computer |
9. Kundendienst
For any questions, issues, or assistance with your Vormooi Digital Voice Recorder, please contact our support team.
- Antwort des Supports: Vormooi support team will promptly respond and solve the problem within 24 hours on weekdays.
- Please refer to the contact information provided on the product packaging or the official Vormooi webWebsite für die aktuellsten Supportkanäle.