1. Produktüberschreitungview
The Riokko YM119 OBD2 Scanner is a diagnostic tool designed for car owners to easily read and clear engine fault codes. It provides real-time data, freeze frame information, and supports various diagnostic functions for OBDII/EOBD compliant vehicles manufactured since 1996. Its intuitive interface and compact design make it suitable for both professional technicians and home users.

Figure 1.1: Riokko YM119 OBD2 Scanner. This image shows the main diagnostic tool with its color screen, control buttons, and the attached OBDII connector cable.
2. Einrichtung und Erstgebrauch
2.1 Packungsinhalt
- Riokko YM119 OBD2 Scanner Unit
- Benutzerhandbuch (dieses Dokument)
2.2 Anschließen des Scanners
- Suchen Sie den Datenverbindungsstecker (DLC) des Fahrzeugs. Dieser befindet sich üblicherweise unter dem Armaturenbrett auf der Fahrerseite.
- Ensure the vehicle's ignition is turned ON (engine can be off or running, depending on the test).
- Plug the OBDII connector of the YM119 scanner firmly into the vehicle's DLC. The scanner will power on automatically.
2.3 Sprachauswahl
The YM119 supports 13 national languages. To change the language:
- From the main menu, navigate to "Setting" using the arrow keys.
- Drücken Sie die OK button to enter the Setting menu.
- Wählen Sie „Sprache“ und anschließend Ihre bevorzugte Sprache aus der Liste.
- Drücken OK , um Ihre Auswahl zu bestätigen.
3. Bedienung des Scanners
3.1 Navigationstasten
- EXIT: Kehrt zum vorherigen Bildschirm oder zum Hauptmenü zurück.
- AUF-/AB-Pfeile: Navigieren Sie durch die Menüoptionen.
- LINKS/RECHTS Pfeile: Navigate through data screens or adjust settings.
- OK: Bestätigt die Auswahl oder öffnet ein Untermenü.
- SCHLÄGER: Initiates the battery voltage testen.

Figure 3.1: Main Menu and Professional Functions. This image illustrates the scanner's main menu interface and highlights its key diagnostic capabilities such as Engine Fault Diagnostics, Quick Clear Fault Code, Real-time Data Stream, and Battery Life Test.
3.2 Diagnosefunktionen
From the main menu, select "Diagnosis" to access the primary diagnostic functions.

Figure 3.2: OBD II Diagnostic Test Items. This image shows the comprehensive list of diagnostic tests available on the scanner, from reading and erasing codes to advanced sensor and component tests.
3.2.1 Codes lesen
Diese Funktion ruft Diagnosefehlercodes (DTCs) vom Fahrzeugcomputer ab. Diese Codes weisen auf spezifische Probleme hin, die vom On-Board-Diagnosesystem des Fahrzeugs erkannt wurden.
- Select "Read Codes" from the Diagnosis menu.
- Der Scanner zeigt alle gespeicherten, ausstehenden oder permanenten Fehlercodes an.
- Verwenden Sie die AUF/AB arrows to scroll through the codes.
- For detailed information on a specific code, use the "DTC Lib" function or refer to a reliable automotive repair database.
3.2.2 Codes löschen
This function erases DTCs from the vehicle's computer and turns off the Malfunction Indicator Lamp (MIL), auch bekannt als Motorkontrollleuchte. Hinweis: Das Löschen von Fehlercodes behebt das zugrundeliegende Problem nicht. Die Motorkontrollleuchte leuchtet erneut auf, wenn der Fehler weiterhin besteht.

Figure 3.3: Check and Turn Off Engine Light. This image demonstrates the scanner's ability to diagnose and clear engine fault codes, effectively turning off the Check Engine Light on the vehicle's dashboard.
- Select "Erase Codes" from the Diagnosis menu.
- Bestätigen Sie die Aktion, wenn Sie dazu aufgefordert werden.
- The MIL should turn off.
3.2.3 Real-time Data (Live Data Stream)
View real-time sensor data from the vehicle's engine control unit (ECU). This data can be displayed in text or graphical format, allowing for dynamic monitoring of vehicle performance.
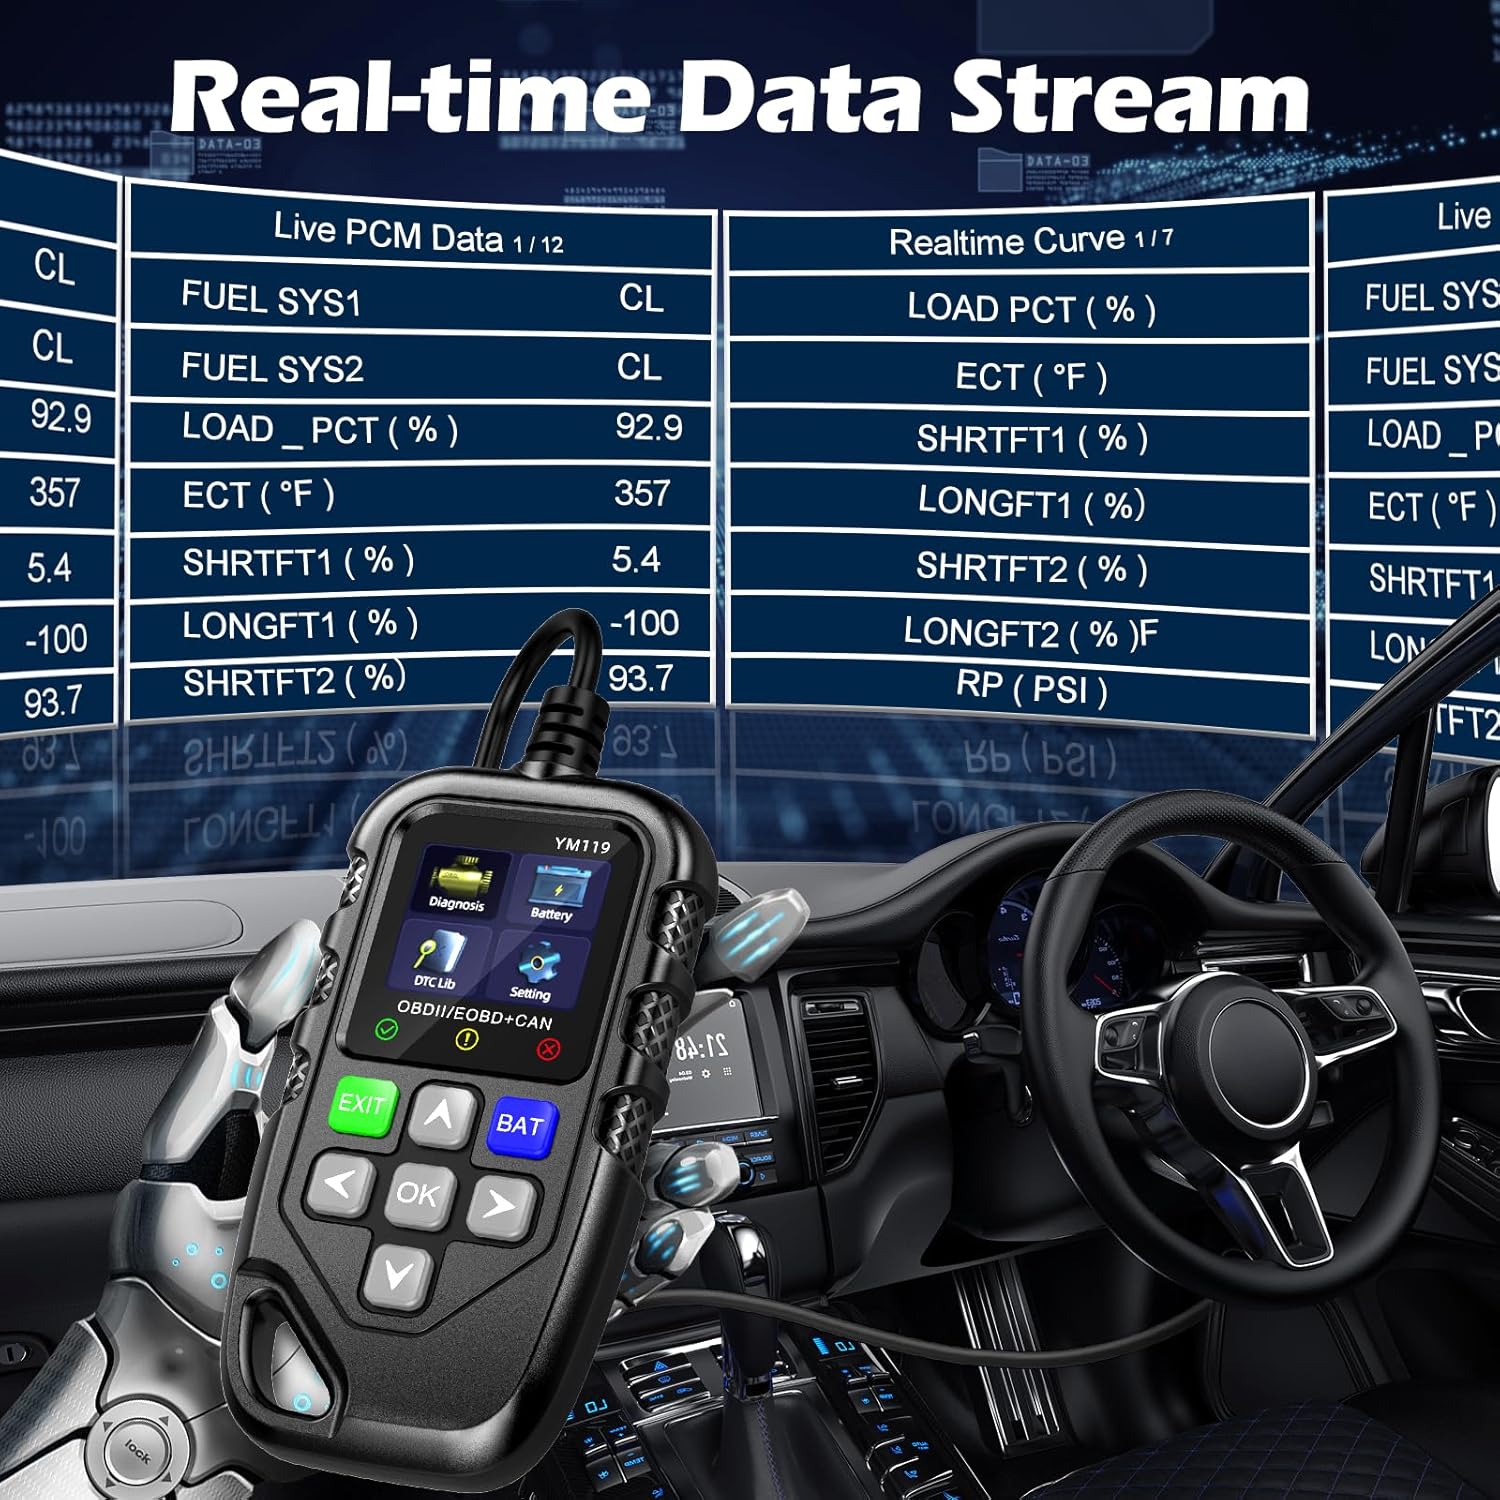
Figure 3.4: Real-time Data Stream. This image shows the scanner's capability to display live engine data, including various sensor readings and their corresponding real-time curves, aiding in dynamic vehicle diagnostics.
- Select "Live Data" or "Realtime Curve" from the Diagnosis menu.
- Verwenden Sie die AUF/AB arrows to scroll through different data parameters.
- Verwenden Sie die LINKS RECHTS arrows to switch between text and graph views (if available for the parameter).
3.2.4 Standbilddaten
When an emission-related fault occurs, the vehicle's computer records a snapshot of operating conditions at the time of the fault. This "freeze frame" data helps in diagnosing intermittent problems.
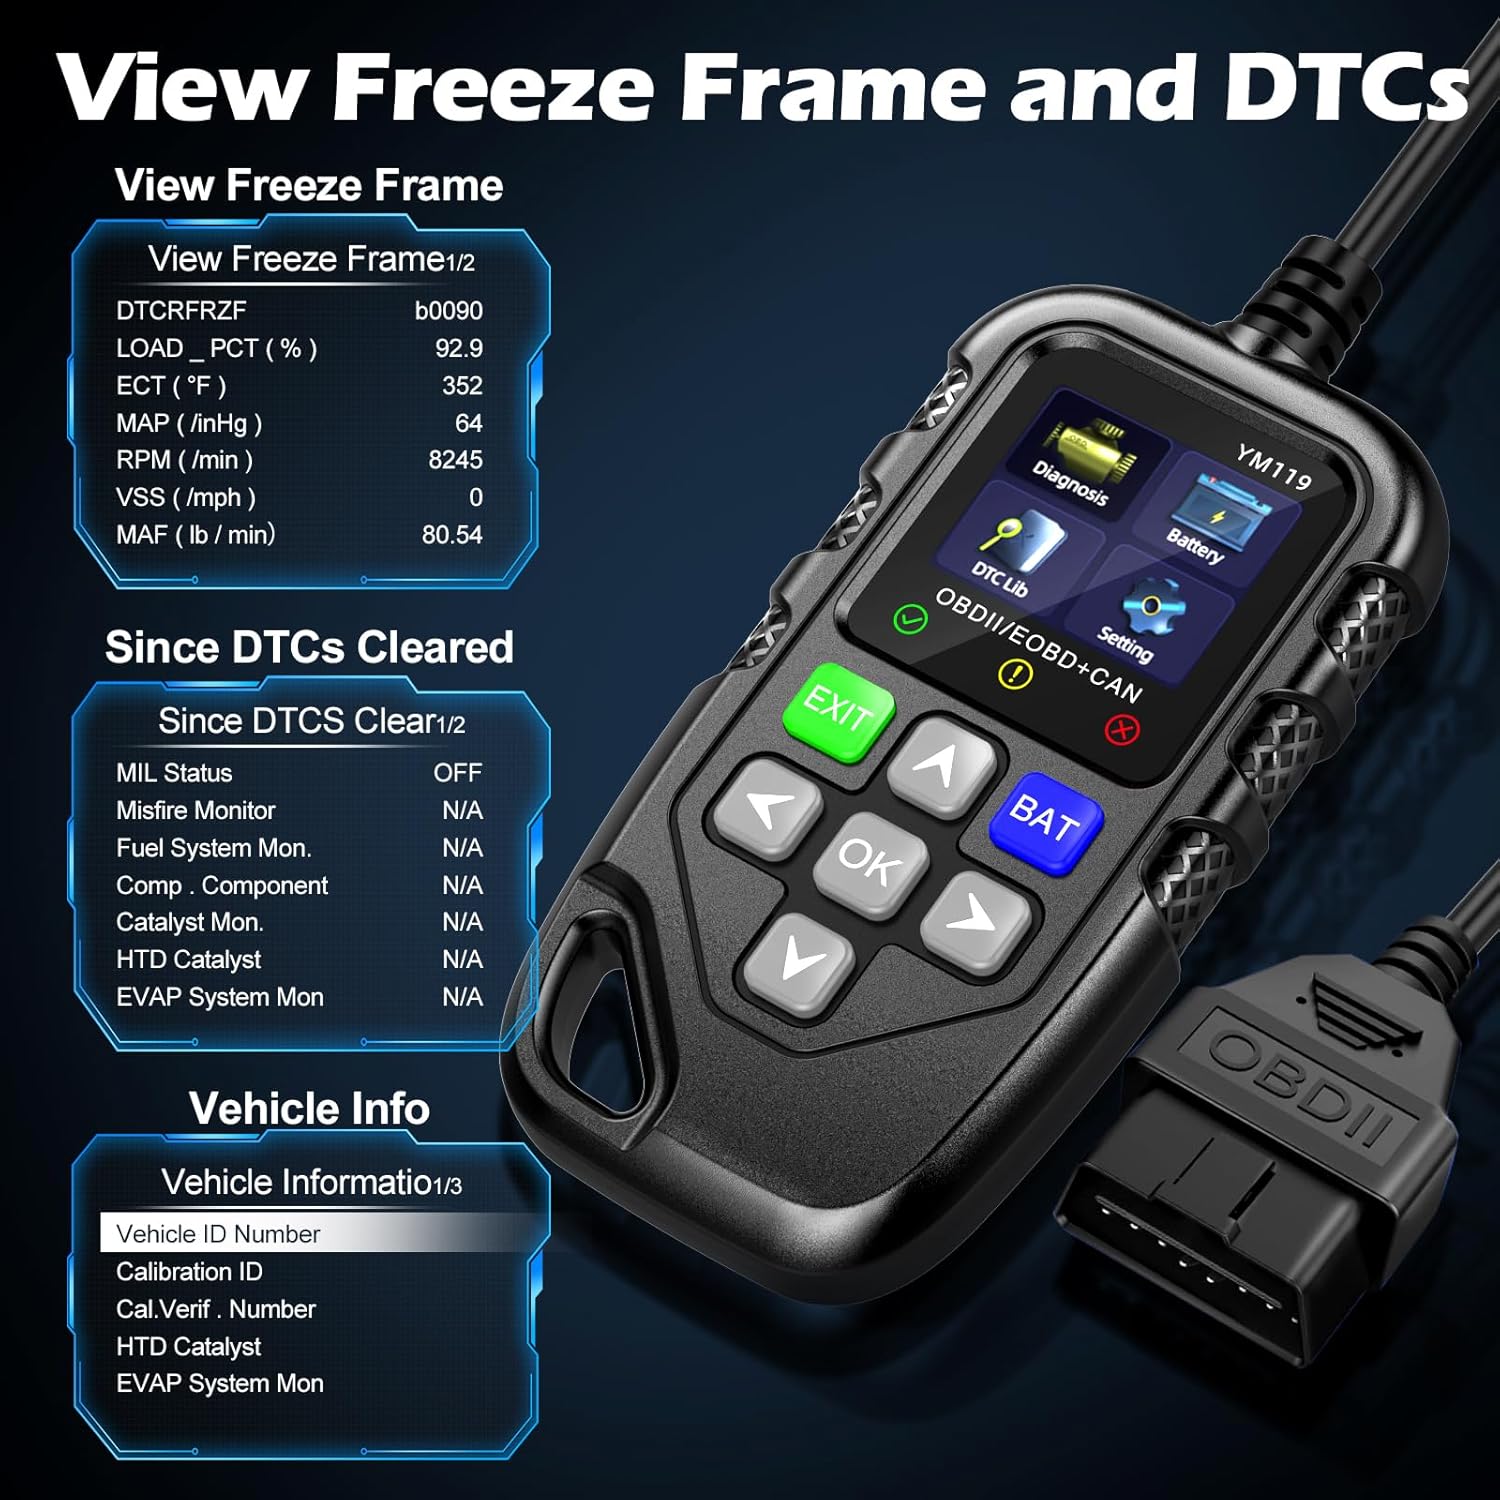
Abbildung 3.5: View Freeze Frame and DTCs. This image displays the scanner's ability to capture and show freeze frame data, which provides a snapshot of engine conditions at the moment a fault code was set, aiding in diagnosis.
- Wählen "View Freeze Frame" from the Diagnosis menu.
- Review the recorded parameters.
3.2.5 DTC Query (DTC Lib)
The built-in DTC Library allows you to look up definitions for generic (P0, P2, P34, B0, C0, U0) and manufacturer-specific (P1, P30-P33, B1, C1, U1) codes.
- From the main menu, select "DTC Lib".
- Enter the DTC code using the arrow keys and OK Taste.
- Der Scanner zeigt die Definition des Codes an.
3.2.6 I/M-Bereitschaft
This function checks the readiness of the emission-related monitoring systems on the vehicle. It's useful for determining if the vehicle is ready for an emissions test.
- Select "I/M Readiness" from the Diagnosis menu.
- The scanner will display the status of various monitors (e.g., Misfire Monitor, Fuel System Monitor). "OK" indicates the monitor has completed its test, "INC" indicates incomplete, and "N/A" indicates not applicable.
3.2.7 Batterie-Voltage-Test
The YM119 can perform a basic battery voltage test to assess the vehicle's battery health.

Figure 3.6: Estimate Battery Life Test. This image shows the scanner's dedicated function for monitoring and assessing the vehicle's battery voltage and overall health.
- From the main menu, select "Battery" or press the SCHLÄGER Taste.
- Der Scanner zeigt den aktuellen Akkustand an.tage.
3.2.8 Fahrzeuginformationen
Diese Funktion ruft die Fahrzeugidentifikationsnummer (VIN), die Kalibrierungs-ID (CALID) und die Kalibrierungsverifizierungsnummer (CVN) des Fahrzeugs ab.
- Select "Vehicle Info" from the Diagnosis menu.
- Der Scanner zeigt die verfügbaren Fahrzeuginformationen an.
4. Wartung
4.1 Gerät reinigen
Um die Leistungsfähigkeit und das Aussehen des Scanners zu erhalten:
- Wischen Sie das Gerät mit einem weichen, damp Tuch.
- Keine Scheuer- oder Lösungsmittel verwenden.
- Stellen Sie sicher, dass das Gerät vor der Lagerung trocken ist.
4.2 Speicherung
Store the scanner in a clean, dry environment away from extreme temperatures and direct sunlight. Keep the OBDII connector free from dust and debris.
5. Fehlerbehebung
| Problem | Mögliche Ursache | Lösung |
|---|---|---|
| Der Scanner lässt sich nicht einschalten. |
|
|
| Fehlermeldung „Verbindungsfehler“ oder „Kommunikationsfehler“. |
|
|
| Engine light reappears after clearing codes. | Underlying fault has not been repaired. | Clearing codes only turns off the light; it does not fix the problem. Diagnose and repair the underlying issue before clearing codes again. |
| Inaccurate or missing data readings. |
|
|
6. Spezifikationen
| Besonderheit | Detail |
|---|---|
| Modellnummer | AE0004L (YM119) |
| Marke | Riokko |
| Bildschirmgröße | 2.8 Zoll |
| Unterstützte Protokolle | Nine standard OBDII/EOBD protocols |
| Unterstützte Sprachen | 13 Landessprachen |
| Artikelgewicht | 7.8 Unzen (ca. 221 Gramm) |
| Verpackungsabmessungen | 8.11 x 5.35 x 1.14 Zoll (ca. 20.6 x 13.6 x 2.9 cm) |
| Erstes verfügbares Datum | 16. Oktober 2024 |
7. Garantie und Support
7.1 Garantieinformationen
The Riokko YM119 OBD2 Scanner comes with a 3 Jahr Garantie ab Kaufdatum. Diese Garantie deckt Material- und Verarbeitungsfehler bei normalem Gebrauch ab.
7.2 Rückgaberecht
A 30-tägiges Rückgaberecht ohne Angabe von Gründen is offered for your purchase. Please refer to your retailer's specific return instructions.
7.3 Kundendienst
For technical assistance, warranty claims, or any other inquiries, please contact Riokko customer service. 24/7 Kundenservice steht Ihnen gerne zur Verfügung.
Please visit the official Riokko webDie aktuellsten Kontaktinformationen finden Sie auf unserer Website oder auf der Verpackung Ihres Produkts.