Einführung
This manual provides detailed instructions for the operation and maintenance of your ASHATA Compact Digital Camera. Please read this manual thoroughly before using the camera to ensure proper function and optimal performance. Keep this manual for future reference.
Produkt überview
Machen Sie sich mit den Komponenten und Bedienelementen der Kamera vertraut.

Abbildung: Vorder- und Rückseite view of the camera with key components labeled.
- Schlüssel öffnen: Schaltet die Kamera ein oder aus.
- Auslösertaste: Press to capture a photo or start/stop video recording.
- Continuous Shooting/T Key/Upper Key: Activates continuous shooting mode, controls zoom (telephoto), and navigates menus upwards.
- Time Lapse/Left Key: Activates time-lapse video mode and navigates menus left.
- Bestätigungsschlüssel: Bestätigt die Menüauswahl.
- Fill Light/Right Key: Activates the built-in LED fill light and navigates menus right.
- Delete/Down Key: Deletes selected photos/videos and navigates menus downwards.
- Menütaste: Öffnet das Einstellungsmenü der Kamera.
- Modusschalter: Wechselt zwischen Foto-, Video- und Wiedergabemodus.
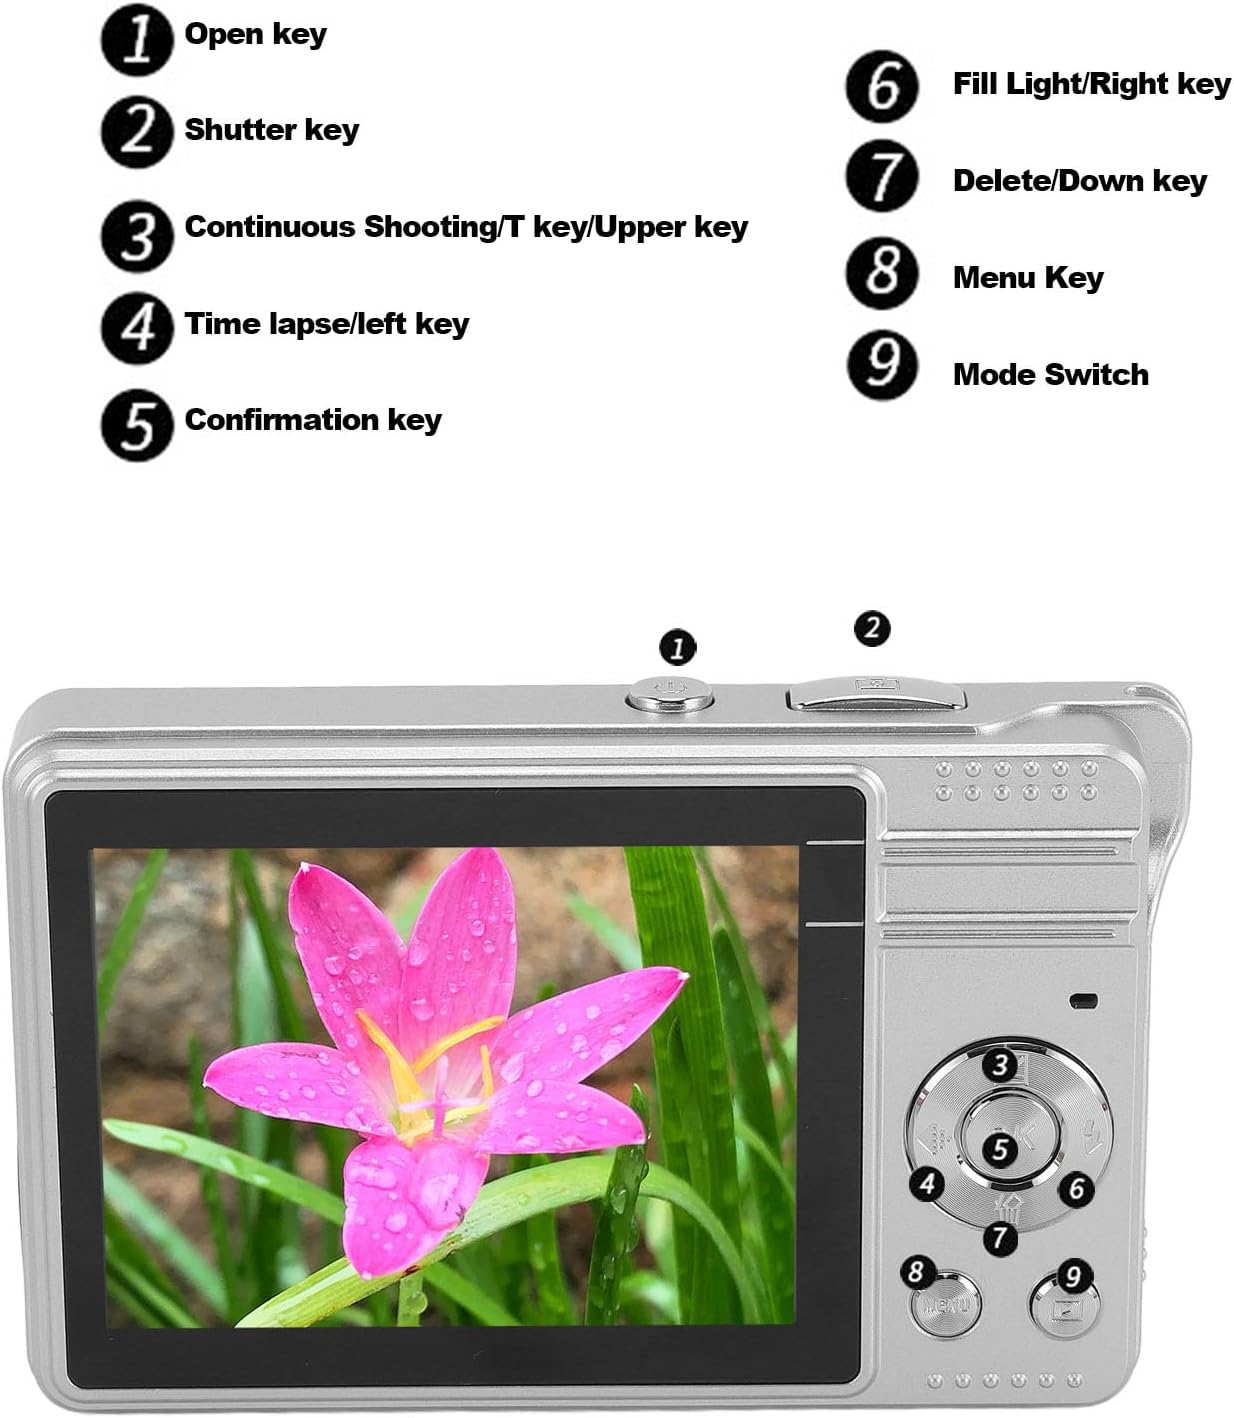
Bild: Vorderseite view of the ASHATA Compact Digital Camera, showing the lens, flash, and microphone.

Abbildung: Seite view of the ASHATA Compact Digital Camera, highlighting the TF card slot and USB port.
Aufstellen
1. Einlegen der Batterie
- Suchen Sie die Abdeckung des Batteriefachs an der Unterseite der Kamera.
- Schieben Sie den Deckelriegel, um das Fach zu öffnen.
- Legen Sie die Batterie entsprechend den Polaritätsmarkierungen (+/-) im Batteriefach ein.
- Schließen Sie den Batteriefachdeckel fest, bis er einrastet.
2. Installation der Speicherkarte
This camera uses a TF (MicroSD) card for storage. A memory card is required to save photos and videos.
- Locate the TF card slot on the side of the camera (refer to the side view Bild).
- Insert the TF card with the metal contacts facing downwards until it clicks into place.
- Zum Entfernen der Karte diese vorsichtig hineindrücken, bis sie herausspringt.
3. Aufladen der Kamera
Connect the camera to a power source using the provided USB cable. The charging indicator light will illuminate during charging and turn off when fully charged.
Bedienungsanleitung
1. Ein-/Ausschalten
Drücken Sie die Open Key (1) to turn the camera on. Press and hold the Open Key erneut, um es auszuschalten.
2. Fotos machen
- Ensure the camera is in photo mode using the Modusschalter (9).
- Frame your shot using the 2.8-inch TFT screen. The camera features autofocus to ensure clarity.
- Drücken Sie die Auslöser (2) halfway down to focus, then press fully to capture the image.
Zoomfunktion
Verwenden Sie die Continuous Shooting/T Key (3) for telephoto zoom (magnifying the subject) and the Time Lapse/Left Key (4) for wide-angle zoom (broadening the view). The camera supports 16x digital zoom.
Flashlight (Fill Light)
Drücken Sie die Fill Light/Right Key (6) to activate or deactivate the built-in LED flashlight for low-light conditions.

Image: Demonstrates the effect of the built-in LED flash, showing a 'Before' image without flash and an 'After' image with flash for improved lighting.
Auto-Timer
Sie können über die folgende Schaltfläche auf das Menü zugreifen: Menütaste (8) to set the auto timer for 2s, 5s, or 10s. This allows for delayed photo capture.
Reihenaufnahmen
Drücken Sie die Continuous Shooting/T Key (3) to activate continuous shooting mode, capturing multiple photos in quick succession.
Advanced Photo Settings
Über die Menütaste (8), you can adjust settings such as exposure compensation, white balance, ISO sensitivity, and anti-shake for various shooting conditions.
3. Videos aufnehmen
- Schalten Sie den Modusschalter (9) to video mode.
- Drücken Sie die Auslöser (2) to start recording. A recording indicator will appear on the screen.
- Drücken Sie die Auslöser (2) erneut, um die Aufnahme zu beenden.
Time-Lapse and Slow Motion
These functions can be accessed through the camera's menu (Menütaste 8) in video mode. Refer to the on-screen prompts for specific settings.
4. Wiedergabe
- Schalten Sie den Modusschalter (9) to playback mode.
- Use the navigation keys (3, 4, 6, 7) to browse through your photos and videos.
- Drücken Sie die Quittiertaste (5) bis view ein ausgewähltes Element.
- To delete an item, select it and press the Delete/Down Key (7), then confirm your choice.
5. Menünavigation und Einstellungen
Drücken Sie die Menütaste (8) to enter the camera's settings menu. Use the navigation keys (3, 4, 6, 7) to scroll through options and the Quittiertaste (5) to select. Press the Menütaste (8) again to exit the menu.
Filtereffekte
The camera offers various filter effects to enhance your photos. These can be applied through the menu settings.

Image: A grid displaying a single image with various color filters applied, demonstrating the camera's filter effects feature.
Wartung
1. Reinigung der Kamera
- Verwenden Sie ein weiches, fusselfreies Tuch, um das Kameragehäuse zu reinigen.
- For the lens and screen, use a specialized lens cleaning cloth and solution. Avoid harsh chemicals.
- Do not spray cleaning solution directly onto the camera.
2. Speicherung
- Bewahren Sie die Kamera an einem kühlen, trockenen Ort fern von direkter Sonneneinstrahlung und extremen Temperaturen auf.
- Bei längerer Lagerung sollte die Batterie entfernt werden, um ein Auslaufen zu verhindern.
- Use the provided pouch to protect the camera from dust and scratches.
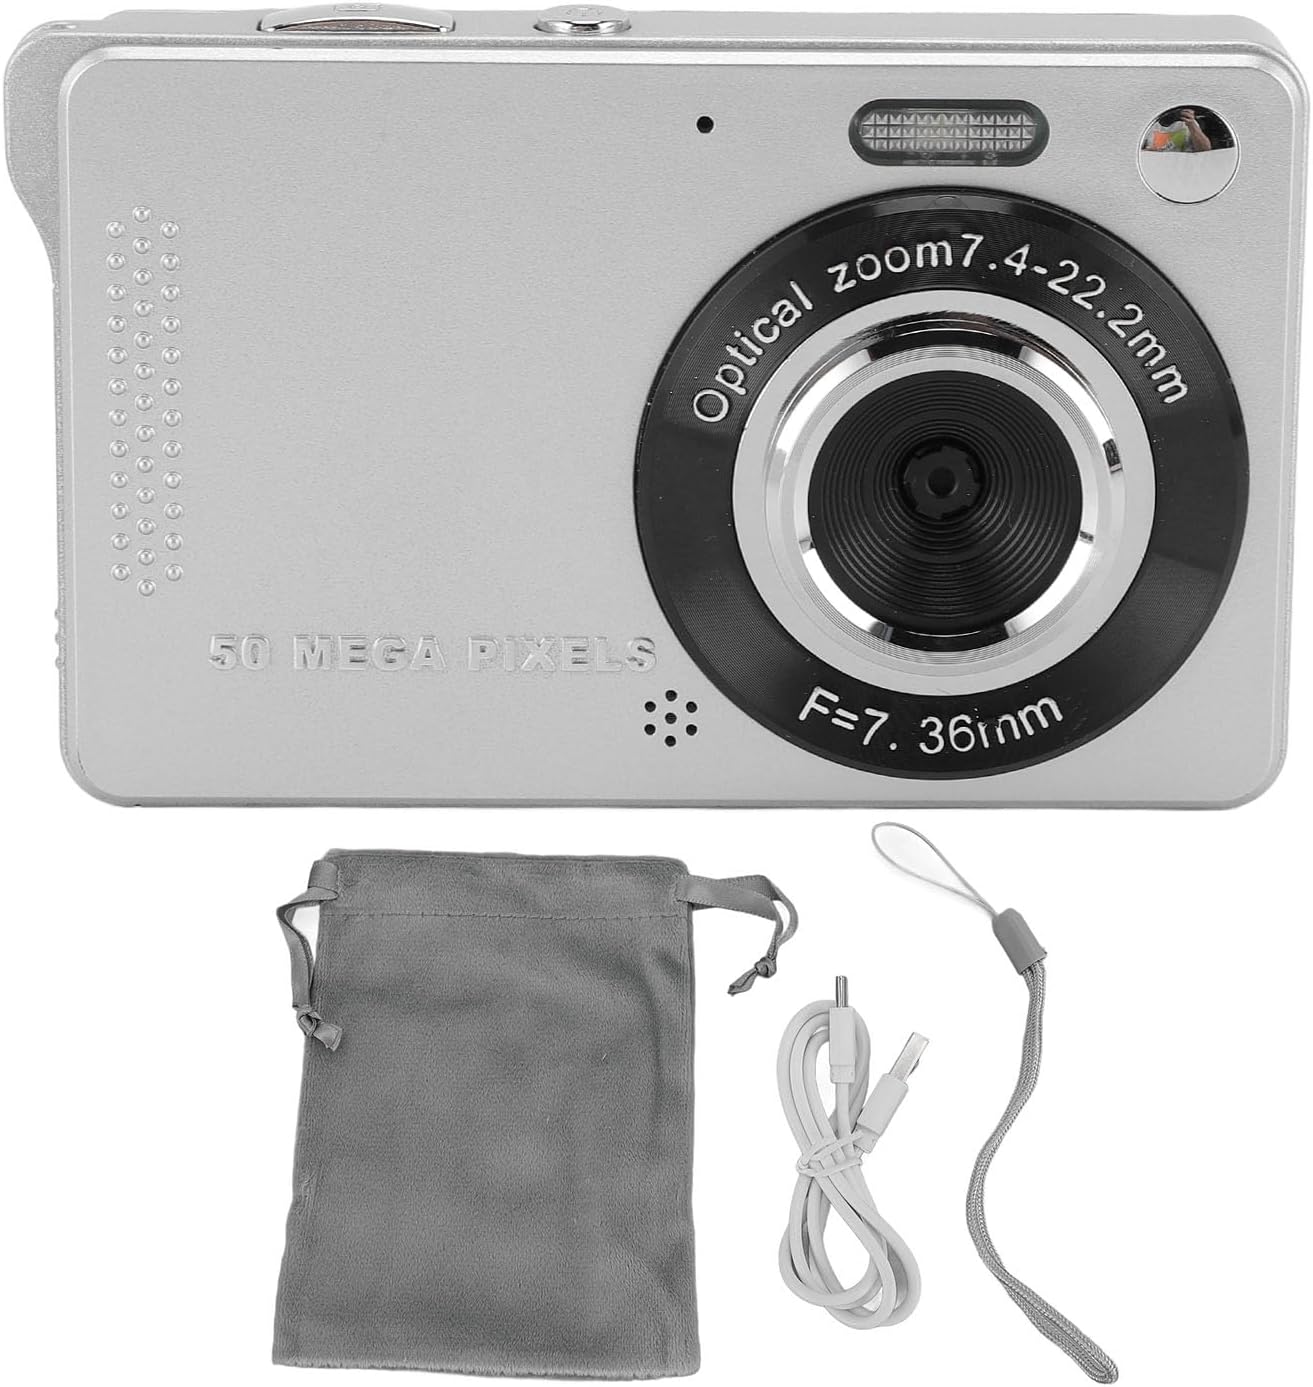
Image: The ASHATA Compact Digital Camera displayed alongside its accessories, including a protective pouch, USB cable, and wrist strap.
3. Batteriepflege
- Laden Sie den Akku vor dem ersten Gebrauch vollständig auf.
- Um die Lebensdauer des Akkus zu verlängern, sollte dieser nicht regelmäßig vollständig entladen werden.
- Setzen Sie den Akku keinen hohen Temperaturen aus.
Fehlerbehebung
| Problem | Mögliche Ursache | Lösung |
|---|---|---|
| Die Kamera lässt sich nicht einschalten. | Die Batterie ist schwach oder nicht richtig eingesetzt. | Laden Sie den Akku auf oder setzen Sie ihn wieder richtig ein. |
| Es dürfen keine Fotos/Videos aufgenommen werden. | Die Speicherkarte ist voll, nicht eingelegt oder beschädigt. | Insert a TF card, delete unnecessary files oder formatieren Sie die Karte (dadurch werden alle Daten gelöscht). |
| Bilder sind verschwommen. | Die Linse ist verschmutzt, das Licht reicht nicht aus oder die Kamera ist verwackelt. | Clean the lens, use the flash, or enable anti-shake in settings. |
| Flash funktioniert nicht. | Flash is turned off or battery is low. | Drücken Sie die Fill Light/Right Key (6) to activate, or charge the battery. |
Technische Daten
- Modell: ASHATA3os5gpbrk9-12
- Effektive Standbildauflösung: 50 Megapixel
- Videoauflösung: 1080P
- Bildschirmgröße: 2.8 Zoll TFT
- Digitalzoom: 16x
- Autofokus: Ja
- Blitz: Eingebaute LED-Taschenlampe
- Speichermedien: TF-Karte (MicroSD)
- Besondere Merkmale: Playback, Fill Light, Time Lapse Video, Slow Motion, Continuous Shooting, Auto Timer (2s, 5s, 10s), Exposure Compensation, White Balance, ISO, Anti-shake.
Garantie und Support
For warranty information and technical support, please refer to the documentation included with your purchase or contact ASHATA customer service through their official channels. Keep your proof of purchase for warranty claims.