1. Einleitung
This manual provides detailed instructions for the safe and efficient operation, maintenance, and troubleshooting of your Deepwave 6L Cool and Warm Mist Humidifier. Please read this manual thoroughly before use and retain it for future reference.
Hauptmerkmale:
- Große Kapazität: 6-liter water tank for extended operation.
- Breite Abdeckung: Suitable for rooms up to 500 square feet.
- Dual Mist Options: Produces both cool and warm mist.
- Intelligente Feuchtigkeitsregulierung: Maintains pre-set humidity levels and displays real-time humidity.
- Einstellbare Nebelstärke: Three distinct mist output settings.
- Integrierter Timer: Allows for scheduled humidification.
- Aromatherapie-Funktion: Built-in tray for essential oils.
- Schlafmodus: Operates quietly with display off for undisturbed rest.
- Top-Fill-Design: Bequemes und einfaches Nachfüllen von Wasser.
- Automatische Abschaltung: Automatically powers off when water level is low for safety.
2. Wichtige Sicherheitshinweise
LESEN SIE VOR DEM GEBRAUCH ALLE ANWEISUNGEN.
- Stellen Sie den Luftbefeuchter immer auf eine feste, ebene und wasserdichte Oberfläche, mindestens 30 cm von Wänden und Elektrogeräten entfernt.
- Stellen Sie den Luftbefeuchter nicht direkt auf Teppichböden, Holzböden oder Oberflächen, die durch Wasser oder Feuchtigkeit beschädigt werden könnten.
- Ziehen Sie vor dem Befüllen, Reinigen oder Umstellen des Luftbefeuchters den Netzstecker.
- Tauchen Sie die Basiseinheit nicht in Wasser oder andere Flüssigkeiten.
- Bewahren Sie den Luftbefeuchter außerhalb der Reichweite von Kindern und Haustieren auf.
- Use only clean, cool tap water. Do not add essential oils directly into the water tank; use the designated aromatherapy tray.
- Blockieren Sie nicht den Nebelauslass.
- Sollte der Luftbefeuchter einen ungewöhnlichen Geruch oder ein ungewöhnliches Geräusch von sich geben, schalten Sie ihn sofort aus und ziehen Sie den Stecker.
- The appliance has an automatic shut-off feature when the water tank is empty.
3. Packungsinhalt
Bitte überprüfen Sie beim Auspacken, ob alle Artikel vorhanden und in gutem Zustand sind:
- Deepwave 6L Humidifier Unit (Base and Water Tank)
- Bedienungsanleitung
4. Produktkomponenten
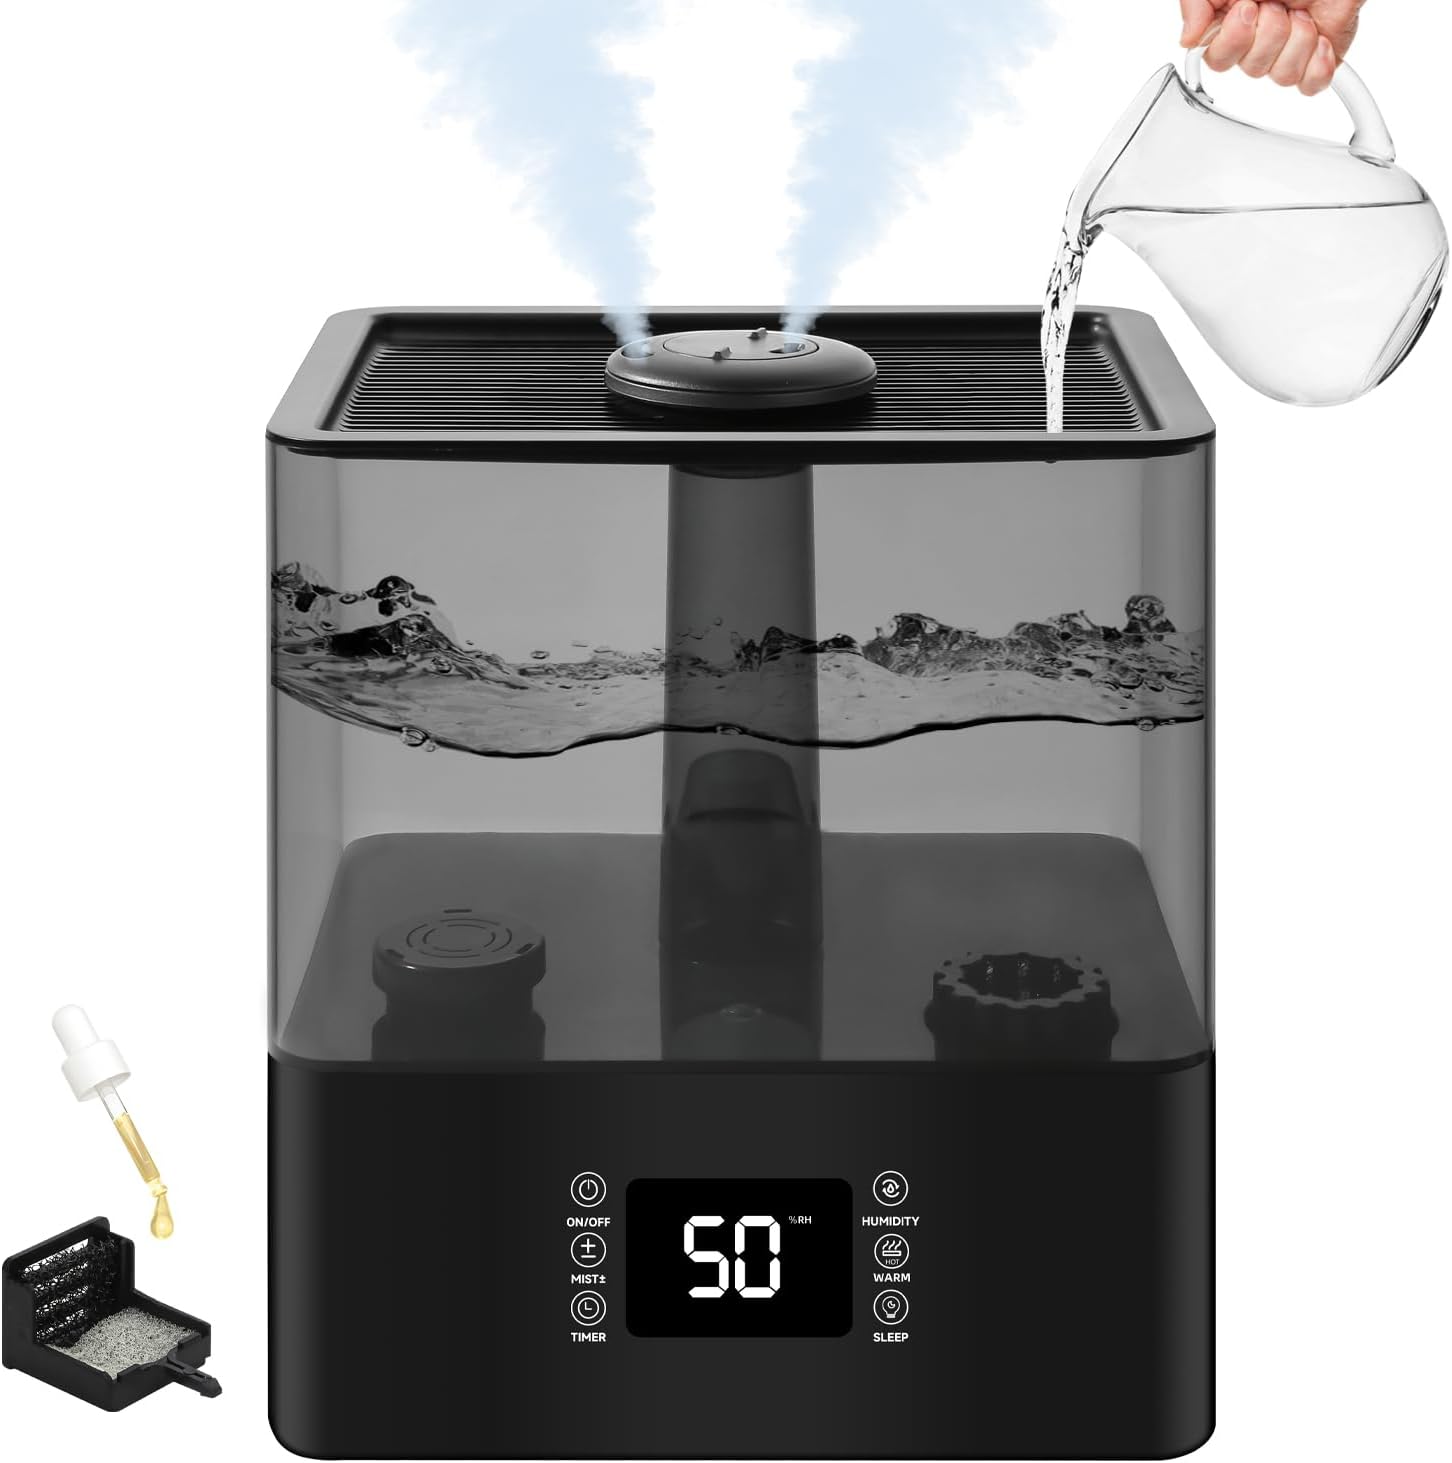
Abbildung 4.1: Gesamt view of the Deepwave 6L Humidifier, showing the top-fill design and essential oil tray.
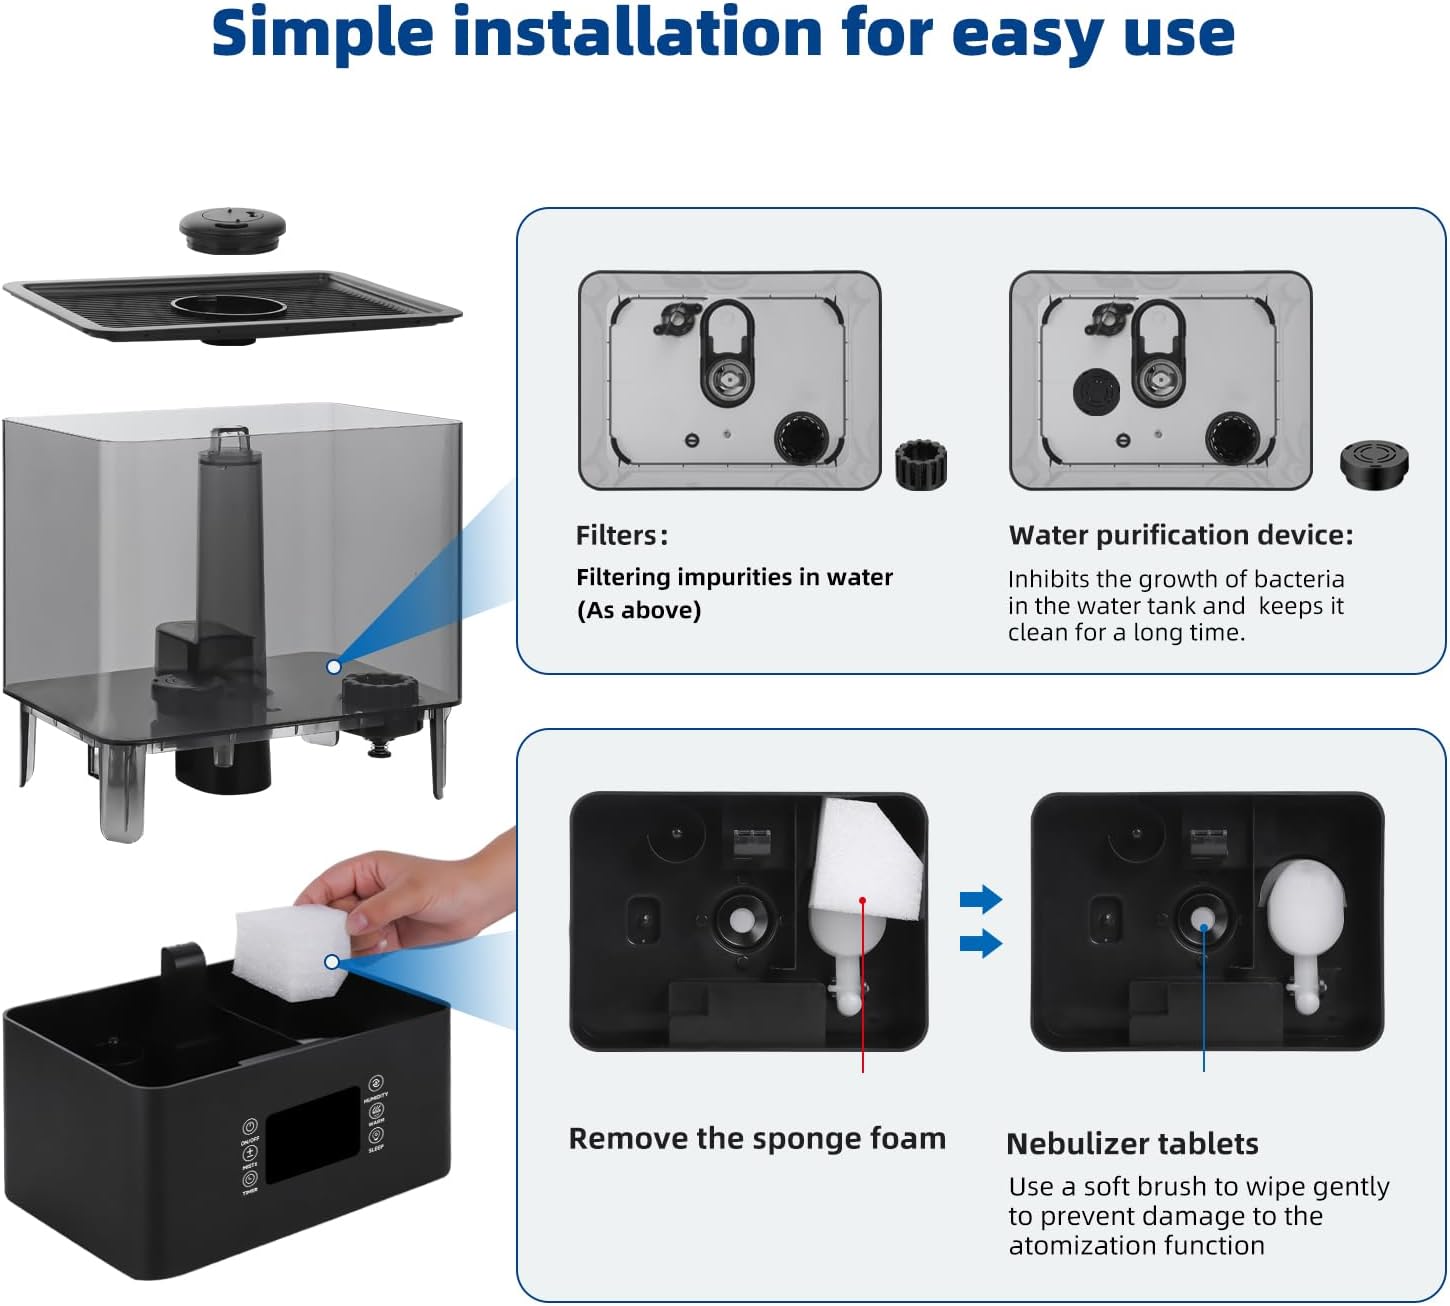
Abbildung 4.2: Explodierte view of humidifier components, illustrating the water tank, base, filters, water purification device, sponge foam, and nebulizer tablets.
Komponentenbeschreibungen:
- Wassertank: The transparent reservoir for holding up to 6 liters of water.
- Grundeinheit: Contains the electronic controls, ultrasonic atomizer, and fan.
- Nebeldüse: Rotatable 360° nozzle for directing mist output.
- Bedienfeld: Touch-sensitive display for operating functions (Power, Mist Level, Timer, Humidity, Warm Mist, Sleep Mode).
- Aromatherapie-Tablett: A small compartment for adding essential oils.
- Filter: Internal filters designed to remove impurities from the water.
- Water Purification Device: Inhibits bacterial growth in the water tank.
- Sponge Foam: Located in the base, used for cleaning and maintenance.
- Nebulizer Tablets: The ultrasonic components responsible for mist generation.
5. Einrichtung
5.1 Erstplatzierung
- Stellen Sie den Luftbefeuchter auf eine ebene, stabile und wasserdichte Oberfläche.
- Ensure there is at least 12 inches (30 cm) of space around the humidifier for proper mist dispersion.
- Keep the unit away from direct sunlight, heat sources, and air vents.
5.2 Füllen des Wassertanks
Abbildung 5.1: Water can be poured directly into the top opening of the humidifier.
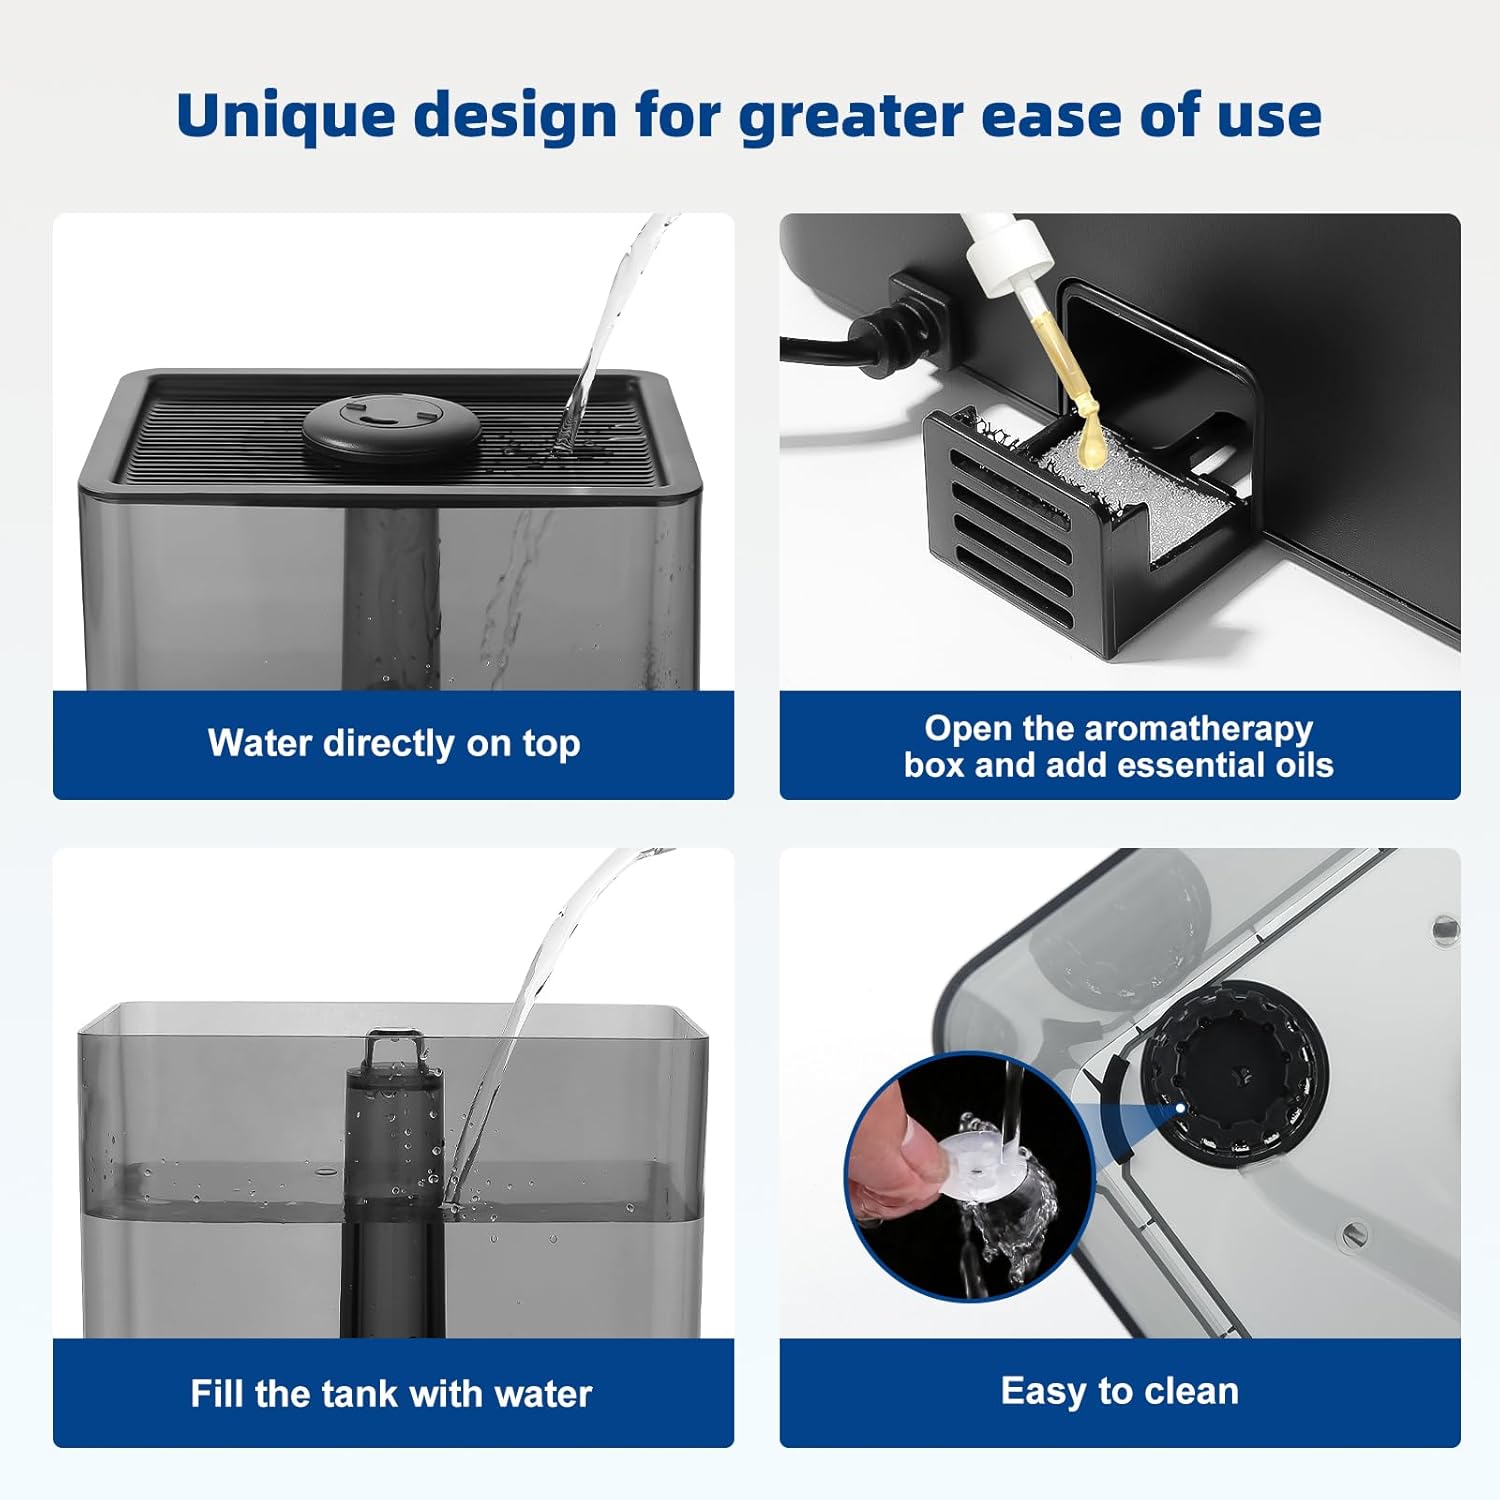
Abbildung 5.2: Detaillierte view of the top-fill process, showing water entering the tank.
- Stellen Sie sicher, dass der Luftbefeuchter vom Stromnetz getrennt ist.
- Nehmen Sie die obere Abdeckung des Luftbefeuchters ab.
- Pour clean, cool tap water directly into the water tank through the top opening. Do not exceed the maximum fill line.
- Bringen Sie die obere Abdeckung wieder fest an.
- Stecken Sie das Netzkabel in eine geeignete Steckdose.
6. Bedienungsanleitung
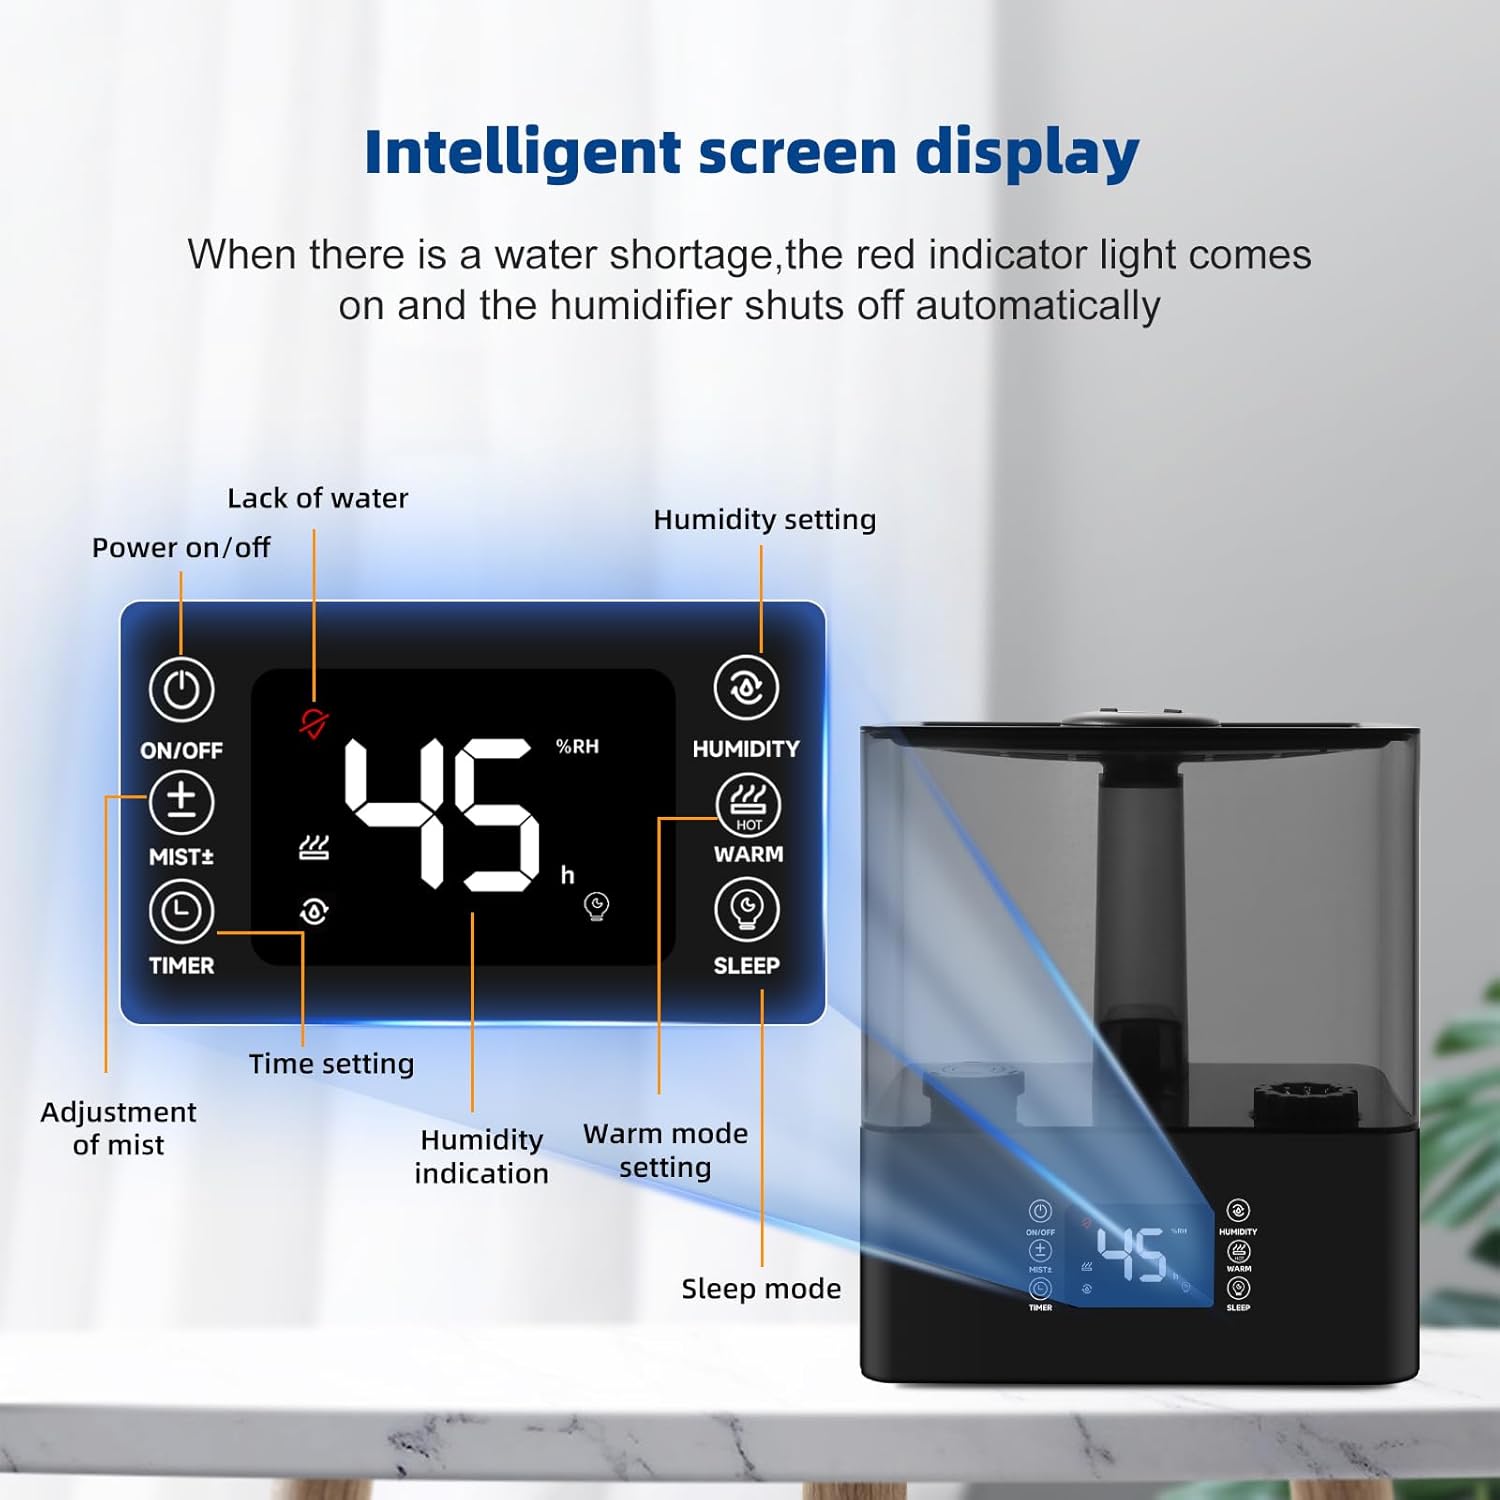
Abbildung 6.1: Intelligent screen display and control panel layout.
6.1 Ein-/Ausschalten
- Drücken Sie die Ein-/Ausschalten button (⑂) to turn the humidifier on or off.
- The display will illuminate when the unit is on.
6.2 Nebelstufeneinstellung
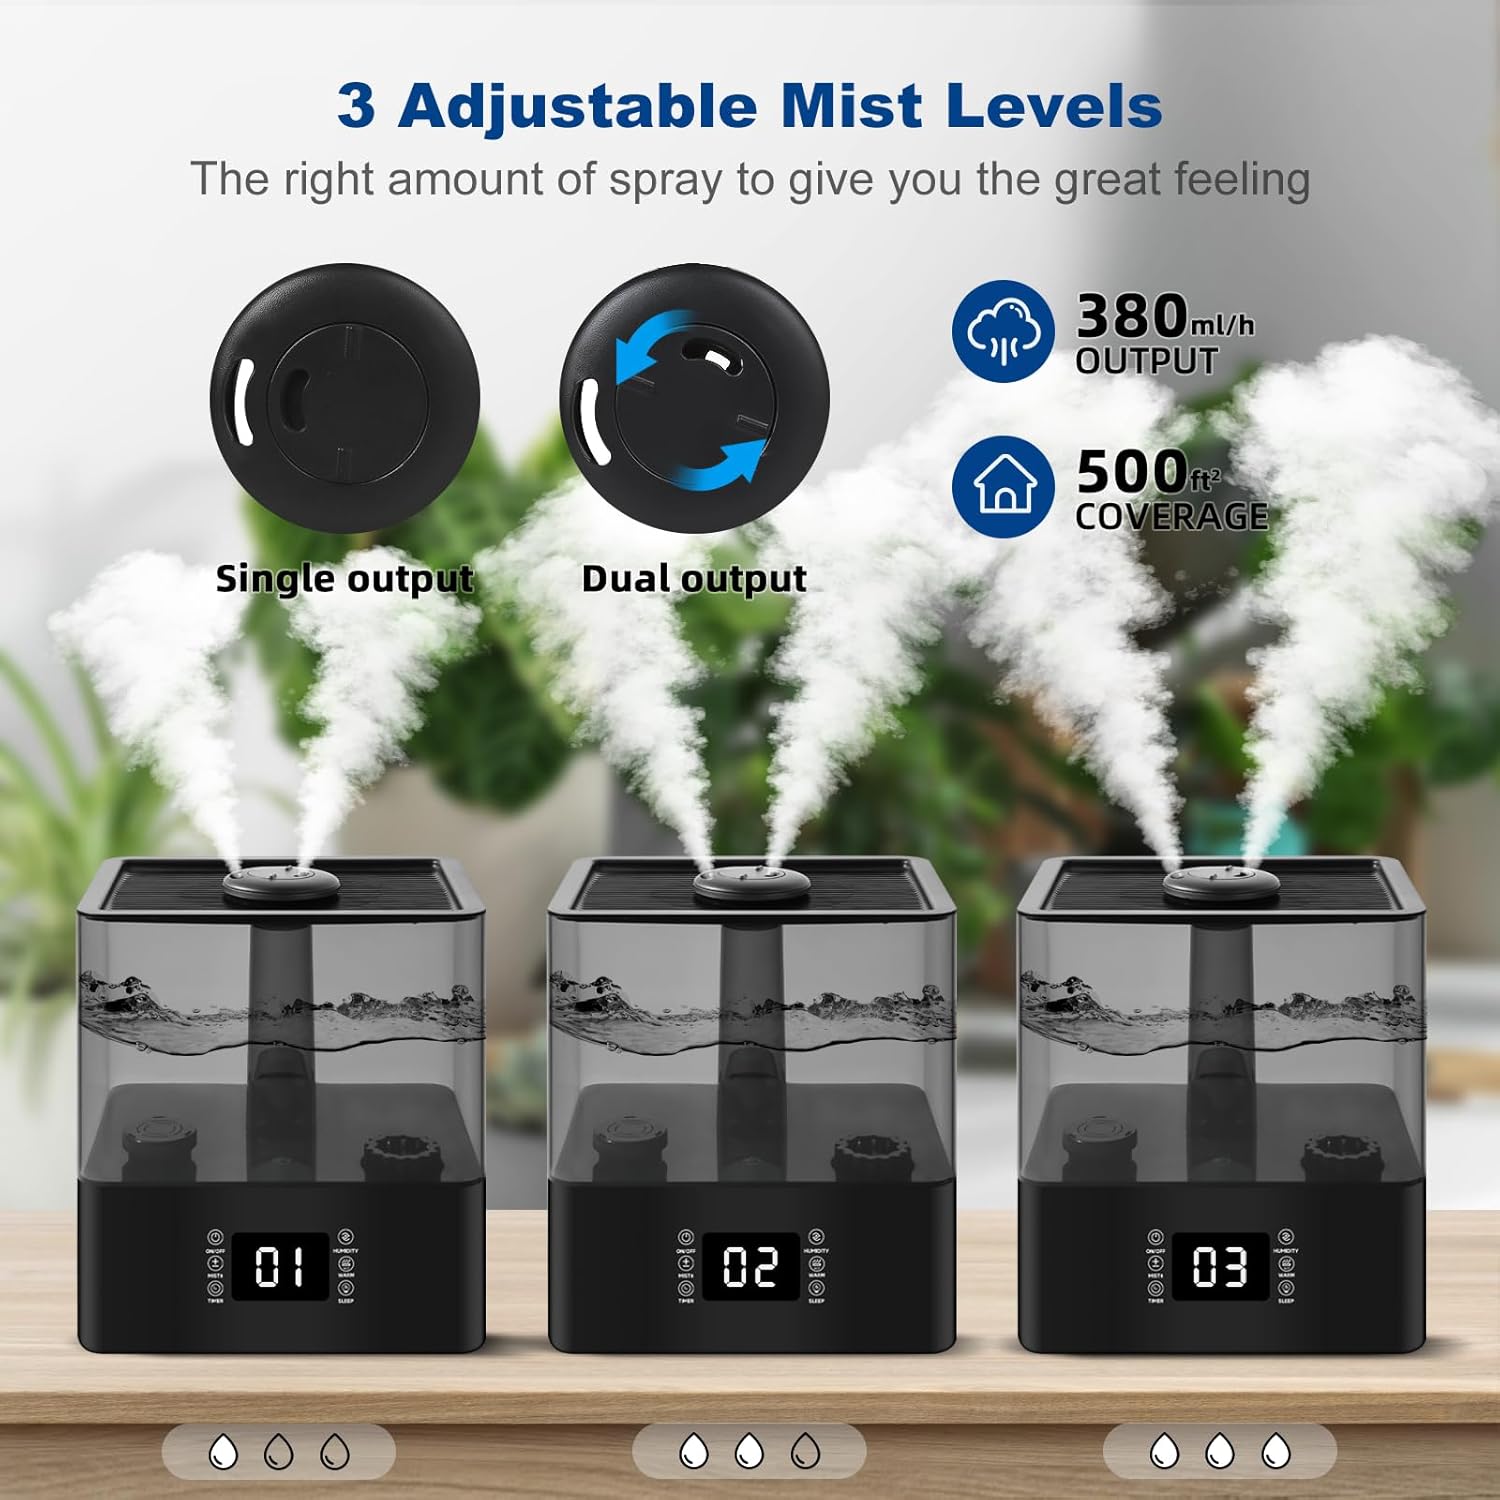
Abbildung 6.2: Illustration of the three adjustable mist levels, from single output to maximum output.
- Drücken Sie die Mist +/- button to cycle through three mist output levels (1, 2, 3).
- Level 1 is the lowest output, and Level 3 is the highest.
- The screen will display the current mist level.
6.3 Luftfeuchtigkeitseinstellung
- Drücken Sie die Luftfeuchtigkeit Knopf zum Einstellen des gewünschten Feuchtigkeitsgrades.
- Der Luftbefeuchter passt seine Nebelmenge automatisch an, um die eingestellte Luftfeuchtigkeit aufrechtzuerhalten.
- The display shows the real-time humidity level.
6.4 Timer-Funktion
- Drücken Sie die Timer button to set an operating duration.
- The timer can be set for specific hours, after which the humidifier will automatically turn off.
6.5 Warmnebelfunktion
- Drücken Sie die Warm button to activate the warm mist function.
- Press it again to turn off warm mist.
6.6 Schlafmodus
- Drücken Sie die Schlafen Taste, um in den Ruhemodus zu wechseln.
- In sleep mode, the display lights will turn off, and the humidifier will operate at a low noise level for undisturbed sleep.
- Drücken Sie eine beliebige Taste, um den Ruhemodus zu beenden.
6.7 Aromatherapie
- Locate the aromatherapy tray, typically a small drawer or compartment on the side or back of the base unit.
- Geben Sie ein paar Tropfen Ihres bevorzugten ätherischen Öls auf das Aromakissen im Inneren der Schale.
- Close the tray. The mist will diffuse the aroma into the air.
- Geben Sie keine ätherischen Öle direkt in den Wassertank.
7. Wartung
Regelmäßige Reinigung ist für optimale Leistung und Hygiene unerlässlich.
7.1 Tägliche Wartung
- Trennen Sie den Luftbefeuchter vor der Reinigung vom Stromnetz.
- Leeren Sie den Tank und den Sockel vollständig.
- Tank und Sockel mit einem sauberen Tuch trockenwischen.
7.2 Wöchentliche Reinigung
Abbildung 7.1: Illustration of the modular design, facilitating easy removal of components for cleaning.
- Ziehen Sie den Stecker des Luftbefeuchters.
- Nehmen Sie den Wassertank heraus und leeren Sie ihn.
- Reinigung des Wassertanks: Rinse the tank with clean water. For thorough cleaning, use a soft brush or cloth with a mild detergent. Rinse thoroughly to remove all soap residue.
- Reinigung der Basiseinheit: Gently wipe the inside of the base with a soft cloth. Use a soft brush to wipe the nebulizer tablets gently to prevent damage to the atomization function. Do not use abrasive cleaners.
- Cleaning Filters and Water Purification Device: Refer to Figure 4.2. Remove the filters and water purification device. Rinse them under running water. For stubborn mineral deposits, soak them in a 1:1 solution of white vinegar and water for 30 minutes, then rinse thoroughly.
- Cleaning Sponge Foam: Remove the sponge foam from its compartment. Rinse it under water and gently squeeze to clean.
- Lassen Sie alle Teile vollständig an der Luft trocknen, bevor Sie sie wieder zusammenbauen.
7.3 Speicherung
- Vor der Einlagerung muss sichergestellt werden, dass der Luftbefeuchter vollständig sauber und trocken ist.
- Lagern Sie das Gerät an einem kühlen, trockenen Ort und schützen Sie es vor direkter Sonneneinstrahlung.
8. Fehlerbehebung
Sollten Sie auf Probleme stoßen, beachten Sie bitte die folgenden häufigen Probleme und Lösungen:
| Problem | Mögliche Ursache | Lösung |
|---|---|---|
| Kein oder nur geringer Nebelausstoß |
|
|
| Rote Kontrollleuchte leuchtet | Wassermangel | Refill the water tank. The humidifier will automatically resume operation. |
| Ungewöhnliche Geräusche |
|
|
| Wasserleck |
|
|
| Geruch von Nebel |
|
|
9. Spezifikationen
| Besonderheit | Detail |
|---|---|
| Marke | Deepwave |
| Modellnummer | BK-888-1 |
| Kapazität | 6 Liter |
| Abdeckungsbereich | Bis zu 500 Quadratmeter |
| Nebeltyp | Kühler und warmer Nebel |
| Besondere Merkmale | Aroma Diffuser, Auto Shut Off, Smart Humidity Control, Timer, Sleep Mode |
| Betriebsmodus | Automatisch |
| Kontrollmethode | Berühren |
| Technische Daten | 9"T x 11"B x 7"H |
| Artikelgewicht | 4.16 Pfund |
| Farbe | Schwarz |
10. Garantie und Kundendienst
Deepwave is committed to providing quality products. If you experience any issues with your humidifier, please contact our customer support team for assistance.
For defective products or any questions regarding operation, maintenance, or troubleshooting not covered in this manual, please reach out to our support channels. Specific warranty details may vary; please refer to your purchase documentation or contact customer service for more information.