ATOMSTACK A6 Pro
ATOMSTACK A6 Pro Lasergravurmaschine Benutzerhandbuch
Modell: A6 Pro | Marke: ATOMSTACK
1. Einleitung
The ATOMSTACK A6 Pro is a high-performance laser engraving and cutting machine designed for precision and ease of use.Featuring a 6W ultra-high performance laser module and advanced blue-ray laser point compression technology,it offers exceptional cutting ability and fine engraving detail. Its integrated design ensures quick setup,making it suitable for various creative and professional applications.

Abbildung 1.1: The ATOMSTACK A6 Pro Laser Engraving Machine, showcasing dank seines kompakten und integrierten Designs.
2. Sicherheitshinweise und Warnungen
WARNUNG: Laser engraving machines emit powerful laser radiation. Improper use can cause serious injury, including eye damage and skin burns.Always adhere to the following safety guidelines:
- Augenschutz: Always wear appropriate laser safety goggles when operating the machine. Never look directly into the laser beam or its reflection.
- Belüftung: Operate the machine in a well-ventilated area to dissipate fumes and smoke produced during engraving and cutting. Consider an exhaust system.
- Brandgefahr: Laser processing can ignite flammable materials. Do not leave the machine unattended during operation. Keep a fire extinguisher nearby.
- Materialverträglichkeit: Only engrave or cut materials specified as safe for laser processing. Avoid materials that produce toxic fumes or can easily ignite.
- Kinder und Haustiere: Halten Sie Kinder und Haustiere während des Betriebs von der Maschine fern.
- Stromversorgung: Use only the specified power adapter (AC 24V 5A) for the machine.
- Not-Halt: Machen Sie sich mit dem Standort und der Bedienung des Not-Aus-Knopfes vertraut.

Abbildung 2.1: Product information label including critical safety warnings regarding direct or scattered radiation.
3. Einrichtung und Installation
The ATOMSTACK A6 Pro is designed for minimal setup, allowing you to start working quickly.
3.1 Auspacken
- Carefully remove the machine and all components from the packaging.
- Verify that all parts are present according to the packing list (refer to your product's specific packing list).

Abbildung 3.1: The ATOMSTACK A6 Pro is designed for immediate use upon unboxing, requiring no complex assembly.
3.2 Initial Placement and Connection
- Place the machine on a stable, level, and non-flammable surface. Ensure adequate space around the machine for ventilation and operation.
- Schließen Sie den Netzadapter an das Gerät und anschließend an eine geeignete Steckdose an.
- Ensure the laser module is securely seated and the tank chain bundling for cables is properly aligned to prevent tangling.

Abbildung 3.2: The tank chain bundling system ensures smooth and tangle-free cable operation, enhancing machine longevity.
4. Bedienungsanleitung
The ATOMSTACK A6 Pro offers versatile engraving and cutting capabilities.
4.1 Softwareinstallation und -verbindung
The ATOMSTACK A6 Pro is compatible with Atomstack's self-developed PC software and supports various control methods.
- Download and install the latest version of Atomstack's PC software from the official website or use the provided mobile application.
- Connect the machine to your computer via USB or Wi-Fi (if supported by your model). For mobile app control, connect your device to the machine's hotspot.
- Ensure the software recognizes the machine before proceeding.
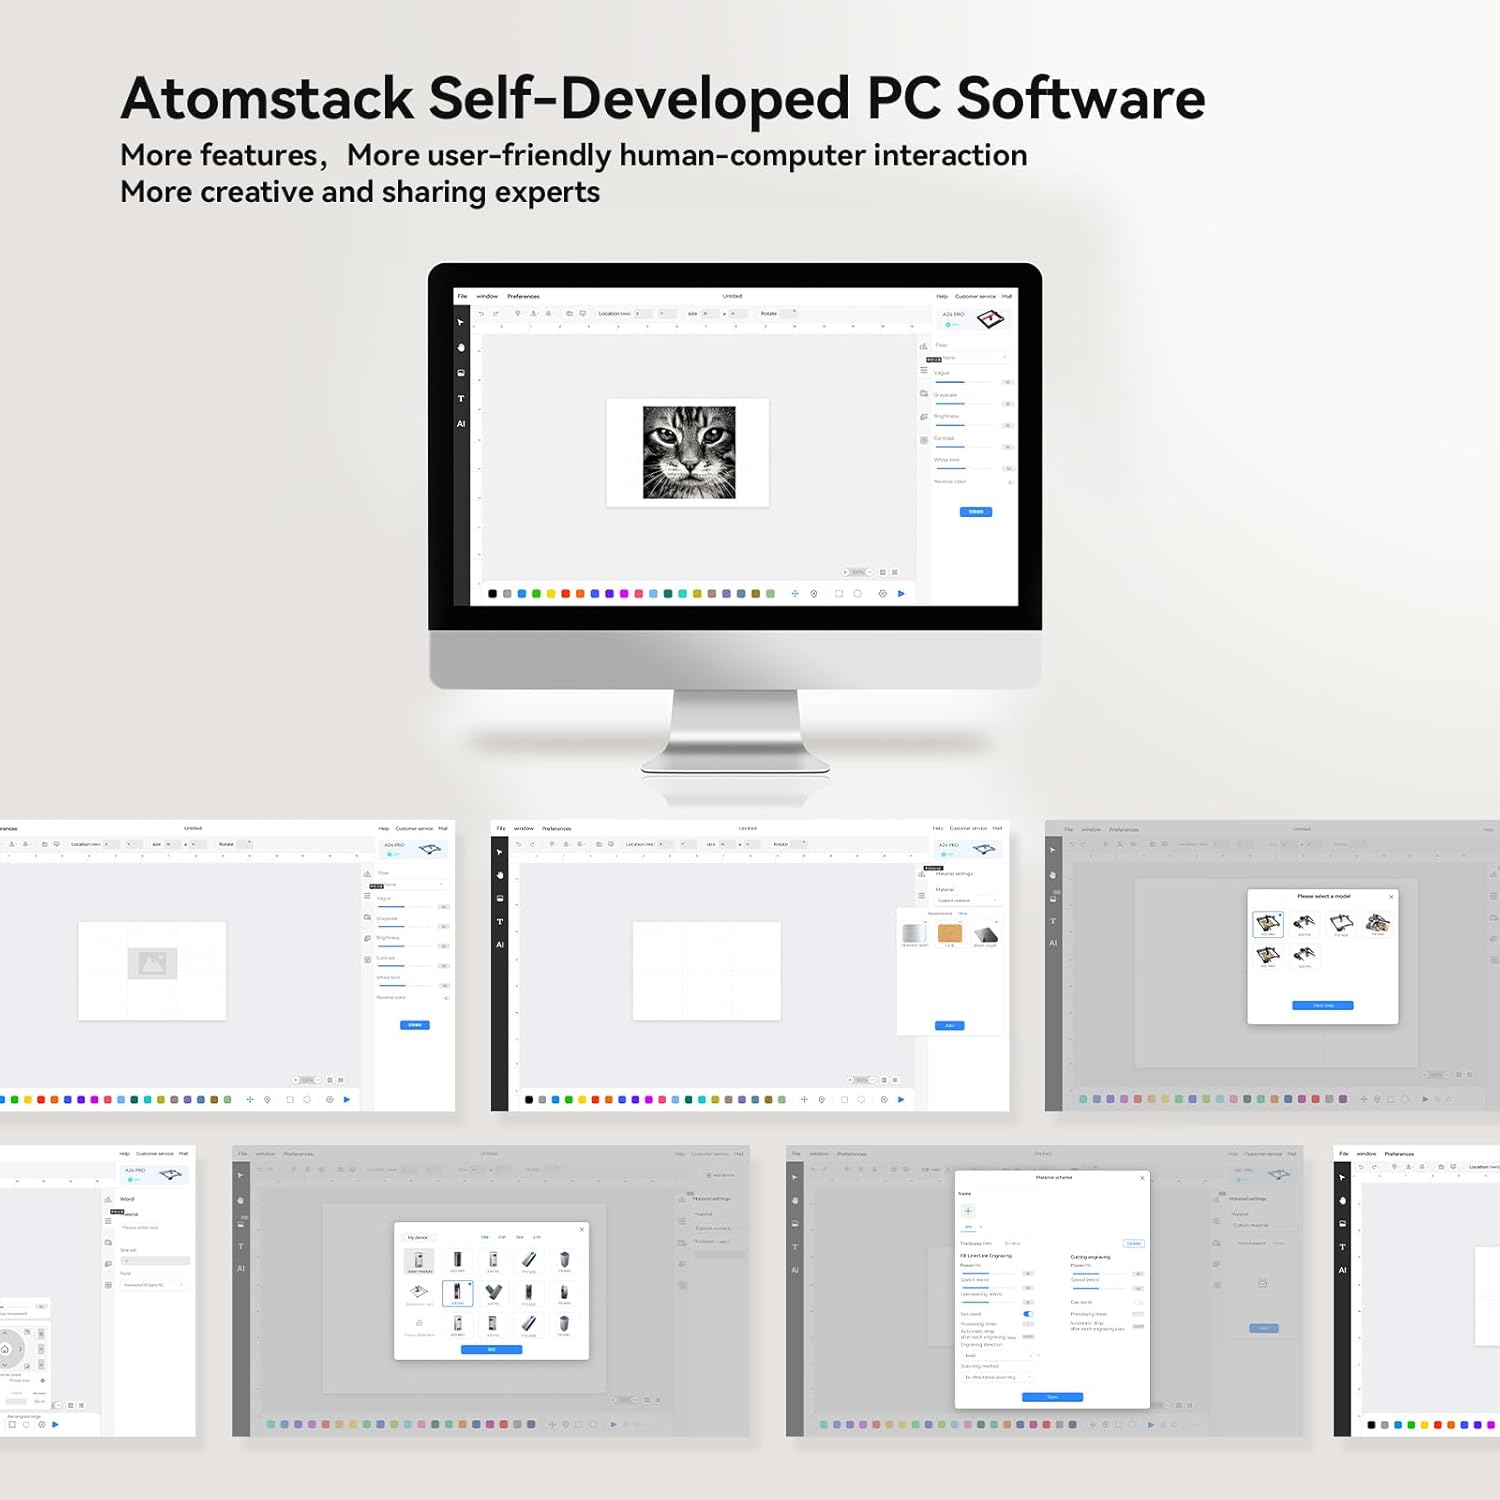
Abbildung 4.1: Überview of the Atomstack self-developed PC software, designed for user-friendly interaction and creative projects.
4.2 Fokussieren des Lasers
The A6 Pro features a fixed focusing design for quick and accurate focusing.
- Legen Sie Ihr Material auf die Gravierfläche.
- Adjust the laser module height according to the material thickness until the laser spot is at its smallest and sharpest point. This typically takes less than 10 seconds.
- For precise positioning, utilize the cross-positioning system for visual edge finding and object alignment.

Abbildung 4.2: The cross-positioning system aids in precise and horizontal engraving, allowing for quick and accurate focusing.
4.3 Gravieren und Schneiden
The A6 Pro is capable of engraving and cutting various materials with high precision.
- Materialvorbereitung: Ensure your material is clean and securely placed on the engraving bed.
- Design Import: Importieren oder erstellen Sie Ihr Design innerhalb der Software.
- Parametereinstellungen: Adjust laser power, speed, and passes based on the material type and desired outcome. The 6W laser can cut through 3mm poplar wood, 3mm black acrylic, 3mm poplar plywood, and laser vinyl.
- Betrieb starten: Starten Sie den Gravur- oder Schneidevorgang über die Software. Überwachen Sie die Maschine während des Betriebs genau.

Abbildung 4.3: The ATOMSTACK A6 Pro is suitable for engraving and cutting a variety of materials including basswood, acrylic, pine wood, paulownia, bamboo, and leather.

Abbildung 4.4: The A6 Pro demonstrates significantly faster engraving speeds compared to traditional frame machines, enhancing work efficiency.
5. Wartung
Regelmäßige Wartung gewährleistet die Langlebigkeit und optimale Leistung Ihres ATOMSTACK A6 Pro.
- Laser Module Cleaning: The non-clogging laser module is designed to resist lens pollution. However, periodic inspection and gentle cleaning of the laser lens with a suitable optical cleaner and lint-free cloth are recommended to maintain optimal laser performance.
- Schienenreinigung: Keep the X-axis metal double guide rails clean and free of dust and debris to ensure smooth and precise movement.
- Allgemeine Reinigung: Wipe down the machine's exterior with a soft, dry cloth. Avoid using abrasive cleaners or solvents.
- Kabelinspektion: Periodically check the tank chain bundled cables for any signs of wear or damage.
6. Fehlerbehebung
Dieser Abschnitt behandelt häufige Probleme, die bei Ihrem ATOMSTACK A6 Pro auftreten können.
| Problem | Mögliche Ursache | Lösung |
|---|---|---|
| Maschine lässt sich nicht einschalten. | Power cable not connected; faulty power adapter; power switch off. | Ensure power cable is securely connected. Check power outlet. Verify power switch is in the ON position. |
| Laser feuert nicht oder ist zu schwach. | Laser module not properly focused; dirty lens; incorrect software settings; laser module malfunction. | Re-focus the laser. Clean the laser lens. Check laser power settings in software. Contact support if issue persists. |
| Engraving/cutting results are inaccurate or distorted. | Loose belts/rails; material not flat; incorrect software settings; vibrations. | Check for any loose components or debris on the guide rails. Ensure material is flat and secured. Verify design and parameter settings in software. Minimize external vibrations. |
| Die Software kann keine Verbindung zum Rechner herstellen. | Incorrect USB port; driver issues; Wi-Fi connection problems. | Try a different USB port. Reinstall drivers. For Wi-Fi, ensure you are connected to the machine's hotspot. Restart both machine and computer/device. |
7. Spezifikationen
| Besonderheit | Detail |
|---|---|
| Modell | A6 Pro |
| Marke | Atomstapel |
| Laserleistung | 6 W (optische Ausgangsleistung) |
| Laserpunktgröße | 0.05 x 0.05 mm (Ultra-fine) |
| Gravurbereich | 370 x 310 mm |
| Mechanische Präzision | Bis zu 0.02 mm |
| Maximale Gravurgeschwindigkeit | 600 mm/s |
| Leistungsaufnahme | Wechselstrom 24 V, 5 A |
| Technische Daten | 60 x 60 x 17 cm |
| Artikelgewicht | 8.26 kg |
| Hauptplatine | Self-developed 32-bit ESP32 motherboard |
| Supported Materials (Cutting) | 3mm Poplar Wood, 3mm Black Acrylic, 3mm Poplar Plywood, Laser Vinyl |
| Supported Materials (Engraving) | Basswood, Acrylic, Pine wood, Paulownia, Bamboo, Leather, etc. |

Abbildung 7.1: The ATOMSTACK A6 Pro features an upgraded self-developed 32-bit motherboard for faster data processing.
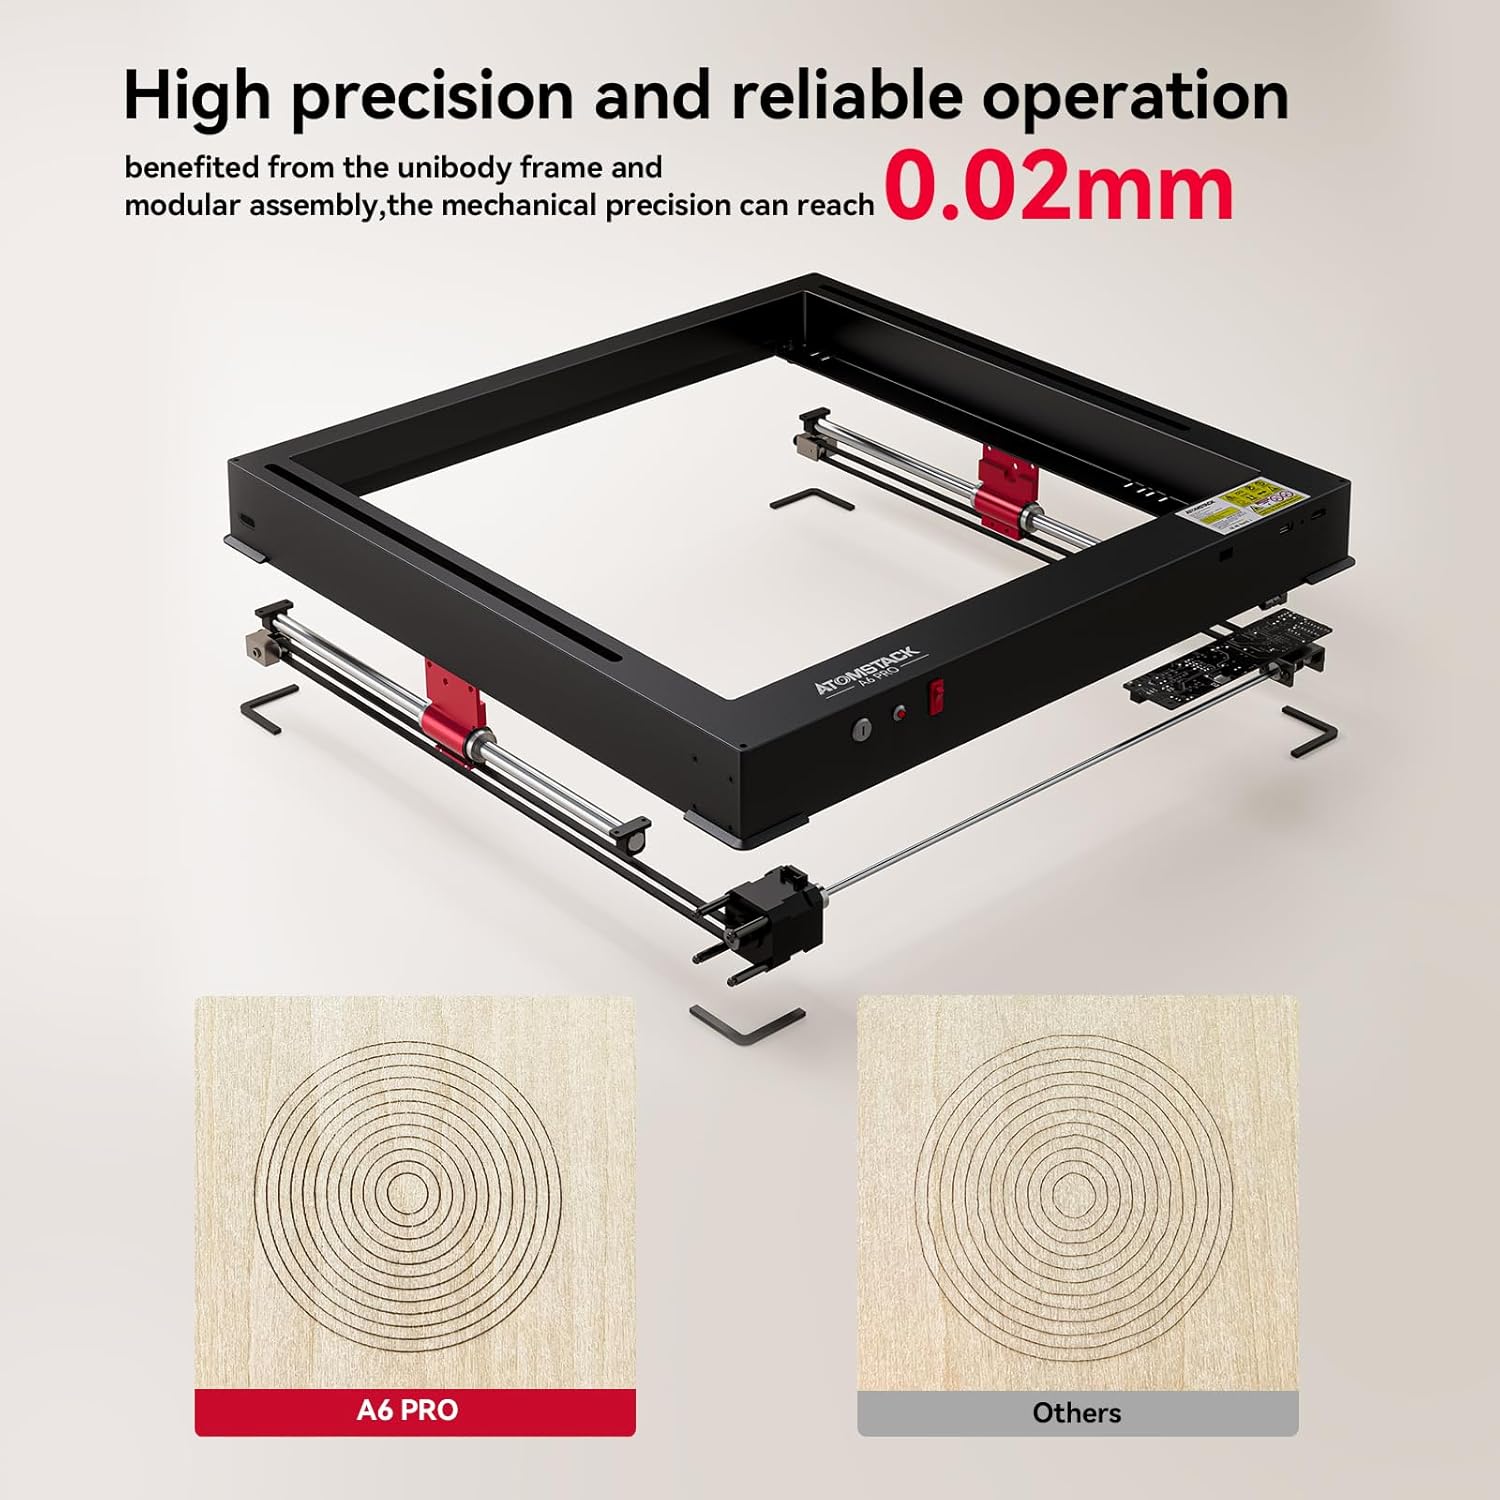
Abbildung 7.2: The unibody frame and modular assembly contribute to a mechanical precision of up to 0.02mm.
8. Garantie und Support
ATOMSTACK provides customer support and warranty services for its products.
- Garantieinformationen: Please refer to the warranty card included with your product or visit the official ATOMSTACK webAuf der Webseite finden Sie die detaillierten Garantiebedingungen.
- Technische Unterstützung: For technical assistance, troubleshooting beyond this manual, or spare parts inquiries, please contact ATOMSTACK customer support.
- Kontakt-E-Mail: support@atomstack.com
- Hersteller: Shenzhen Atomstack Technologies Co., Ltd.
- Adresse: 17th Floor, Building 3A, Phase II, Intelligent Park, No.76.Baohe Avenue, Baolong Street, Longgang Dist., Shenzhen, 518172China.