1. Einleitung
Thank you for choosing the Tefola 1000W 36V/48V Brushless Motor Controller Kit. This kit provides stable speed control and sensitive braking for your electric bike or scooter. It features a durable aluminum alloy controller housing for efficient heat dissipation and an LCD display for clear riding data. Please read this manual carefully before installation and operation to ensure proper use and safety.
2. Sicherheitshinweise
- Always wear appropriate safety gear when operating electric bikes or scooters.
- Ensure all connections are secure and properly insulated before powering on the system.
- Do not attempt to modify the controller or any components, as this may void the warranty and create safety hazards.
- Controller und Display sollten nicht mit Wasser oder extremen Temperaturen in Berührung kommen.
- Regularly inspect all wiring for damage or loose connections.
3. Packungsinhalt
Bitte überprüfen Sie, ob alle unten aufgeführten Artikel in Ihrem Paket enthalten sind:
- 1 x Motor Controller
- 1 x Throttle with LCD Display Panel
- 1 x Throttle Handle Grip
- 2 x Keys (for throttle lock)
- 1 x Bedienungsanleitung (dieses Dokument)
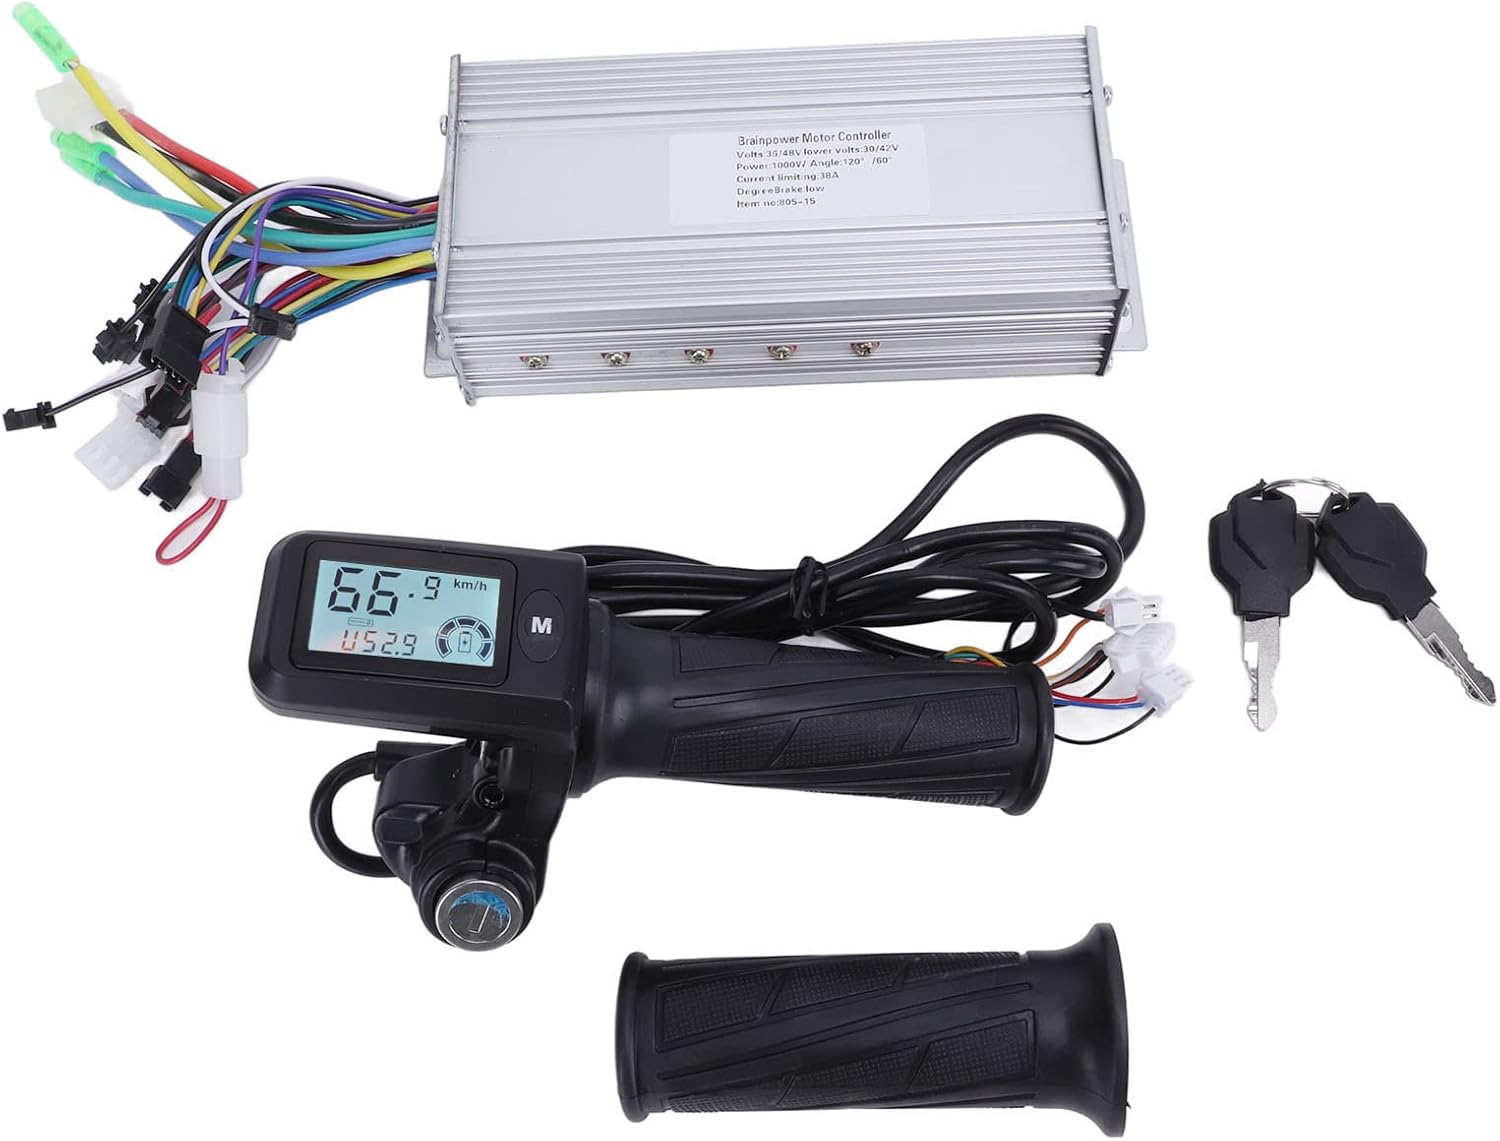
Image: Complete contents of the Tefola Motor Controller Kit.
4. Spezifikationen
| Besonderheit | Spezifikation |
|---|---|
| Bandtage | 36 V / 48 V (automatische Erkennung) |
| Leistung | 1000 W |
| Strombegrenzung | 38 A |
| Niedrige Lautstärketage-Schutz | 30 V / 42 V |
| Controller-Material | Aluminum alloy (fluted design) |
| Throttle Handlebar Diameter | 22.5 mm |
| Artikelgewicht | Ca. 1.16 kg |
5. Einrichtung und Installation
This section outlines the general steps for installing the motor controller kit. Professional installation is recommended if you are unfamiliar with electric bike/scooter wiring.
5.1 Controller Placement
Mount the controller in a secure location on your electric bike or scooter, ensuring it is protected from direct impact and moisture. The fluted aluminum housing is designed for heat dissipation, so ensure adequate airflow around it.
5.2 Throttle and Handlebar Installation
- Remove your existing throttle and handle grip from the handlebar.
- Slide the new throttle with LCD display onto the right side of the handlebar. Ensure it fits securely on 22.5mm diameter handlebars.
- Install the additional handle grip on the left side of the handlebar.
- Secure both components firmly to prevent rotation during use.

Image: Throttle with LCD display and handle grip for handlebar installation.
5.3 Kabelverbindungen
The controller has multiple color-coded wires for various functions. Connect them according to your electric bike/scooter's wiring diagram. Common connections include:
- Stromkabel: Connect to the battery (usually thicker red for positive, black for negative).
- Motorkabel: Connect to the motor (typically three phase wires and five Hall sensor wires). Match colors carefully.
- Throttle Wires: Connect to the throttle unit.
- Bremsleitungen: Connect to brake levers (often with cut-off function).
- LCD Display Wires: Connect to the display unit.
- Other Wires: May include wires for lights, pedal assist sensor (PAS), speed sensor, etc. Refer to your vehicle's specific wiring diagram for these.

Image: Motor controller with its array of connection wires.
Wichtig: Ensure all connections are correct and secure before applying power. Incorrect wiring can damage the components.
6. Bedienungsanleitung
6.1 Ein-/Ausschalten
Insert the key into the throttle's lock mechanism and turn it to the 'ON' position to power on the system. The LCD display will illuminate. Turn the key to 'OFF' to power down.
6.2 LCD-Anzeigefunktionen
The LCD display provides real-time riding data. The backlight ensures visibility in various lighting conditions. Use the 'M' button to cycle through display modes or adjust settings.

Image: LCD display showing current speed, battery level, and mileage.
Das Display zeigt typischerweise Folgendes an:
- Echtzeitgeschwindigkeit: Aktuelle Fahrgeschwindigkeit.
- Batteriestand: Anzeige des verbleibenden Akkuladestands.
- Bandtage: Aktuelle Batterievoltage.
- Single Run Mileage: Zurückgelegte Strecke auf der aktuellen Reise.
- Gesamtkilometerstand: Cumulative distance covered by the vehicle.
- Gear Indication: Aktuelle Unterstützungsstufe oder Ausrüstung.
- Warnung bei niedrigem Batteriestand: Visual warning when battery is low.
- Fehlersymbol: Indicates system errors (refer to troubleshooting for details).
6.3 Drosselklappenbetätigung
Gently twist the throttle grip to engage the motor and control speed. The brushless motor controller provides sensitive and stable speed control. Release the throttle to reduce speed or apply brakes.
6.4 Tastensperrfunktion
The integrated key lock on the throttle acts as a power switch, preventing unauthorized use of your electric bike or scooter when turned to the 'OFF' position and the key is removed.
7. Wartung
Regular maintenance ensures the longevity and optimal performance of your motor controller kit.
- Reinigung: Wipe the controller and LCD display with a soft, dry cloth. Avoid using harsh chemicals or excessive moisture.
- Verbindungsprüfung: Periodically inspect all electrical connections for tightness and signs of corrosion or damage. Re-secure any loose connections.
- Controllergehäuse: Ensure the controller's aluminum housing remains free of obstructions to allow for proper heat dissipation.
- Verkabelungsprüfung: Check all wires for fraying, cuts, or pinches. Repair or replace damaged wiring immediately.
8. Fehlerbehebung
Sollten Sie auf Probleme stoßen, konsultieren Sie bitte die folgenden häufigen Probleme und Lösungen:
| Problem | Mögliche Ursache | Lösung |
|---|---|---|
| Motor reagiert nicht | Loose power connection, low battery, faulty throttle, controller error. | Check battery charge. Inspect all power and motor connections. Check throttle wiring. Look for fault icons on LCD. |
| LCD-Display lässt sich nicht einschalten | Key not in 'ON' position, loose display connection, no power to controller. | Ensure key is turned. Check display wiring. Verify main power connection to controller. |
| Inkonsistente Geschwindigkeitskontrolle | Faulty throttle, motor Hall sensor issue, loose motor phase wires. | Inspect throttle for damage. Check motor wiring for secure connections. |
| Überhitzung des Controllers | Insufficient airflow, prolonged heavy load, internal fault. | Ensure controller is in a well-ventilated area. Reduce continuous heavy load. If problem persists, contact support. |
| Fault icon on display | Specific system error (e.g., motor, Hall sensor, brake). | Consult your vehicle's specific error code guide or contact support with the displayed icon/code. |
If you cannot resolve the issue using the troubleshooting guide, please contact customer support.
9. Garantie und Support
For warranty information, please refer to the purchase documentation or contact your retailer. If you require technical assistance or have questions about your Tefola Motor Controller Kit, please visit the Tefola Store on Amazon oder kontaktieren Sie den Kundendienst über Ihre Kaufplattform.