1. Einleitung
Thank you for choosing the XTRONS PE72DLRL Android 12 Car Stereo GPS. This unit is designed to enhance your driving experience with advanced navigation, multimedia, and connectivity features. This manual provides essential information for the safe installation, setup, and operation of your new car stereo. Please read it thoroughly before use and retain it for future reference.
2. Sicherheitshinweise
- Professionelle Installation empfohlen: Aufgrund der Komplexität der elektrischen Systeme von Autos wird eine professionelle Installation dringend empfohlen, um Schäden am Gerät oder an Ihrem Fahrzeug zu vermeiden.
- Batterie abklemmen: Always disconnect the vehicle's negative battery terminal before beginning any installation work to avoid electrical shorts.
- Verdrahtung: Ensure all wiring is correctly connected according to the provided wiring diagram. Incorrect wiring can cause damage or malfunction.
- Fahrsicherheit: Bedienen Sie das Gerät nicht so, dass Sie vom Fahren abgelenkt werden. Die Verkehrssicherheit hat stets Vorrang.
- Lautstärkeregelung: Stellen Sie die Lautstärke so ein, dass Sie die Geräusche des Straßenverkehrs von außen noch hören können.
- Feuchtigkeit vermeiden: Um Stromschläge oder Brände zu vermeiden, darf das Gerät weder Feuchtigkeit noch Wasser ausgesetzt werden.
3. Packungsinhalt
Verify that all items listed below are included in your package. If any items are missing or damaged, please contact your dealer.
- XTRONS PE72DLRL Main Unit
- Stromkabelbaum
- GPS-Antenne
- USB-Kabel (x2)
- RCA-Ausgangskabel
- Externes Mikrofon
- Benutzerhandbuch (dieses Dokument)
- Montagehalterungen
- CANbus-Decoder
- Fernbedienung

Abbildung 3.1: All components included with the XTRONS PE72DLRL unit. This includes the main head unit, various cables (power, USB, RCA), GPS antenna, external microphone, mounting brackets, CANbus decoder, and a separate remote control unit.
4. Produktüberschreitungview
4.1 Frontplatte und Display
The XTRONS PE72DLRL features a high-resolution IPS touchscreen display, offering clear visuals and responsive touch control. The Android 12 operating system provides a modern and intuitive user interface, with options for dual UI themes.
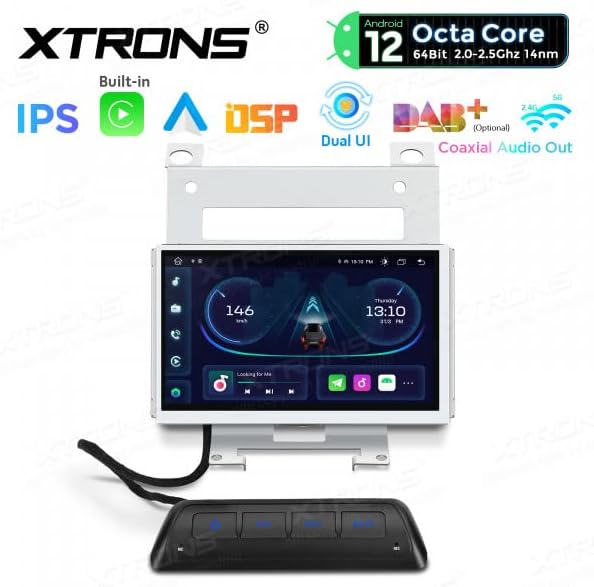
Abbildung 4.1: Front view of the XTRONS PE72DLRL unit with a dynamic car dashboard interface, showing speed, time, and media controls.

Abbildung 4.2: The unit's display showing the main media and radio interface, with quick access icons for navigation, video, and music.

Abbildung 4.3: The application launcher screen, providing access to various apps like Maps, Podcasts, Phone, Calendar, Settings, and SmartThings.
4.2 Anschlüsse hinten
The rear panel of the unit houses all necessary ports for power, audio, video, and peripheral connections. Refer to the wiring diagram for specific pin assignments.

Abbildung 4.4: Hinteren view of the XTRONS PE72DLRL unit, illustrating the various connectors for power, speakers, RCA outputs, USB, GPS antenna, and other accessories.
4.3 Fernbedienung
A separate remote control unit is provided for convenient access to common functions such as power, car settings, navigation, and mute.

Abbildung 4.5: The remote control unit, typically mounted for easy access, with buttons for power, car settings, navigation, and mute. The image also shows the overall dimensions of the main unit.
5. Installation
This section outlines the general steps for installing the XTRONS PE72DLRL unit. For detailed vehicle-specific instructions, consult your vehicle's service manual or a professional installer.
5.1 Vorinstallation
- Ensure the vehicle's ignition is off and disconnect the negative terminal of the battery.
- Remove the original car stereo or display unit from the dashboard.
- Carefully unpack the XTRONS unit and all accessories.
5.2 Kabelverbindungen
Connect the provided wiring harnesses to the corresponding ports on the XTRONS unit and your vehicle's wiring. Ensure all connections are secure.
- Stromkabelbaum: Connect the main power harness to the unit and the vehicle's power supply. The CANbus decoder should be integrated here for steering wheel controls and vehicle data.
- GPS-Antenne: Schließen Sie die GPS-Antenne an und richten Sie sie auf einen Standort mit freiem Empfang aus. view des Himmels (z. B. Armaturenbrett, unter der Windschutzscheibe).
- USB-Kabel: Connect the USB cables and route them to a convenient location for connecting USB devices.
- Externes Mikrofon: Connect the external microphone for improved call quality and voice commands. Route it to a suitable position, such as near the rearview Spiegel.
- RCA-Kabel: Schließen Sie RCA-Kabel für externe Verbindungen an amplifiers, subwoofers, or video output if applicable.
- Optionale Verbindungen: If using a rear camera, DVR, DAB+ box, or TPMS kit, connect them according to their respective manuals.
5.3 Montage der Einheit
- Attach the provided mounting brackets to the sides of the XTRONS unit.
- Schieben Sie das Gerät vorsichtig in die Öffnung im Armaturenbrett und achten Sie darauf, dass alle Kabel verstaut und nicht eingeklemmt sind.
- Befestigen Sie das Gerät mit den Befestigungsschrauben.
- Alle entfernten Verkleidungsteile wieder anbringen.
6. Einrichtung
6.1 Erstes Einschalten
- Schließen Sie den Minuspol der Fahrzeugbatterie wieder an.
- Turn on the vehicle's ignition. The XTRONS unit should power on automatically.
- Follow the on-screen prompts for initial setup, such as language selection and time zone.
6.2 Systemeinstellungen
Access the 'Settings' menu from the main interface to configure various system parameters.
- Datum und Uhrzeit: Stellen Sie das korrekte Datum und die korrekte Uhrzeit ein oder aktivieren Sie die automatische Synchronisierung über GPS/Netzwerk.
- Anzeige: Adjust brightness, wallpaper, and UI themes.
- Klang: Configure audio settings, including the DSP equalizer for optimal sound.
6.3 Wi-Fi-Verbindung
- Gehen Sie zu „Einstellungen“ > „Netzwerk & Internet“ > „WLAN“.
- Schalten Sie WLAN ein und wählen Sie das gewünschte Netzwerk aus der Liste aus.
- Geben Sie gegebenenfalls das Passwort ein und stellen Sie die Verbindung her.
6.4 Bluetooth-Kopplung
- Gehen Sie zu „Einstellungen“ > „Verbundene Geräte“ > „Bluetooth“.
- Ensure Bluetooth is enabled on both the XTRONS unit and your mobile device.
- Suchen nach available devices on your mobile phone and select 'XTRONS' (or similar name).
- Bestätigen Sie den Kopplungscode auf beiden Geräten.
7. Bedienungsanleitung
7.1 Hauptschnittstellennavigation
The Android 12 interface allows for intuitive navigation. Swipe left or right to access different home screens or the app drawer. Tap icons to launch applications.
7.2 GPS-Navigation
The unit comes with integrated GPS. You can use pre-installed navigation apps or download others from the Google Play Store (requires Wi-Fi connection).
- Tap the 'Navigation' or 'Maps' icon to launch the GPS application.
- Geben Sie Ihr Ziel ein und folgen Sie den Anweisungen auf dem Bildschirm und den Sprachansagen.

Abbildung 7.1: The unit's display showing a navigation map, indicating a route and current location.
7.3-Radio
Access the 'Radio' application to listen to FM/AM broadcasts.
- Tippen Sie auf das Symbol „Radio“.
- Nutzen Sie die Bedienelemente auf dem Bildschirm, um nach Sendern zu suchen, manuell einzustellen oder Voreinstellungen auszuwählen.
7.4 Medienwiedergabe
Audio und Video abspielen files from connected USB devices or via Bluetooth streaming.
- USB: Insert a USB drive into one of the USB ports. The unit will automatically detect it, or you can access files via a file Manager-App.
- Bluetooth Audio: Once your phone is paired via Bluetooth, you can stream music directly to the unit.
7.5 Apple CarPlay & Android Auto
The unit supports integrated Apple CarPlay and Android Auto for seamless smartphone integration.
- Kabelverbindung: Connect your iPhone or Android phone to one of the USB ports using a certified USB cable.
- Folgen Sie den Anweisungen auf dem Bildschirm, um CarPlay oder Android Auto zu aktivieren.
- Once connected, you can access compatible apps, navigation, calls, and messages directly from the unit's display.
7.6 Lenkradsteuerung
The integrated CANbus decoder allows the unit to work with your vehicle's original steering wheel controls. These controls are typically pre-configured, but can be customized in the system settings if needed.
8. Wartung
8.1 Reinigung
- Use a soft, dry cloth to clean the display and unit exterior.
- For stubborn marks on the screen, use a screen cleaner specifically designed for electronics and a microfiber cloth.
- Keine Scheuer- oder Lösungsmittel verwenden.
8.2 Softwareaktualisierungen
Prüfen Sie regelmäßig, ob Software-Updates verfügbar sind, um eine optimale Leistung und den Zugriff auf neue Funktionen zu gewährleisten.
- Connect the unit to a Wi-Fi network.
- Go to 'Settings' > 'About device' > 'System updates'.
- Follow the on-screen instructions to download and install any available updates. Ensure the vehicle's engine is running during the update process to prevent power interruption.
9. Fehlerbehebung
This section addresses common issues you might encounter. For problems not listed here, please contact XTRONS customer support.
| Problem | Mögliche Ursache | Lösung |
|---|---|---|
| Gerät lässt sich nicht einschalten. | Falsche Verkabelung, durchgebrannte Sicherung, lose Verbindung. | Check power connections and fuses. Ensure the negative battery terminal is reconnected. |
| Kein Ton aus den Lautsprechern. | Lautstärke zu niedrig, Stummschaltung aktiviert, falsche Lautsprecherverkabelung ampLifier-Problem. | Increase volume, check mute status, verify speaker wiring, check external ampVerstärker, falls verwendet. |
| Das GPS-Signal ist schwach oder nicht verfügbar. | GPS antenna not properly installed, obstructed view of sky, faulty antenna. | Ensure GPS antenna is mounted in a clear location. Check antenna connection. |
| Probleme mit der Bluetooth-Verbindung. | Bluetooth nicht aktiviert, Gerät nicht auffindbar, Kopplung fehlgeschlagen. | Ensure Bluetooth is on for both devices. Make device discoverable. Re-attempt pairing. |
| Touchscreen reagiert nicht. | Systemabsturz, vorübergehender Softwarefehler. | Restart the unit (refer to manual for reset button location if available, or turn off ignition and restart vehicle). |
10. Spezifikationen
- Modell: PE72DLRL
- Betriebssystem: Android 12
- CPU: 8 Kerne
- RAM: 2 GB DDR4
- ROM: 32GB SSD (Expandable via USB)
- Anzeige: IPS-Touchscreen
- Bluetooth: Version 5.0
- W-lan: Integrated (2.4Ghz & 5Ghz Dual Band)
- Konnektivität: Bluetooth, USB, WLAN
- Kompatible Geräte: Smartphone (für CarPlay/Android Auto)
- Besondere Merkmale: Built-in DSP Equalizer, Apple CarPlay, Android Auto, Steering Wheel Control Support, DAB+ Ready (DAB box not included), TPMS Ready (TPMS kit not included), Rear Camera Input, DVR Input.

Abbildung 10.1: Überview of the XTRONS PE72DLRL's core specifications and features.
11. Garantie und Support
XTRONS products are designed for reliability and performance. For warranty information, please refer to the warranty card included with your purchase or visit the official XTRONS website. For technical support, troubleshooting assistance, or inquiries about spare parts, please contact your authorized XTRONS dealer or XTRONS customer service directly.
Please note that information regarding software updates and spare parts availability is subject to change and may not be available indefinitely.