CUTEROOM D031 Molan House
CUTEROOM Molan House DIY Miniature Dollhouse Kit Instruction Manual
Model: D031 Molan House | Brand: CUTEROOM
1. Einleitung
Thank you for choosing the CUTEROOM Molan House DIY Miniature Dollhouse Kit. This kit provides a detailed and engaging experience for building your own miniature house, complete with furniture and LED lighting. Designed for individuals aged 14 and above, it encourages patience, creativity, and hands-on skill development. This manual will guide you through the assembly process, operation, maintenance, and troubleshooting of your miniature dollhouse.
Bitte lesen Sie alle Anweisungen sorgfältig durch, bevor Sie mit der Montage beginnen.
2. Packungsinhalt
Your CUTEROOM Molan House kit includes all necessary wooden pieces, paper cutouts, fabric, and other small components required to build the miniature dollhouse and its furniture. LED lights are also included. Please note that glue, batteries (AA type recommended), scissors, small knife, screwdriver, precision tweezers, and a ruler are nicht enthalten and must be prepared separately.
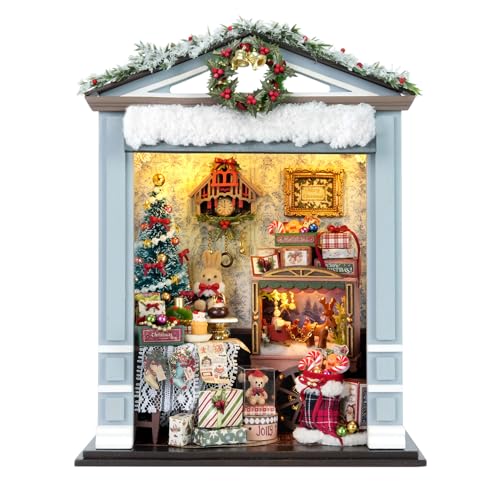
Figure 1: Product Information and Contents Overview. This image details the product name, materials (wood, paper, cloth), approximate assembly time (about 2 days), and assembled product size (10*5.4*12.8cm). Note: Product weight is 0.22 Kilograms.
3. Aufbau und Montage
Assembly of the Molan House requires patience and attention to detail. Follow the included English manual and detailed pictures step-by-step. It is recommended to organize all components before starting.
3.1 Erforderliche Werkzeuge (nicht enthalten)
- Glue (silicone liquid glue recommended for general assembly, superglue for faster drying on small parts)
- Schere
- Small knife or craft knife (for precise cutting of paper patterns and releasing wooden pieces)
- Schraubendreher
- Precision tweezers (essential for handling tiny components)
- Herrscher
- AA Batteries (2 pcs for LED lights)
- Magnifying glass (optional, but highly recommended for very small parts)
- Cutting mat (to protect surfaces when using a craft knife)
- Toothpicks (useful for applying small amounts of glue or cleaning excess)
3.2 Allgemeine Montagetipps
- Komponenten organisieren: Before starting, carefully unpack and identify all parts. The manual often groups items by room or assembly stage.
- Folgen Sie den Anweisungen: Adhere strictly to the step-by-step instructions and diagrams provided in the manual. Pay close attention to placement and orientation.
- Handle Small Parts Carefully: Many components are very small and delicate. Use tweezers for precise handling and avoid forcing pieces.
- Kleberauftrag: Apply glue sparingly. Excess glue can be messy and affect the final appearance. Use toothpicks for fine application. Allow sufficient drying time for each glued section before proceeding.
- Cutting Wooden Pieces: Wooden pieces are often pre-cut but may be held by small tabs. Use a craft knife to carefully cut these tabs to release the pieces cleanly, preventing damage.
- Paper Elements: For paper patterns or cutouts, use a craft knife for clean edges. Fold precisely where indicated.

Figure 2: Assembled Molan House interior, showcasing the intricate details of each room.


Abbildung 3: Ausführlich views of the miniature study and bedroom within the Molan House.
4. Bedienung der LED-Leuchten
The Molan House kit includes LED lights to illuminate your miniature creation. These lights typically operate on AA batteries (not included). Ensure batteries are inserted correctly into the designated battery box, observing polarity (+/-).
- Verdrahtung: Carefully connect the LED light wires according to the manual's diagrams. Ensure all connections are secure.
- Einlegen der Batterie: Open the battery compartment, insert 2 AA batteries, and close the compartment securely.
- Ein-/Ausschalten: Locate the switch connected to the battery box. Flip the switch to turn the lights on or off.

Figure 4: The Molan House exterior with LED lights activated, highlighting the illuminated windows.
5. Wartung
To ensure the longevity and appearance of your miniature dollhouse, follow these maintenance guidelines:
- Abstauben: Regularly dust the dollhouse and its miniature furniture using a soft brush or compressed air to prevent dust accumulation in small crevices.
- Reinigung: Hartnäckigen Schmutz mit einem leicht feuchten Tuch vorsichtig abwischen.amp cloth. Avoid excessive moisture, which can damage wooden or paper components.
- Lagerung: Store the dollhouse in a dry environment away from direct sunlight and extreme temperatures to prevent warping or fading of materials.
- Batteriewechsel: If the LED lights dim or stop working, replace the AA batteries. Remove batteries if the dollhouse will not be used for an extended period to prevent leakage.
6. Fehlerbehebung
| Problem | Mögliche Ursache | Lösung |
|---|---|---|
| Die LED-Leuchten schalten sich nicht ein. |
|
|
| Die Teile passen nicht zusammen. |
|
|
| Fehlende oder beschädigte Teile. |
|
|
7. Spezifikationen
- Produktname: Molan House
- Modellnummer: T031 - Die wunderbare Welt der Träume
- Marke: CUTEROOM
- Materialien: Wood, Paper, Cloth
- Zusammengebaute Maße: Ungefähr 10 cm (B) x 5.4 cm (T) x 12.8 cm (H)
- Paketabmessungen: 9 x 6 x 2 Zoll (22.86 x 15.24 x 5.08 cm)
- Produktgewicht: 0.22 Kilogramm
- Empfohlenes Alter: Ab 14 Jahren
- Montage erforderlich: Ja
- Enthaltene Komponenten: DIY house kit, LED lights (Glue and batteries not included)
8. Offizielles Produktvideo
Video 1: Official product video demonstrating the assembled CUTEROOM Molan House DIY Miniature Dollhouse Kit, showcasing its exterior and detailed interior rooms with LED lighting.
9. Garantie und Support
CUTEROOM is committed to providing high-quality products. While specific warranty details are not provided in this manual, for any issues regarding missing parts, damaged components, or assembly questions, please contact CUTEROOM customer support directly. You can often find contact information on the product packaging or through the retailer where the product was purchased.
For more information about CUTEROOM products, visit the official CUTEROOM Store.
Ask a question about this manual
Ask about setup, troubleshooting, compatibility, parts, safety, or missing instructions. Manuals+ will review the question and use this page’s manual context to help answer it.