1. Einleitung
Thank you for choosing the EDECOA 3500W 24V Pure Sine Wave Power Inverter. This device converts 24V DC battery power into 110V/120V AC household electricity, suitable for various applications including RVs, off-grid systems, and backup power. This manual provides essential information for safe installation, operation, and maintenance. Please read it thoroughly before using the inverter.

Image 1.1: EDECOA 3500W 24V Pure Sine Wave Power Inverter. This image shows the overall design of the inverter, highlighting its robust construction and cooling fins.
2. Sicherheitshinweise
Failure to follow these safety guidelines can result in electric shock, fire, or serious injury. Always exercise caution when working with electrical systems.
- Belüftung: Ensure the inverter is installed in a well-ventilated area. Do not block the cooling fans.
- Trockener Standort: Halten Sie den Wechselrichter von Wasser, Regen und Feuchtigkeit fern.
- Richtige Erdung: Der Wechselrichter muss ordnungsgemäß geerdet sein, um einen Stromschlag zu verhindern.
- Eingangslautstärketage: Schließen Sie den Wechselrichter nur an eine 24-V-Gleichstromquelle an. Der Anschluss an eine andere Spannung ist nicht zulässig.tage kann das Gerät beschädigen.
- Polarität: Always connect the battery cables with correct polarity (positive to positive, negative to negative). Reverse polarity will cause damage.
- Überlastschutz: Die Dauerleistung (3500 W) und die Spitzenleistung (7000 W) des Wechselrichters dürfen nicht überschritten werden. Eine Überlastung kann Schutzmechanismen auslösen oder das Gerät beschädigen.
- Temperatur: Avoid operating the inverter in extreme temperatures. The intelligent fan control (IFC) and over-temperature protection are designed to manage heat, but proper ambient conditions are crucial.
- Wartung: Wartungs- und Reparaturarbeiten sollten nur von qualifiziertem Personal durchgeführt werden.
3. Packungsinhalt
Überprüfen Sie, ob alle Artikel im Paket vorhanden sind:
- EDECOA 3500W 24V Sinus-Wechselrichter
- Battery cables (pair of cables with terminal rings)
- ET-RC Remote control (with 4-meter cable)
- Accessory bag (may include spare fuses, mounting hardware)
- Benutzerhandbuch (dieses Dokument)

Image 3.1: Inverter and included accessories. This image displays the main inverter unit along with the battery cables and the remote control, as typically found in the package.
4. Produktüberschreitungview
4.1 Inverter Front and Rear Panels

Image 4.1: Inverter front and rear panels. The top view shows the rear panel with 24VDC input terminals (positive and negative) and cooling fans. The bottom view shows the front panel with four AC 120V outlets, an AC terminal block, a power switch, an ET-RC remote port, and indicator lights (WORK, ERROR).
4.2 AC-Klemmenblock

Image 4.2: Updated AC Terminal Block Cover. This image highlights the AC terminal block with its protective cover, designed for secure and direct wiring of appliances requiring higher power.
4.3 Fernbedienung (ET-RC)

Image 4.3: ET-RC Remote Controller. This image shows the remote controller with its LCD display, power button, and two USB ports. The remote allows for convenient monitoring and control of the inverter from a distance.
5. Einrichtung und Installation
Proper installation is critical for the inverter's performance and safety.
5.1 Wechselrichter montieren
- Wählen Sie einen trockenen, kühlen und gut belüfteten Ort.
- Stellen Sie sicher, dass um den Wechselrichter herum ausreichend Platz für die Luftzirkulation vorhanden ist, insbesondere um die Lüfter herum.
- Montieren Sie den Wechselrichter sicher mit geeigneter Hardware.
5.2 Batterieanschluss
Connect the inverter directly to a 24V battery bank. Use the provided battery cables or cables of adequate gauge for your application. Ensure connections are tight to prevent voltage Tropfen und Überhitzung.
- Verbinden Sie Rot Batteriekabel zum positiv (+) terminal of the inverter and the positive terminal of the 24V battery.
- Verbinden Sie Schwarz Batteriekabel zum negativ (-) terminal of the inverter and the negative terminal of the 24V battery.
- Double-check all connections for correct polarity before proceeding.
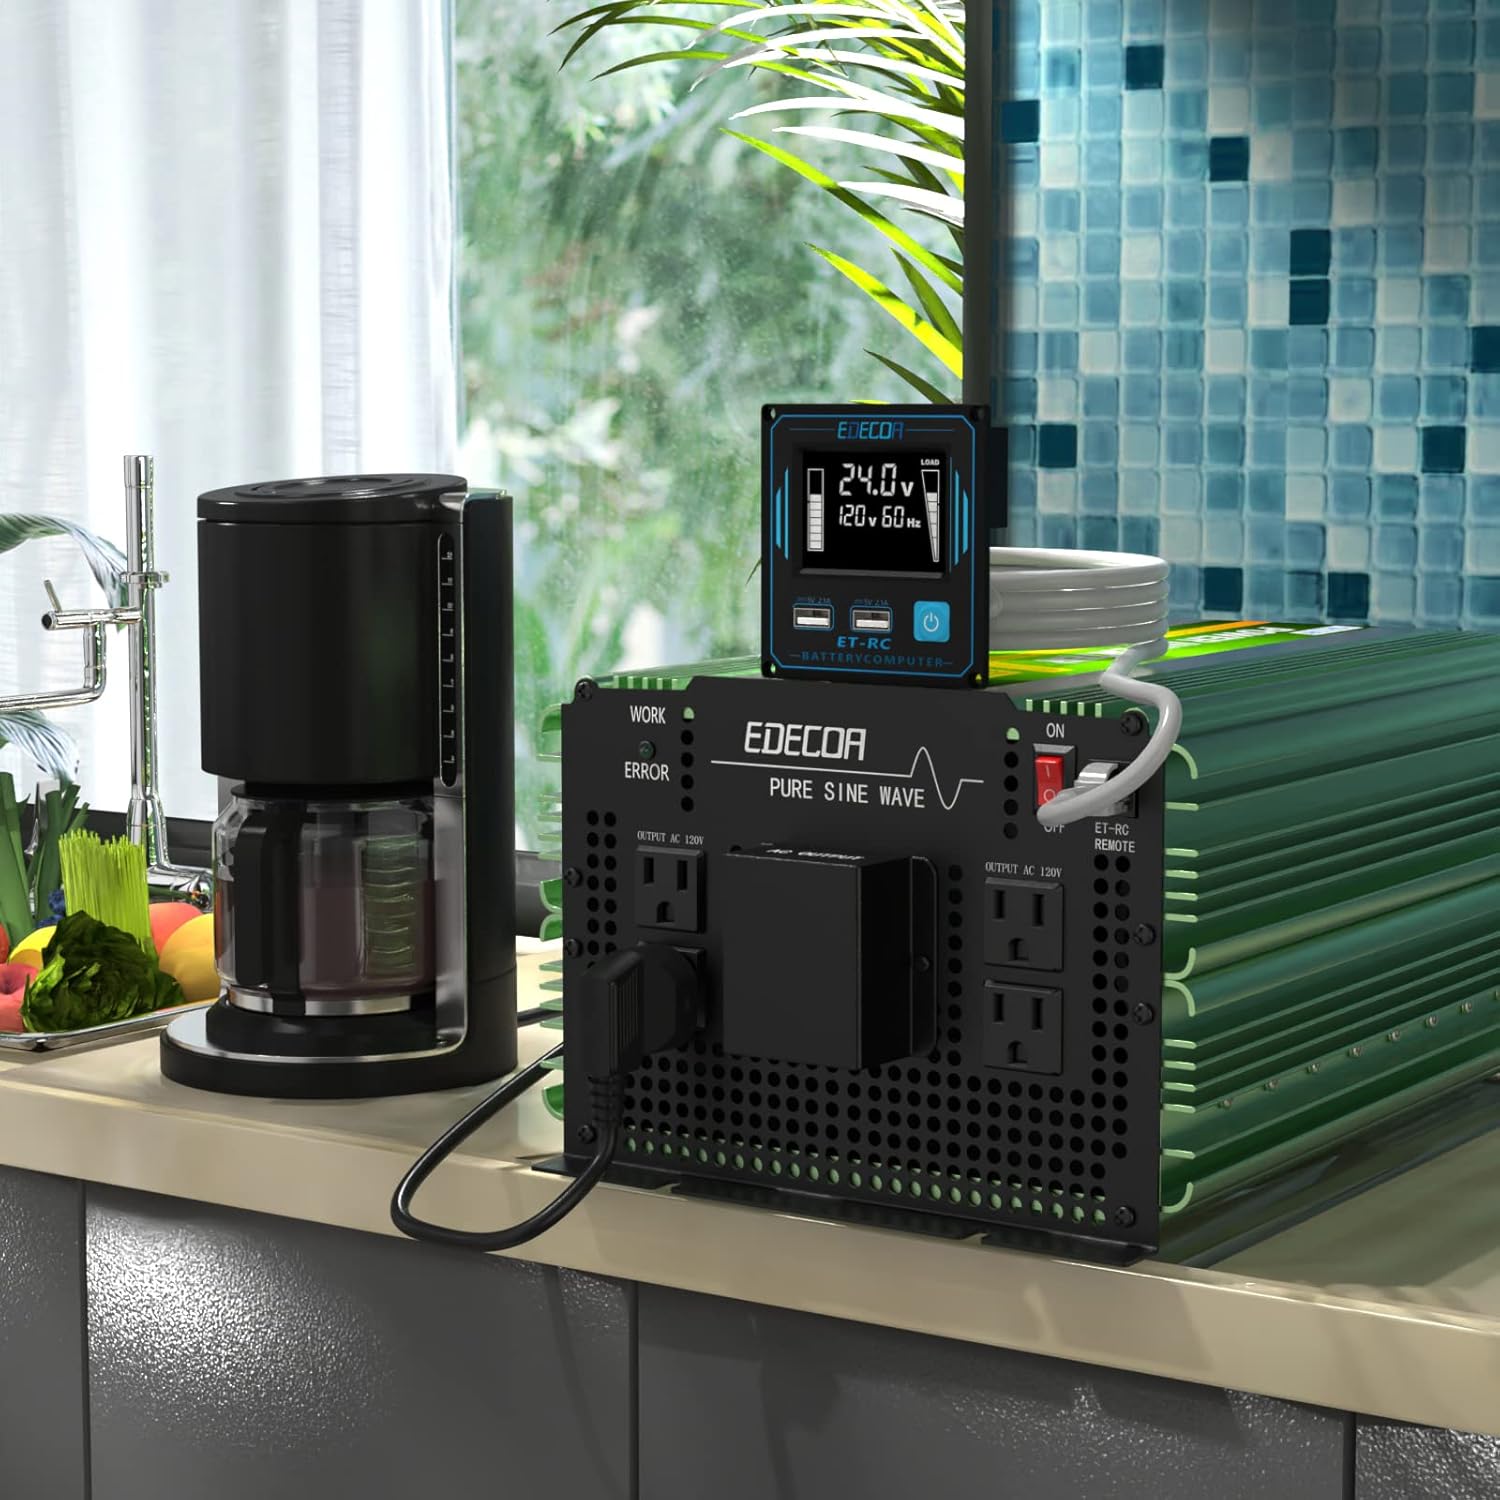
Image 5.1: Inverter dimensions and battery cables. This image illustrates the physical dimensions of the inverter and shows the included heavy-gauge battery cables, emphasizing the importance of proper cable selection for safe operation.
5.3 Erdung
Connect the inverter's chassis to a reliable earth ground using a suitable ground wire. This is a critical safety step.
5.4 Fernbedienungsanschluss
Plug the 4-meter RJ45 cable from the ET-RC remote controller into the 'ET-RC REMOTE' port on the inverter's front panel.
6. Bedienungsanleitung
6.1 Ein-/Ausschalten
- After all connections are secure, switch the main power switch on the inverter to the 'ON' position. The 'WORK' indicator light should illuminate.
- Alternatively, use the power button on the ET-RC remote controller to turn the inverter on or off.
- To power off, switch the inverter to 'OFF' or use the remote's power button.
6.2 Geräte anschließen
You can connect AC appliances to the four standard US outlets or directly to the AC terminal block.
- AC-Steckdosen: Suitable for appliances under 1800 watts (0-15A).
- Wechselstrom-Anschlussblock: Recommended for appliances requiring higher continuous power, up to 3500 watts (0-30A). Ensure proper wiring to the N (Neutral), L (Live), and G (Ground) terminals.
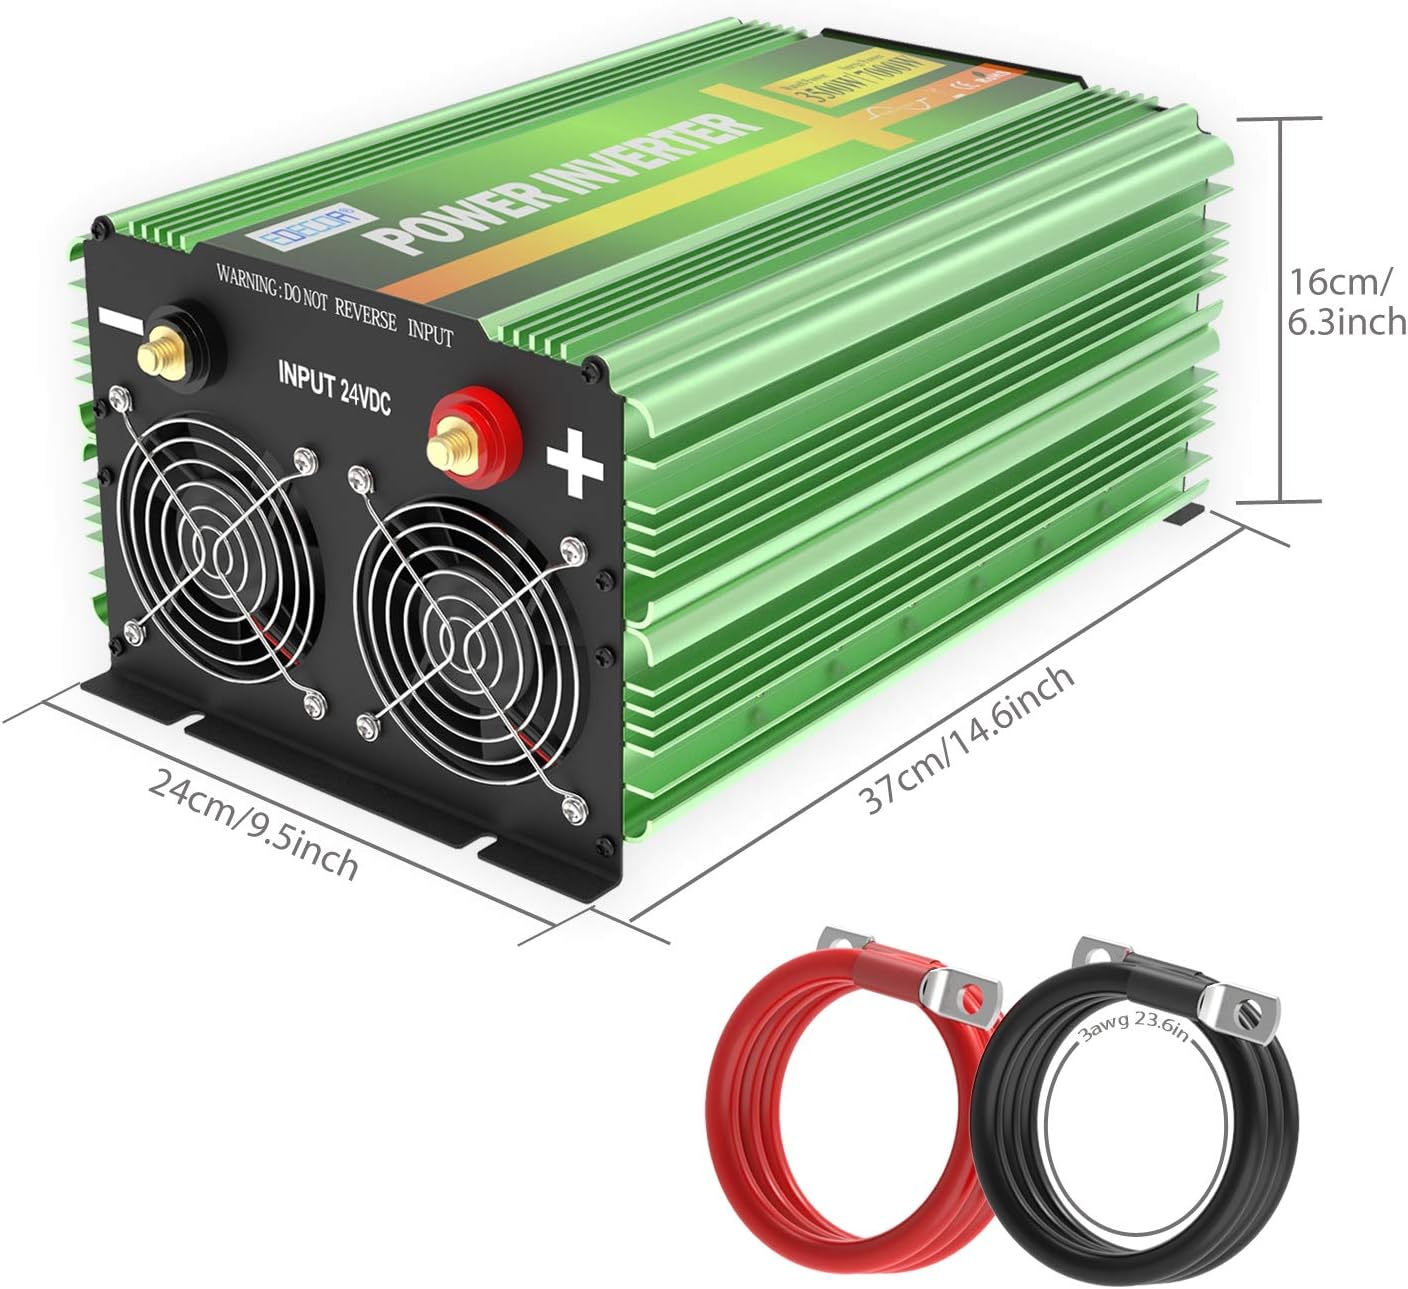
Image 6.1: EDECOA 3500W 24V Inverter in use. This image shows the inverter connected and powering a coffee maker, demonstrating a typical application.
6.3 Understanding the ET-RC Remote Display
The ET-RC remote controller provides real-time operational data:

Image 6.2: ET-RC Remote Controller Display Details. This diagram labels the various indicators on the remote's LCD screen, including: 1. Power Switch, 2. Dual USB (5V 2.1A), 3. Alarm, 4. Over-temperature Protection, 5. Low Input Voltage, 6. Battery Capacity, 7. High Input Voltage, 8. AC Output Voltage, 9. DC Input Voltage, 10. Overload Protection, 11. Wattages of Appliances, 12. Fan Working Status, 13. Frequency.
- Batteriekapazität: Indicates the remaining charge in your 24V battery bank.
- Ladestufe: Zeigt die aktuelle Leistungsaufnahme der angeschlossenen Geräte an.
- Temperatur: Displays the inverter's internal temperature.
- Fanstatus: Zeigt an, ob die Lüfter aktiv sind.
- DC-Eingangsvoltage: Zeigt die Lautstärke antage from your 24V battery.
- AC-Ausgangsvolumentage: Zeigt die Ausgangs-Wechselstromspannung antage (110 V/120 V).
- Frequenz: Shows the output AC frequency (60 Hz).
- Schutzhinweis: Icons will illuminate to indicate various protection states (e.g., overload, low voltage, Übertemperatur).
7. Wartung
Regelmäßige Wartung gewährleistet optimale Leistung und Langlebigkeit Ihres Wechselrichters.
- Reinigung: Periodically clean the exterior of the inverter with a dry cloth. Ensure cooling vents and fans are free from dust and debris.
- Verbindungen: Regularly check all electrical connections (battery cables, AC wiring, ground wire) to ensure they are tight and free from corrosion. Loose connections can cause overheating and power loss.
- Belüftung: Confirm that the installation area remains well-ventilated and that nothing obstructs the inverter's cooling fans.
- Batteriezustand: Monitor your battery bank's health. A weak battery can cause the inverter to trigger low voltage Schutz.
8. Fehlerbehebung
Sollten Sie auf Probleme stoßen, konsultieren Sie bitte die folgenden häufigen Probleme und Lösungen:
| Problem | Mögliche Ursache | Lösung |
|---|---|---|
| No power output / Inverter does not turn on | Lose Batterieanschlüsse, niedriger Batteriestandtage, blown fuses, inverter switch off, remote not working. | Check battery cable connections and polarity. Verify battery voltage (must be above 21V for 24V system). Check internal/external fuses. Ensure inverter switch is ON. If using remote, check its cable connection. |
| Overload protection triggered (LCD shows overload icon) | Connected appliance exceeds inverter's continuous or peak power rating. | Reduce the total load by disconnecting some appliances. Ensure starting (surge) power of motors/compressors does not exceed 7000W peak. |
| Over-temperature protection triggered (LCD shows temperature icon) | Poor ventilation, blocked cooling fans, high ambient temperature, prolonged high load. | Ensure adequate ventilation. Clear any obstructions from cooling fans. Reduce load. Allow inverter to cool down. |
| Niedrige Eingangslautstärketage protection (LCD shows low voltage-Symbol) | Akku voltage ist zu niedrig. | Recharge or replace the battery. The inverter will shut down to protect the battery from deep discharge. |
| Hohe Eingangslautstärketage protection (LCD shows high voltage-Symbol) | Akku voltage ist zu hoch. | Check the charging system. Ensure battery voltage does not exceed 30V for a 24V system. |
| Fernbedienung reagiert nicht | Loose RJ45 cable, faulty remote. | Check the RJ45 cable connection at both ends. Try using the main power switch on the inverter. If the main switch works but the remote does not, the remote or its cable may be faulty. |
9. Spezifikationen
Detailed technical specifications for the EDECOA 3500W 24V Pure Sine Wave Power Inverter:
- Marke: EDECOA
- Modellname: 3500W-24V
- Eingangslautstärketage: 24 Volt Gleichstrom
- Kontinuierliche Ausgangsleistung: 3500 Watt
- Ausgangsspitzenleistung: 7000 Watt (<10 ms)
- Ausgangsvolumentage: 110 Volts / 120 Volts AC
- Elektrische Ausgangswellenform: Rein Sinus
- Frequenz: 60 Hz
- Anzahl der AC-Steckdosen: 4 (US sockets)
- Zusätzliche Ausgabe: 1 AC-Klemmenblock
- Anzeigetyp: LCD (on remote controller)
- Schutzfunktionen: Eingang niedrige Lautstärketage, Input over voltage, Overload, Over temperature, Reverse polarity, Automatic voltage regulation (AVR), Intelligent power management (IPM), Intelligent fan control (IFC)
- Abmessungen (L x B x H): 14.6" x 9.5" x 6.3" (37 cm x 24 cm x 16 cm)
- Energiequelle: Batteriebetrieben
- Empfohlene Verwendung: Home, RV, Camping, Off-grid applications
10. Garantie und Support
The EDECOA 3500W 24V Pure Sine Wave Power Inverter comes with a 12 Monate Garantie ab Kaufdatum.
For warranty claims, technical assistance, or any questions not covered in this manual, please contact EDECOA customer support through their official channels. Keep your purchase receipt as proof of purchase for warranty validation.