1. Einleitung
This manual provides detailed instructions for the setup, operation, maintenance, and troubleshooting of your UF-TOOLS 7-Inch LCD Digital Microscope. Please read this manual thoroughly before using the device to ensure proper functionality and to maximize its lifespan.
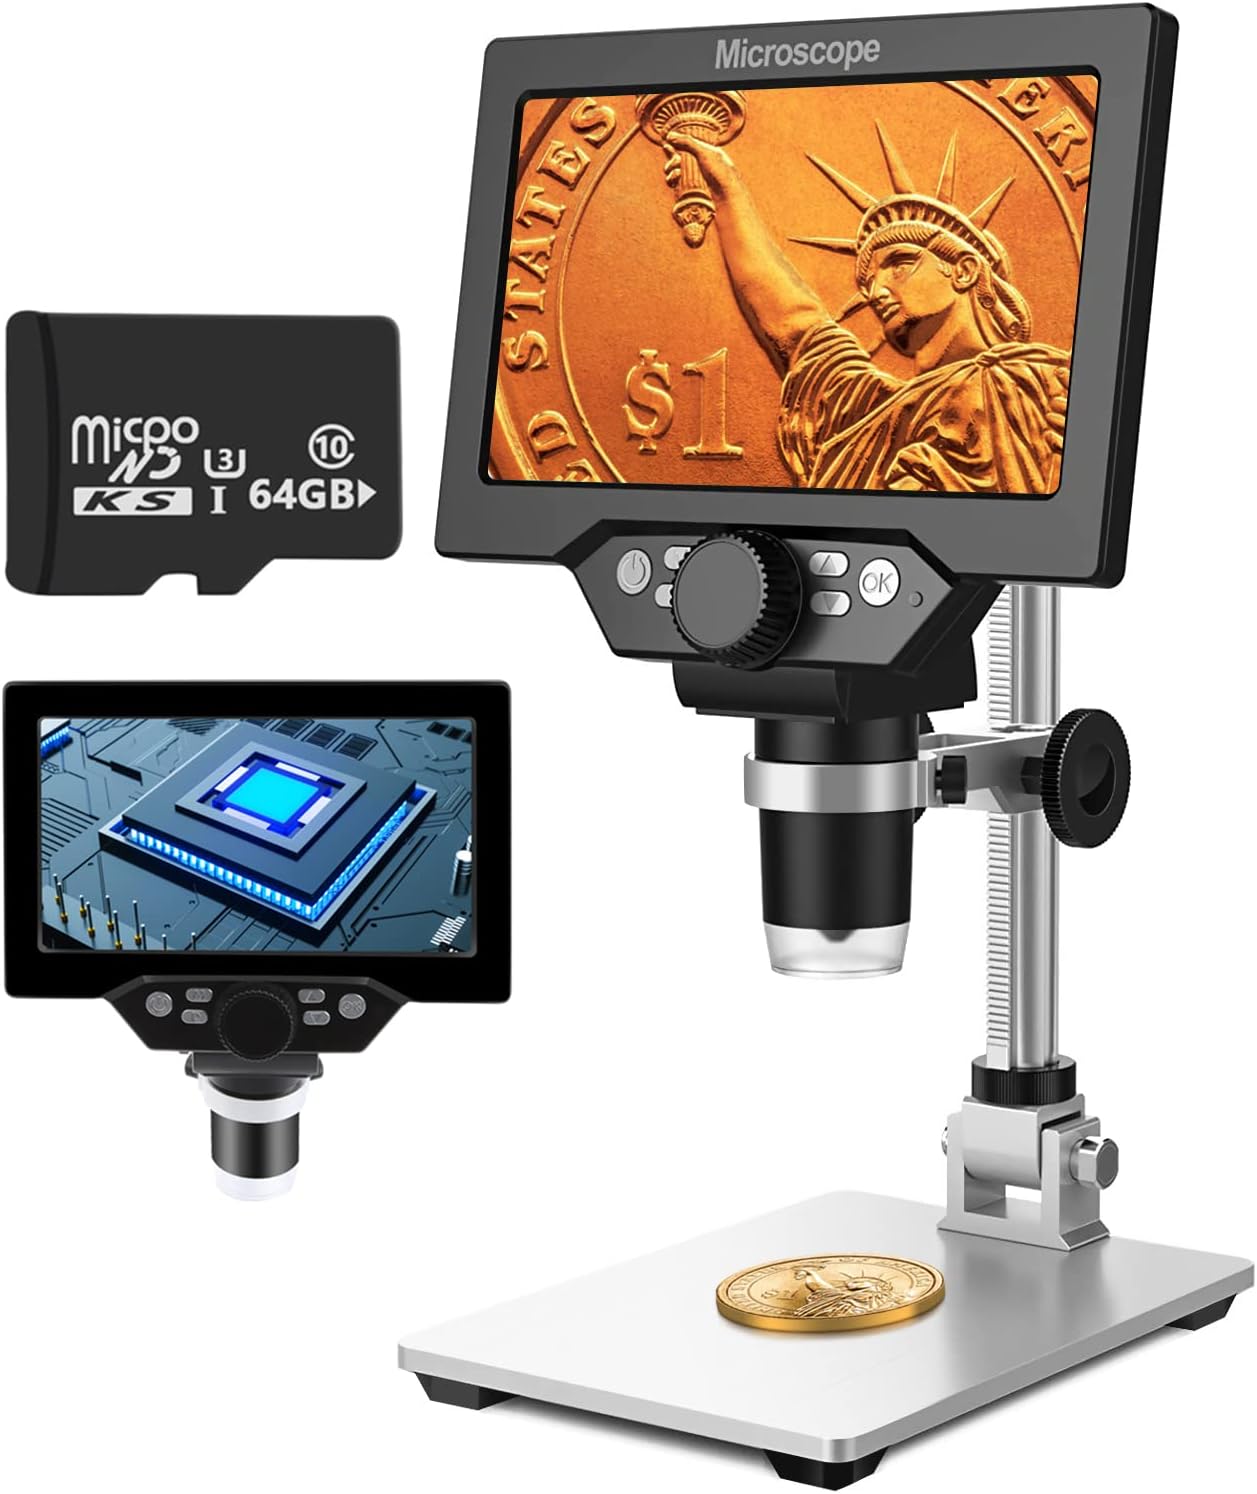
Image 1.1: UF-TOOLS 7-Inch LCD Digital Microscope with included 64GB TF card, showing the main unit and stand.
1.1 Hauptmerkmale
- 7-Zoll-LCD-Bildschirm: Provides a clear, high-definition display for direct viewing without a computer.
- 10- bis 1200-fache Vergrößerung: Continuous zoom capability for observing various objects.
- 12MP Kamera: Captures high-resolution images and 1080P video.
- 64 GB TF-Karte: Included for direct storage of photos and videos. Supports up to 128GB.
- 8 verstellbare LED-Leuchten: Ensures optimal illumination for detailed observation.
- Flexible Aluminum Alloy Stand: Allows for 90° angle adjustment and 2-10cm focus distance adjustment.
- Eingebauter 3000-mAh-Akku: Offers portability with up to 6 hours of operation on a full charge.
- PC-Konnektivität: Compatible with Windows 7/8/10 for larger display and data transfer.
2. Packungsinhalt
Bitte überprüfen Sie, ob alle unten aufgeführten Artikel in Ihrem Paket enthalten sind:
- UF-TOOLS 7-Inch LCD Digital Microscope Unit
- Adjustable Aluminum Alloy Stand
- 64GB TF Karte
- USB-Kabel
- Netzteil (sofern enthalten)
- Benutzerhandbuch (dieses Dokument)

Image 2.1: The microscope package includes a 64GB TF card for storage.
3. Installationsanleitung
3.1 Zusammenbau des Mikroskops
- Packen Sie alle Komponenten vorsichtig aus dem Karton aus.
- Attach the microscope unit to the adjustable aluminum alloy stand. Ensure it is securely fastened using the provided screws or locking mechanisms.
- Insert the 64GB TF card into the designated slot on the microscope unit.
- Stellen Sie das zusammengebaute Mikroskop auf eine stabile, ebene Fläche.

Image 3.1: Product dimensions and adjustable stand features, including 270° rotation and height adjustment.
3.2 Laden des Akkus
The microscope has a built-in 3000mAh rechargeable battery. Before first use, fully charge the device.
- Connect the USB cable to the microscope's charge port and the other end to a power adapter or a computer's USB port.
- Die Ladeanzeigeleuchte zeigt den Ladestatus an.
- Eine vollständige Ladung ermöglicht in der Regel bis zu 6 Stunden Dauerbetrieb.

Image 3.2: The microscope features a long-lasting rechargeable battery, charged via USB.
4. Bedienungsanleitung
4.1 Gerät überview und Kontrollen

Bild 4.1: Überview of the microscope's controls and ports, including charge port, MicroSD slot, light regulation, fixed knob, lifting adjusting bracket knob, and various function buttons.
- Ein-/Ausschalten: Halten Sie die Ein-/Aus-Taste gedrückt, um das Gerät ein- oder auszuschalten.
- Video/Camera Playback: Use dedicated buttons to switch between video recording, photo capture, and playback modes.
- System Key Programming: Access menu settings for various configurations.
- Object Distance Adjustment: Stellen Sie den Abstand zwischen Linse und Objekt ein.
- Bild auf/ab: Navigate through menus or captured media.
- Confirm Key/Camera Button: Select options or capture photos/videos.
- Light Regulation: Adjust the brightness of the 8 LED lights.
- Fester Drehknopf: Secures the microscope unit to the stand.
- Lifting Adjusting Bracket Knob: Adjusts the height of the microscope unit on the stand.
4.2 Einstellen von Vergrößerung und Fokus
- Platzieren Sie den Gegenstand, den Sie beobachten möchten, auf der Grundplatte.
- Adjust the height of the microscope unit using the Lifting Adjusting Bracket Knob to get a rough focus.
- Use the focus wheel on the microscope lens to fine-tune the focus until the image on the 7-inch LCD screen is clear.
- The magnification range is 10X to 1200X. Adjust the distance between the lens and the object, along with the focus wheel, to achieve the desired magnification.

Image 4.2: The microscope features an adjustable screen, free length adjustment, and precise focus control.

Image 4.3: Digital magnification from 10X to 1200X, demonstrating the zoom capability on small objects.
4.3 Verwendung der LED-Leuchten
The microscope is equipped with 8 adjustable LED lights to illuminate your subject. Use the Light Regulation control to increase or decrease brightness as needed for optimal viewing.

Image 4.4: The 8 LED lights provide adequate illumination for observing objects in various lighting conditions.
4.4 Fotos und Videos aufnehmen
With the included 64GB TF card, you can directly save images and videos.
- In photo mode, press the Confirm/Camera button to capture an image.
- In video mode, press the Confirm/Camera button to start recording, and press again to stop.
- Captured media can be reviewed using the playback function.
4.5 PC-Konnektivität
Zu view observations on a larger screen or transfer files, connect the microscope to a Windows PC (Windows 7/8/10) using the provided USB cable.
- Connect the microscope to your PC via the USB cable.
- Das Mikroskop sollte als Speichermedium oder als webcam, depending on the mode selected on the microscope.
- You can then access the stored images/videos or use the microscope as a live camera feed.

Image 4.5: Connect the microscope to a PC for a larger viewing experience and data management.
5. Wartung
5.1 Reinigung
- Linse: Verwenden Sie ein weiches, fusselfreies Tuch, das speziell für optische Linsen entwickelt wurde. Bei hartnäckigen Verschmutzungen kann etwas Linsenreinigungsmittel auf das Tuch und nicht direkt auf die Linse gegeben werden.
- Bildschirm: Wipe the LCD screen gently with a microfiber cloth. Avoid harsh chemicals.
- Körper: Clean the microscope body and stand with a soft, dry cloth. Do not use abrasive cleaners or solvents.
5.2 Speicherung
- Bewahren Sie das Mikroskop an einem kühlen, trockenen Ort fern von direkter Sonneneinstrahlung und extremen Temperaturen auf.
- Bei längerer Lagerung sollte der Akku teilweise geladen sein (etwa 50 %), um seine Lebensdauer zu verlängern.
- Keep the lens covered to prevent dust accumulation.
5.3 Batteriepflege
- Vermeiden Sie häufiges vollständiges Entladen des Akkus.
- Laden Sie den Akku regelmäßig auf, auch wenn er nicht benutzt wird, um seine Lebensdauer zu erhalten.
- Setzen Sie den Akku keinen hohen Temperaturen aus.
6. Fehlerbehebung
- Kein Strom:
- Ensure the battery is charged. Connect the microscope to a power source and try again.
- Überprüfen Sie die Netzkabelverbindung.
- Verschwommenes Bild:
- Stellen Sie das Fokusrad sorgfältig ein.
- Adjust the height of the microscope unit on the stand.
- Ensure the object is properly illuminated by adjusting the LED lights.
- Clean the lens if smudges or dust are present.
- Fotos/Videos können nicht aufgenommen werden:
- Ensure a TF card is inserted and properly formatted.
- Check if the TF card has sufficient storage space.
- Verify the device is in the correct photo or video capture mode.
- PC erkennt Gerät nicht:
- Stellen Sie sicher, dass das USB-Kabel sowohl mit dem Mikroskop als auch mit dem PC fest verbunden ist.
- Probieren Sie einen anderen USB-Anschluss an Ihrem Computer aus.
- Restart both the microscope and the PC.
- Ensure your PC is running Windows 7/8/10.
7. Spezifikationen
| Besonderheit | Detail |
|---|---|
| Modellname | SUGON-Digital Microscope |
| Bildschirmgröße | 7 Zoll LCD |
| Vergrößerung | 10- bis 1200-fach |
| Kameraauflösung | 12 Megapixel |
| Videoauflösung | 1080P |
| Lagerung | 64GB TF Card (Max 128GB supported) |
| Beleuchtung | 8 LED-Leuchten |
| Batteriekapazität | 3000 mAh Lithium-Polymer |
| Akkulaufzeit | Bis zu 6 Stunden (ca.) |
| PC-Kompatibilität | Windows 7/8/10 |
| Material | Metall, Kunststoff |
| Artikelgewicht | 2.44 Pfund (1.11 kg) |
| Verpackungsabmessungen | 9.8 x 8.19 x 3.35 Zoll |
8. Garantie und Support
UF-TOOLS provides the following warranty and support for this product:
- Zurückzukehren: 45 days limited product return period.
- Umtauschbedingungen: 18 months exchange for product defects.
For technical support or warranty claims, please contact UF-TOOLS customer service through the retailer where the product was purchased or visit the official UF-TOOLS webWebsite für Kontaktinformationen.
Note: Warranty terms may vary based on region and retailer. Please retain your proof of purchase.