NÄCHSTE 8000
NEXT 8000 Full HD Satellitenreceiver – Benutzerhandbuch
Modell: 8000
Einführung
Thank you for choosing the NEXT 8000 Full HD Satellite Receiver. This manual provides detailed instructions for the proper installation, operation, and maintenance of your device. Please read this manual thoroughly before using the receiver to ensure optimal performance and safety.
The NEXT 8000 is designed to deliver a high-quality viewing experience with its Full HD capabilities, multi-satellite search, and media playback features. It supports various languages and offers convenient software upgrades via USB.
Packungsinhalt
Bitte überprüfen Sie, ob alle Artikel im Paket vorhanden sind:
- NEXT 8000 Satellite Receiver Unit
- Fernbedienung
- HDMI-Kabel
- USB-Kabel
- Netzteil

Image: The NEXT 8000 Full HD Satellite Receiver unit shown alongside its remote control.
Installationshandbuch
1. Anschließen des Empfängers
Follow these steps to connect your satellite receiver to your television and satellite dish:
- Satelliteneingang: Verbinden Sie das Koaxialkabel Ihrer Satellitenschüssel mit dem Anschluss „LNB IN“ auf der Rückseite des Receivers.
- HDMI-Verbindung: Use the provided HDMI cable to connect the 'HD OUT' port on the receiver to an available HDMI input on your television. Note the HDMI input number on your TV (e.g., HDMI 1, HDMI 2).
- AV-Anschluss (optional): If your TV does not have an HDMI input, use an AV cable (not included) to connect the 'AV' port on the receiver to the corresponding AV inputs on your television.
- Stromanschluss: Connect the power adapter to the 'DC 12V' input on the receiver, then plug the adapter into a power outlet.
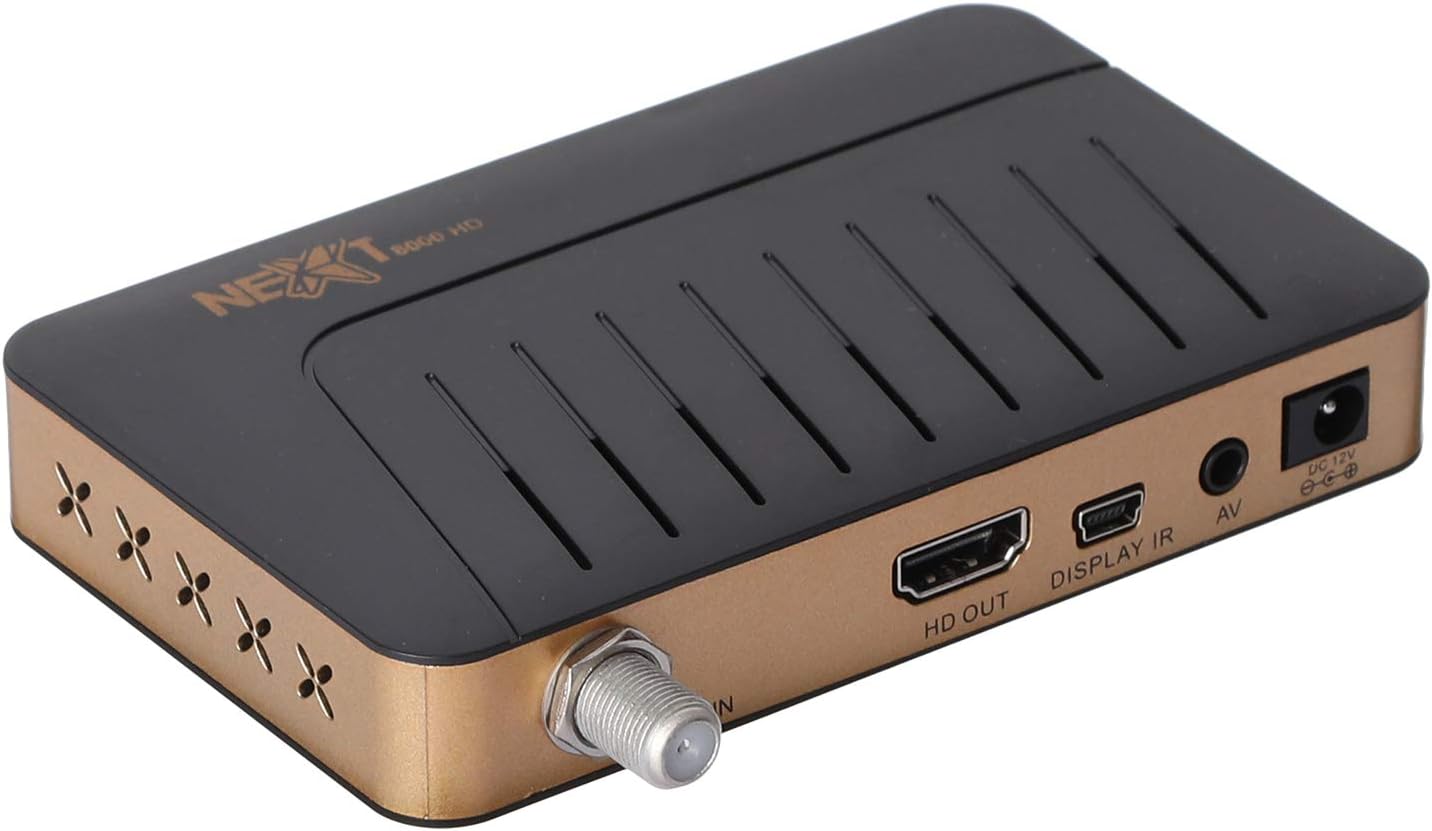
Bild: Rückseite view of the NEXT 8000 receiver, highlighting the LNB IN, HD OUT (HDMI), AV, and DC 12V power input ports.
2. Erste Inbetriebnahme und Einrichtung
After connecting all cables:
- Turn on your television and select the correct HDMI or AV input source.
- The receiver will power on automatically. The initial setup wizard should appear on your screen.
- Follow the on-screen instructions to select your preferred language, time zone, and perform a channel scan. Refer to the 'Operating Instructions' section for details on channel scanning.
3. Fernsteuerung überview
Machen Sie sich mit den Funktionen der Fernbedienung vertraut:

Image: The remote control for the NEXT 8000 satellite receiver, showing various buttons for power, navigation, volume, channel, and special functions.
- Netzschalter: Turns the receiver on/off or to standby mode.
- SPEISEKARTE: Öffnet das Hauptmenü für Einstellungen und Funktionen.
- OK: Confirms selections or displays channel list.
- Pfeiltasten (Hoch/Runter/Links/Rechts): Navigiert durch Menüs und Optionen.
- EXIT: Kehrt zum vorherigen Bildschirm zurück oder verlässt das Menü.
- LAUTSTÄRKE +/-: Passt die Lautstärke an.
- CH +/-: Wechselt die Kanäle.
- EPG: Zeigt den elektronischen Programmführer an.
- SA: Selects satellite.
- USB: Accesses USB media playback.
- Zeitverschiebung: Activates the Timeshift function (requires USB storage).
Bedienungsanleitung
1. Kanalsuche und -verwaltung
To find and organize channels:
- Drücken Sie die SPEISEKARTE Taste auf der Fernbedienung.
- Navigate to 'Installation' or 'Channel Search' using the arrow buttons and press OK.
- Select 'Multi-satellite search' or 'Network search' based on your setup.
- Follow the on-screen prompts to initiate the scan. The receiver will automatically detect available channels.
- After the scan, you can access options to 'Program lock', 'Delete', 'Move', or 'Rename' channels within the channel management menu.
2. Medienwiedergabe über USB
The receiver supports media playback from a USB flash drive.
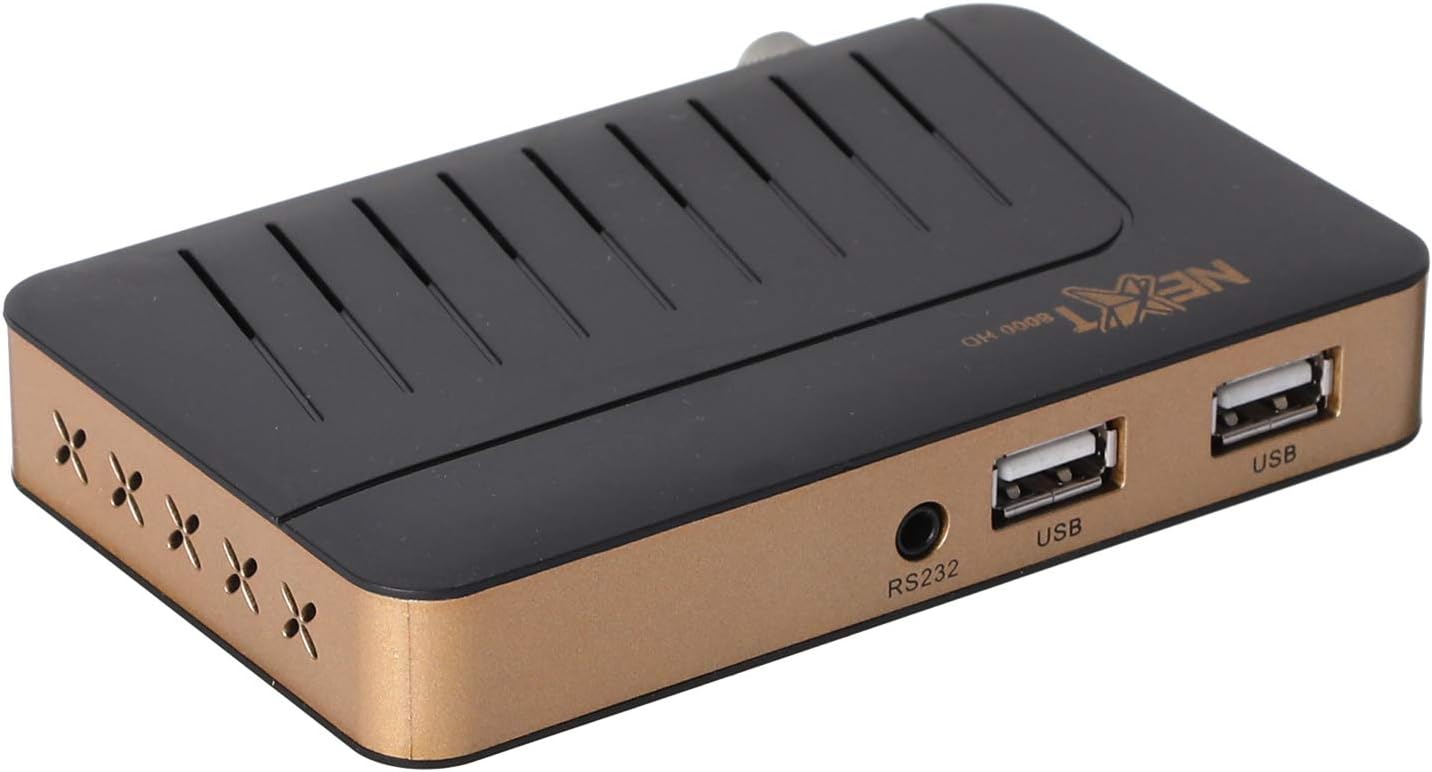
Bild: Vorderseite view of the NEXT 8000 receiver, showing the two USB ports available for connecting external storage devices.
- Insert a USB flash drive into one of the USB ports on the receiver.
- Drücken Sie die USB button on the remote control or navigate to the 'Media' menu.
- Wählen Sie den Medientyp aus, den Sie abspielen möchten (z. B. Video, Musik, Foto).
- Browse your USB drive content and select the desired file. The receiver supports AVI, MKV, TS, TP, TRP, MPG, and MP4 files.
3. Aufnahme und Timeshift
To record programs or use the Timeshift function, a USB storage device must be connected.
- Aufnahme: Drücken Sie während des Ansehens einer Sendung die Taste Aufzeichnen button (usually a red circle) on the remote control to start recording. Press it again to stop. Recorded content will be saved to the connected USB drive.
- Zeitverschiebung: Drücken Sie die Zeitverschiebung button on the remote control to pause live TV. You can then fast-forward or rewind within the buffered content.
4. Elektronischer Programmführer (EPG)
Drücken Sie die EPG Taste auf der Fernbedienung auf view the 7-day electronic program guide. This allows you to see upcoming programs and set reminders or recordings.
5. Parental Lock
To restrict access to certain channels or menus, navigate to the 'System Settings' or 'Parental Control' menu. You can set a password to lock programs or specific functions.
Wartung
1. Software Upgrade via USB
To ensure your receiver has the latest features and bug fixes, you can upgrade its software:
- Laden Sie die neueste Software herunter file from the official NEXT website to a USB flash drive. Ensure the file is placed in the root directory of the USB drive.
- Stecken Sie den USB-Stick in den USB-Anschluss des Receivers.
- Gehe zu SPEISEKARTE > 'System Settings' > 'Software Upgrade' (or similar option).
- Select 'Upgrade by USB' and choose the software file.
- Confirm the upgrade. The receiver will restart automatically after the upgrade is complete. Do not power off the receiver during the upgrade process.
2. Reinigung
To clean the receiver, disconnect it from the power supply. Use a soft, dry cloth to wipe the exterior surfaces. Do not use liquid cleaners or abrasive materials.
Fehlerbehebung
If you encounter issues with your NEXT 8000 receiver, refer to the following table:
| Problem | Mögliche Ursache | Lösung |
|---|---|---|
| Kein Bild oder Ton | Incorrect TV input selected; Loose HDMI/AV cable; Receiver not powered on. | Select correct TV input; Check all cable connections; Ensure receiver is powered on. |
| Keine Kanäle gefunden | Satellite dish not aligned; Incorrect LNB settings; Channel scan not performed. | Check satellite dish alignment; Verify LNB settings in menu; Perform a channel scan. |
| Fernbedienung funktioniert nicht | Dead batteries; Obstruction between remote and receiver; Remote sensor blocked. | Replace batteries; Remove obstructions; Ensure receiver's IR sensor is clear. |
| USB-Medien werden nicht wiedergegeben | Nicht unterstützt file Formatierung; USB-Stick nicht richtig eingesteckt; Beschädigt file. | Überprüfen file format compatibility; Re-insert USB drive; Try a different USB drive or file. |
Wenn das Problem nach dem Ausprobieren dieser Lösungen weiterhin besteht, wenden Sie sich bitte an den Kundensupport.
Technische Daten
Key technical specifications for the NEXT 8000 Full HD Satellite Receiver:
- Modell: 8000
- Videoausgabeauflösung: 576i, 576p, 720p, 1080i, 1080p (50/60 Hz)
- Konnektivität: HDMI, USB (2 ports), RS232, AV
- Unterstützte Audioformate: Dolby Digital, DTS, AAC, PCM
- Supported Video/Media Formats: AVI, MKV, TS, TP, TRP, MPG, MP4
- Speicher: 100 satellites, 4000 frequencies, 8000 channels
- Prozessor: Sunplus
- Merkmale: Recording by USB flash, Screen enlargement, Multi-satellite search, Network search, Media playback, 7-day Electronic Program Guide (EPG), Teletex, Timeshift, Parental lock.
- Abmessungen: 19.6 x 17.4 x 6.6 cm
- Gewicht: 396 g
Garantie und Support
For warranty information and technical support, please refer to the documentation provided with your purchase or visit the official NEXT product support webBewahren Sie Ihren Kaufbeleg als Kaufnachweis für Garantieansprüche auf.