1. Wichtige Sicherheitshinweise
Please read all instructions carefully before using the appliance and retain for future reference. Always follow basic safety precautions when using electrical appliances.
- Tauchen Sie das Gerät, das Kabel oder den Stecker nicht in Wasser oder andere Flüssigkeiten.
- Stellen Sie sicher, dass die LautstärketagDie auf dem Gerät angegebene e entspricht Ihrer örtlichen Netzvoltage vor dem Anschließen.
- Bei der Benutzung von Geräten durch oder in der Nähe von Kindern ist eine genaue Aufsicht erforderlich.
- Bei Nichtgebrauch und vor der Reinigung den Stecker aus der Steckdose ziehen. Vor dem Anbringen oder Abnehmen von Teilen abkühlen lassen.
- Betreiben Sie kein Gerät, dessen Kabel oder Stecker beschädigt ist, oder wenn das Gerät eine Fehlfunktion aufweist oder auf sonstige Weise beschädigt wurde.
- Stellen Sie das Gerät nicht an eine Wand oder an andere Geräte. Lassen Sie mindestens 10 cm Freiraum an der Rückseite und den Seiten sowie 10 cm Freiraum über dem Gerät.
- Stellen Sie keine Gegenstände auf das Gerät.
- Verwenden Sie das Gerät nicht für andere als die in diesem Handbuch beschriebenen Zwecke.
- Beim Bewegen eines Geräts, das heißes Öl oder andere heiße Flüssigkeiten enthält, ist äußerste Vorsicht geboten.
- Das Gerät ist nur für den Gebrauch im Haushalt bestimmt.
2. Produktüberschreitungview
2.1 Hauptmerkmale
- Large digital touch display for instant cooking mode adjustments.
- Smart knob for easy start/stop and precise time/temperature control.
- Powerful 1800W heating element with rapid hot air circulation for perfect cooking.
- Temperature range: 65-200°C for cooking, 30-80°C for dehydration.
- 8 preset cooking settings for various meals including chicken, seafood, and desserts.
- Spacious 12L cooking capacity with 3 rack levels for family-sized portions.
- Interior light to monitor cooking progress.
- Dishwasher-safe accessories for easy cleaning.
- Sleek black body with cool-touch silver handle.
- EU certified, LFGB food-safe material, PFOA and PTFE free.
2.2 Komponenten und Zubehör
Familiarize yourself with the main unit and included accessories:


Das Gerät wird mit folgendem Zubehör geliefert:
- 3 x Removable Air Flow Racks
- 1 x Rotisserie Spit and Forks
- 1 x Drehkorb
- 1 x Retrieval Tool
- 1 x Removable Drip Tray
3. Einrichtung und erste Verwendung
3.1 Auspacken
- Entfernen Sie sorgfältig sämtliche Verpackungsmaterialien und Werbeetiketten von der Heißluftfritteuse.
- Remove all accessories from inside the appliance.
- Keep packaging materials for future storage or disposal.
3.2 Reinigung vor dem ersten Gebrauch
- Wischen Sie die Außenseite der Heißluftfritteuse mit einem sauberen, trockenen Tuch ab.amp Tuch.
- Wash all removable accessories (air flow racks, rotisserie spit, rotating basket, drip tray) with warm, soapy water. Rinse thoroughly and dry completely. All accessories are dishwasher safe.
- Tauchen Sie das Hauptgerät nicht in Wasser.
3.3 Platzierung
- Stellen Sie die Heißluftfritteuse auf eine stabile, ebene und hitzebeständige Oberfläche.
- Ensure there is at least 10 cm of clear space around the back and sides, and 10 cm above the appliance for proper ventilation.
- Stellen Sie die Heißluftfritteuse nicht in die Nähe von brennbaren Materialien oder Wärmequellen.
4. Bedienungsanleitung
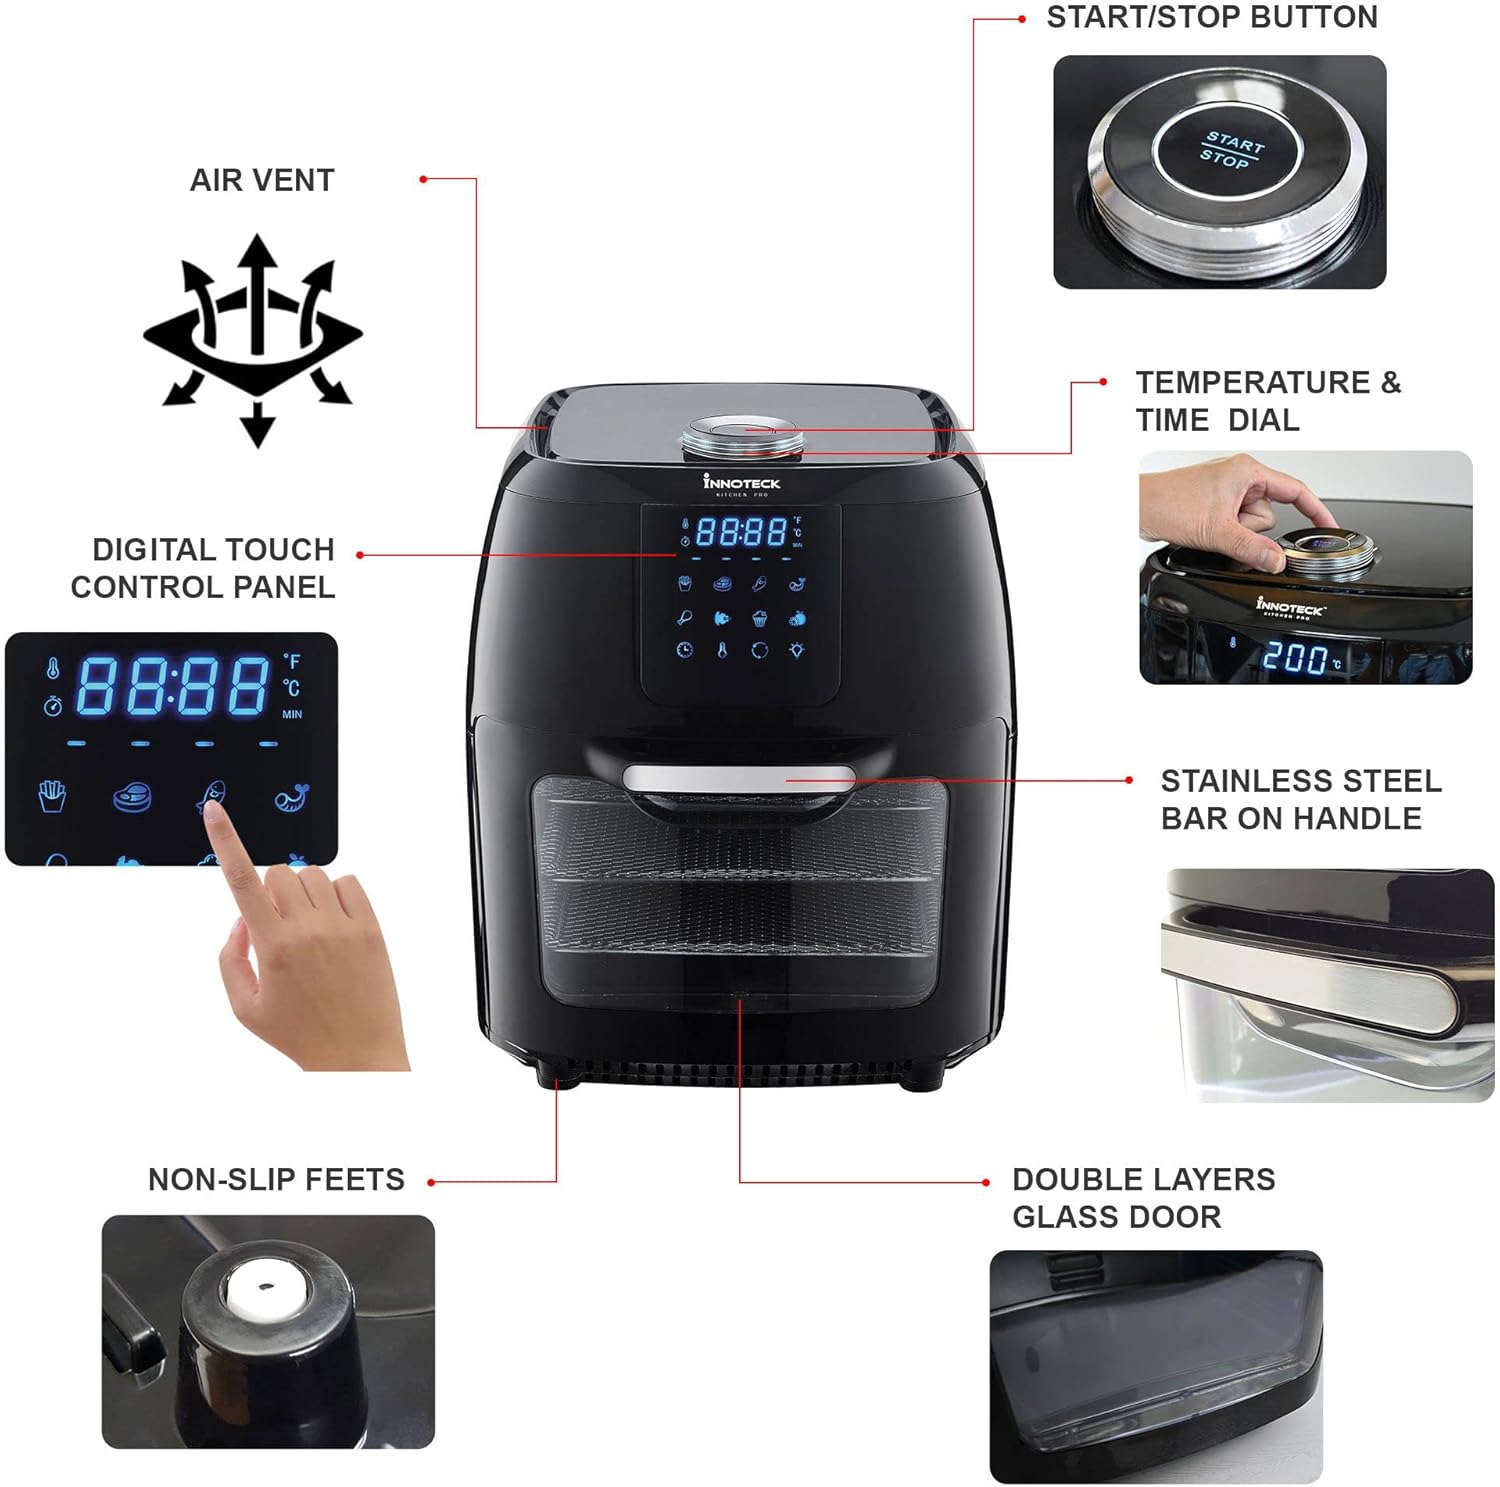
4.1 Digitales Bedienfeld
The air fryer features a large digital touch display and a smart knob for intuitive control. Refer to Figure 2.2 for a visual guide.
- Netzschalter: Drücken Sie diese Taste, um das Gerät ein-/auszuschalten.
- Voreingestellte Symbole: Touch an icon to select a pre-programmed cooking mode (e.g., Fries, Meat, Fish, Shrimp, Chicken, Rotisserie, Bake, Dehydrate).
- Temperatur-/Zeitanzeige: Zeigt die aktuelle Temperatur und die verbleibende Garzeit an.
- Smart Knob: Rotate to adjust temperature or time. Press to confirm selection or to start/pause cooking.
- Internal Light Button: Drücken, um die Innenbeleuchtung ein-/auszuschalten.
- Drehen-Taste: Activates the rotisserie function for the rotating basket or rotisserie spit.
4.2 Kochen mit Voreinstellungen
The air fryer includes 8 optimized cooking presets for convenience:

- Place food inside the air fryer using the appropriate accessory (rack, basket, or spit).
- Gerätetür fest schließen.
- Drücken Sie den Ein-/Ausschalter, um das Display einzuschalten.
- Touch the desired preset icon on the digital display. The air fryer will automatically set the optimal temperature and time for that food type.
- If desired, you can adjust the preset time or temperature by rotating the smart knob.
- Press the smart knob or the Start/Stop button to begin cooking.
- The interior light can be turned on/off to check cooking progress.
- When cooking is complete, the air fryer will beep and automatically shut off.
4.3 Manuelles Kochen
- Place food inside the air fryer and close the door.
- Drücken Sie die Einschalttaste.
- Rotate the smart knob to set the desired temperature (65-200°C). Press the knob to confirm.
- Rotate the smart knob again to set the desired cooking time. Press the knob to confirm and start cooking.
4.4 Verwendung der Drehspießfunktion
The rotisserie function is ideal for whole chickens or using the rotating basket for fries or nuts.
- Prepare your food and secure it onto the rotisserie spit or place it inside the rotating basket.
- Insert the rotisserie assembly into the air fryer's internal slots.
- Select a cooking preset or set manual temperature and time.
- Press the 'Rotate' button on the control panel to activate the rotation.
- Monitor cooking through the glass door and interior light.
- Once cooking is complete, use the retrieval tool to safely remove the hot rotisserie assembly.
5. Wartung und Reinigung
Durch regelmäßige Reinigung gewährleisten Sie die Langlebigkeit und optimale Leistung Ihrer Heißluftfritteuse.
- Vor der Reinigung muss die Heißluftfritteuse immer vom Stromnetz getrennt und vollständig abgekühlt sein.
- Haupteinheit: Wischen Sie die Außenseite mit adamp Tuch. Keine Scheuermittel verwenden und das Gerät nicht in Wasser tauchen.
- Innere: Wischen Sie den Innenraum mit Werbung abamp cloth and mild detergent if necessary. For stubborn food residue, use a non-abrasive sponge.
- Zubehör: All removable accessories (air flow racks, rotisserie spit, rotating basket, drip tray) are dishwasher safe. Alternatively, wash them with warm, soapy water, rinse, and dry thoroughly.
- Tropfschale: Empty and clean the drip tray after each use to prevent smoke and odors.
- Stellen Sie sicher, dass alle Teile vollständig trocken sind, bevor Sie das Gerät einlagern oder wieder verwenden.
6. Fehlerbehebung
If you encounter any issues, please refer to the table below before contacting customer support.
| Problem | Mögliche Ursache | Lösung |
|---|---|---|
| Die Heißluftfritteuse lässt sich nicht einschalten. | Appliance not plugged in; Power outlet not working; Power button not pressed. | Ensure plug is securely in outlet; Test outlet with another appliance; Press the Power button on the control panel. |
| Das Essen wird nicht gleichmäßig gegart. | Too much food in the basket/on racks; Food not shaken/rotated during cooking; Incorrect temperature/time. | Cook in smaller batches; Shake/rotate food halfway through cooking; Adjust temperature and time as needed. |
| Aus dem Gerät kommt weißer Rauch. | Fettrückstände vom vorherigen Gebrauch; Zubereitung von fetthaltigen Speisen. | Clean the drip tray and interior thoroughly; For fatty foods, add a small amount of water to the drip tray to prevent smoke. |
| Das Essen ist nicht knusprig. | Zu wenig Öl (falls zutreffend); Temperatur zu niedrig; Garzeit zu kurz. | Lightly coat food with oil; Increase temperature or cooking time. |
7. Spezifikationen
Detailed technical specifications for the Innoteck Kitchen Pro 12L Digital Air Fryer.

| Besonderheit | Detail |
|---|---|
| Marke | Innoteck |
| Modellnummer | DS-5894 |
| Farbe | Schwarz & Silber |
| Produktabmessungen (L x B x H) | 31 x 32 x 39 cm |
| Kapazität | 12 Liter |
| Leistung / Wattage | 1800 Watt |
| Bandtage | 230 Volt |
| Material | Aluminium |
| Besondere Merkmale | Temperaturregelung |
| Artikelgewicht | 9.1 Kilogramm |
| Empfohlene Verwendung | Roasting, Dehydrating, Baking |
| Erstes verfügbares Datum | 13. Mai 2022 |
8. Garantie und Support
Your Innoteck Kitchen Pro 12L Digital Air Fryer comes with a standard manufacturer's warranty. Please refer to the warranty card included in your product packaging for specific terms and conditions.
For technical support, troubleshooting assistance, or warranty claims, please contact Innoteck Customer Service:
- WebWebsite: Visit the official Innoteck webWebsite mit häufig gestellten Fragen und Support-Ressourcen.
- E-Mail: Refer to your warranty card for the dedicated support email address.
- Telefon: Contact numbers may vary by region; please check the product packaging or website for local support lines.
When contacting support, please have your model number (DS-5894) and purchase date ready.