MINDEO MD-2250
MINDEO MD-2250 1D Handlicher USB-Kabelgebundener Barcode-Scanner – Benutzerhandbuch
Modell: MD-2250
1. Einleitung
This manual provides detailed instructions for the proper setup, operation, and maintenance of your MINDEO MD-2250 High Speed 1D Handheld USB Wired Barcode Scanner. Please read this manual thoroughly before using the device to ensure optimal performance and longevity.
The MINDEO MD-2250 is designed for fast and precise scanning of 1D barcodes, supporting both handheld and presentation scanning modes. Its robust construction makes it suitable for various environments including manufacturing, logistics, retail, and healthcare.
2. Packungsinhalt
Bitte überprüfen Sie beim Auspacken, ob alle unten aufgeführten Artikel vorhanden und in gutem Zustand sind:
- MINDEO MD-2250 Barcode Scanner
- USB-Verbindungskabel
- Benutzerhandbuch (dieses Dokument)
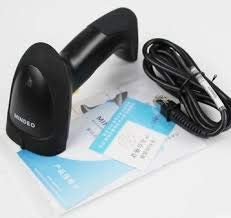
Image 2.1: Contents of the MINDEO MD-2250 package, including the scanner, USB cable, and documentation.
3. Produktüberschreitungview
Familiarize yourself with the main components of your MINDEO MD-2250 barcode scanner:
- Scan-Fenster: The area through which the laser beam is emitted to read barcodes.
- Auslösetaste: Activates the scanning process in handheld mode.
- LED-Anzeige: Provides visual feedback on scanning status (e.g., successful scan, error).
- USB-Anschluss: Connects the scanner to a host device via the USB cable.
- Ergonomischer Griff: Designed for comfortable grip during extended use.
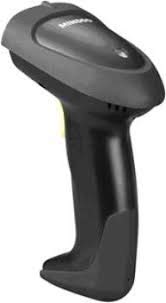
Abbildung 3.1: Seite view of the MINDEO MD-2250 Barcode Scanner, highlighting its ergonomic design.
4. Einrichtung
Follow these steps to set up your MINDEO MD-2250 barcode scanner:
- Schließen Sie das USB-Kabel an: Insert the smaller end of the USB cable into the USB port at the base of the scanner.
- Verbindung zum Hostgerät herstellen: Plug the larger end of the USB cable into an available USB port on your computer (desktop or laptop).
- Treiberinstallation: The scanner is typically plug-and-play and will be recognized automatically by most operating systems (Windows, macOS, Linux) as a Human Interface Device (HID) keyboard. No additional driver installation is usually required.
- Bestätigung: Once connected, the scanner's LED indicator may flash or illuminate, indicating it is powered on and ready for use.
The scanner will emulate keyboard input, meaning scanned barcode data will appear wherever your cursor is positioned, just like typing on a keyboard.
5. Bedienungsanleitung
5.1. Grundlegendes Scannen
- Ziel: Point the scan window of the scanner at the barcode you wish to read.
- Aktivieren:
- Handheld-Modus: Drücken und halten Sie den Auslöserknopf. Eine Laserlinie erscheint.
- Presentation Mode (Auto-sense): The scanner will automatically detect a barcode placed within its scanning field and activate the laser.
- Scan: Position the laser line across the entire barcode. Ensure the barcode is flat and well-lit.
- Bestätigung: A successful scan is typically indicated by an audible beep and/or a change in the LED indicator light. The barcode data will then be transmitted to your connected device.
5.2. Scan-Tipps
- Maintain an appropriate distance from the barcode. The optimal scanning distance can vary depending on the barcode size and density.
- Avoid scanning at extreme angles, as this can make it difficult for the scanner to read the barcode.
- Ensure the barcode is clean and free from obstructions or damage.
- For reflective surfaces, try tilting the scanner slightly to avoid glare.
6. Wartung
6.1. Reinigung
- Exterieur: Verwenden Sie ein weiches, sauberes Tuch und wischen Sie es leicht ab.ampened with water or a mild, non-abrasive cleaning solution to wipe the exterior of the scanner.
- Scan-Fenster: Gently clean the scan window with a lint-free cloth or a lens cleaning wipe. Avoid using abrasive materials or harsh chemicals that could scratch the surface.
- Do not immerse the scanner in any liquid.
6.2. Speicherung
- Bewahren Sie den Scanner an einem kühlen, trockenen Ort auf, fern von direkter Sonneneinstrahlung und extremen Temperaturen.
- Protect the scanner from drops and impacts when not in use.
7. Fehlerbehebung
If you encounter issues with your MINDEO MD-2250 scanner, refer to the following common problems and solutions:
| Problem | Mögliche Ursache | Lösung |
|---|---|---|
| Der Scanner lässt sich nicht einschalten. | USB-Kabel nicht richtig angeschlossen oder USB-Anschluss defekt. | Ensure the USB cable is securely connected to both the scanner and the host device. Try a different USB port or a different computer. |
| Der Scanner liest keine Barcodes. | Barcode damaged, poor lighting, incorrect scanning angle, or scanner not enabled. | Check barcode integrity. Ensure adequate lighting. Adjust scanning angle and distance. Verify the scanner is recognized by the computer. |
| Die gescannten Daten sind fehlerhaft oder unvollständig. | Barcode partially obscured, damaged, or incorrect symbology settings. | Ensure the entire barcode is visible and undamaged. If issues persist, consult advanced programming guides for symbology settings (not covered in this basic manual). |
| No beep or LED feedback after scanning. | Scanner settings may have disabled feedback, or scan was unsuccessful. | Ensure the scan was successful. If feedback is consistently absent, refer to advanced programming guides to enable audible/visual feedback. |
8. Spezifikationen
The following table outlines the key technical specifications for the MINDEO MD-2250 Barcode Scanner:
| Besonderheit | Detail |
|---|---|
| Modell | MD-2250 (Manufacturer Part Number: SDH12) |
| Marke | MINDEO |
| Konnektivitätstechnologie | USB-Kabel |
| Scan-Typ | 1D-Laser-Barcodescanner |
| Scanmodi | Handheld, Presentation (Auto-sense) |
| Kompatible Geräte | Desktop, Laptop |
| Stromquelle | Kabelgebunden (über USB) |
| Farbe | Schwarz |
| Artikelgewicht | 250 g |
| Artikelabmessungen (LxBxH) | 110 x 200 x 80 Centimeters (Note: This dimension seems unusually large for a handheld scanner, likely refers to packaging or a different unit. User should verify actual product dimensions.) |
| Material | ABS + PC (Anti-shock and Durable) |
9. Garantie und Support
For warranty information, technical support, or service inquiries, please contact your MINDEO product vendor or visit the official MINDEO webBewahren Sie Ihren Kaufbeleg als Kaufnachweis für Garantieansprüche auf.