1. Einleitung
Thank you for choosing the Bearware Wireless Weather Station with Projection and Outdoor Sensor. This device provides accurate time via DCF radio signal, indoor and outdoor temperature readings, weather forecasts, and a convenient alarm function with projection. Please read this manual carefully to ensure proper use and optimal performance of your weather station.
2. Sicherheitshinweise
- Setzen Sie das Hauptgerät oder den Außensensor keinen extremen Temperaturen, direkter Sonneneinstrahlung oder übermäßiger Feuchtigkeit aus.
- Vermeiden Sie es, das Gerät fallen zu lassen oder starken Stößen auszusetzen.
- Versuchen Sie nicht, das Gerät selbst zu zerlegen oder zu reparieren. Überlassen Sie alle Wartungsarbeiten qualifiziertem Fachpersonal.
- Batterien für Kinder unzugänglich aufbewahren. Gebrauchte Batterien gemäß den örtlichen Vorschriften umweltgerecht entsorgen.
- Use only the provided power adapter or specified battery types.
3. Packungsinhalt
Bitte prüfen Sie das Paket auf folgende Artikel:
- Bearware Wireless Weather Station (Main Unit)
- Drahtloser Außensensor
- DC 5V 1.2A Netzteil
- User Manual (Italian version available online)

Image: Contents of the Bearware Weather Station package, including the main unit, outdoor sensor, and power adapter.
4. Produktüberschreitungview
4.1 Main Unit (Front View)
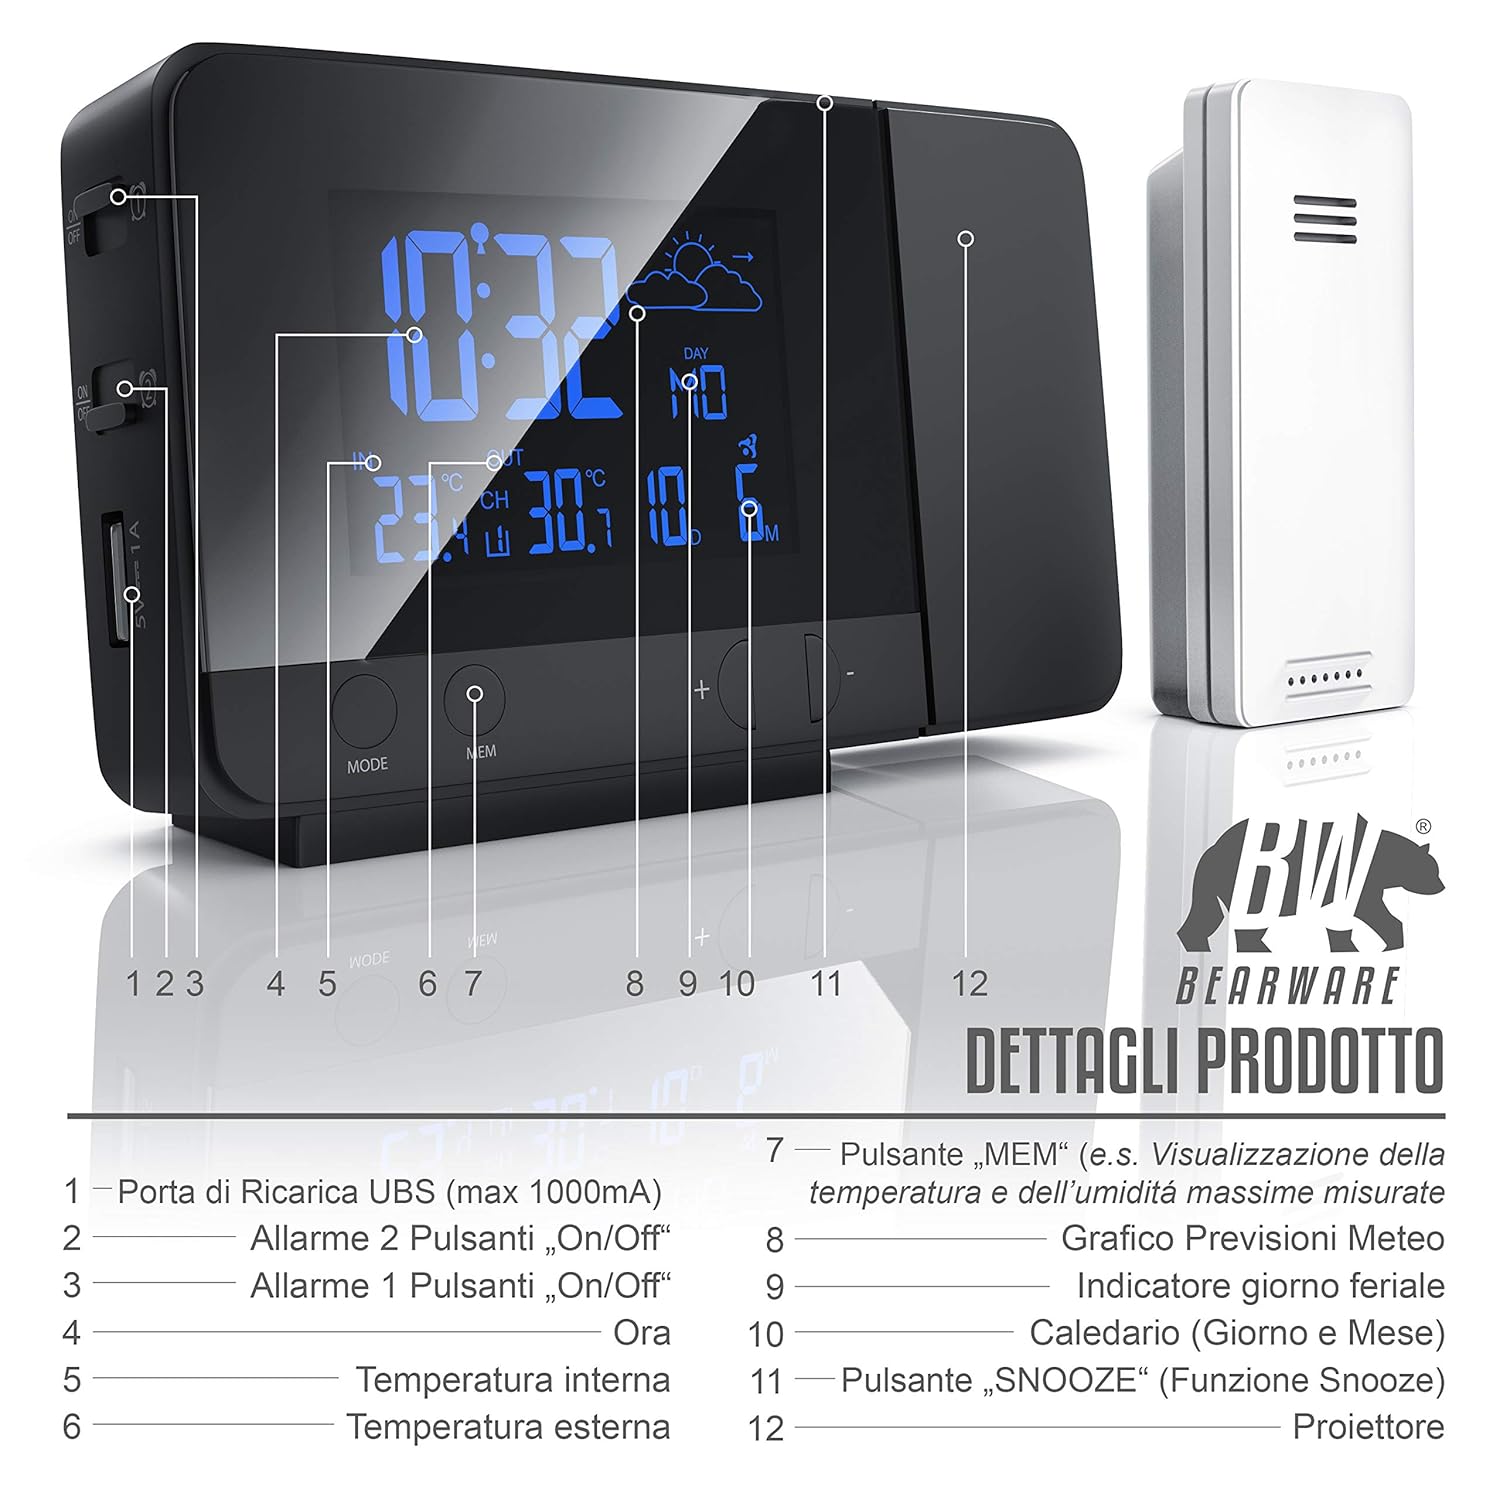
Bild: Vorderseite view of the weather station display and control buttons. Key elements include the time, indoor/outdoor temperature, weather forecast icon, day, and date. Buttons for MODE, MEM, and +/- are visible below the display.
- USB Charging Port (max 1000mA)
- Alarm 2 On/Off Button
- Alarm 1 On/Off Button
- Zeitanzeige
- Innentemperatur
- Außentemperatur
- "MEM" Button (e.g., Display Max/Min Temperature and Humidity)
- Weather Forecast Graph
- Wochentagsanzeige
- Calendar (Day and Month)
- "SNOOZE" Button (Snooze Function)
- Projektor
4.2 Main Unit (Side/Rear View)

Abbildung: Seite und Rückseite view of the weather station, highlighting the control buttons and ports. This includes the snooze button, color change settings, alarm switches, battery compartment, and DC power input.
- SNOOZE Button (Stops and postpones alarm)
- Set Color Change in "Loop" (Automatic color cycle)
- Set Color Change in "Rainbow" (Specific color selection)
- Alarm 1 Ein-/Ausschalter
- Alarm 2 Ein-/Ausschalter
- Battery Compartment (2x 1.5V AAA Batteries)
- DC 5V 1.2A Power Adapter Input
4.3 Drahtloser Außensensor
The outdoor sensor measures external temperature and transmits data wirelessly to the main unit. It is protected against splashes (IPX4) and operates on 2x AAA 1.5V batteries.
5. Einrichtung
5.1 Stromversorgung der Haupteinheit
- Batterieleistung: Open the battery compartment on the rear of the main unit and insert 2 x 1.5V AAA batteries, observing polarity (+/-). This provides backup power in case of a power outage.
- Wechselstromversorgung: Connect the included DC 5V 1.2A power adapter to the DC input port on the rear of the main unit, then plug it into a wall outlet. The display will light up.
5.2 Powering the Outdoor Sensor
- Open the battery compartment on the outdoor sensor and insert 2 x 1.5V AAA batteries, observing polarity (+/-).
- Place the outdoor sensor in a sheltered location, away from direct sunlight and rain, to ensure accurate readings. The maximum wireless range is approximately 10 meters.
5.3 Initial Synchronization (DCF Time & Sensor)
Upon initial power-up, the weather station will automatically attempt to synchronize with the DCF radio signal for accurate time and date. It will also search for the outdoor sensor.
- Place the main unit near a window for better DCF signal reception.
- The synchronization process may take several minutes or up to 6 hours.
- Once synchronized, the DCF icon will appear on the display.
- If the outdoor temperature does not appear, ensure the sensor batteries are correctly installed and it is within range. You may need to manually initiate a sensor search (refer to Operating Instructions).
6. Bedienungsanleitung
6.1 Uhrzeit und Datum einstellen
- In normal time display mode, press and hold the "MODE" button to enter time setting mode.
- Use the "+/-" buttons to adjust values. Press "MODE" to confirm and move to the next setting (e.g., 12/24 hour format, hour, minute, year, month, day, weekday language).
- The weekday display supports 7 different languages.
6.2 Alarmeinstellungen
The weather station features two independent alarms.
- Press the "MODE" button repeatedly to cycle through time, Alarm 1, and Alarm 2 display modes.
- To set an alarm, select Alarm 1 or Alarm 2 display, then press and hold the "MODE" button. Use "+/-" to adjust the hour and minute. Press "MODE" to confirm.
- Use the dedicated Alarm 1 On/Off and Alarm 2 On/Off switches on the side/rear of the unit to activate or deactivate each alarm.
- When an alarm sounds, press the "SNOOZE" button to activate the snooze function. The alarm will sound again after a few minutes. To stop the alarm completely, press any other button.
6.3 Display Settings (Backlight & Brightness)

Image: The weather station display showcasing its 8-color RGB backlight feature, with different colors like green, blue, red, and yellow.
- The display features an 8-color RGB backlight (green, turquoise, blue, purple, white, red, orange, yellow).
- Use the "Set Color Change in 'Loop'" switch on the side/rear to enable automatic color cycling.
- Use the "Set Color Change in 'Rainbow'" switch to manually select a specific color.
- Brightness can be adjusted (details not specified, typically via a dedicated button or holding a button).
6.4 Temperature Display & Min/Max Values
- The display shows both indoor and outdoor temperatures.
- Drücken Sie die Taste „MEM“, um view the minimum and maximum recorded temperatures. Press again to cycle through min/max indoor and outdoor temperatures.
- To switch between Celsius (°C) and Fahrenheit (°F), locate the °C/°F switch (often on the back or via a button combination).
6.5 Wettervorhersage
The weather station provides a weather forecast for approximately the next 12 hours based on changes in atmospheric pressure. Icons on the display will indicate sunny, partly cloudy, cloudy, rainy, or snowy conditions.
6.6 USB-Ladefunktion

Image: A smartphone connected to the USB charging port on the side of the Bearware Weather Station, illustrating its charging capability.
The main unit includes a USB Type A female port (max 1000mA output) for charging external devices like smartphones. Connect your device's USB charging cable to this port.
6.7 Projektionsfunktion
The integrated projector can display the time and temperature onto a wall or ceiling. The projection angle can be adjusted. The projection is typically red for clear visibility in low light conditions.
7. Wartung
- Reinigung: Wipe the unit and sensor with a soft, dry cloth. Do not use abrasive cleaners or solvents.
- Batteriewechsel: Replace batteries in both the main unit and outdoor sensor when the low battery indicator appears on the display or when performance degrades. Ensure correct battery type (AAA) and polarity.
- Lagerung: Wenn Sie das Gerät über einen längeren Zeitraum lagern, entfernen Sie alle Batterien, um ein Auslaufen zu verhindern.
8. Fehlerbehebung
| Problem | Mögliche Ursache | Lösung |
|---|---|---|
| No display / Unit not powering on | No power from adapter; dead batteries; incorrect battery polarity. | Check power adapter connection; replace batteries; ensure correct battery orientation. |
| Outdoor temperature not displayed | Outdoor sensor out of range; dead sensor batteries; interference. | Move sensor closer to main unit; replace sensor batteries; try repositioning both units. |
| DCF time not synchronizing | Schlechter Signalempfang; Störungen. | Move unit near a window; avoid electronic devices that may cause interference; allow more time for synchronization. |
| Ungenaue Temperaturwerte | Sensor exposed to direct sunlight or heat sources; poor ventilation. | Verlegen Sie den Sensor an einen schattigen, gut belüfteten Ort. |
| Projection is blurry or unclear | Incorrect focus; projection surface too far or uneven. | Adjust the projector's focus (if available); ensure projection surface is flat and within optimal distance. |
9. Spezifikationen

Image: Top and front view of the Bearware Weather Station with key dimensions: 137mm length, 85mm height, and 33mm depth.
- Modellnummer: 302688
- Abmessungen (Hauptgerät): 13.7 x 3.3 x 8.5 cm (L x B x H)
- Gewicht (Hauptgerät): 168 Gramm
- Farbe: Schwarz (matt)
- Material: Plastik
- Stromversorgung (Haupteinheit): 2 x 1.5V AAA batteries or DC 5V 1.2A power adapter (included)
- Stromversorgung (Außensensor): 2 x 1.5 V AAA-Batterien
- Innentemperaturbereich: -9.9 °C (14 °F) bis 50 °C (122 °F)
- Außentemperaturbereich: -40 °C (-40 °F) bis 70 °C (158 °F)
- Temperaturgenauigkeit: 1 °C
- Sensortechnologie: Kabellos
- USB-Ladeausgang: Max. 1000 mA (USB Type A female)
- Display-Hintergrundbeleuchtung: 8-color RGB (green, turquoise, blue, purple, white, red, orange, yellow)
- Zeitformat: 12/24 Stunden
- Besondere Merkmale: DCF radio-controlled time, 2 adjustable alarms, Snooze function, Min/Max temperature display, Weather trend function, USB charging port, Time projection on ceiling/wall.
10. Garantie und Support
This Bearware product comes with a 24-month warranty from the date of purchase. In case of any issues or for technical support, please contact Bearware customer service. Please refer to the contact information provided with your purchase or on the official Bearware webWebsite.