KAFF KSQ 60
KAFF Cooking Range Stainless Steel 4 Burner Hob, Model KSQ 60 User Manual
Einführung
This manual provides essential information for the safe and efficient operation, installation, and maintenance of your KAFF Cooking Range Stainless Steel 4 Burner Hob, Model KSQ 60. Please read these instructions carefully before using the appliance and retain them for future reference.
Sicherheitshinweise
Wichtig: Beachten Sie beim Gebrauch dieses Geräts stets die grundlegenden Sicherheitsvorkehrungen, um das Risiko von Bränden, Stromschlägen, Verbrennungen oder Verletzungen zu verringern.
- Sorgen Sie während des Betriebs für ausreichende Belüftung im Küchenbereich.
- Lagern Sie keine brennbaren Materialien in der Nähe des Geräts.
- Halten Sie Kinder und Haustiere während des Gebrauchs vom Gerät fern.
- Bei Fettbränden darf kein Wasser verwendet werden; das Feuer muss erstickt oder ein Trockenlöschmittel oder ein Schaumlöscher eingesetzt werden.
- Always turn off all controls and disconnect the power supply before cleaning or servicing.
- Stellen Sie sicher, dass das Gerät von einem qualifizierten Techniker gemäß den örtlichen Vorschriften installiert wird.
Setup und Installation
The KAFF KSQ 60 is a freestanding cooking range designed for household use. Proper installation is crucial for safety and performance.

Image: KAFF KSQ 60 Cooking Range.
This image displays the complete Kaff KSQ 60 freestanding cooking range, featuring a stainless steel finish, a four-burner gas hob with cast iron grates, a control panel with knobs, and a visible oven cavity with a glass door below.
1. Auspacken
Carefully remove all packaging materials. Inspect the appliance for any damage incurred during transit. Report any damage immediately to your retailer.
2. Positionierung und Nivellierung
Place the cooking range in the desired location. The appliance features adjustable legs to ensure it is perfectly level. Adjust each leg by rotating it until the range is stable and level on all surfaces.
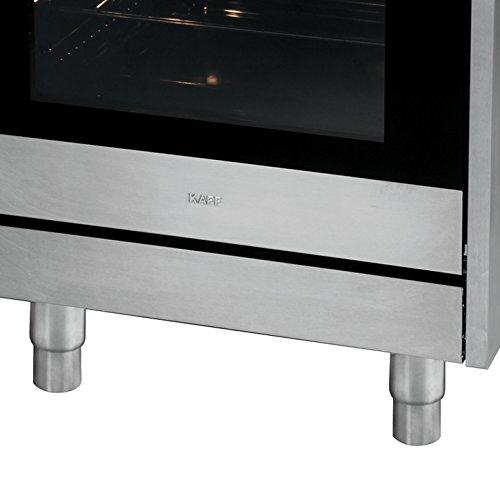
Image: Adjustable legs for leveling the cooking range.
This image shows a close-up of the stainless steel adjustable legs at the base of the cooking range, along with the lower front panel featuring the KAFF brand logo. These legs allow for precise leveling of the appliance on uneven surfaces.
3. Abmessungen und Freiraum
Ensure adequate clearance around the appliance for proper ventilation and safe operation. Refer to the dimension diagram for precise measurements.
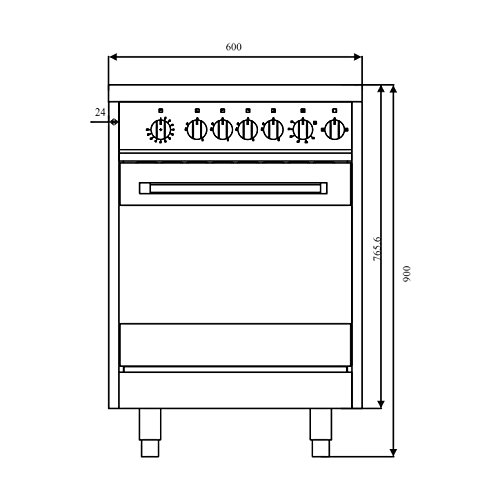
Image: Dimensional drawing of the cooking range.
This technical drawing illustrates the front view of the Kaff KSQ 60 cooking range with key dimensions indicated in millimeters. The width is 600mm, and the total height including the hob is 900mm, with the main body height being 765.6mm.
4. Gasanschluss
This appliance operates on gas. The gas connection must be performed by a qualified and certified technician. Ensure all connections are leak-free and comply with local gas safety standards.
5. Elektrische Verbindung
The cooking range requires an electrical connection for the auto electric ignition, oven light, and rotisserie. Ensure the power supply matches the appliance's requirements (220-240V, 50Hz) and is properly grounded. Do not use extension cords.
Bedienungsanleitung
1. Hob Burner Operation
The hob features four gas burners and one triple flame burner, each controlled by a dedicated knob with auto electric ignition.

Image: Hob burners and grates.
Dieses Bild zeigt eine Nahaufnahme. view of the stainless steel hob surface, showcasing the robust cast iron grates and the individual gas burners. The design allows for stable placement of cookware.

Image: Control panel and hob.
Ein breiteres view of the control panel and the hob area. The six control knobs are visible, corresponding to the four standard burners, one triple flame burner, and the oven functions. The stainless steel finish is prominent.
- Place your cookware centrally on the burner grate.
- Push in the corresponding burner knob and turn it counter-clockwise to the maximum flame setting (large flame symbol).
- The auto electric ignition will spark, igniting the gas. Hold the knob in for a few seconds after ignition to allow the thermocouple to heat up.
- Den Knopf loslassen. Falls die Flamme erlischt, den Vorgang wiederholen.
- Adjust the flame size by turning the knob between the maximum and minimum flame settings.
- To turn off, turn the knob clockwise to the 'off' position (dot symbol).
2. Ofenbetrieb
The oven is gas-operated with a capacity of 59 liters, featuring a double glass door, timer, grill shelf, oven tray, and rotisserie function.

Image: Oven interior.
This image shows the interior of the oven cavity, visible through the double glass door. Multiple rack positions are evident, along with the internal lighting, indicating a spacious and functional oven design.

Image: Oven control knobs.
Eine detaillierte view of the right-hand side control knobs. These knobs are used to set the oven temperature (ranging from MIN to MAX, with specific markings like 150°C and 180°C) and select oven functions, indicated by symbols for baking, grilling, and rotisserie.
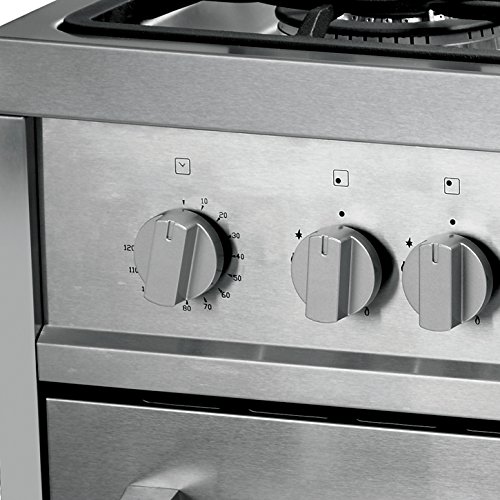
Image: Timer control knob.
This image focuses on the left-hand side control knobs, specifically highlighting the timer knob. The timer can be set for durations up to 60 minutes, indicated by numerical markings around the knob.
- Temperatur einstellen: Push in the oven temperature knob and turn it to the desired temperature setting (e.g., 150°C, 180°C, up to 250°C).
- Den Ofen anzünden: The oven typically has a separate ignition procedure or may ignite automatically with the temperature knob. Consult the specific markings on your appliance's control panel. Hold the knob in for a few seconds after ignition.
- Verwendung des Timers: Turn the timer knob clockwise to the desired cooking duration (up to 60 minutes). The oven will turn off automatically when the timer expires.
- Rotisserie-Funktion: If using the rotisserie, ensure the rotisserie rod and forks are correctly assembled and the meat is balanced. Select the rotisserie function using the appropriate knob.
- Vorwärmen: Allow the oven to preheat to the desired temperature before placing food inside.
- Ausschalten: Turn the oven temperature knob to the 'off' position.
Wartung und Reinigung
Regular cleaning and maintenance will ensure the longevity and optimal performance of your cooking range.
- Allgemeine Reinigung: Always ensure the appliance is cool and disconnected from the power supply before cleaning. Use a soft cloth and mild detergent for stainless steel surfaces. Avoid abrasive cleaners or scouring pads.
- Hob and Burners: Remove cast iron grates and burner caps/crowns. Wash them in warm soapy water. Clean the burner ports with a soft brush if clogged. Ensure all parts are completely dry before reassembling.
- Ofeninnenraum: Bei leichten Verschmutzungen mit einem Tuch abwischen.amp cloth. For stubborn stains, use a specialized oven cleaner, following the product instructions carefully. Ensure adequate ventilation during and after cleaning.
- Broiler-Element: If the broiler element has blocked holes due to splatters, gently clean with a non-abrasive brush when the oven is cool. Avoid using harsh chemicals directly on the element.
- Exterieur: Wipe the stainless steel body and front black glass with a soft, damp Mit einem Tuch abwischen und gründlich trocknen, um Wasserflecken zu vermeiden.
Fehlerbehebung
Before contacting service, please refer to the following common issues and their potential solutions:
| Problem | Mögliche Ursache | Lösung |
|---|---|---|
| Brenner zündet nicht. | No gas supply, clogged burner port, faulty ignition. | Check gas supply. Clean burner ports. Ensure knob is held in long enough. If issue persists, contact a qualified technician. |
| Oven flame extinguishes. | Insufficient gas flow, faulty thermocouple, oven temperature set too low. | Ensure adequate gas supply. If the flame goes out when reducing temperature, this may indicate a specific issue requiring professional inspection. Contact a qualified technician. |
| Auto electric ignition not working. | No power, ignition electrode dirty/damaged, moisture. | Check power supply. Ensure appliance is plugged in. Clean ignition electrode. Allow to dry if wet. If issue persists, contact a qualified technician. |
| Ungleichmäßiges Garen im Ofen. | Incorrect rack position, oven not preheated, faulty thermostat. | Use recommended rack positions. Always preheat the oven. If problem continues, a technician may need to check the thermostat. |
Technische Daten
- Marke: KAFF
- Modell: KSQ 60
- Typ: Freestanding Cooking Range
- Material: Stainless Steel Body with Front Black Glass
- Kochfeldbrenner: 4 Gas Burners + 1 Triple Flame Burner
- Grillmöglichkeiten: Cast Iron Grills
- Zündung: Auto Electric Ignition
- Ofentyp: Gas Operated Oven
- Ofenkapazität: 59 Liter
- Ofenmerkmale: Double Glass Oven Door, Timer, One Grill Shelf, One Oven Tray, Cavity Cooling System, Rotisserie
- Thermostat: Up to 250 Degree Celsius
- Steuerkonsole: Knopf
- Abmessungen (BxTxH): 600mm x 600mm x 900mm (approximate, refer to diagram for precise measurements)
- Gewicht: 55 kg
- Verstellbare Beine: Ja
Garantie und Support
For information regarding warranty coverage, service, or spare parts, please refer to the documentation provided at the time of purchase or contact your retailer or the KAFF customer support directly. It is recommended to keep your purchase receipt as proof of purchase.
Ask a question about this manual
Ask about setup, troubleshooting, compatibility, parts, safety, or missing instructions. Manuals+ will review the question and use this page’s manual context to help answer it.