
1. Einleitung
The BSIDE ELM02 is an auto-ranging digital lux/FC meter designed for measuring light illuminance. It provides accurate and easy-to-read measurements across a wide range, suitable for various applications requiring light level assessment. This manual provides detailed instructions for the proper use, setup, operation, and maintenance of your ELM02 meter.
2. Sicherheitshinweise
- Lesen Sie alle Anweisungen sorgfältig durch, bevor Sie das Gerät in Betrieb nehmen.
- Setzen Sie das Messgerät keinen extremen Temperaturen, hoher Luftfeuchtigkeit oder direkter Sonneneinstrahlung aus.
- Avoid dropping or subjecting the meter to strong impacts.
- Do not attempt to open or modify the meter; this will void the warranty and may cause damage.
- Remove the battery if the meter is not used for an extended period to prevent leakage.
- Für genaue Messwerte muss der Sensor sauber und frei von Verunreinigungen sein.
3. Produktüberschreitungview
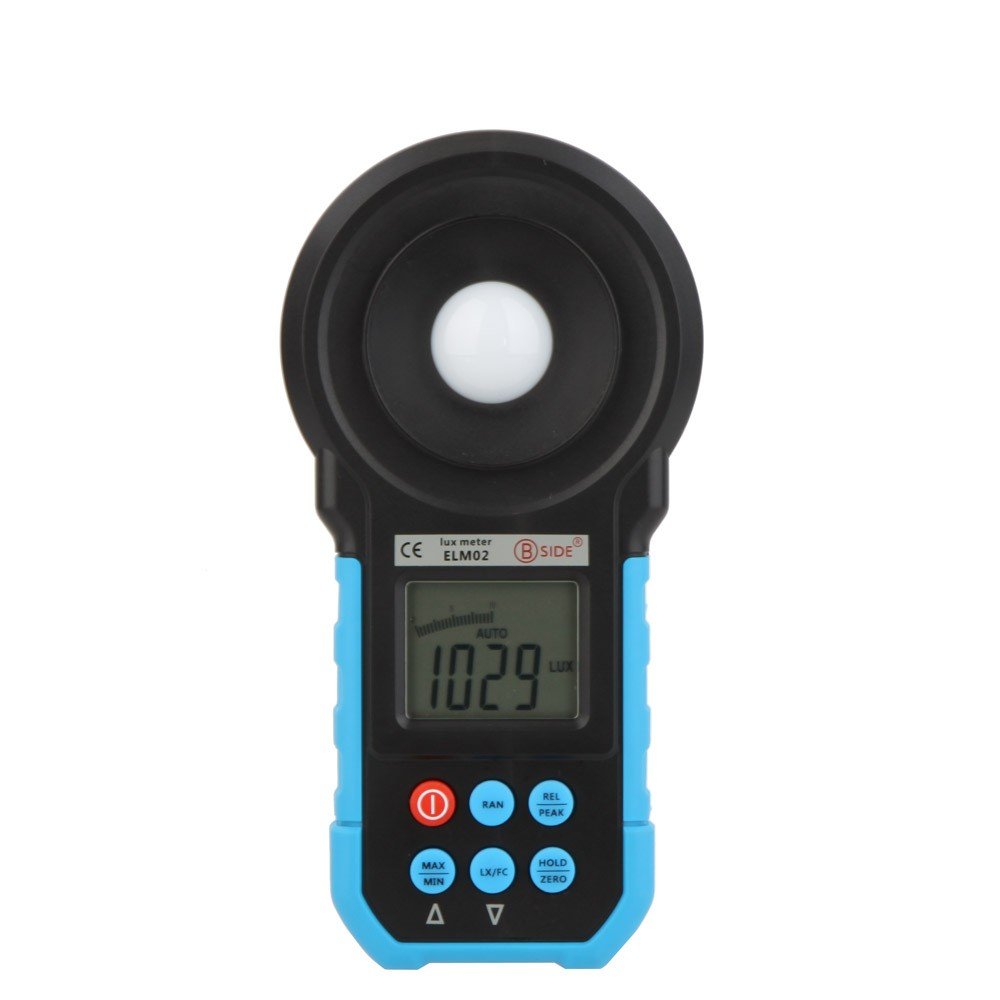
Abbildung 3.1: Vorderseite view of the BSIDE ELM02 Digital Lux/FC Meter, showing the light sensor, LCD display, and control buttons.
3.1 Komponenten
- Lichtsensor: Erfasst die Umgebungslichtstärke.
- LCD Anzeige: Zeigt Messwerte, Einheiten und verschiedene Indikatoren an.
- Bedientasten: For operating different functions of the meter.
- Batteriefach: Located at the rear for 9V battery installation.
3.2 Steuertasten

Abbildung 3.2: Nahaufnahme view of the BSIDE ELM02 control buttons, including Power, RAN, REL/PEAK, MAX/MIN, LX/FC, and HOLD/ZERO.
- Netzschalter (①): Turns the meter ON or OFF.
- RAN (Range) Button: Toggles between auto-ranging and manual ranging modes. The ELM02 primarily operates in auto-range.
- REL/PEAK-Taste: Short press for Relative mode, long press for Peak value display.
- MAX/MIN-Taste: Displays the maximum or minimum measured value.
- LX/FC Button: Switches the measurement unit between Lux and Foot-Candles (FC).
- HOLD/NULL-Taste: Short press to hold the current reading, long press for Zero Calibration.
4. Einrichtung
4.1 Einlegen der Batterie
- Suchen Sie den Batteriefachdeckel auf der Rückseite des Messgeräts.
- Schieben oder schrauben Sie die Abdeckung ab, um sie zu öffnen.
- Insert one 9V (6F22) battery, observing the correct polarity (+/-).
- Bringen Sie den Batteriefachdeckel wieder fest an.
The meter will display a low battery indicator on the LCD when the battery needs replacement.
5. Bedienungsanleitung
5.1 Ein-/Ausschalten
- To turn ON the meter, press the ① (Ein/Aus)-Taste.
- To turn OFF the meter, press and hold the ① (Power) button until the display turns off.
5.2 Messungen durchführen
- Schalten Sie das Messgerät ein.
- Ensure the light sensor is clean and pointed towards the light source you wish to measure.
- The meter will automatically select the appropriate range for measurement (Auto Range function).
- Der aktuelle Beleuchtungsstärkewert wird auf dem LCD-Display angezeigt.
5.3 Einheitenauswahl (Lux/FC)
Drücken Sie die LX/FC button to toggle between Lux and Foot-Candle (FC) measurement units. The selected unit will be indicated on the LCD.
5.4 Datenhaltefunktion
Drücken Sie die HALTEN/NULL button briefly to freeze the current reading on the display. Press it again to release the hold function and resume live measurements.
5.5 Peak Value Display
Halten Sie die REL/PEAK button to enter Peak mode. The meter will display the maximum light intensity detected during the measurement period. Press and hold again to exit Peak mode.
5.6 Relative Mode Measurement
Drücken Sie die REL/PEAK button briefly to enter Relative mode. The current reading becomes the reference value, and subsequent measurements are displayed as the difference from this reference. Press again to exit Relative mode.
5.7 MAX/MIN-Funktion
Drücken Sie die MAX/MIN button to cycle through the maximum, minimum, and current readings recorded since the function was activated. Press and hold to clear the recorded MAX/MIN values.
5.8 Nullkalibrierung
In a dark environment (e.g., with the sensor cap on), press and hold the HALTEN/NULL button to perform zero calibration. This ensures accuracy by setting the baseline reading to zero in the absence of light.
5.9 Automatische Abschaltung
The meter features an auto power-off function to conserve battery life. If no button is pressed for approximately 15 minutes, the meter will automatically shut down. To disable this feature temporarily, refer to the full user manual if available (not detailed in provided data).
6. Spezifikationen
| Messbereich | 20~200000 Lux; 20/200/2000/20000 FC |
| Sampling Zeit | 2-mal / Sekunde |
| Sensortyp | Silicon photoelectric diode |
| Spektralbereich | 320~730 nm |
| Stromversorgung | 1 x 9V battery (6F22) |
| Anzeige | LCD with analogue bar graph |
| Merkmale | Auto Range, Data Hold, Peak Value, Relative Mode, Lux/FC Switch, Low Battery Indicator, Zero Calibration, Auto Power Off |
| Modellnummer | BSIDE ELM02 Auto Range Digital LCD |
| ASIN | B01K1GG268 |
| Datum der ersten Verfügbarkeit | 22. Juli 2015 |
7. Wartung
7.1 Reinigung
- Wischen Sie die Außenseite des Zählers mit einem weichen, trockenen Tuch ab.
- Keine Scheuer- oder Lösungsmittel verwenden.
- Keep the light sensor clean and free of dust or smudges for accurate readings. Use a soft brush or lens cloth if necessary.
7.2 Speicherung
- Bewahren Sie das Messgerät an einem kühlen, trockenen Ort auf, geschützt vor direkter Sonneneinstrahlung und extremen Temperaturen.
- Bei längerer Lagerung sollte die Batterie entfernt werden, um ein Auslaufen und mögliche Schäden am Gerät zu vermeiden.
- Utilize the provided carrying bag for protection during storage and transport.

Figure 7.1: The BSIDE ELM02 meter, carrying bag, and user manual.
8. Fehlerbehebung
| Problem | Mögliche Ursache/Lösung |
|---|---|
| Das Messgerät schaltet sich nicht ein | Check battery installation and polarity. Replace with a fresh 9V battery if necessary. |
| Ungenaue Messwerte | Ensure the light sensor is clean and unobstructed. Perform Zero Calibration in a dark environment. Check for stable light conditions. |
| Display shows 'OL' or '---' | The measurement is out of the meter's range. Move to an area with lower or higher light intensity as appropriate. |
9. Packungsinhalt
- 1 x BSIDE ELM02 Digital Lux/FC Meter
- 1 x englisches Handbuch
- 1 x Tragetasche
10. Garantie und Support
Informationen zur Garantie und technische Unterstützung finden Sie in der mitgelieferten Dokumentation oder wenden Sie sich direkt an den Hersteller. Bewahren Sie Ihren Kaufbeleg als Kaufnachweis auf.