1. Einleitung
The COTEC SP-4000-148 is a high-frequency pure sine wave inverter designed to convert 48VDC battery power into 120VAC household electricity. This inverter delivers a continuous output of 4000W, making it suitable for various applications requiring stable and clean AC power. Its robust design and advanced features ensure reliable performance and protection for your connected devices.
Hauptmerkmale:
- Reiner Sinuswellenausgang für empfindliche Elektronik.
- Ein-/Ausschaltfunktion per Fernbedienung (grüner Anschluss).
- Ein- und Ausgänge sind für erhöhte Sicherheit vollständig voneinander getrennt.
- Temperature & load controlled cooling fan.
- Benutzerfreundliche Oberfläche mit 3-farbigen LED-Statusanzeigen.
- Ausgangsfrequenz (50/60 Hz) über DIP-Schalter wählbar.
- Ausgangsvolumentage über DIP-Schalter auswählbar.
- Energiesparmodus über variablen Widerstand einstellbar.
- Comprehensive input protections: Reverse Polarity (Fuse), Under Voltage, Über Voltage.
- Extensive output protections: Short Circuit, Overload, Over Temperature.
- Typ 1 Aluminium-Innengehäuse.
- E13 / UL / CE / FCC-geprüft.
2. Sicherheitshinweise
Read all instructions and warnings carefully before installing or operating the inverter. Failure to follow these instructions may result in electric shock, fire, serious injury, or death.
Allgemeine Sicherheitsvorkehrungen:
- Elektrische Gefahr: Dieser Wechselrichter erzeugt eine hohe Spannungtage AC power. Treat the output terminals with the same respect as any utility AC outlet.
- Qualifiziertes Personal: Installation und Wartung dürfen nur von qualifiziertem Personal durchgeführt werden.
- Belüftung: Sorgen Sie für ausreichende Belüftung rund um den Wechselrichter. Blockieren Sie keine Belüftungsöffnungen. Überhitzung kann zu Schäden oder Brand führen.
- Umfeld: Do not expose the inverter to rain, snow, spray, or any liquids. Do not operate in areas with flammable fumes or gases.
- Erdung: The inverter must be properly grounded. Refer to the installation section for grounding instructions.
- Batteriesicherheit: Work near lead-acid batteries is dangerous. Batteries can generate explosive gases. Ensure proper ventilation and wear eye protection.
- Gleichstromeingang: Connect the DC input cables with correct polarity. Reverse polarity will blow the internal fuse and void the warranty.
- Überlast: Do not exceed the inverter's rated output power. Overloading can damage the inverter and connected appliances.
- Wartung: Before performing any maintenance or cleaning, disconnect all power sources (DC and AC).
3. Produktüberschreitungview
The COTEC SP-4000-148 inverter features a robust aluminum enclosure and clearly labeled connection points for ease of installation and operation. Familiarize yourself with the components before proceeding with installation.

Abbildung 3.1: Insgesamt view of the COTEC SP-4000-148 Pure Sine Wave Inverter. This image shows the blue aluminum casing and the grey end caps with ventilation slots.
Front Panel (AC Output Side):
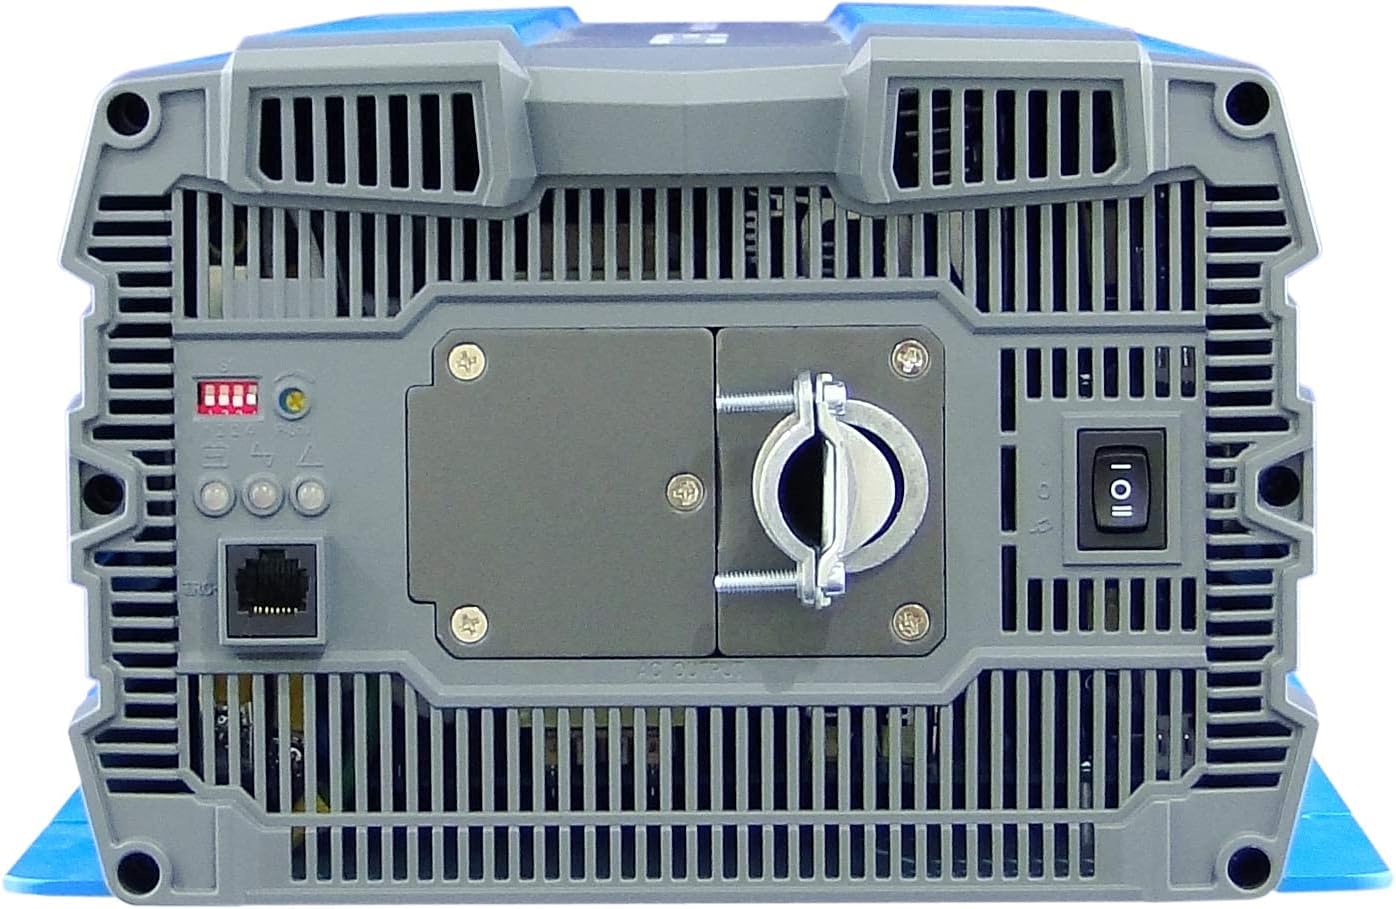
Figure 3.2: Front panel of the inverter. This view highlights the AC output terminal, the remote control terminal (green), LED status indicators, DIP switches, and the main power switch.
- AC-Ausgangsanschluss: Hardwire connection for 120VAC output.
- Remote Control Terminal (Green): For connecting an optional remote ON/OFF switch.
- LED-Statusanzeigen: Provide visual feedback on inverter status (Power, Fault, Overload).
- Dip-Schalter: Used to select output frequency (50/60 Hz) and output voltage.
- Power Saving Mode Resistor: Adjustable resistor for fine-tuning power saving mode.
- Hauptschalter: Steuert die Leistung des Wechselrichters.
Rear Panel (DC Input Side):

Figure 3.3: Rear panel of the inverter. This view shows the DC input terminals (red for positive, black for negative) and the chassis ground connection point.
- Gleichstrom-Eingangsanschlüsse: Heavy-duty terminals for connecting to the 48VDC battery bank. Ensure correct polarity (Red for Positive, Black for Negative).
- Chassis Ground Terminal: Zum Anschluss des Wechselrichters an die Erdung.
- Lüftungsschlitze: Ensure these vents are not obstructed for proper heat dissipation.
4. Installation
Eine fachgerechte Installation ist entscheidend für den sicheren und effizienten Betrieb Ihres Wechselrichters. Befolgen Sie diese Schritte sorgfältig.
4.1 Wechselrichter montieren
- Choose a dry, well-ventilated location away from direct sunlight, heat sources, and moisture.
- Mount the inverter on a non-combustible surface.
- Ensure there is at least 6 inches (15 cm) of clear space around all sides of the inverter for proper airflow.
- Use appropriate fasteners to secure the inverter firmly to the mounting surface.
4.2 DC-Eingangsanschluss
WARNUNG: Ensure the battery bank is disconnected or isolated before making any connections. Use appropriately sized cables and fuses/breakers.
- Connect the positive (+) DC cable (typically red) from your 48VDC battery bank to the red positive (+) terminal on the inverter's rear panel.
- Connect the negative (-) DC cable (typically black) from your 48VDC battery bank to the black negative (-) terminal on the inverter's rear panel.
- Ensure all DC connections are tight and secure to prevent loose connections and arcing.
- Install an external DC fuse or circuit breaker between the battery bank and the inverter's positive terminal, as close to the battery as possible. Consult the specifications for appropriate fuse sizing.
4.3 AC-Ausgangsanschluss
The SP-4000-148 uses a hardwire AC output connection.
- Ensure the inverter is OFF and all DC power is disconnected.
- Connect your AC load wiring to the designated AC output terminal block on the front panel.
- Follow all local electrical codes for AC wiring.
- Ensure all AC connections are secure.
4.4 Erdung
The inverter chassis must be properly grounded.
- Connect a ground wire from the chassis ground terminal on the inverter's rear panel to a reliable earth ground point.
- Ensure the ground connection is secure and meets all local electrical codes.
4.5 Anschluss einer Fernbedienung (optional)
If using an optional remote control, connect it to the green terminal block on the front panel according to the remote control's instructions.
5. Bedienung
Sobald der Wechselrichter ordnungsgemäß installiert und alle Verbindungen sicher hergestellt sind, können Sie ihn in Betrieb nehmen.
5.1 Ein-/Ausschalten
- Ensure all DC and AC connections are correct and secure.
- If an external DC breaker is installed, ensure it is closed (ON).
- Flip the main power switch on the inverter's front panel to the 'ON' position.
- The LED indicators will illuminate, and the cooling fan may briefly activate.
- Zum Ausschalten den Hauptschalter in die Position „AUS“ schalten.
5.2 LED-Statusanzeigen
The inverter features 3-color LED indicators to display its operational status:
- Grüne LED: Zeigt den Normalbetrieb an.
- Gelbe LED: Indicates a warning or abnormal condition (e.g., low battery, minor overload). Refer to troubleshooting.
- Rote LED: Indicates a fault or critical error (e.g., severe overload, over-temperature, short circuit). The inverter will typically shut down. Refer to troubleshooting.
5.3 DIP-Schaltereinstellungen
The DIP switches on the front panel allow configuration of output frequency and voltage. Refer to the detailed specifications or the label on the inverter for specific switch positions for desired settings.
- Ausgabefrequenz: Select between 50 Hz or 60 Hz.
- Ausgangsvolumentage: Select desired AC output voltage (z. B. 100 V, 110 V, 115 V, 120 V).
NOTIZ: Always power off the inverter before changing DIP switch settings.
5.4 Energiesparmodus
The power saving mode can be adjusted via the variable resistor on the front panel. This mode reduces standby power consumption when no load or a very light load is detected. Adjust the resistor to set the threshold for entering/exiting power saving mode.
6. Wartung
Regelmäßige Wartung gewährleistet die Langlebigkeit und optimale Leistung Ihres Wechselrichters.
- Reinigung: Reinigen Sie die Außenseite des Wechselrichters regelmäßig mit einem trockenen, weichen Tuch. Achten Sie darauf, dass die Lüftungsöffnungen frei von Staub und Schmutz sind. Verwenden Sie keine flüssigen Reinigungsmittel.
- Verbindungsprüfungen: Annually inspect all DC and AC connections for tightness. Loose connections can cause overheating and damage.
- Batteriewartung: Follow the battery manufacturer's recommendations for maintenance, including checking electrolyte levels (for flooded batteries) and terminal cleanliness.
- Umfeld: Stellen Sie sicher, dass die Betriebsumgebung innerhalb der vorgegebenen Temperatur- und Feuchtigkeitsbereiche bleibt.
7. Fehlerbehebung
Dieser Abschnitt bietet Lösungen für häufig auftretende Probleme mit Ihrem Wechselrichter.
| Problem | Mögliche Ursache | Lösung |
|---|---|---|
| Inverter does not turn on (No LEDs) | No DC input power; Blown DC fuse/breaker; Loose DC connections; Reverse polarity. | Überprüfen Sie die Batterieladungtage; Check external DC fuse/breaker; Verify DC connections are tight and correct polarity. |
| Red LED illuminates, inverter shuts down | Overload; Short circuit on AC output; Over-temperature; Input over/under voltage. | Reduce AC load; Check AC wiring for short circuits; Allow inverter to cool down; Verify battery voltage liegt innerhalb des Betriebsbereichs. |
| Yellow LED illuminates, intermittent operation | Minor overload; Low battery voltage warning; High temperature warning. | Reduce AC load; Recharge batteries; Ensure adequate ventilation. |
| No AC output, Green LED is on | AC output wiring issue; Faulty AC appliance. | Check AC output connections; Test with a different AC appliance. |
| Der Lüfter läuft ständig oder laut. | High ambient temperature; Heavy load; Obstructed vents. | Ensure proper ventilation; Reduce load if possible; Clean vents. |
8. Spezifikationen
The following table details the technical specifications for the COTEC SP-4000-148 Pure Sine Wave Inverter.

Figure 8.1: Detailed technical specifications for the COTEC SP-4000 series, including input, output, protection, and environmental parameters.
| Spezifikation | Wert |
|---|---|
| Marke | COTEK |
| Modellname | SP-Serie |
| Wastage | 4000 Watt |
| Eingangslautstärketage | 48 Volt Gleichstrom |
| Ausgangsleistung | 4000 Watt |
| Ausgangsfrequenz | 60 Hz (Selectable) |
| Insgesamt Steckdosen | 1 (Hardwire) |
| Standby Power Shutoff | High Efficiency (Adjustable) |
| Gehäusetyp | Type 1 Indoor Aluminum Enclosure |
| Zulassungen | E13 / UL / CE / FCC |
| UPC | 648152674771 |
| Hersteller-Teilenummer | SP-4000-148 |
Mechanische Zeichnungen:

Figure 8.2: Mechanical drawings providing dimensions for the COTEC SP-4000 series inverter, useful for installation planning.
9. Garantie und Support
COTEK products are manufactured to high-quality standards. This product is covered by a manufacturer's warranty against defects in materials and workmanship. Please refer to the warranty card included with your product or visit the official COTEC webAuf der Webseite finden Sie die detaillierten Garantiebedingungen.
Kundendienst:
For technical assistance, troubleshooting, or warranty claims, please contact COTEC customer support through their official channels. Have your product model number (SP-4000-148) and purchase information ready when contacting support.
- WebWebsite: www.cotek.com.tw (Example, bitte überprüfen Sie die offizielle webWebsite)
- E-Mail: support@cotek.com (Example)
- Telefon: +1-XXX-XXX-XXXX (Example)