1. Einleitung
The Sigma SD14 is a 14-megapixel Digital Single-Lens Reflex (DSLR) camera designed for advanced photographers. It features the Foveon X3 direct-image sensor, which captures full RGB color information at each pixel layer, aiming for high-definition images with rich gradation. This manual provides essential information for setting up, operating, and maintaining your SD14 camera.
Key features include a 2.5-inch LCD monitor, a durable shutter mechanism rated for over 100,000 cycles, a 5-point autofocus system, and continuous shooting capabilities. The camera supports both RAW and JPEG image recording formats and includes Sigma Photo Pro 3.0 software for RAW image processing.

Abbildung 1.1: Vorderseite view of the Sigma SD14 Digital SLR Camera, showing the lens mount and body design.
2. Lieferumfang
Verify that all the following items are included in your Sigma SD14 package:
- Sigma SD14 Digital SLR Camera Body
- Lithium-ion Power Battery BP-21
- Battery Charger BC-21
- USB-Kabel
- Video-Kabel
- Umhängeband
- Eye Cap
- Gehäusedeckel
- Okularkappe
- SIGMA Photo Pro 3.0 CD-ROM
- SD14 Instruction Manual (this document)
3. Einrichtung
3.1. Laden und Einsetzen des Akkus
- Insert the Lithium-ion Battery BP-21 into the Battery Charger BC-21.
- Schließen Sie das Ladegerät an eine Steckdose an. Die Ladeanzeige leuchtet auf.
- Das vollständige Aufladen dauert in der Regel etwa 120 Minuten.
- Sobald der Akku vollständig aufgeladen ist, nehmen Sie ihn aus dem Ladegerät.
- Open the battery compartment cover on the camera body.
- Insert the charged battery into the compartment, ensuring correct orientation.
- Schließen Sie den Batteriefachdeckel fest.
A fully charged BP-21 battery can capture approximately 500 images.
3.2. Einlegen einer Speicherkarte
The SD14 uses CompactFlash (CF) Type I/II cards. Ensure the card is formatted in the camera before first use.
- Öffnen Sie die Abdeckung des CF-Kartensteckplatzes an der Seite der Kamera.
- Insert the CF card with the correct orientation until it clicks into place.
- Close the CF card slot cover securely.
3.3. Anbringen eines Objektivs
The Sigma SD14 uses the Sigma SA Bayonet mount. Only Sigma SA mount lenses are directly compatible.
- Entfernen Sie den Gehäusedeckel von der Kamera und den hinteren Objektivdeckel vom Objektiv.
- Align the red index mark on the lens with the red index mark on the camera body's lens mount.
- Attach the lens by rotating it clockwise until it locks into place with a click.
- Zum Abnehmen des Objektivs drücken Sie die Objektiventriegelungstaste am Kameragehäuse und drehen das Objektiv gegen den Uhrzeigersinn.
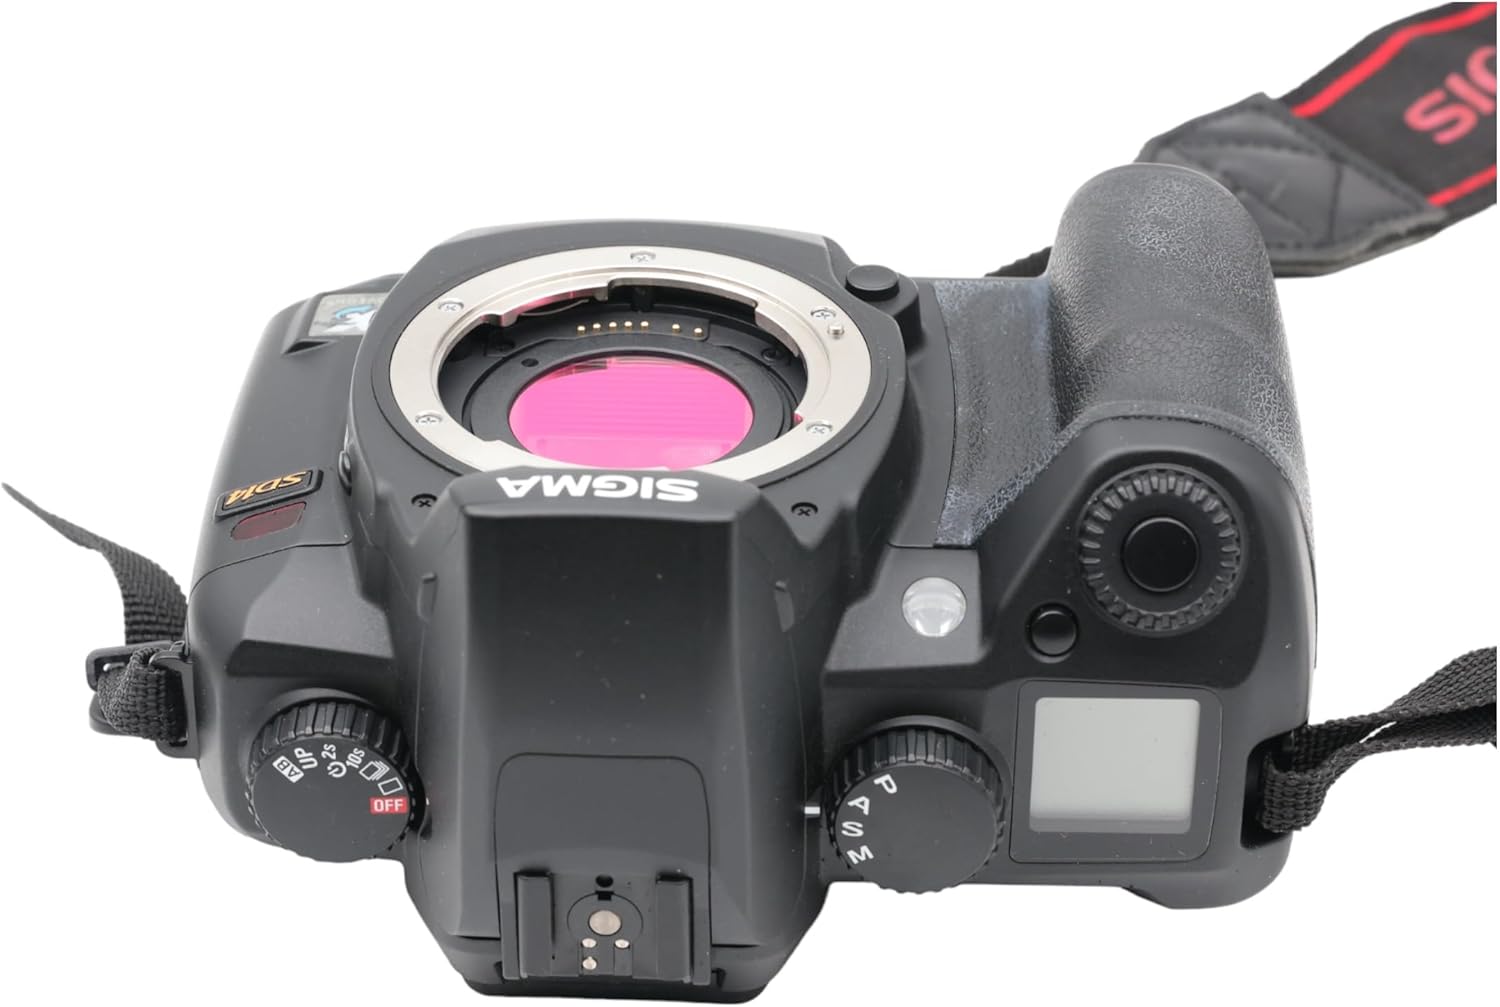
Abbildung 3.1: Oben view of the Sigma SD14, illustrating the lens mount and mode dials.
4. Bedienung
4.1. Ein-/Ausschalten
Rotate the power switch to the ON position to turn on the camera. Rotate it to OFF to power down.
4.2. Grundlegende Bedienelemente und Anzeige
The SD14 features a 2.5-inch LCD monitor for reviewing images and navigating menus, and a pentaprism viewfinder for composing shots. The top LCD panel displays key settings such as resolution, metering mode, battery status, and remaining shots.

Abbildung 4.1: Rückseite view of the Sigma SD14, showing the LCD monitor, viewSucher- und Steuerungstasten.
Key buttons include MENU, ISO, WB (White Balance), and a 4-way controller with an OK button for navigation. The INFO button displays shutter speed, aperture, and other settings on the LCD.
4.3. Fokussieren
The camera utilizes a 5-point autofocus (AF) system (center, left, right, up, and down). The center AF point features a cross-type sensor for enhanced precision. AF point selection can be automatic or manual.
4.4. Messmodi
The SD14 offers three metering modes:
- 8-segment Evaluative Metering: Analyzes the entire scene for balanced exposure.
- Center Area Metering: Der Fokus liegt auf dem zentralen Bereich des Bildausschnitts.
- Center Weighted Average Metering: Measures the entire frame but gives more weight to the central area.
Exposure compensation and auto bracketing functions are available for fine-tuning exposure.
4.5. Bildaufzeichnung
The camera supports both RAW (X3F) and JPEG formats. JPEG recording offers four sizes (Super High, High, Medium, Low) and three quality settings (Fine, Normal, Basic).
- Super High (4608 x 3072 pixels): Suitable for A3 or larger prints.
- High (2640 x 1760 pixels): Suitable for A4 prints.
- Medium (1776 x 1184 pixels): Suitable for regular size prints.
- Low (1296 x 864 pixels): Passend für web pages and email.
4.6. Serienaufnahme
The SD14 can shoot continuously at 3 frames per second. The number of frames captured in a burst depends on the resolution setting:
- Hoch: 6 Rahmen
- Medium: 12 Rahmen
- Niedrig: 24 Rahmen
These figures apply to both RAW and JPEG modes.
4.7. Eingebauter Blitz
The built-in flash has a guide number of 11 (ISO 100) and covers a 17mm lens angle (28mm equivalent on 35mm format). It supports S-TTL automatic flash metering and can synchronize with shutter speeds up to 1/180 second.
4.8. Mirror Lock-up
Activate the mirror lock-up mechanism to prevent camera shake caused by mirror movement during exposure. This is particularly useful for macro photography, long telephoto shots, or scientific applications. For best results, use with a remote controller or cable release (sold separately).
4.9. Sigma Photo Pro 3.0 Software
The included Sigma Photo Pro 3.0 software is a RAW image developer. It allows for quick conversion of RAW data and offers three adjustment modes: X3F Mode (original settings), Auto Adjustment Mode, and Custom Mode for manual adjustments (exposure, contrast, shadow, highlight, saturation, sharpness, fill-light). The software supports 8-bit TIFF, 16-bit TIFF, and JPEG file formats, and sRGB, Apple RGB, Adobe RGB, and ColorMatch RGB color spaces.
5. Wartung
5.1. Image Sensor Dust Protector
The SD14 features a dust protector positioned in front of the image sensor. This design prevents dust from adhering directly to the sensor, minimizing its impact on image quality. If dust accumulates on the protector, it will be out of focus and generally not visible in images.
5.2. Reinigung des Kameragehäuses und des Objektivs
- Verwenden Sie ein weiches, fusselfreies Tuch, um das Kameragehäuse abzuwischen. Bei hartnäckigem Schmutz leicht andrücken.ampReinigen Sie das Tuch mit Wasser oder einer milden Reinigungslösung.
- For lenses, use a lens brush to remove loose dust, then a lens cleaning solution and a microfiber cloth. Avoid touching the lens surface with your fingers.
- Never use organic solvents like paint thinner or benzene to clean the camera or lens.
5.3. Batteriepflege
- Bewahren Sie Batterien an einem kühlen, trockenen Ort auf, wenn Sie sie nicht verwenden.
- Um die Lebensdauer der Batterie zu verlängern, sollte eine häufige vollständige Entladung vermieden werden.
- Wenn die Kamera längere Zeit nicht benutzt wird, entfernen Sie den Akku.
6. Fehlerbehebung
| Problem | Mögliche Ursache | Lösung |
|---|---|---|
| Die Kamera lässt sich nicht einschalten. | Die Batterie ist leer oder falsch eingesetzt. | Laden Sie den Akku vollständig auf und vergewissern Sie sich, dass er richtig eingesetzt ist. |
| Bilder sind verschwommen. | Falscher Fokus, Verwacklungen oder eine verschmutzte Linse. | Stellen Sie sicher, dass der Fokus korrekt ist. Verwenden Sie eine kürzere Verschlusszeit oder ein Stativ. Reinigen Sie das Objektiv. |
| Die Bilder sind entweder zu dunkel oder zu hell. | Incorrect exposure settings or metering mode. | Adjust exposure compensation. Select an appropriate metering mode for the scene. |
| Color blotching in underexposed areas. | Characteristic of the Foveon sensor when severely underexposed. | Aim to slightly overexpose images (e.g., +.7 EV) to retain shadow detail and avoid this effect. |
| Es können keine Bilder aufgezeichnet werden. | Die Speicherkarte ist voll, gesperrt oder nicht richtig eingesetzt. | Insert an empty card, unlock the card, or reinsert it correctly. Format the card if necessary (this will erase all data). |
| Die Kamera friert ein oder reagiert nicht mehr. | Vorübergehender Softwarefehler. | Um die Kamera zurückzusetzen, nehmen Sie die Batterie heraus und setzen Sie sie wieder ein. |
For more detailed troubleshooting or error codes, please refer to the comprehensive instruction manual included with your camera or visit the Sigma support webWebsite.
7. Spezifikationen
| Besonderheit | Detail |
|---|---|
| Modellname | SD14 |
| Auflösung des Fotosensors | 14 MP (Foveon X3 direct-image sensor) |
| Fotosensorgröße | APS-C |
| Kompatible Halterungen | Sigma SA Bayonet |
| Unterstützt File Formate | JPEG, RAW (X3F), TIFF |
| Bildschirmgröße | 2.5 Inches (150,000 pixels) |
| ViewFinder | Optical Pentaprism (98% coverage, 0.9x magnification) |
| Autofokuspunkte | 5-point (Phase Detection) |
| Geschwindigkeit fortlaufender Aufnahmen | 3 Bilder pro Sekunde |
| Maximale Verschlusszeit | 1/4000 Sekunde |
| Minimale Verschlusszeit | 30 Sekunden |
| Erweiterter ISO-Bereich | 100 - 1600 |
| Messmodi | 8-segment Evaluative, Center Area, Center Weighted Average |
| Built-in Flash Guide Number | 11 (ISO 100) |
| Speichermedien | Compact Flash (CF) Type I/II |
| Stromquelle | Lithium-ion Battery BP-21 |
| Konnektivität | USB, Videoausgang |
| Artikelgewicht | 1.65 Pfund (ca. 748 g) |
| Modellnummer | C23900 |
| UPC | 085126924416 |
7.1. Optionales Zubehör (separat erhältlich)
- Sigma Lenses (over 40 compatible models)
- Flashguns: EF-500 DG SUPER, EF-500 DG ST, EM-140 DG
- Power Grip PG-21
- Cable Release CR-21
- Remote Controller RS-31
- AC Adapter SAC-21
8. Garantie und Support
8.1. Garantieinformationen
Die detaillierten Garantiebedingungen finden Sie auf der Ihrem Produkt beiliegenden Garantiekarte oder auf der offiziellen Sigma-Website. webDie Garantie deckt in der Regel Material- und Verarbeitungsfehler für einen bestimmten Zeitraum ab Kaufdatum ab.
8.2. Kundendienst
If you encounter any issues or have questions not covered in this manual, please contact Sigma customer support. Contact information can usually be found on the official Sigma webauf der Website oder in der Garantiedokumentation.
Online-Ressourcen: Visit the official Sigma website for product registration, firmware updates, FAQs, and additional support resources.