
1. Introduktion
This manual provides detailed instructions for the installation, operation, and maintenance of your MakeSkyBlue 60A MPPT Solar Charge Controller V124 with CloudBOX. This advanced controller is designed for stable, efficient, and intelligent solar charging in various applications, including home, RV, cabin, and off-grid power systems.
Nøglefunktioner:
- Upgraded 60A MPPT Controller with CloudBOX: New generation controller for stable, efficient, and intelligent solar charging.
- Advanced MPPT Charging Technology: True 100% MPPT algorithm and intelligent DSP control for faster, more precise power point tracking, improving efficiency by up to 30% compared to PWM controllers.
- Smart batteristyring: Automatic detection of 12V/24V/48V systems and 3-stage charging (Bulk, Absorption, Float). Supports AGM, Gel, and Flooded batteries.
- Comprehensive Protection System: Protection against overcharge, over-discharge, overheating, reverse polarity, and short circuit.
- User-Friendly & Expandable Design: LCD display for real-time data and charging status. Supports parallel connection.
2. Sikkerhedsoplysninger
Læs venligst alle instruktioner og advarsler omhyggeligt inden installation og betjening. Manglende overholdelse af disse instruktioner kan resultere i elektrisk stød, brand eller alvorlig personskade.
Generelle sikkerhedsforanstaltninger:
- Installer styreenheden i et godt ventileret område, væk fra brandfarlige materialer.
- Sørg for korrekt jordforbindelse af systemet.
- Adskil ikke controlleren eller forsøg at reparere den. Kontakt kvalificeret personale for service.
- Hold børn væk fra solcelleanlæggets komponenter.
Elektrisk sikkerhed:
- Always disconnect the solar panel array and battery bank before installing or servicing the controller.
- Use appropriate circuit breakers and fuses for all connections.
- Ensure all wiring is correctly polarized (+ to + and - to -). Reverse polarity can damage the controller and other components.
- Brug isoleret værktøj for at forhindre utilsigtede kortslutninger.
- Verify that the solar panel open-circuit voltage (VOC) does not exceed the controller's maximum input voltage (160VDC).
3. Produktet er slutview
The MakeSkyBlue 60A MPPT Solar Charge Controller V124 is a robust device designed for optimal solar energy harvesting. It features a durable aluminum casing for heat dissipation and an intuitive LCD display for monitoring.
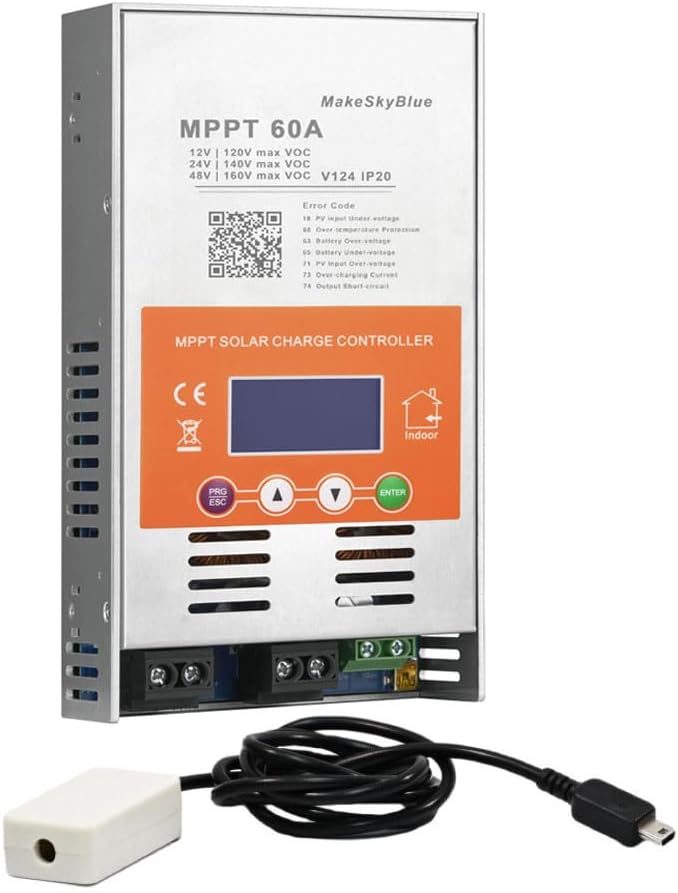
Figure 1: MakeSkyBlue 60A MPPT Solar Charge Controller V124 with CloudBOX
Komponenter:
- MPPT solcelleladningsregulatorenhed
- CloudBOX (for remote monitoring/control)
- Brugermanual
Fysisk beskrivelse:
The controller features a metallic enclosure with ventilation slots and a cooling fan for temperature management. The front panel includes an LCD display and control buttons. Connection terminals for solar input, battery, and DC load are located at the bottom.

Figure 2: Controller Dimensions (8.46 x 4.52 x 1.96 inches)
LCD-skærm:
The LCD provides real-time data and status indicators. It typically shows:
- PV Indgang Voltage (PV)
- Batteri Voltage (BATT)
- Charging Current (CHARGE)
- Load Output (LOAD)
- Operating Mode (e.g., 24H for continuous load, 00H for light control)
- Temperatur (TEMP)
- Error Codes (FAULT)
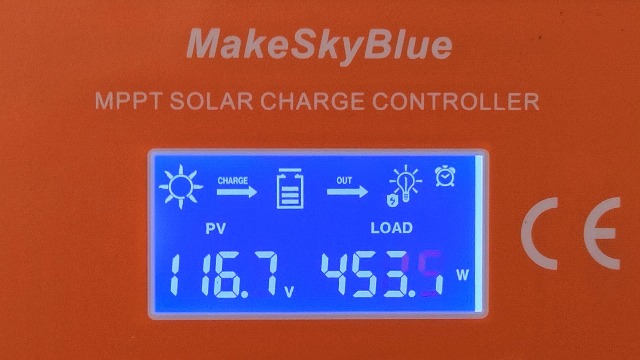
Figur 3: LCD-skærmgrænseflade
4. Opsætning og installation
Korrekt installation er afgørende for sikker og effektiv drift af din solcelleladeregulator. Følg disse trin omhyggeligt.
4.1 Montering af controlleren:
- Choose a dry, well-ventilated indoor location, protected from direct sunlight, high temperatures, and moisture.
- Ensure adequate clearance (at least 75mm) around all sides of the controller for proper airflow and heat dissipation.
- Securely mount the controller to a stable surface using appropriate screws.

Figure 4: Temperature Protection and Mounting Considerations
4.2 Ledningsforbindelser:
Tilslut komponenterne i følgende rækkefølge for at undgå skader:
- Tilslut batteriet: Connect the battery to the controller's battery terminals (+ to + and - to -). Ensure a secure connection. The controller will automatically detect the system voltage (12V/24V/48V).
- Tilslut solpanelerne: Connect the solar panel array to the controller's PV input terminals (+ to + and - to -). Ensure the PV open-circuit voltage ikke overstiger 160VDC.
- Tilslut DC-belastningen (valgfrit): Connect your DC loads to the controller's load terminals (+ to + and - to -).

Figure 5: Typical System Wiring Diagram
4.3 Parallel Connection (Optional):
The controller supports parallel connection for expanding your solar power system. Refer to the official video for detailed instructions on parallel setup and communication line configuration.
Video 1: HHJ60-PRO Paralleling Guide. This video demonstrates the installation and configuration of multiple controllers for parallel operation, including wiring and communication settings.
5. Betjeningsvejledning
After successful installation, the controller will power on and display the main interface. Use the control buttons to navigate and adjust settings.
5.1 LCD Display Navigation:
Use the "Up" and "Down" arrow buttons to cycle through different display interfaces, showing PV voltage, batteri voltage, charging current, load status, temperature, and error codes.
Video 2: MPPT Controller Connected | Real-Time LCD Display Demo. This video illustrates how to navigate the LCD display to view real-time system data.
5.2 Parameterindstillinger:
To enter the settings interface, press the "PRG/ESC" button. Use the "Up" and "Down" arrows to adjust values and "ENTER" to confirm. Key settings include:
- d00 (Load Operating Mode): Configure how the DC load operates (e.g., 24H for continuous, 00H for light control, 1H-23H for timed operation).
- d01 (Charging Voltage): Indstil boost-opladningsvolumentage.
- d02 (Float Charging Voltage): Indstil flydeladningsvolumentage.
- d03 (Low Voltage beskyttelse): Set the battery low voltage disconnect (LVD) threshold.
- d04 (Battery Voltag(e Kalibrering): Calibrate the displayed battery voltage if it differs from a multimeter reading.
- d05 (Parallel Communication Code): Define the communication address for parallel operation (lowest code acts as master).
- d06 (Battery Type): Select the battery type (e.g., Sealed, Gel, Flooded, Lithium Iron Phosphate). Choosing "USE" allows manual settings for d01, d02, and d03.
- d07 (System Voltage): Configure the system voltage (f.eks. 12V, 24V, 48V).
Video 3: D01-D06 Parameter Setting Information. This video guides you through adjusting various operational parameters of the controller.
6. Vedligeholdelse
Regelmæssig vedligeholdelse sikrer optimal ydeevne og levetid for din solcelleladeregulator.
- Renhed: Hold controlleren ren og fri for støv og snavs. Brug en tør klud til rengøring.
- Forbindelser: Kontrollér regelmæssigt alle ledningsforbindelser for tæthed og korrosion.
- Ventilation: Sørg for, at ventilationsåbningerne ikke er blokerede, så varmen kan afledes korrekt.
- Firmwareopdateringer: Tjek producentens webwebstedet for tilgængelige firmwareopdateringer til forbedret ydeevne eller nye funktioner.
7. Fejlfinding
If you encounter issues with your controller, refer to the following common problems and their solutions. The LCD display may show error codes to help diagnose the problem.
Fejlkoder:
| Kode | Beskrivelse | Mulig årsag/løsning |
|---|---|---|
| E1 | PV-indgang over-voltage | PV array voltage exceeds maximum allowed. Reduce the number of solar panels in series. |
| E2 | PV input under-voltage | PV array voltage is too low. Check solar panel connections, ensure sufficient sunlight. |
| E3 | Overtemperaturbeskyttelse | Controller is overheating. Ensure adequate ventilation and ambient temperature. |
| E4 | Batteri over-voltage | Batteri voltage overstiger den indstillede over-voltage protection. Check battery settings (d01, d02). |
| E5 | Batteri under voltage | Batteri voltage is below the set low voltage protection. Charge battery or reduce load. |
| E6 | PV-overstrøm | PV array current exceeds maximum allowed. Check PV array configuration. |
| E7 | Udgang kortslutning | Short circuit detected on the load output. Disconnect load, check wiring, and reconnect. |
| E8 | Output overbelastning | Load current exceeds maximum allowed. Reduce the connected load. |
Generelle fejlfindingstips:
- If the controller is not charging, ensure solar panels are receiving adequate sunlight and all connections are secure.
- If the load is not working, check the load operating mode (d00) and ensure the battery has sufficient charge.
- For persistent issues, power cycle the controller by disconnecting the solar panels, then the battery, waiting a few minutes, and reconnecting in the correct order (battery first, then solar).
8. Specifikationer
| Feature | Specifikation |
|---|---|
| Model | 60A-V124 |
| System Voltage | 12V/24V/48V Auto-detection |
| Max PV-indgang Voltage | 160VDC |
| Nominel ladestrøm | 60A |
| Understøttede batterityper | AGM, Gel, Flooded, Lithium |
| Opladningsalgoritme | 3-Stage (Bulk, Absorption, Flydning) |
| Display Type | LCD |
| Materiale | Aluminium |
| Varens vægt | 3.5 pund |
| Pakkedimensioner | 8.46 x 4.52 x 1.96 tommer |
| Inkluderede komponenter | Solar Charge Controller, CloudBOX, User Manual |
9. Garanti og support
For warranty information, technical support, or service inquiries, please contact MakeSkyBlue customer service through the retailer where the product was purchased or visit the official MakeSkyBlue webwebsted. Hav venligst din produktmodel og købsdato klar, når du kontakter support.