1. Produktet er slutview
The Riokko YM119 OBD2 Scanner is a diagnostic tool designed for car owners to easily read and clear engine fault codes. It provides real-time data, freeze frame information, and supports various diagnostic functions for OBDII/EOBD compliant vehicles manufactured since 1996. Its intuitive interface and compact design make it suitable for both professional technicians and home users.

Figure 1.1: Riokko YM119 OBD2 Scanner. This image shows the main diagnostic tool with its color screen, control buttons, and the attached OBDII connector cable.
2. Opsætning og første brug
2.1 Pakkens indhold
- Riokko YM119 OBD2 Scanner Unit
- Brugervejledning (dette dokument)
2.2 Tilslutning af scanneren
- Locate the vehicle's Data Link Connector (DLC). This is typically located under the dashboard on the driver's side.
- Ensure the vehicle's ignition is turned ON (engine can be off or running, depending on the test).
- Plug the OBDII connector of the YM119 scanner firmly into the vehicle's DLC. The scanner will power on automatically.
2.3 Valg af sprog
The YM119 supports 13 national languages. To change the language:
- From the main menu, navigate to "Setting" using the arrow keys.
- Tryk på OK button to enter the Setting menu.
- Vælg "Sprog", og vælg dit foretrukne sprog fra listen.
- Trykke OK for at bekræfte dit valg.
3. Betjening af scanneren
3.1 Navigationsknapper
- AFSLUT: Vender tilbage til den forrige skærm eller hovedmenu.
- OP/NED-pile: Naviger gennem menuindstillinger.
- VENSTRE/HØJRE Pile: Navigate through data screens or adjust settings.
- OK: Bekræfter valg eller åbner en undermenu.
- FLAGERMUS: Initiates the battery voltage test.

Figure 3.1: Main Menu and Professional Functions. This image illustrates the scanner's main menu interface and highlights its key diagnostic capabilities such as Engine Fault Diagnostics, Quick Clear Fault Code, Real-time Data Stream, and Battery Life Test.
3.2 Diagnostiske funktioner
From the main menu, select "Diagnosis" to access the primary diagnostic functions.

Figure 3.2: OBD II Diagnostic Test Items. This image shows the comprehensive list of diagnostic tests available on the scanner, from reading and erasing codes to advanced sensor and component tests.
3.2.1 Læs koder
Denne funktion henter diagnostiske fejlkoder (DTC'er) fra køretøjets computer. Disse koder angiver specifikke problemer, der er registreret af køretøjets indbyggede diagnosesystem.
- Select "Read Codes" from the Diagnosis menu.
- Scanneren viser alle gemte, ventende eller permanente DTC'er.
- Brug OP/NED arrows to scroll through the codes.
- For detailed information on a specific code, use the "DTC Lib" function or refer to a reliable automotive repair database.
3.2.2 Ryd koder
This function erases DTCs from the vehicle's computer and turns off the Malfunction Indicator Lamp (MIL), også kendt som Check Engine-lampen. Bemærk: Sletning af koder løser ikke det underliggende problem. MIL-lampen lyser igen, hvis fejlen fortsætter.

Figure 3.3: Check and Turn Off Engine Light. This image demonstrates the scanner's ability to diagnose and clear engine fault codes, effectively turning off the Check Engine Light on the vehicle's dashboard.
- Select "Erase Codes" from the Diagnosis menu.
- Bekræft handlingen, når du bliver bedt om det.
- The MIL should turn off.
3.2.3 Real-time Data (Live Data Stream)
View real-time sensor data from the vehicle's engine control unit (ECU). This data can be displayed in text or graphical format, allowing for dynamic monitoring of vehicle performance.
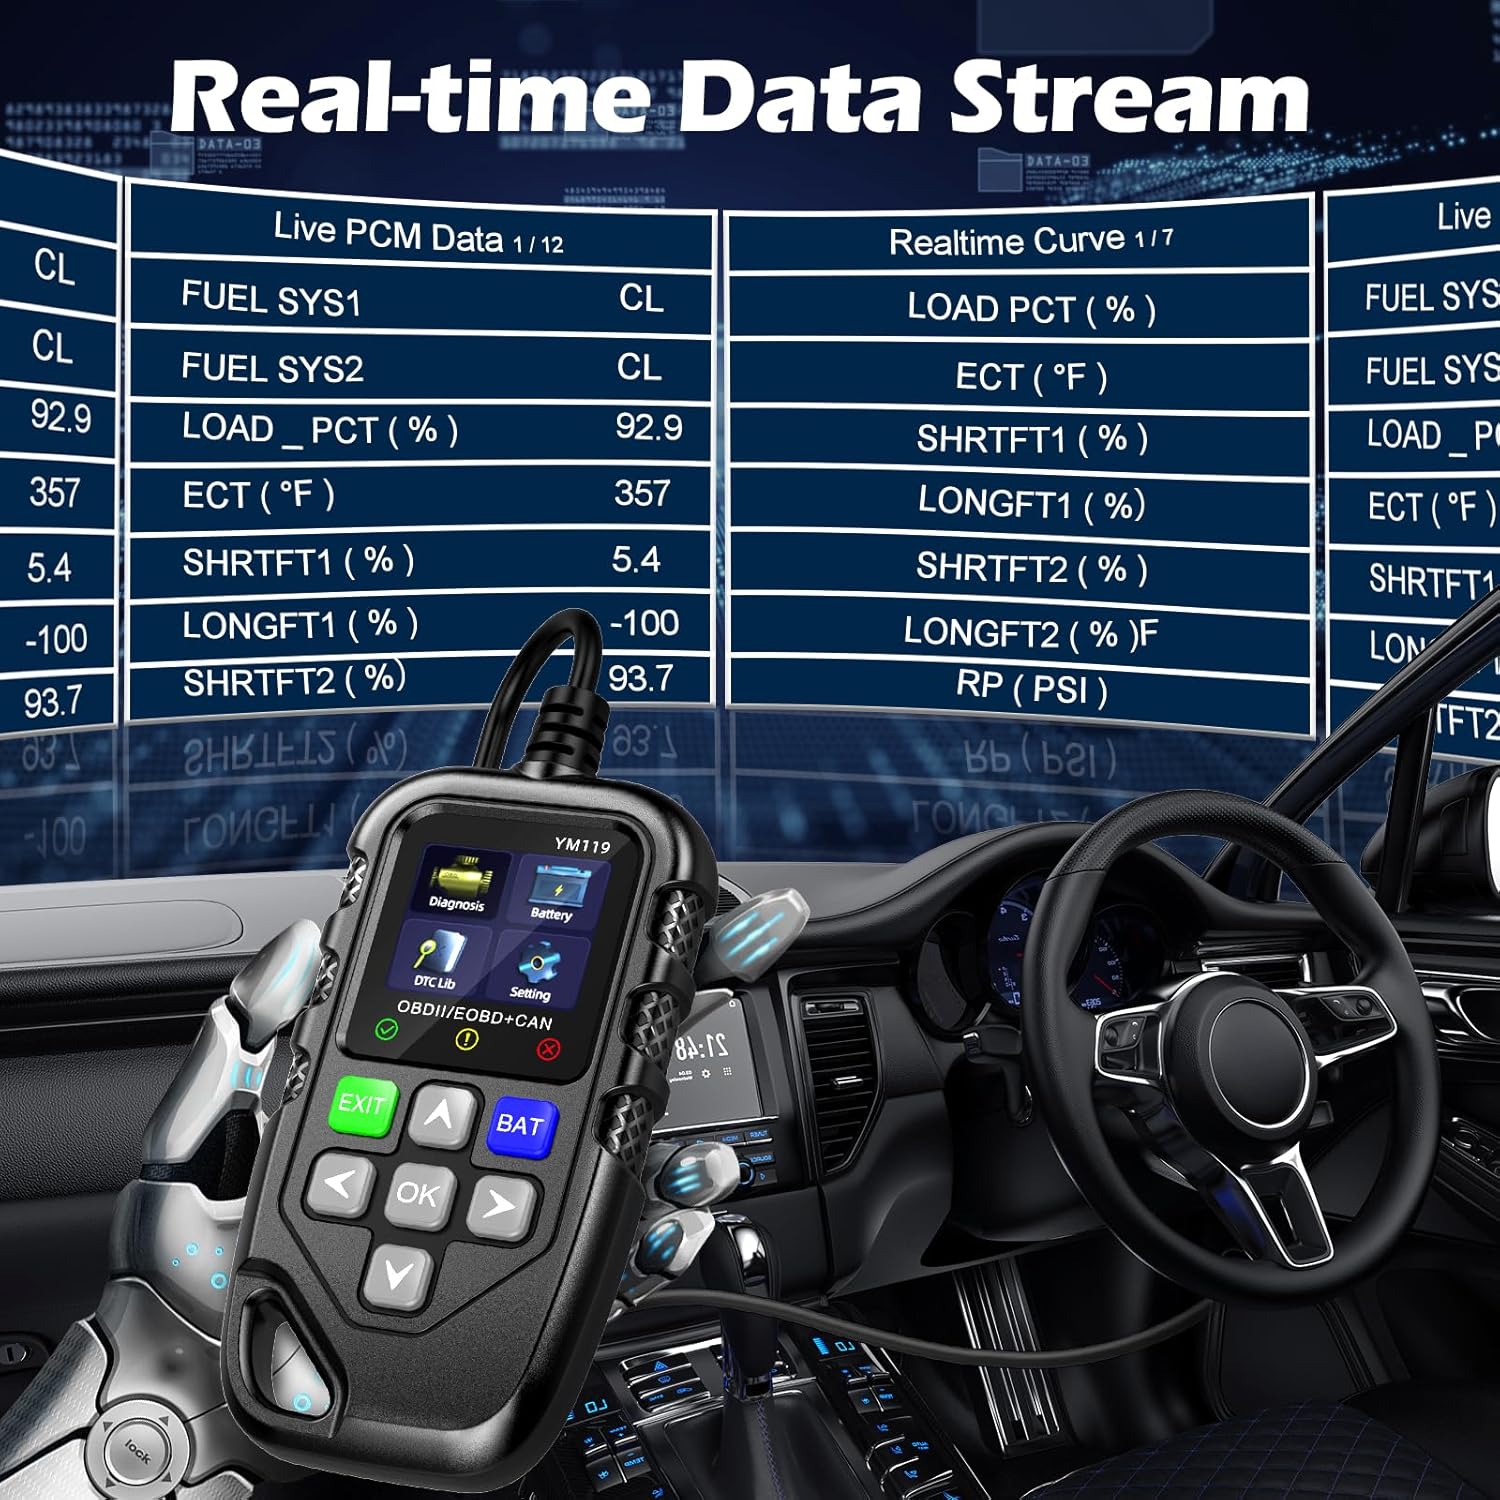
Figure 3.4: Real-time Data Stream. This image shows the scanner's capability to display live engine data, including various sensor readings and their corresponding real-time curves, aiding in dynamic vehicle diagnostics.
- Select "Live Data" or "Realtime Curve" from the Diagnosis menu.
- Brug OP/NED arrows to scroll through different data parameters.
- Brug VENSTRE/HØJRE arrows to switch between text and graph views (if available for the parameter).
3.2.4 Frysebillededata
When an emission-related fault occurs, the vehicle's computer records a snapshot of operating conditions at the time of the fault. This "freeze frame" data helps in diagnosing intermittent problems.
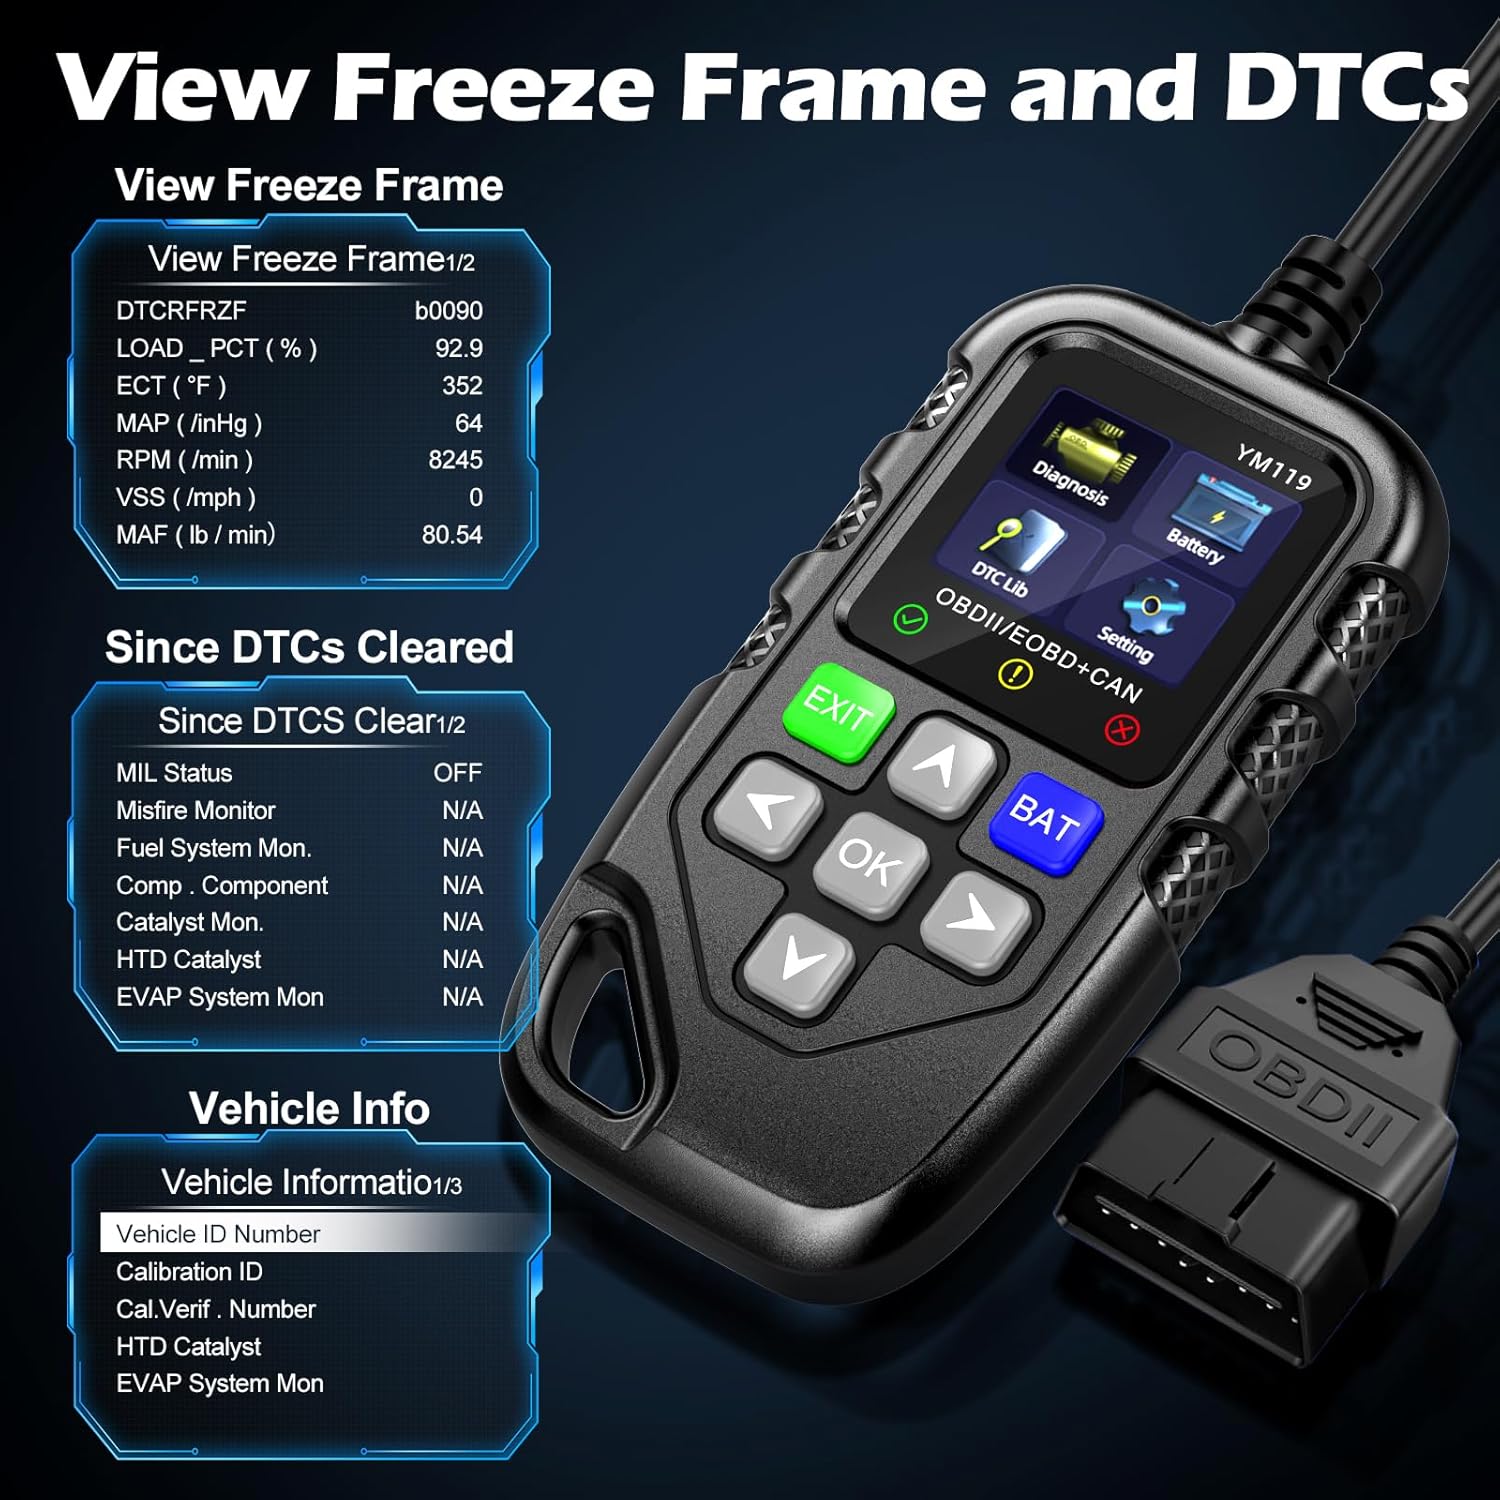
Figur 3.5: View Freeze Frame and DTCs. This image displays the scanner's ability to capture and show freeze frame data, which provides a snapshot of engine conditions at the moment a fault code was set, aiding in diagnosis.
- Vælg "View Freeze Frame" from the Diagnosis menu.
- Review the recorded parameters.
3.2.5 DTC Query (DTC Lib)
The built-in DTC Library allows you to look up definitions for generic (P0, P2, P34, B0, C0, U0) and manufacturer-specific (P1, P30-P33, B1, C1, U1) codes.
- From the main menu, select "DTC Lib".
- Indtast DTC-koden ved hjælp af piletasterne og OK knap.
- Scanneren viser definitionen af koden.
3.2.6 I / M-beredskab
This function checks the readiness of the emission-related monitoring systems on the vehicle. It's useful for determining if the vehicle is ready for an emissions test.
- Select "I/M Readiness" from the Diagnosis menu.
- The scanner will display the status of various monitors (e.g., Misfire Monitor, Fuel System Monitor). "OK" indicates the monitor has completed its test, "INC" indicates incomplete, and "N/A" indicates not applicable.
3.2.7 Batteri Voltage Test
The YM119 can perform a basic battery voltage-test til at vurdere køretøjets batteritilstand.

Figure 3.6: Estimate Battery Life Test. This image shows the scanner's dedicated function for monitoring and assessing the vehicle's battery voltage og generel sundhed.
- From the main menu, select "Battery" or press the FLAGERMUS knap.
- Scanneren viser det aktuelle batteriniveautage.
3.2.8 Køretøjsoplysninger
Denne funktion henter køretøjets stelnummer (VIN), kalibrerings-ID (CALID) og kalibreringsverifikationsnummer (CVN).
- Select "Vehicle Info" from the Diagnosis menu.
- Scanneren viser de tilgængelige køretøjsoplysninger.
4. Vedligeholdelse
4.1 Rengøring af enheden
Sådan bevarer du scannerens ydeevne og udseende:
- Tør enheden af med en blød, damp klæde.
- Brug ikke slibende rengøringsmidler eller opløsningsmidler.
- Sørg for, at enheden er tør før opbevaring.
4.2 Opbevaring
Store the scanner in a clean, dry environment away from extreme temperatures and direct sunlight. Keep the OBDII connector free from dust and debris.
5. Fejlfinding
| Problem | Mulig årsag | Løsning |
|---|---|---|
| Scanneren tænder ikke. |
|
|
| Meddelelsen "Linkfejl" eller "Kommunikationsfejl". |
|
|
| Engine light reappears after clearing codes. | Underlying fault has not been repaired. | Clearing codes only turns off the light; it does not fix the problem. Diagnose and repair the underlying issue before clearing codes again. |
| Inaccurate or missing data readings. |
|
|
6. Specifikationer
| Feature | Detalje |
|---|---|
| Modelnummer | AE0004L (YM119) |
| Mærke | Riokko |
| Skærmstørrelse | 2.8 tommer |
| Understøttede protokoller | Nine standard OBDII/EOBD protocols |
| Understøttede sprog | 13 nationale sprog |
| Varens vægt | 7.8 ounce (ca. 221 gram) |
| Pakkedimensioner | 8.11 x 5.35 x 1.14 tommer (ca. 20.6 x 13.6 x 2.9 cm) |
| Første ledige dato | 16. oktober 2024 |
7. Garanti og support
7.1 Garantioplysninger
The Riokko YM119 OBD2 Scanner comes with a 3 års garanti fra købsdatoen. Denne garanti dækker fejl i materialer og udførelse ved normal brug.
7.2 Returpolitik
A 30-dages returpolitik uden spørgsmål is offered for your purchase. Please refer to your retailer's specific return instructions.
7.3 Kundesupport
For technical assistance, warranty claims, or any other inquiries, please contact Riokko customer service. 24/7 kundeservice er tilgængelig for at hjælpe dig.
Please visit the official Riokko webwebstedet eller se din produktemballage for de seneste kontaktoplysninger.