1. Introduktion
Thank you for choosing the Backnets 12-Inch Rainfall Shower System. This manual provides essential information for the safe installation, proper operation, and effective maintenance of your new shower system. Please read these instructions thoroughly before installation and retain them for future reference.
2. Produktet er slutview
The Backnets Shower System is designed to provide a luxurious and functional showering experience. It features a 12-inch rainfall shower head, a handheld shower, and a 3-function thermostatic valve with an LED temperature display.
Nøglefunktioner:
- Materiale af høj kvalitet: Constructed from durable brass and 304 stainless steel for longevity.
- Triple Function Valve: Allows simultaneous use of up to three shower functions.
- LED temperatur display: Digital display shows water temperature, powered by water flow (no batteries required).
- Termostatisk teknologi: Ensures stable water temperature and prevents scalding.
- Standardforbindelser: Equipped with NPT1/2 standard inlet and outlet.
Komponenter:
The system includes the main thermostatic mixing valve, a 12-inch rainfall shower head, a handheld shower with hose, and mounting hardware.

This image displays the complete shower system, including the large square rainfall shower head, the wall-mounted control panel with three function buttons and a temperature control knob, and the handheld shower with its flexible hose and wall bracket.

This image highlights the handheld shower head, featuring silicone nozzles for easy cleaning, a durable brass holder for secure mounting, and a 59-inch long stainless steel hose for extended reach and flexibility.
3. Sikkerhedsoplysninger
- Sluk altid for hovedvandforsyningen, inden du påbegynder installation eller vedligeholdelse.
- Hvis du er usikker på nogen del af installationsprocessen, skal du kontakte en kvalificeret VVS-installatør.
- Sørg for, at alle forbindelser er sikre og vandtætte for at forhindre lækager.
- Do not use harsh chemicals or abrasive cleaners on the shower system, as this may damage the finish.
- Verify that the water pressure in your home is within the recommended range for optimal performance.
4. Opsætning og installation
Professional installation is recommended for this shower system. Ensure all necessary tools and materials are available before starting.
Valve Connections:
The thermostatic mixing valve has clearly marked inlets for hot and cold water, and outlets for the various shower functions. All connections are NPT1/2 standard.
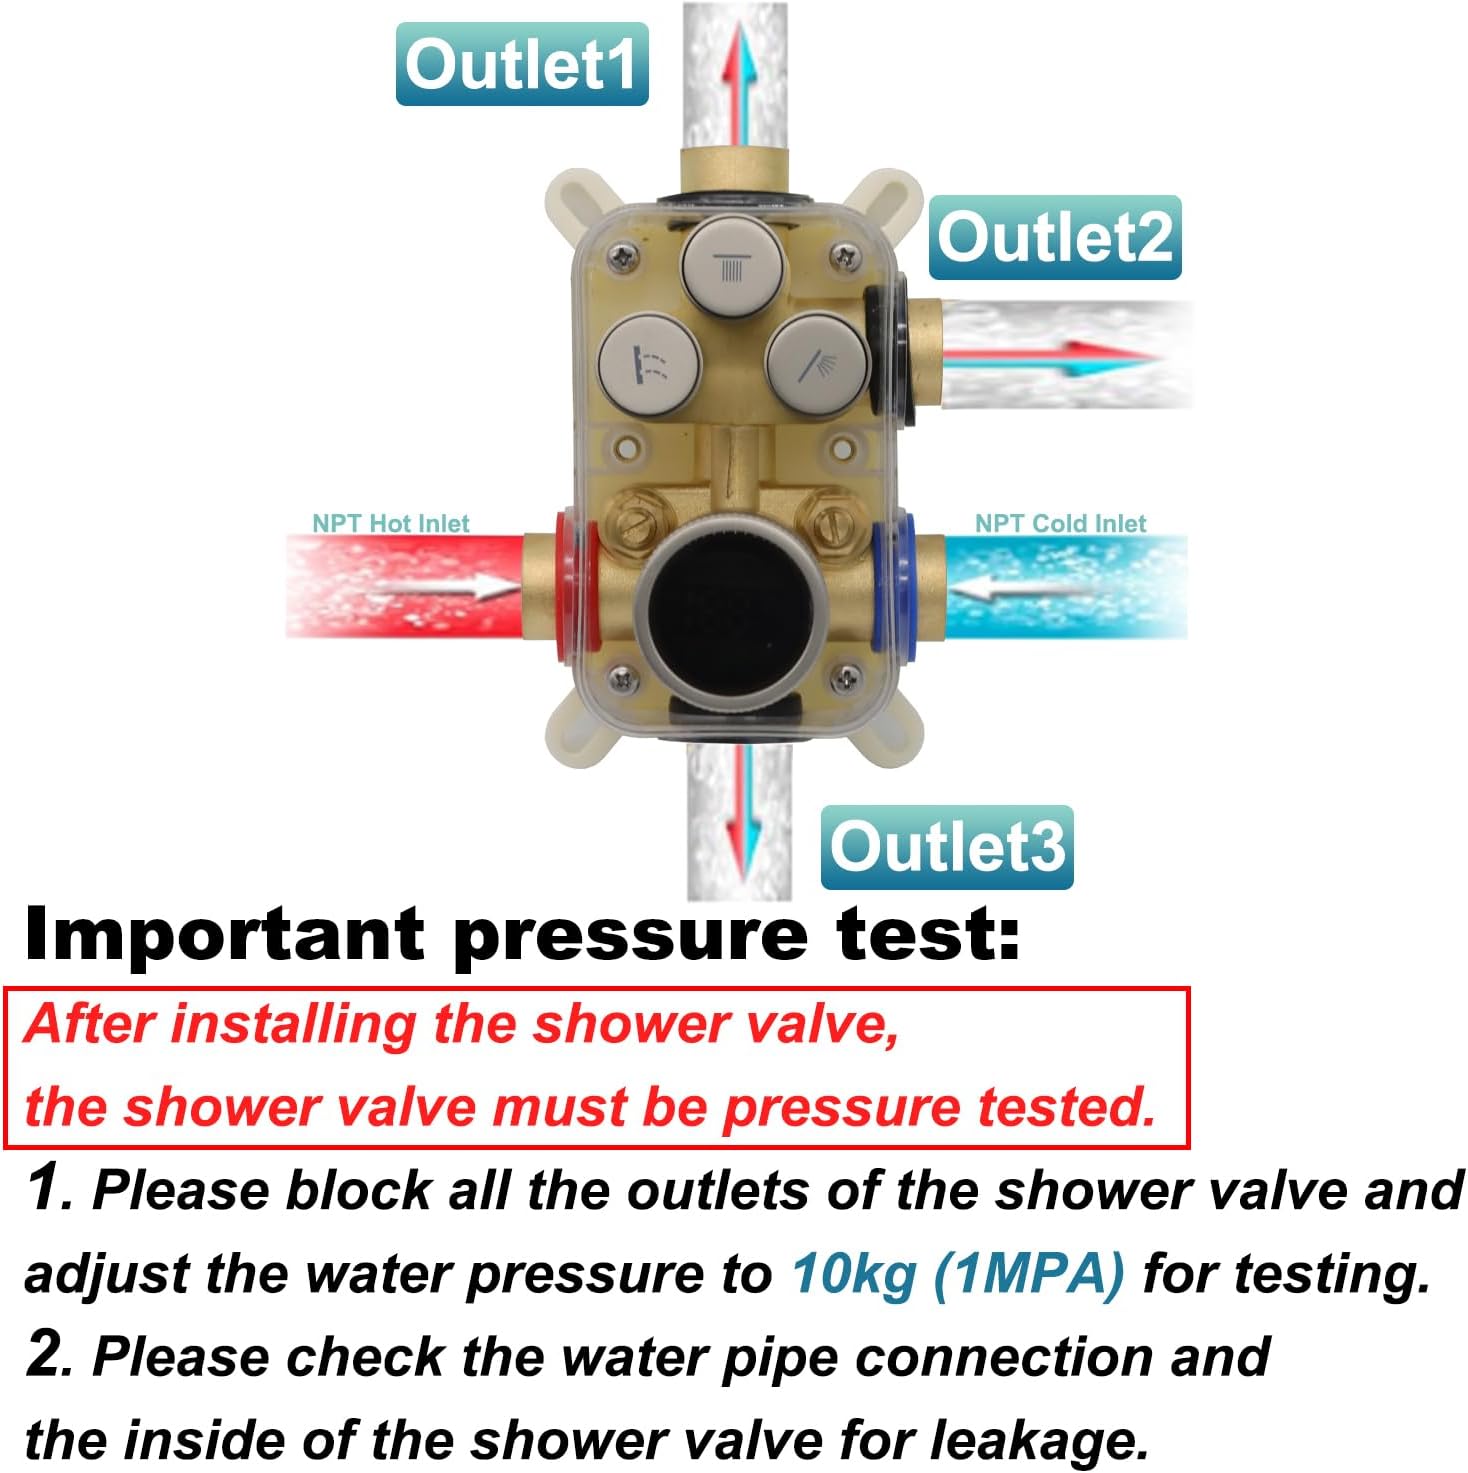
This diagram illustrates the shower valve's connection points: NPT Hot Inlet, NPT Cold Inlet, and three outlets labeled Outlet1, Outlet2, and Outlet3 for connecting to different shower components.
Important Pressure Test:
After installing the shower valve, it is crucial to perform a pressure test to check for leaks.
- Block all outlets of the shower valve.
- Adjust the water pressure to 10kg (1MPA) for testing.
- Check all water pipe connections and the inside of the shower valve for any signs of leakage.
Video: Shower Valve Connections
This video demonstrates the various inlet and outlet connections on the 3-function shower valve, showing where hot water, cold water, and the three shower outlets connect.
5. Betjeningsvejledning
Your Backnets shower system features intuitive controls for a personalized showering experience.
Funktionsvalg:
The control panel includes three push-button selectors for different shower functions. Press a button to activate or deactivate a function. You can use one, two, or all three functions simultaneously.

This image illustrates the control panel, detailing how to select shower functions by clicking the top three buttons and how to adjust temperature using the rotary knob at the bottom. The LED display shows the current water temperature, with blue indicating cooler temperatures and orange indicating warmer temperatures.
Temperaturkontrol:
The large rotary knob at the bottom of the control panel adjusts the water temperature. Rotate it left for colder water (blue indicator) and right for warmer water (orange indicator). The integrated LED display shows the precise water temperature in real-time, powered by the water flow itself.

This image provides a close-up of the digital LED temperature display on the control knob, showing how it indicates water temperature for both hot and cold settings. The display is powered by hydroelectric energy from the water flow, requiring no external batteries.
Video: Dual Head Shower System Operation
This video demonstrates the operation of the dual head shower system, showing how to switch between the main shower head and the handheld shower, and how the water flows from each.
Video: Handheld Shower System Operation
This video showcases the handheld shower system in use, demonstrating its flexibility and water spray patterns.
6. Vedligeholdelse
Rengøring af finishen:
To maintain the brushed nickel finish, clean regularly with a soft cloth and mild soap. Rinse thoroughly with clean water and dry immediately to prevent water spots. Avoid abrasive cleaners, scouring pads, or chemicals containing ammonia, bleach, or alcohol, as these can damage the finish.
Rengøring af brusehoveddyser:
The silicone nozzles on the rainfall and handheld shower heads are designed for easy cleaning. If mineral deposits build up, gently rub the nozzles with your finger or a soft brush to dislodge them. For stubborn deposits, a solution of equal parts white vinegar and water can be used. Soak the shower head (if removable) or apply the solution to the nozzles, let it sit for a few minutes, then rinse thoroughly.
7. Fejlfinding
| Problem | Mulig årsag | Løsning |
|---|---|---|
| Ingen vandgennemstrømning eller lavt tryk | Main water supply off, clogged nozzles, valve issue. | Check main water supply. Clean shower head nozzles. Inspect valve for obstructions or damage. |
| Vandtemperaturen svinger | Inconsistent hot/cold water supply, thermostatic cartridge issue. | Ensure stable hot and cold water pressure. If problem persists, the thermostatic cartridge may need inspection or replacement by a professional. |
| Lækager fra forbindelser | Løse forbindelser, beskadigede pakninger. | Tighten all connections. Check and replace any worn or damaged O-rings or seals. |
| LED display virker ikke | Insufficient water flow to power the hydroelectric generator. | Ensure adequate water flow through the valve. If flow is sufficient and display still doesn't work, contact customer support. |
8. Specifikationer
| Feature | Detalje |
|---|---|
| Mærke | Backnets |
| Modelnummer | BK-SDP-1 |
| Farve | Børstet nikkel |
| Materiale | Messing, rustfrit stål |
| Finish Type | Børstet |
| Antal håndtag | 2 |
| Monteringstype | Vægmontering |
| Inkluderede komponenter | Ventil |
| Hovedstørrelse | 12 tommer |
| Varens vægt | 14.52 pund |
| Produktdimensioner | 22 x 15 x 11 tommer |
| Vandtilslutning | NPT1/2 Standard |
9. Garanti og support
Backnets is committed to providing high-quality products. This shower system is designed for long-term use, with a focus on durability and reliability. We believe a shower system should be installed once and then enjoyed for many years.
For any questions, technical assistance, or warranty claims, please contact Backnets customer support. Refer to your purchase documentation for specific warranty details and contact information.

This image displays the official Backnets brand logo, which is typically found on product packaging and official communications.