1. Vigtige sikkerhedsinstruktioner
Read all instructions carefully before operating the tool. Failure to follow all instructions listed below may result in electric shock, fire, and/or serious injury.
- Always wear safety glasses and closed-toe shoes to protect against flying debris.
- Ensure the battery is securely installed and balanced during operation.
- When using the edger function, be aware of the cutting edges and maintain a safe distance from obstacles.
- Keep hands, face, and feet clear of the cutting line at all times.
- Brug ikke værktøjet i våde omgivelser eller i nærheden af brandfarlige væsker eller gasser.
- Hold børn og tilskuere i sikker afstand (mindst 50 meter) fra driftsområdet.
- Remove the battery pack when not in use, before cleaning, or when changing accessories.
2. Pakkens indhold
Bekræft, at alle nedenstående varer er inkluderet i din pakke. Hvis der mangler eller er beskadigede dele, skal du kontakte kundeservice.
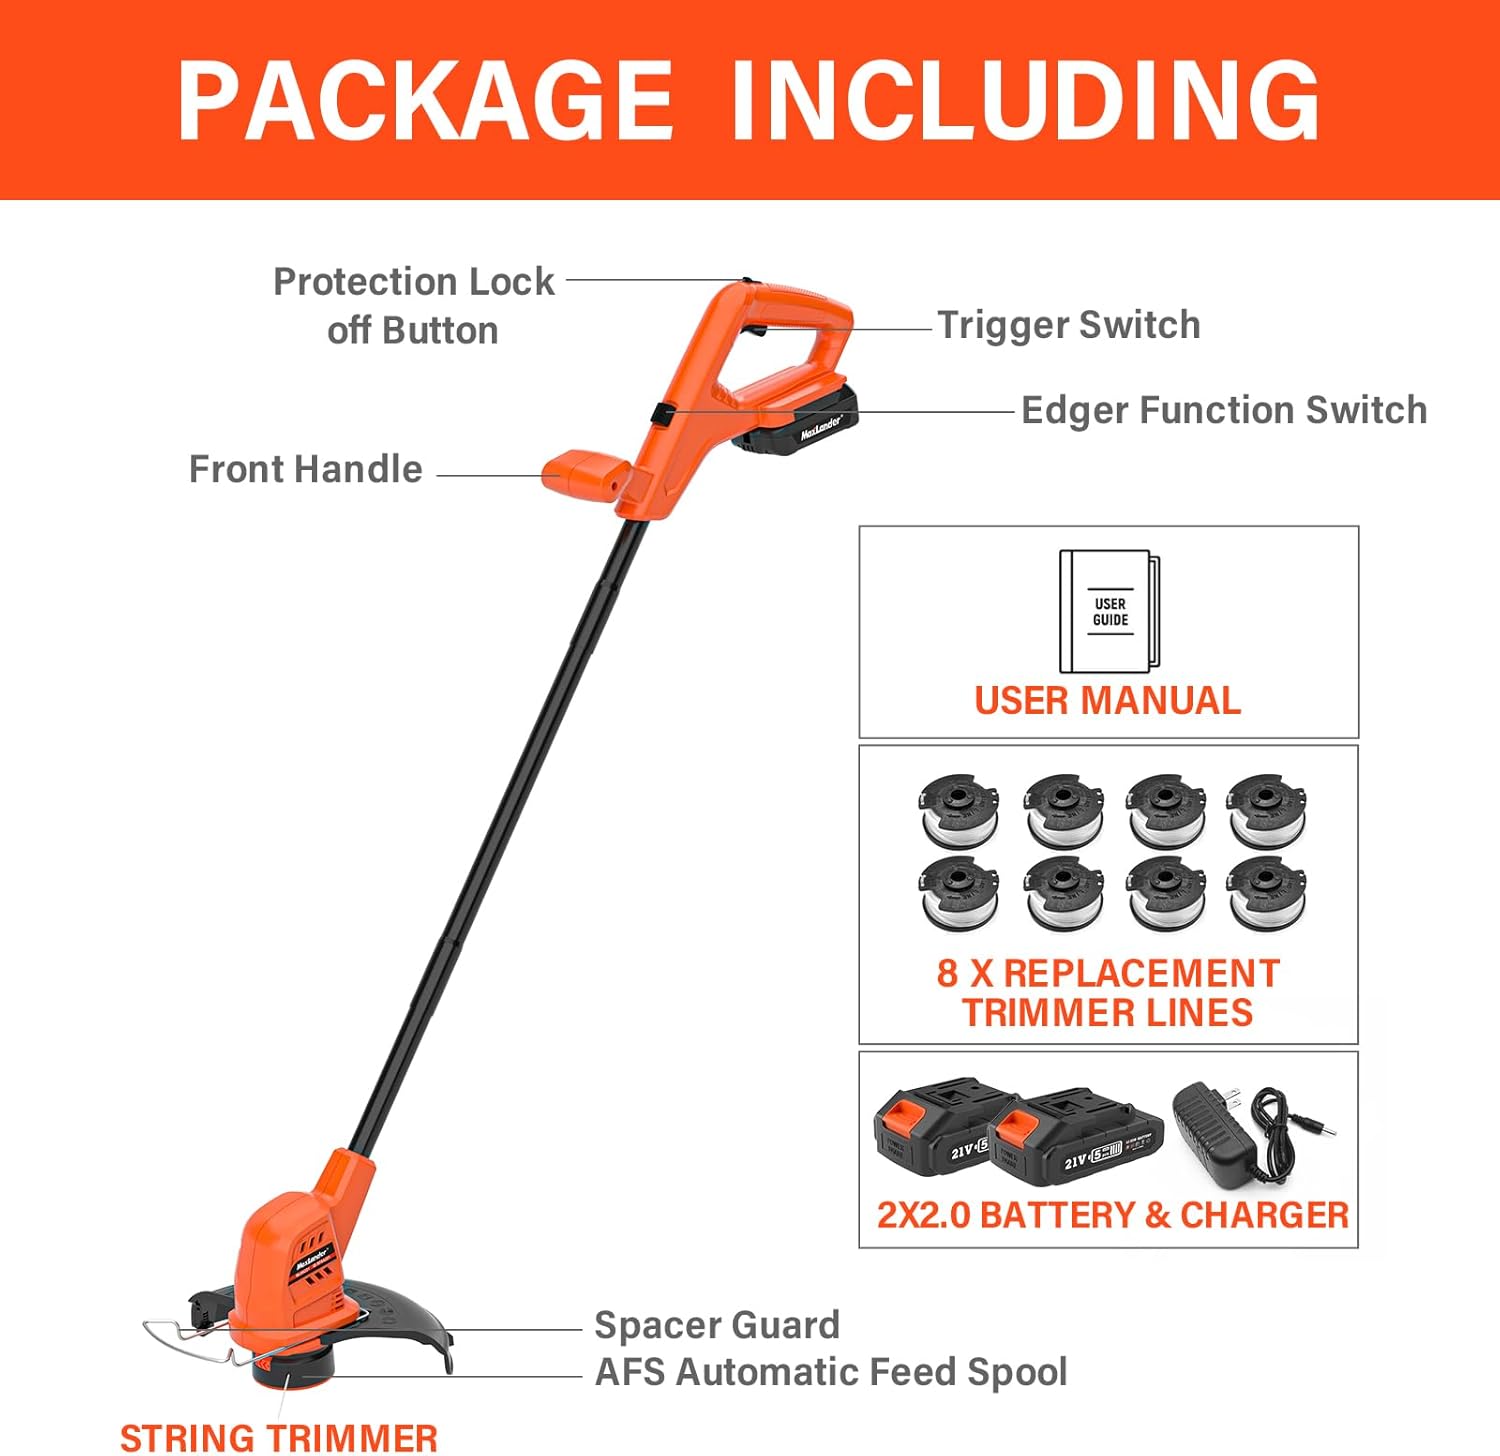
Image: MAXLANDER Cordless Weed Wacker and its accessories, including batteries, charger, and replacement spools.
- MAXLANDER Cordless Weed Wacker (SF8A220)
- 2 x 20V 2.0Ah litium-ion-batterier
- 1 x hurtigoplader
- 8 x udskiftningsspoletrimmertråde
- Brugermanual
3. Montering
Follow these steps to assemble your MAXLANDER Cordless Weed Wacker:
- Fastgør beskyttelsen: Align the guard with the mounting slots on the trimmer head. Secure it with the provided screws. Ensure it is firmly in place to protect against debris.
- Installer det forreste håndtag: Slide the front handle onto the shaft and adjust it to a comfortable working position. Tighten the handle securely.
- Indsæt batteriet: Slide a charged 20V battery into the battery slot on the handle until it clicks into place. Ensure it is fully seated.
4. Opladning og installation af batteri
4.1 Opladning af batteriet
- Tilslut hurtigopladeren til en almindelig stikkontakt.
- Slide the 20V battery into the charger. The indicator light on the charger will show the charging status.
- A 2.0Ah battery typically charges fully in approximately 1 hour.
- Når det er fuldt opladet, skal du fjerne batteriet fra opladeren.
4.2 Installation af batteriet
- Ensure the tool is turned off before installing or removing the battery.
- Slide the charged battery pack into the battery port on the tool's handle until it locks securely.
- For at fjerne batteriet skal du trykke på batteriets udløserknap og skubbe det ud.
5. Betjening
5.1 Start og stop af trimmeren
- Ensure the battery is installed and the area is clear of bystanders and obstacles.
- Press the protection lock-off button (usually located on the side of the handle).
- While holding the lock-off button, squeeze the trigger switch to start the trimmer.
- Release the trigger switch to stop the trimmer.
5.2 Using as a String Trimmer

Image: A person using the MAXLANDER weed wacker to trim grass around a tree, demonstrating automatic line feed.
- Hold trimmeren fast med begge hænder.
- Hold en behagelig afstand til din krop.
- Swing the trimmer from side to side, cutting grass and weeds with the tip of the line.
- The automatic line feed system will advance the line as needed.
5.3 Converting to Edger Mode

Image: The MAXLANDER weed wacker head rotated 90 degrees for edging, highlighting its 2-in-1 design.
- Ensure the trimmer is OFF and the battery is removed.
- Locate the edger function switch (usually near the trimmer head).
- Press the switch and rotate the trimmer head 90 degrees until it locks into the edging position.
- Geninstaller batteriet.
5.4 Using as an Edger
Video: Official MAXLANDER video demonstrating the 10-inch weed wacker in action, showcasing its edging capabilities.
- Hold the tool with the wheel on the guard resting on the paved surface (e.g., sidewalk, driveway).
- Gå langsomt, og før trimmeren langs kanten.
- Allow the line to cut cleanly without forcing the tool.
6. Vedligeholdelse
6.1 Replacing Trimmer Line
- Ensure the tool is OFF and the battery is removed.
- Refer to the diagram on the spool cover for instructions on how to open the spool housing.
- Remove the empty spool and replace it with a new MAXLANDER replacement spool.
- Thread the line through the eyelet and reassemble the spool housing.
6.2 Rengøring og opbevaring
- Rengør værktøjet efter hver brug med enamp klæde. Brug ikke skrappe kemikalier.
- Fjern eventuelt græsafklip eller snavs fra beskyttelsesskærmen og trimmerhovedet.
- Opbevar værktøjet et tørt og sikkert sted utilgængeligt for børn.
- Fjern batteripakken, før du opbevarer den i længere perioder.
7. Fejlfinding
If you encounter issues with your MAXLANDER Cordless Weed Wacker, refer to the following common problems and solutions:
| Problem | Mulig årsag | Løsning |
|---|---|---|
| Værktøjet starter ikke | Battery not charged or improperly installed; Lock-off button not pressed. | Ensure battery is fully charged and correctly inserted. Press lock-off button before squeezing trigger. |
| Trimmertråd fremføres ikke | Line tangled or empty spool; Debris in feed mechanism. | Remove battery, inspect spool for tangles or replace spool. Clear any debris from the trimmer head. |
| Reduceret skæreydelse | Dull or short trimmer line; Low battery charge. | Advance or replace trimmer line. Recharge or replace battery. |
| Overdreven vibration | Beskadiget eller forkert installeret spole/line. | Remove battery, inspect spool and line for damage. Ensure proper installation. |
If the problem persists, contact MAXLANDER customer support.
8. Specifikationer
| Feature | Detalje |
|---|---|
| Mærke | MAXLANDER |
| Modelnummer | SF8A220 |
| Strømkilde | Batteridrevet (20V) |
| Batteritype | Lithium-ion (2 x 2.0Ah included) |
| Skærebredde | 10 tommer |
| Hastighed | 3000 RPM |
| Varens vægt | 6 pund |
| Farve | Orange & Sort |
| Montering påkrævet | Ja |
9. Garanti og kundesupport
MAXLANDER products are designed for durability and performance. For warranty information, technical support, or to order replacement parts, please refer to the contact details provided on the product packaging or visit the official MAXLANDER webwebsted.
Gem venligst dit købsbevis for garantikrav.