1. Introduktion
Thank you for choosing the TIC-D2500 2-Input, 2-Zone, 2X300W Bridged Power Amplifier. Denne professionelle kvalitet amplifier is designed for reliable performance in various audio applications, featuring 8 Ohm, 4 Ohm, and 70V output capabilities, along with Crown ultra-efficient DriveCore technology. This manual provides essential information for the safe and efficient operation of your amplivligere.
2. Sikkerhedsoplysninger
ADVARSEL: To reduce the risk of fire or electric shock, do not expose this equipment to rain or moisture. Do not open the casing. Overlad al service til kvalificeret servicepersonale.
- Læs alle instruktioner inden betjening af amplivligere.
- Gem disse instruktioner til fremtidig reference.
- Overhold alle advarsler på produktet og i betjeningsvejledningen.
- Følg alle instruktioner.
- Brug ikke dette apparat i nærheden af vand.
- Rengør kun med en tør klud.
- Bloker ikke ventilationsåbninger. Installer i overensstemmelse med producentens anvisninger.
- Må ikke installeres i nærheden af varmekilder såsom radiatorer, varmeapparater, komfurer eller andre apparater (inklusive ampløftere), der producerer varme.
- Undgå at omgå sikkerhedsformålet med det polariserede stik eller stik med jordforbindelse. Et polariseret stik har to knive, hvor den ene er bredere end den anden. Et stik med jordforbindelse har to knive og et tredje jordstik. Det brede blad eller det tredje ben er tilvejebragt for din sikkerhed. Hvis det medfølgende stik ikke passer i din stikkontakt, skal du kontakte en elektriker for at få udskiftet den forældede stikkontakt.
- Beskyt netledningen mod at blive trådt på eller klemt, især ved stik, stikkontakter og det sted, hvor de kommer ud af apparatet.
- Brug kun tilbehør/tilbehør specificeret af producenten.
- Træk stikket ud af dette apparat under tordenvejr, eller når det ikke skal bruges i længere perioder.
- Overlad al service til kvalificeret servicepersonale. Service er påkrævet, når apparatet er blevet beskadiget på nogen måde, såsom strømforsyningsledning eller stik er beskadiget, væske er blevet spildt, eller genstande er faldet ind i apparatet, apparatet har været udsat for regn eller fugt, ikke fungerer normalt , eller er blevet droppet.
3. Produktet er slutview
3.1 Frontpanel

Figure 3.1: Front Panel of the TIC-D2500 Amplifier. Shows the power switch, LCD display, control knobs for channels A and B, and navigation buttons.
- Afbryderen: Drejer amplivligere til eller fra.
- CHA / CHB Level Controls: Rotary knobs to adjust the output level for Channel A and Channel B independently.
- LCD-skærm: Shows volume in dB per channel, operating temperature, and other system information.
- Navigation Buttons (Home, Level, Type, Function, Mute): Used to navigate menus and adjust settings on the LCD display.
- TIC-D2500 Model Indicator: Displays the product model number.
3.2 Bagpanel

Figure 3.2: Rear Panel of the TIC-D2500 Amplifier. Displays input/output connectors, mode switches, AC inlet, and breaker.
- Afbryder: Afbryder til beskyttelse.
- AC indgang: Power input connector for the AC power cord.
- Speaker Outputs (CH1, CH2, BRG): Connectors for speaker cables. Supports 4Ω, 8Ω, and 70V outputs. Includes both binding posts and Speakon-style connectors.
- CH1 Input / CH2 Input (XLR): Balanced XLR input connectors for audio signals.
- CH1 Link / CH2 Link (XLR): XLR link outputs for passing the input signal to another amplifier or device.
- Mode Switches (BRG, PARALLEL, STEREO): Switches to select the amplifier's operating mode (Bridged, Parallel, or Stereo).
- HI-PASS Switches (OFF, 30Hz, 50Hz): Switches to activate high-pass filters at 30Hz or 50Hz, or disable them.
3.3 Detailed Rear Panel Connectors
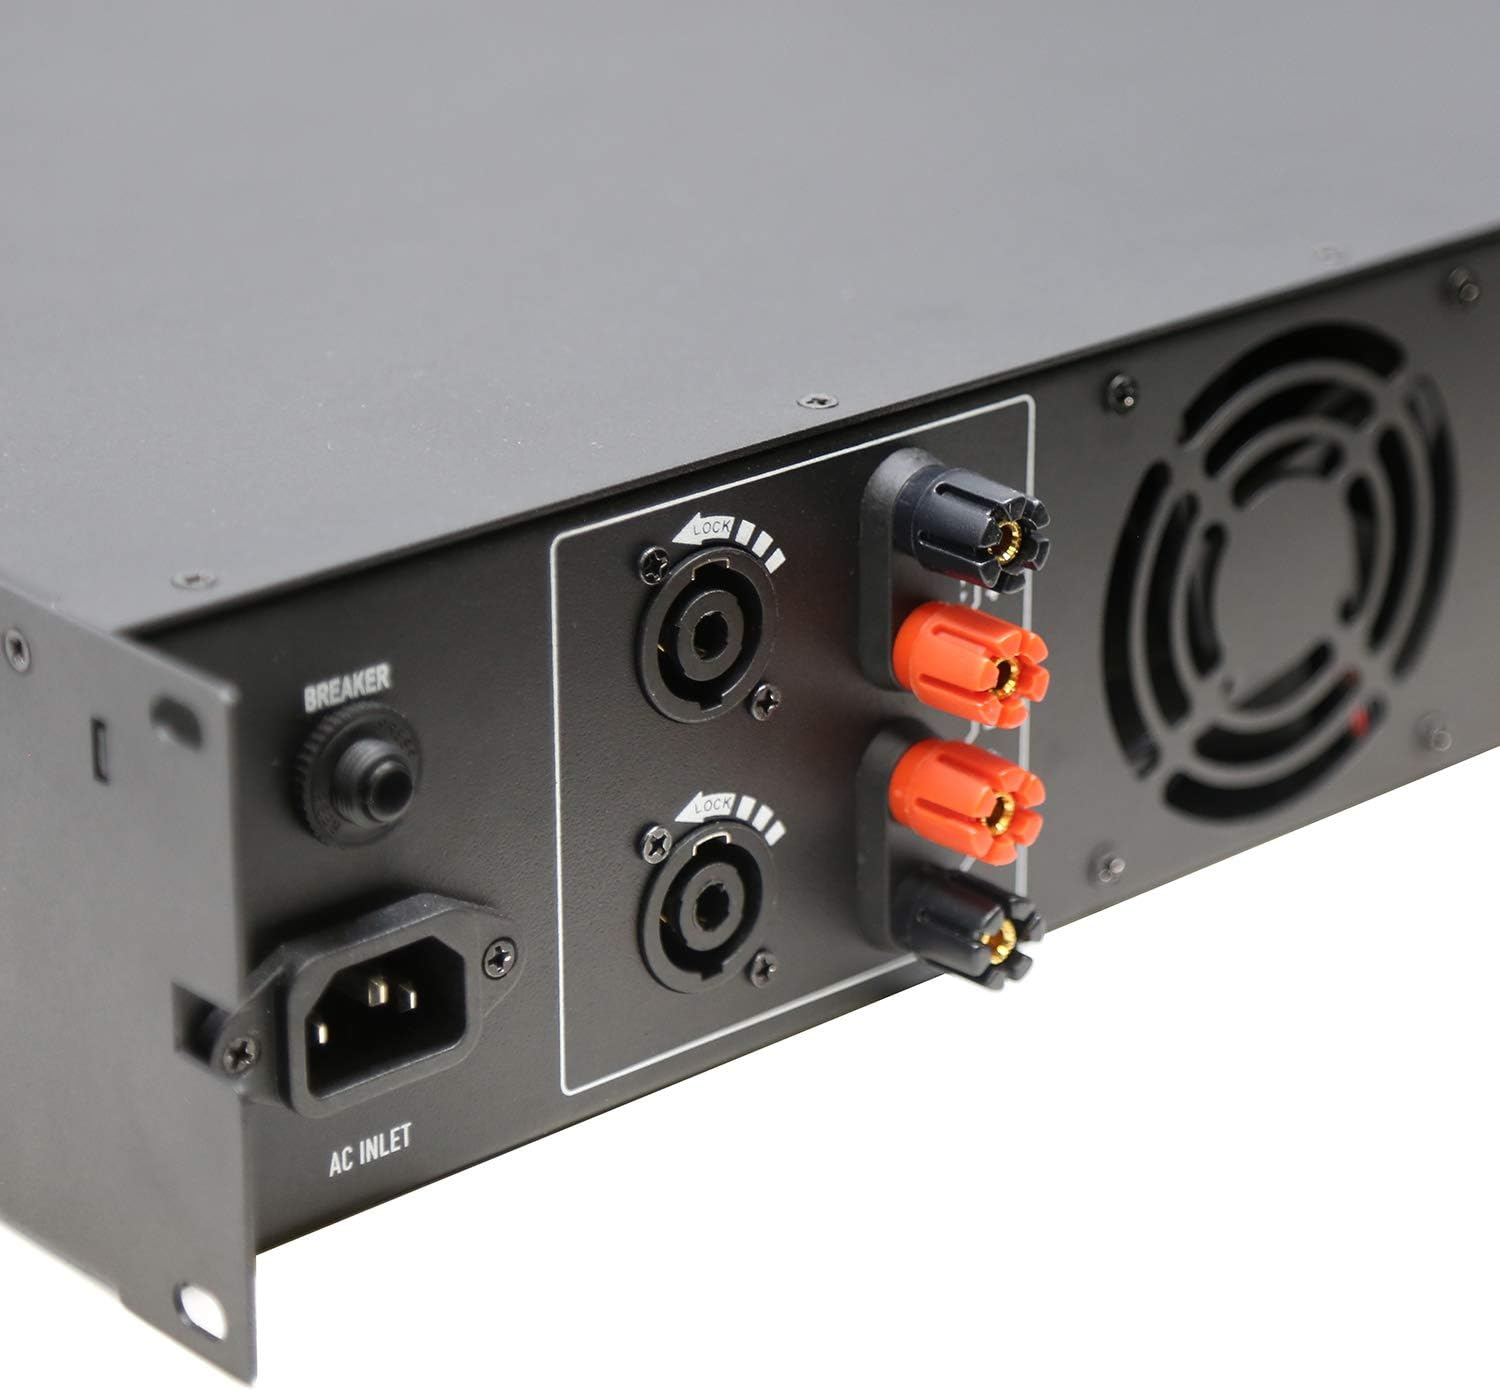
Figure 3.3: Rear Left Panel Detail. Shows the AC inlet, breaker, and speaker output terminals (binding posts and Speakon).

Figure 3.4: Rear Right Panel Detail. Shows the XLR input and link output connectors, along with the BRG/PARALLEL/STEREO and HI-PASS switches.
4. Opsætning
- Placering: Sørg for amplifier is placed in a well-ventilated area, preferably in a standard 2U rack space. Maintain adequate clearance around the unit for airflow.
- Strømtilslutning:
- Sørg for ampStrømafbryderen er i OFF-positionen.
- Connect the supplied AC power cord to the AC Inlet on the rear panel and then to a suitable grounded power outlet.
- Indgangsforbindelser:
- Tilslut din lydkilde (mixer, forforstærker)amplifier, etc.) to the CH1 INPUT and CH2 INPUT XLR connectors on the rear panel using balanced XLR cables.
- If linking to another amplifier, use the CH1 LINK and CH2 LINK XLR outputs.
- Output Connections (Speakers):
- Connect your speakers to the appropriate speaker output terminals (binding posts or Speakon) on the rear panel. Ensure correct polarity (+ to + and - to -).
- For 70V systems, ensure your speakers are compatible with 70V constant voltage systems and connect them accordingly.
- For 4Ω or 8Ω operation, ensure your speakers' impedance matches the amplifier's output capabilities for the selected mode (Stereo or Parallel).
- For Bridged mode (BRG), connect a single speaker to the designated BRG output terminals. Refer to the rear panel markings for correct connections.
- Valg af tilstand:
- Set the BRG/PARALLEL/STEREO switch to your desired operating mode.
- Set the HI-PASS switches according to your system requirements. "OFF" for full range, "30Hz" or "50Hz" to filter out low frequencies.
5. Betjeningsvejledning
- Tænd:
- Before powering on, ensure all level controls (CHA, CHB) are set to their minimum position.
- Tænd først dit lydkildeudstyr.
- Flip the Power Switch on the front panel to the ON position. The LCD display will illuminate.
- Justering af lydstyrke:
- Slowly increase the CHA and CHB level controls to achieve the desired output volume.
- Monitor the LCD display for volume levels (in dB) and operating temperature.
- Using the LCD Display and Navigation:
- Use the "Home", "Level", "Type", "Function", and "Mute" buttons to navigate through the amplifier's settings and monitoring options displayed on the LCD.
- Consult the on-screen menus for specific adjustments related to input sensitivity, output modes, and other advanced features.
- Sluk:
- Before powering off, reduce all level controls to their minimum position.
- Sluk for amplifier ved hjælp af afbryderen.
- Turn off your audio source equipment.
6. Vedligeholdelse
- Rensning: Frakobl amplifier from power before cleaning. Use a soft, dry cloth to wipe down the exterior. Do not use liquid cleaners or aerosols.
- Ventilation: Regularly check that ventilation openings are clear of dust and debris to ensure proper cooling.
- Kabelforbindelser: Periodically inspect all cable connections for secure fit and signs of wear.
- Opbevaring: Hvis du opbevarer amplifier for an extended period, ensure it is in a cool, dry place, protected from dust and extreme temperatures.
7. Fejlfinding
| Problem | Mulig årsag | Løsning |
|---|---|---|
| Ingen strøm | Power cord disconnected; Power switch off; Circuit breaker tripped; Power outlet issue. | Check power cord connection; Ensure power switch is ON; Reset circuit breaker; Test power outlet with another device. |
| Ingen lydudgang | Input cables disconnected; Speaker cables disconnected or incorrect polarity; Amplifier level controls at minimum; Incorrect mode selection; Audio source issue. | Check all input and output cable connections; Verify speaker polarity; Increase CHA/CHB level controls; Ensure correct BRG/PARALLEL/STEREO mode is selected; Check audio source. |
| Forvrænget lyd | Input signal too high (clipping); Amplifier overloaded; Speaker impedance mismatch; Faulty cables. | Reduce input signal level from source; Ensure speakers match amplifier impedance; Check speaker connections and cables; Reduce amplifier udgangsniveau. |
| Overophedning | Blocked ventilation; Excessive load; Prolonged high-level operation. | Sørg for ordentlig ventilation omkring amplifier; Reduce load or operating level; Allow ampvarmebeholder for at køle ned. |
If the problem persists after attempting these solutions, please contact qualified service personnel or TIC Audio support.
8. Specifikationer
| Feature | Detalje |
|---|---|
| Model | D2500 |
| Udgangseffekt (8Ω) | 300 B x 2 |
| Udgangsimpedans | 4Ω / 8Ω / 70V Stable |
| Amplivligere Type | Class D with Crown DriveCore technology |
| Frekvensrespons | 20Hz - 20KHz (+/-3dB) |
| Indgangsstik | 2 x 3-pin XLR (balanced signal input) |
| Output Stik | Speaker (x2) - Binding Posts & Speakon-style |
| Rack plads | 2U |
| Dimensioner (B x D x H) | 483 x 257 x 88.8mm (19 x 10.1 x 3.5 inches approx.) |
| Varens vægt | 17.27 pund (7.83 kg) |
| Strømkilde | AC |
9. Garanti og support
For warranty information, technical support, or service inquiries, please contact TIC Audio directly. Refer to the official TIC Audio webwebstedet eller din købsdokumentation for at få de seneste kontaktoplysninger og garantivilkår.
This product may be eligible for extended protection plans. Please refer to your retailer for details on available protection plans.
Fabrikant: TIC Audio