
1. Introduktion
This manual provides detailed instructions for the installation, operation, and maintenance of your SCYAN X7 Fingerprint Keypad Door Lock. Please read this manual thoroughly before installation and use to ensure proper function and safety.
The SCYAN X7 lock offers multiple unlocking methods including fingerprint, user code, and mechanical keys, enhancing security and convenience for interior doors.

Image 1.1: SCYAN X7 Fingerprint Keypad Door Lock in Satin Nickel finish, showing fingerprint sensor, keypad, and lever handle.
2. Produktkomponenter
Kontroller, at alle komponenter er til stede, før installationen påbegyndes:
- Front lock unit
- Back lock unit
- Two levers
- Cylinder & key set
- Låsemekanisme
- Monteringsskruer

Image 2.1: Front (keypad and fingerprint sensor) and back (battery cover) units of the SCYAN X7 lock.
3. Installation
3.1 Dørkompatibilitet
The SCYAN X7 lock is designed for interior doors with a thickness of 1-1/4" to 2-1/4" (approximately 32mm to 57mm). It requires a USA standard 2-1/8" (54mm) diameter bore hole. Ensure your door meets these specifications.
The distance between the top of the lock and the lever centerline is 6 inches. Please measure your door to ensure compatibility, especially if a deadbolt lock is already present.
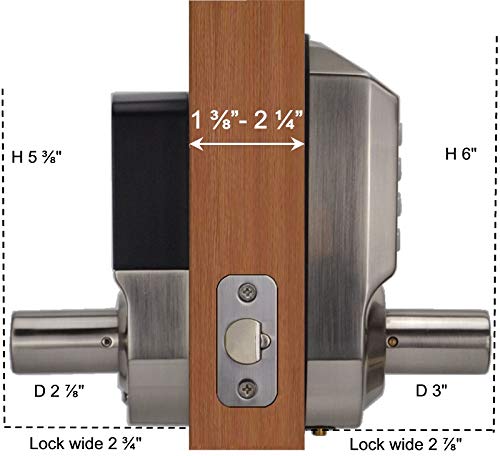
Image 3.1: Diagram illustrating the dimensions of the SCYAN X7 lock and required door measurements.
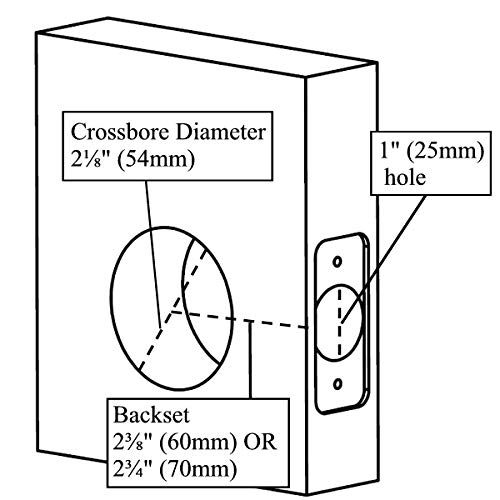
Image 3.2: Diagram showing standard crossbore (2-1/8" or 54mm) and backset (2-3/8" or 60mm, or 2-3/4" or 70mm) dimensions for door preparation.
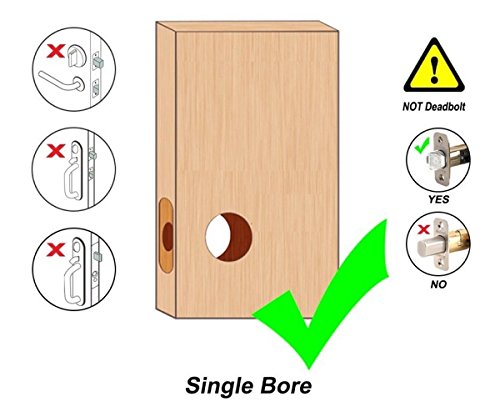
Image 3.3: Illustration confirming compatibility with single bore doors, indicating non-compatibility with deadbolts or handle sets requiring multiple bores.
3.2 Reversible Handle Installation
The SCYAN X7 features a reversible handle, allowing installation on both left-handed and right-handed doors. The lever direction can be adjusted during installation.

Image 3.4: Diagram illustrating the fully reversible lever, adaptable for both right-handed and left-handed door installations.

Image 3.5: Step-by-step visual guide for configuring the lever for either left-handed or right-handed door operation, involving spindle rotation and key insertion.
Follow the detailed instructions provided with the lock for specific steps on rotating the spindle and inserting the cylinder and lever catch to match your door's handing.
4. Betjening
4.1 Oplåsningsmetoder
The SCYAN X7 lock supports multiple unlocking methods:
- Fingeraftryk: Place a registered finger on the semiconductor sensor. The sensor array (160x160 pixels) is designed for high recognition rates, adapting to various finger conditions (dry, wet, light texture, aged).
- Brugerkode: Enter a 4-12 digit user code on the keypad.
- User Code + Fingerprint: For enhanced security, combine a user code entry with a fingerprint scan.
- Fingerprint + Fingerprint: Utilize two registered fingerprints for unlocking, further increasing-sikkerhed.
- Mekanisk nøgle: Use the provided mechanical keys for emergency access or traditional unlocking.
4.2 Programming Fingerprints and Codes
The lock supports up to 100 unique fingerprints and 100 user-defined 4-12 digit codes. Refer to the separate programming guide included with your lock for detailed steps on adding, modifying, or deleting fingerprints and user codes.
4.3 Passage Function
The passage function allows the door to remain unlocked for continuous entry without requiring a code or fingerprint. This feature can be easily activated and deactivated as needed. Consult the programming guide for instructions on enabling and disabling this mode.
4.4 Batterioplysninger
The lock operates on 4 AA batteries (not included). These are housed in the back lock unit. In case of battery depletion, the lock can be temporarily powered from the outside using a standard 9-volt battery for emergency access. The lock is designed to remain locked if batteries die, but it is recommended to replace batteries promptly when low battery warnings are indicated.
5. Vedligeholdelse
5.1 Udskiftning af batteri
When the lock indicates low battery, replace all four AA batteries. To do this, remove the battery cover on the interior side of the lock, replace the old batteries with new ones, and secure the cover.
5.2 Generel pleje
Clean the lock's exterior with a soft, dry cloth. Avoid using abrasive cleaners or solvents, which can damage the finish or electronic components. Ensure the fingerprint sensor and keypad are kept clean for optimal performance.
6. Fejlfinding
- Fingeraftryk ikke genkendt: Ensure your finger is clean and dry. Try repositioning your finger on the sensor. If issues persist, re-register the fingerprint or try a different registered finger.
- Tastatur reagerer ikke: Check battery levels. If batteries are low or dead, replace them. Ensure all internal cable connections are secure.
- Lock Not Engaging/Disengaging Properly: Verify that the latch mechanism is installed correctly and moves freely. Check for any obstructions in the door frame or strike plate.
- Advarsel om lavt batteri: Replace all four AA batteries immediately to ensure continuous operation.
7. Specifikationer
| Feature | Specifikation |
|---|---|
| Modelnummer | X7SSN |
| Dimensioner (LxBxH) | 15.2 x 10.2 x 16.5 centimeter (ca. 6 x 4 x 6.5 tomme) |
| Varens vægt | 454 g (ca. 1 lb) |
| Dørtykkelseskompatibilitet | 1-1/4" to 2-1/4" |
| Borehulsdiameter | 2-1/8" (USA Standard) |
| Fingeraftrykskapacitet | Op til 100 |
| Brugerkodekapacitet | Op til 100 (4-12 cifre) |
| Strømkilde | 4 x AA batterier |
| Nødstrøm | 9V batteriterminal |
| Anvendelse | Interior Doors Only (Non-Weatherproof) |
8. Vigtige sikkerhedsoplysninger
- This lock is designed for interior use only. Do not install it on exterior doors or in areas exposed to weather.
- Keep mechanical keys in a safe location outside the premises to ensure emergency access.
- Regularly check battery levels and replace batteries promptly when indicated.
- Forsøg ikke selv at skille låsen ad eller reparere den. Kontakt kvalificeret personale for service.
9. Garanti og support
For warranty information or technical support, please refer to the documentation provided with your purchase or contact SCYAN customer service directly. Keep your purchase receipt for warranty claims.