
1. Introduktion
This manual provides essential information for the safe and effective operation, maintenance, and troubleshooting of your Norton TR202 Tile Saw. Please read this manual thoroughly before assembly, operation, or maintenance to ensure proper use and to prevent injury or damage to the equipment.
The Norton TR202 is a 900W tile saw designed for precise cutting of various tile materials using a 200mm disc. It operates on 230V electrical power.
2. Sikkerhedsinstruktioner
Prioritér altid sikkerheden, når du bruger elværktøj. Manglende overholdelse af disse instruktioner kan resultere i alvorlig personskade eller materielle skader.
- Personligt beskyttelsesudstyr (PPE): Always wear safety glasses, hearing protection, and appropriate work gloves. A dust mask is recommended when cutting dry.
- Elektrisk sikkerhed: Ensure the power supply matches the saw's requirements (230 Volts, 900 Watts). Use a ground fault circuit interrupter (GFCI) when operating in wet conditions. Do not operate with wet hands or in standing water.
- Klingesikkerhed: Ensure the 200mm cutting disc is correctly installed and secured before operation. Never attempt to cut without the blade guard in place. Allow the blade to reach full speed before beginning a cut.
- Arbejdsområde: Hold arbejdsområdet rent, godt oplyst og fri for forhindringer. Sørg for tilstrækkelig ventilation.
- Stabilitet: Ensure the saw is placed on a stable, level surface. The integrated stand provides stability.
- Materialehåndtering: Secure the workpiece firmly. Never force the saw through material.
- Opretholdelse: Disconnect power before performing any maintenance, adjustments, or blade changes.
3. Komponenter overview
Familiarize yourself with the main components of your Norton TR202 Tile Saw.

Figur 3.1: Samlet set view of the Norton TR202 Tile Saw on its stand.
The image above shows the complete tile saw assembly, including the cutting head, sliding table, water tray, and integrated stand with wheels for mobility.

Figure 3.2: Close-up of the cutting head, blade, and water feed line.
Denne view highlights the 200mm cutting disc, the protective blade guard, the motor housing, and the clear tubing for the water cooling system, which is essential for wet cutting.
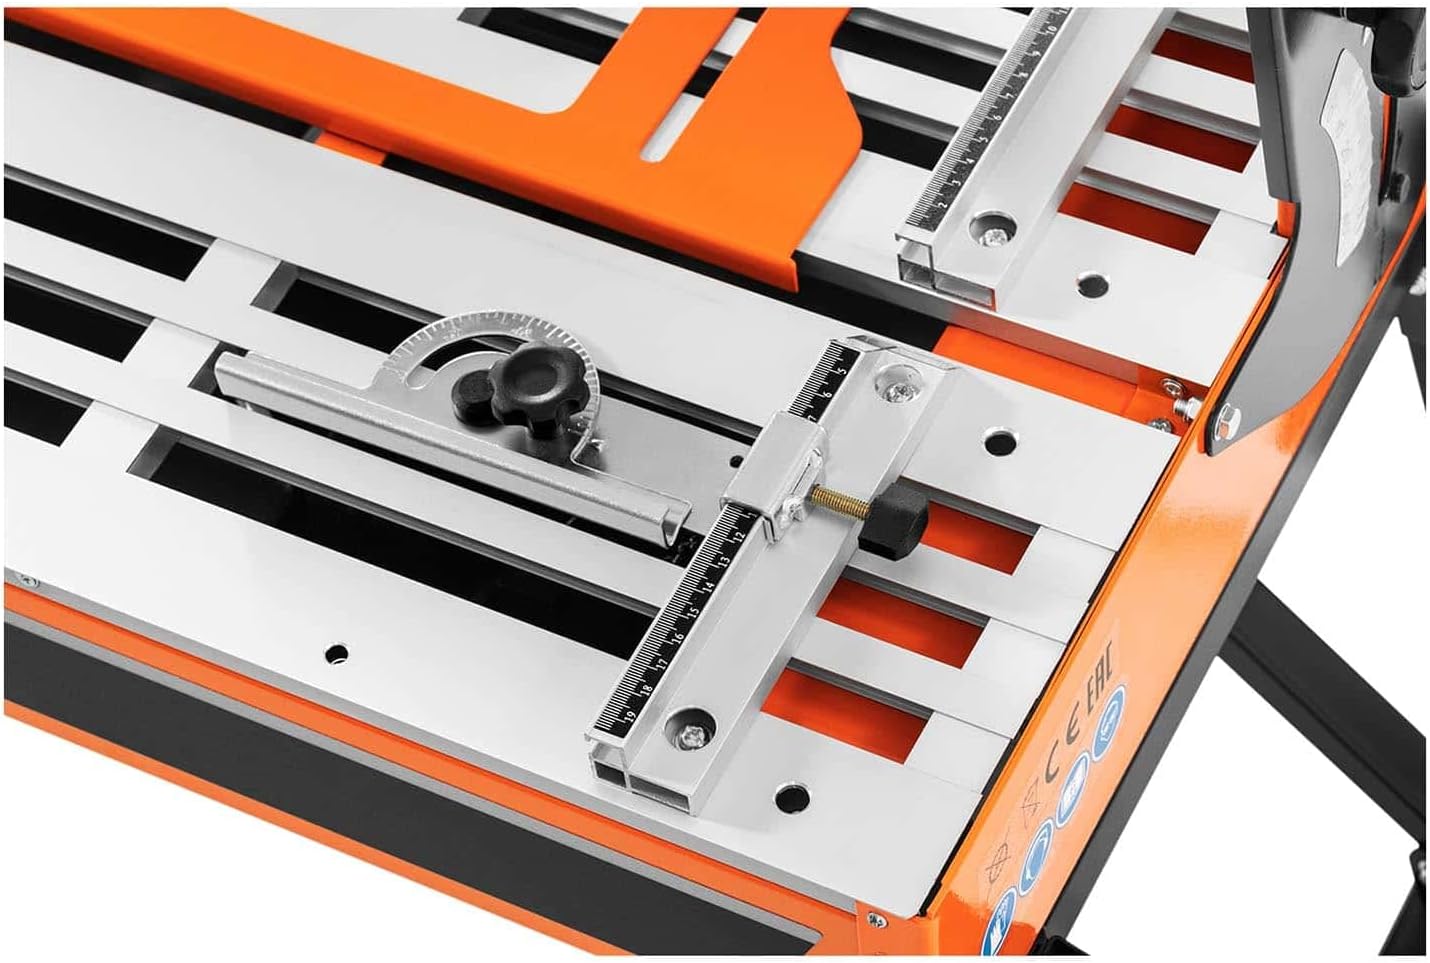
Figure 3.3: Detail of the sliding cutting table with measurement guides and adjustable fence.
The sliding table allows for smooth movement of the tile during cutting. The integrated ruler and adjustable fence assist in making accurate, repeatable cuts.

Figure 3.4: Bevel angle adjustment mechanism.
This mechanism allows the cutting head to be tilted for bevel cuts, up to 45 degrees, providing versatility for various tile installations.

Figure 3.5: Included tools for assembly and maintenance.
The saw comes with essential tools, including wrenches and a screwdriver, for assembly, blade changes, and minor adjustments.
4. Opsætning
4.1 Udpakning og montering
- Fjern forsigtigt alle komponenter fra emballagen.
- Assemble the stand according to the diagrams provided in the separate assembly guide (if applicable). Ensure all fasteners are securely tightened.
- Mount the tile saw unit onto the assembled stand, ensuring it is stable and level.
4.2 Bladinstallation
- Afbryd saven fra strømforsyningen.
- Fjern klingebeskyttelsesdækslet.
- Using the provided wrenches, loosen the arbor nut and remove the outer flange.
- Place the 200mm diamond cutting disc onto the arbor, ensuring the rotation arrow on the blade matches the direction of rotation indicated on the saw.
- Genmonter den ydre flange, og spænd akselmøtrikken godt fast. Spænd ikke for hårdt.
- Replace the blade guard cover.
4.3 Vandforsyningstilslutning
- Fill the water tray with clean water to the recommended level.
- Ensure the water pump is submerged and the water feed lines are properly connected to direct water onto the blade during operation.
4.4 Elektrisk tilslutning
- Verify that the power switch is in the 'OFF' position.
- Plug the saw into a properly grounded 230V electrical outlet protected by a GFCI.
5. Betjeningsvejledning
5.1 Tænd/sluk
- To turn on: Press the green 'ON' button.
- To turn off: Press the red 'OFF' button.
5.2 Justering af skæredybde og -vinkel
- Skæredybde: The cutting depth is generally fixed by the blade's position relative to the table. For specific adjustments, consult the saw's mechanical adjustment points.
- Skærevinkel (skråkant): Loosen the locking knob for angle adjustment (refer to Figure 3.4). Tilt the motor head to the desired angle (up to 45 degrees). Tighten the locking knob securely before cutting.
5.3 Lav et snit
- Ensure the water tray is filled and the pump is operating, providing water to the blade.
- Place the tile firmly against the adjustable fence on the sliding table.
- Align the cutting line on the tile with the blade.
- Tænd for saven og lad klingen nå fuld driftshastighed.
- Slowly and steadily push the sliding table forward, guiding the tile through the blade. Do not force the cut.
- Once the cut is complete, retract the table and turn off the saw. Wait for the blade to stop completely before removing the cut tile.
6. Vedligeholdelse
Regular maintenance ensures the longevity and optimal performance of your tile saw.
- Rensning: After each use, disconnect power and clean the saw thoroughly. Remove tile dust and debris from the table, water tray, and motor housing.
- Vandsystem: Regularly clean the water tray and pump to prevent clogging from tile slurry. Replace water frequently.
- Bladinspektion: Inspect the 200mm blade for wear, damage, or dullness. Replace worn blades promptly.
- Elektrisk ledning: Kontrollér netledningen for tegn på skade. Brug ikke saven, hvis ledningen er flosset eller beskadiget.
- Bevægelige dele: Keep sliding parts clean and lubricated as recommended by the manufacturer (if applicable).
7. Fejlfinding
Dette afsnit omhandler almindelige problemer, du kan støde på.
| Problem | Mulig årsag | Løsning |
|---|---|---|
| Saven starter ikke | No power, faulty switch, tripped GFCI | Check power connection, reset GFCI, inspect power cord. |
| Dårlig skærekvalitet / Langsom skæring | Dull or incorrect blade, insufficient water, forcing the cut | Replace blade, ensure adequate water flow, reduce feed pressure. |
| Overdreven vibration | Loose blade, damaged blade, unstable saw | Tighten blade, replace damaged blade, ensure saw is on a stable surface. |
| No water flow to blade | Empty water tray, clogged pump/lines | Refill water tray, clean pump and water lines. |
8. Specifikationer
Key technical specifications for the Norton TR202 Tile Saw.
| Feature | Specifikation |
|---|---|
| Mærke | Norton |
| Modelnummer | 70184601106 |
| Wattage | 900 watt |
| Voltage | 230 volt |
| Strømkilde | Elektrisk med ledning |
| Bladmateriale | Aluminium Oxide or Carbide (for cutting disc) |
| Diskens diameter | 200mm (implied by product title) |
| Skærevinkel | Op til 45 grader |
| Varens vægt | 2.2 pounds (Note: This weight seems unusually low for a tile saw and may refer to a component, not the full unit.) |
| Produktdimensioner | 19.69 x 19.69 x 11.02 tommer |
| Inkluderede komponenter | Bare Tool (plus standard accessories like blade, pump, stand, tools) |
9. Garanti og support
For warranty information, please refer to the documentation included with your purchase or contact the retailer or manufacturer directly. Specific warranty terms and conditions may vary.
For technical support, spare parts, or service inquiries, please contact your authorized Norton dealer or the manufacturer's customer service department.
10. Officielle produktvideoer
Der er ingen officielle produktvideoer fra sælgeren tilgængelige til indlejring på nuværende tidspunkt.