1. Introduktion
This manual provides detailed instructions for the installation, operation, and maintenance of your Soundstream VL-11A Single DIN Digital Media Receiver. Please read this manual thoroughly before using the product to ensure proper operation and to prevent damage.
The Soundstream VL-11A is designed to provide high-quality audio playback from various digital sources, including USB drives, SD cards, and auxiliary input devices. It features a compact single DIN chassis for easy integration into most vehicle dashboards.
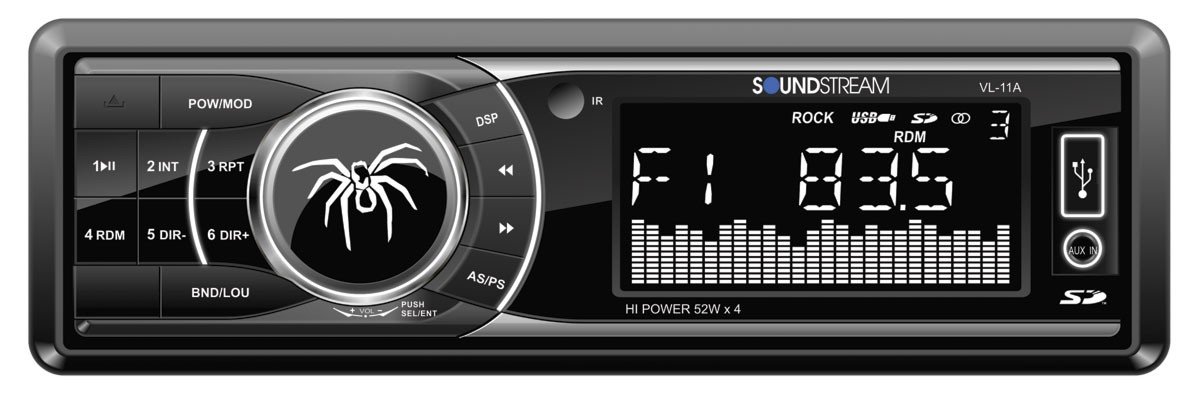
Figur 1.1: Front view of the Soundstream VL-11A Digital Media Receiver. This image displays the main unit with its control buttons and display panel.
2. Sikkerhedsoplysninger
Overhold følgende sikkerhedsforanstaltninger for at forhindre personskade eller beskadigelse af enheden:
- Betjen ikke enheden på en måde, der distraherer dig fra kørslen. Prioritér altid trafiksikkerhed.
- Ensure proper wiring connections. Incorrect wiring can cause fire or damage to the vehicle's electrical system.
- Undgå at udsætte enheden for fugt eller ekstreme temperaturer.
- Forsøg ikke at skille enheden ad eller ændre den. Overlad al service til kvalificeret personale.
- Hold lydstyrken på et niveau, der gør det muligt at høre trafiklyde udefra.
3. Pakkens indhold
Bekræft at alle varer er til stede i pakken:
- Soundstream VL-11A Digital Media Receiver
- Ledningsnet
- Monteringshardware (skruer, monteringsmuffe)
- Fjernbetjening
- Brugervejledning (dette dokument)
4. Produktet er slutview
4.1 Betjeningselementer på frontpanelet
The front panel provides access to primary functions and media inputs.
Figur 4.1: Illustrative diagram of the VL-11A front panel. This image highlights the display, volume knob, mode button, track controls, USB port, SD card slot, and auxiliary input.
- Tænd/sluk-knap: Press to turn on/off. Short press to cycle through audio sources (Radio, USB, SD, AUX).
- Lydstyrkeknap: Drej for at justere lydstyrken. Tryk for at få adgang til lydindstillinger (bas, diskant, balance, fader, EQ).
- Vise: Shows current status, track information, and settings.
- USB-port: Tilslut USB-lagerenheder til medieafspilning.
- SD-kortplads: Indsæt SD-kort for medieafspilning.
- AUX-indgang: Tilslut eksterne lydenheder via et 3.5 mm jackstik.
- Track/Tune Buttons: Navigate tracks or tune radio frequencies.
4.2 Bagtilslutninger
The rear of the unit contains the main wiring harness and preamp udgange.
Figur 4.2: Illustrative diagram of the VL-11A rear connections. This image shows the main wiring harness connector and the RCA preamp udgange.
- Hovedledningsnet: Connects to vehicle power, ground, accessory, and speaker wires.
- RCA Preamp Udgange: Two sets of 2V outputs for connecting external amplivførere.
5. Opsætning
5.1 Installation
Professional installation is recommended. If installing yourself, ensure the vehicle's battery is disconnected before beginning.
- Montering: Insert the metal mounting sleeve into the vehicle's dashboard opening. Bend the tabs to secure it.
- Ledningsføring: Connect the supplied wiring harness to the vehicle's wiring. Match wire colors and functions carefully.
- Højttalerforbindelser: Connect the speaker wires from the harness to your vehicle's speakers. Ensure correct polarity.
- Strømforbindelser: Connect the yellow wire (constant 12V), red wire (switched 12V), and black wire (ground) to the appropriate vehicle circuits.
- Antenne: Tilslut køretøjets antennekabel til enhedens antenneindgang.
- Sikker enhed: Slide the VL-11A into the mounting sleeve until it clicks into place.
Warning: Incorrect wiring can cause severe damage to the unit or vehicle. Consult a professional if unsure.
5.2 Indledende opstart
After installation, reconnect the vehicle's battery. Press the power button on the unit or remote control to turn it on. The display should illuminate.
6. Betjeningsvejledning
6.1 Grundlæggende kontroller
- Tænd/sluk: Tryk på PWR/MODE knap.
- Lydstyrkejustering: Drej på BIND knop.
- Kildevalg: Tryk kort på PWR/MODE button to cycle through Radio, USB, SD, and AUX.
6.2 Lydindstillinger
Tryk på BIND knob to enter the audio menu. Rotate the knob to navigate options and press to select.
- BAS/TREBLE: Adjust bass and treble levels.
- BALANCE: Adjust audio balance between left and right speakers.
- FADER: Adjust audio balance between front and rear speakers.
- EQ (Equalizer): Select from preset EQ curves (e.g., Pop, Rock, Classic) or a custom setting.
6.3 USB/SD-afspilning
Insert a USB drive into the USB port or an SD card into the SD card slot. The unit will automatically switch to the respective source and begin playback.
- Afspil/pause: Tryk på AFSPIL/PAUSE knap.
- Næste / forrige nummer: Tryk på NEXT/PREV knapper.
- Mappenavigation: Brug MAPPE OP/NED buttons (if available on remote or unit).
6.4 Ekstraindgang (AUX)
Connect an external audio device (e.g., smartphone, MP3 player) to the 3.5mm AUX input on the front panel using an audio cable. Select AUX as the source using the MODE knap.
6.5 Radiotuner
Select Radio as the source. The unit supports AM/FM bands.
- Bandvalg: Tryk på BAND button to switch between FM1, FM2, FM3, and AM.
- Manuel indstilling: Tryk kort på INDSTILLING OP/NED buttons to adjust frequency step-by-step.
- Søgeindstilling: Tryk længe på INDSTILLING OP/NED knapperne for automatisk at søge den næste station med stærk frekvens.
- Forudindstillede stationer: Press and hold a numbered preset button (1-6) to save the current station. Short press to recall a saved station.
6.6 Fjernbetjening
The included remote control provides convenient access to most functions. Point the remote control towards the unit's front panel sensor.
Figur 6.1: Illustrative diagram of the VL-11A remote control. This image shows the various buttons for power, mode, volume, track control, and numeric presets.
7. Vedligeholdelse
7.1 Rengøring af enheden
- Use a soft, dry cloth to wipe the front panel and display.
- Brug ikke slibende rengøringsmidler, voks eller opløsningsmidler.
- Avoid spraying cleaning solutions directly onto the unit.
7.2 Generel pleje
- Sørg for korrekt ventilation omkring enheden for at forhindre overophedning.
- Undgå at placere tunge genstande på enheden.
- If the unit is exposed to extreme cold, allow it to warm up before operation to prevent condensation.
8. Fejlfinding
Hvis du støder på problemer, skal du se følgende tabel, før du kontakter support:
| Problem | Mulig årsag | Løsning |
|---|---|---|
| Ingen strøm | Blown fuse; Incorrect wiring; Disconnected battery. | Check vehicle fuses and unit fuse. Verify wiring connections. Ensure battery is connected. |
| Ingen lyd | Volume too low; Mute activated; Incorrect speaker wiring; Source not selected. | Increase volume. Deactivate mute. Check speaker connections and polarity. Select correct audio source. |
| USB/SD afspiller ikke | Ikke understøttet file format; Corrupt media; Incorrectly inserted device. | Ensure media contains supported audio files (e.g., WMA). Try a different USB/SD. Reinsert device. |
| Dårlig radiomodtagelse | Antenne ikke tilsluttet; Område med svagt signal. | Kontroller antenneforbindelsen. Prøv at stille ind på en stærkere station. |
| Fjernbetjening virker ikke | Dead battery; Obstruction; Not pointing at sensor. | Replace remote battery. Remove obstructions. Ensure direct line of sight to unit's IR sensor. |
9. Specifikationer
Technical specifications for the Soundstream VL-11A Digital Media Receiver:
- Model: VL-11A
- Mærke: Lydstrøm
- Fabrikant: Lydstrøm
- Produktdimensioner: 22.35 x 20.32 x 9.65 cm
- Varens vægt: 771.11 g (1.7 pund)
- Audio Wattage: 52 Watt (Max)
- Antal kanaler: 4
- Preamp Udgange: 2 Sets of 2V
- Medieformat: WMA (and other common digital audio formats)
- Særlige funktioner: SD Card Input, USB Input, Auxiliary Input
- Connector Type: Auxiliary, USB, 3.5mm Jack
- Kompatible enheder: Højttaler
- Kontrolmetode: Fjern
10. Garanti og support
Soundstream-produkter er designet og fremstillet efter de højeste kvalitetsstandarder. For specifikke garantioplysninger henvises til garantikortet, der følger med dit produkt, eller besøg den officielle Soundstream-side. webwebsted.
For technical support or service inquiries, please contact Soundstream customer service through their official channels. Keep your purchase receipt and product model number (VL-11A) handy when contacting support.