JEYI PCIe 5.0 NVMe Heatsink
JEYI PCIe 5.0 M.2 NVMe Adapter Card with Aluminum Heatsink User Manual
Model: PCIe 5.0 NVMe Heatsink | Brand: JEYI
Zavedení
This manual provides comprehensive instructions for the installation, operation, and maintenance of the JEYI PCIe 5.0 M.2 NVMe Adapter Card with Aluminum Heatsink. This adapter is designed to expand high-speed storage capabilities in desktop, workstation, and server PCs by utilizing PCIe 5.0 slots for M.2 NVMe SSDs.
Bezpečnostní informace
- Ensure your computer is powered off and unplugged before installation.
- Před manipulací s komponenty se zbavte veškeré statické elektřiny na těle.
- Handle the adapter card and SSDs with care to avoid damage to sensitive electronic components.
- Refer to your motherboard's manual for specific PCIe slot information and compatibility.
Obsah balení
Ověřte, zda jsou v balení přítomny všechny položky:
- JEYI PCIe 5.0 to M.2 NVMe Adapter Card
- Standardní výškový držák
- Low Profile Konzola
- Šroubovák
- Thermal Pads (3 pieces)
- Montážní šrouby (8 kusy)
- Heatsink Securing Screw
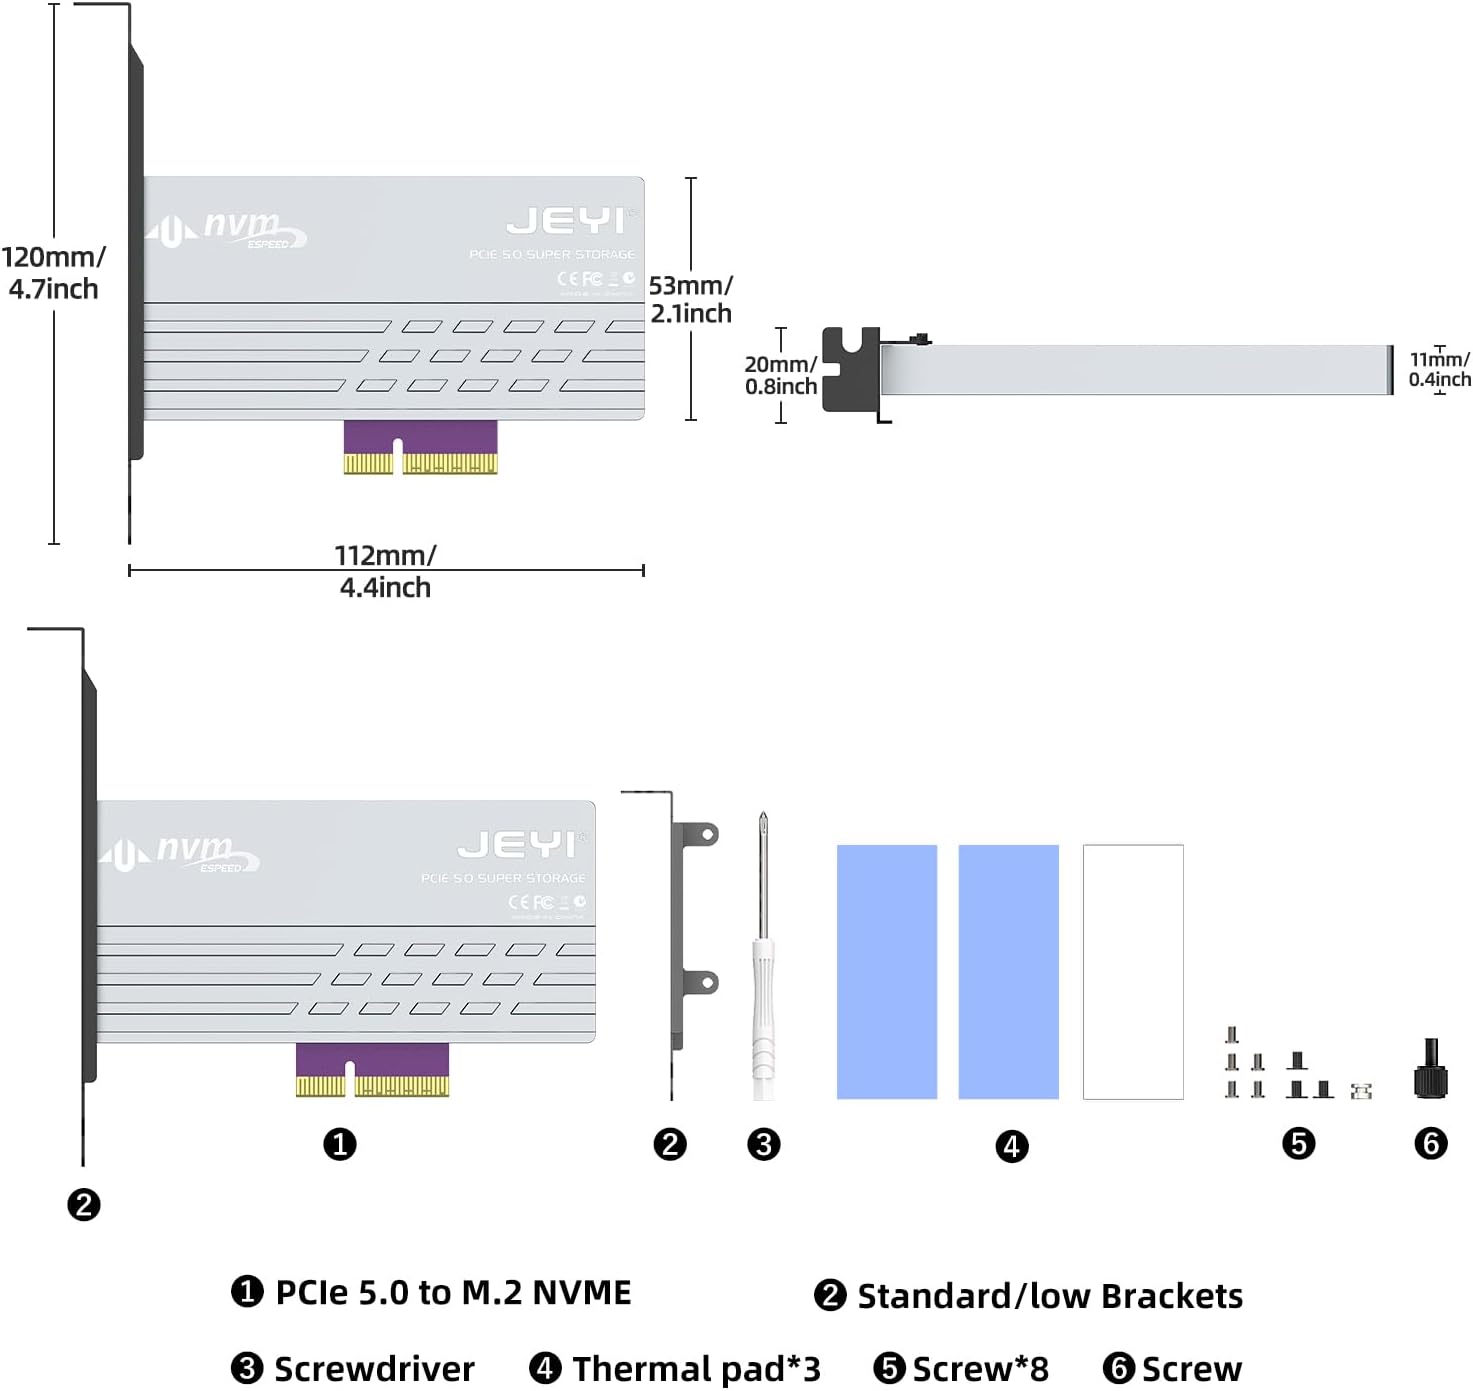
Image: Contents of the JEYI PCIe 5.0 M.2 NVMe Adapter Card package. It includes the adapter card, standard and low-profile brackets, a screwdriver, thermal pads, and various screws for installation.
Nastavení a instalace
Follow these steps to install your M.2 NVMe SSD onto the adapter card and then install the card into your computer.
1. SSD Installation onto Adapter Card
- Remove Heatsink Screws: Locate and remove the screws securing the aluminum heatsink to the adapter card. Carefully detach the heatsink.
Video: This video demonstrates the unboxing and installation process for the JEYI PCIe 5.0 M.2 NVMe Adapter Card. It shows how to remove the heatsink, install an M.2 SSD, and secure the bracket.
- Insert M.2 NVMe SSD: Gently insert your M.2 NVMe SSD into the M.2 slot on the adapter card. Ensure it is fully seated.

Image: Step-by-step visual guide for installing the M.2 SSD onto the adapter card, including inserting the SSD and securing it with a screw.
- Bezpečný SSD disk: Use the provided screw to secure the M.2 NVMe SSD in place on the adapter card.
- Aplikace tepelných vložek: Place the thermal pads onto the M.2 NVMe SSD, ensuring good contact with the SSD's chips.
- Znovu připevněte chladič: Carefully place the aluminum heatsink back onto the adapter card, aligning it with the screw holes. Secure it with the previously removed screws.
- Připevněte držák: Choose the appropriate bracket (standard or low-profile) for your PC case. Attach it to the adapter card using the provided screws.
2. Adapter Card Installation into PC
- Power Off PC: Úplně vypněte počítač a odpojte napájecí kabel.
- Otevřete skříň počítače: Sejměte boční panel skříně počítače.
- Vyhledejte slot PCIe: Identify an available PCIe 5.0/4.0 x4, x8, or x16 slot on your motherboard.

Image: The JEYI PCIe 5.0 M.2 NVMe Adapter Card shown installed within a desktop computer's PCIe slot.
- Insert Adapter Card: Carefully align the adapter card with the chosen PCIe slot and press down firmly until it is securely seated.
- Bezpečný držák: Secure the adapter card's bracket to the PC case with the appropriate screw.
- Zavřít PC skříň: Replace the side panel of your computer case and reconnect the power cord.
Návod k obsluze
The JEYI PCIe 5.0 M.2 NVMe Adapter Card is designed for plug-and-play functionality, requiring no additional drivers for most modern operating systems.
- První použití: Upon booting your computer, the operating system (Windows 10/11, Linux, macOS) should automatically detect the newly installed M.2 NVMe SSD.
- Inicializace disku: For a new SSD, you may need to initialize and format the drive through your operating system's Disk Management utility before it appears as usable storage. Refer to your OS documentation for specific steps.
- Výkon: To achieve maximum throughput (up to 128Gbps or 16GB/s), ensure your motherboard and CPU support PCIe 5.0, and the entire data path adheres to PCIe 5.0 specifications. The adapter is backward compatible with PCIe 4.0/3.0/2.0 slots, operating at the speed of the lowest common denominator.

Image: A visual representation comparing the bandwidth of PCIe 5.0 (10000+ MB/s) with PCIe 4.0 (6000+ MB/s), highlighting the ultra-high speed capability of Gen5.

Image: A screenshot of CrystalDiskMark benchmark results, illustrating read and write speeds exceeding 10000 MB/s, demonstrating the high performance of the adapter with a compatible SSD.
- Spouštěcí disk: The adapter card can support an M.2 NVMe SSD as a boot drive, provided your motherboard's BIOS/UEFI supports booting from PCIe NVMe devices. Consult your motherboard manual for details.
Údržba
The JEYI PCIe 5.0 M.2 NVMe Adapter Card is designed for minimal maintenance. However, periodic checks can ensure optimal performance and longevity.
- Odstranění prachu: Periodically open your PC case and use compressed air to gently remove any dust accumulation from the adapter card and heatsink. Dust can impede heat dissipation.
- Thermal Pad Integrity: If you notice unusual temperatures or performance degradation, inspect the thermal pads for wear or damage. Replace them if necessary.
- Zabezpečená připojení: Ensure all screws and connections remain tight. Loose components can lead to intermittent issues.

Image: A diagram showing the effective multiple heatsink method, illustrating how the heavy-duty aluminum heatsink with thermal compound pads and airflow notches dissipates heat from the M.2 NVMe SSD.
Odstraňování problémů
| Problém | Možná příčina | Řešení |
|---|---|---|
| SSD not detected by OS. |
|
|
| Pomalý výkon. |
|
|
| Nestabilita/pády systému. |
|
|
Specifikace
| Funkce | Detail |
|---|---|
| Číslo modelu | PCIe 5.0 NVMe Heatsink |
| Hardwarové rozhraní | PCI Express 16 GB/s (PCIe 5.0 x4) |
| Rychlost přenosu dat | Up to 128 Gigabits Per Second (16GB/s) |
| Kompatibilita slotů PCIe | PCIe 5.0/4.0 x4, x8, x16 (backward compatible) |
| Podpora M.2 SSD disků | 2280, 2260, 2242, 2230 M.2 NVMe SSDs (M Key) |
| Materiál chladiče | Aluminum with Thermal Pads |
| Kompatibilita operačního systému | Windows 10/11, Linux, macOS |
| Rozměry produktu | 4.72 cm D x 2.09 cm Š x 4.41 cm V (přibližně 120 mm x 53 mm x 112 mm) |
| Hmotnost položky | 5.7 unce (0.16 kilogramů) |

Image: Detailed diagram illustrating the dimensions of the JEYI PCIe 5.0 M.2 NVMe Adapter Card and its included components, such as brackets, screwdriver, thermal pads, and screws.
Záruka a podpora
JEYI products are designed for reliability and performance. For warranty information and technical support, please refer to the official JEYI webwebu nebo se přímo obraťte na jejich zákaznický servis.
- Zásady vrácení: Tento produkt má nárok na vrácení peněz nebo výměnu do 30 dnů od zakoupení.
- Výrobce: JEJ
- Kontakt: Pro další pomoc navštivte stránku JEYI Store on Amazon nebo se podívejte na kontaktní informace uvedené na obalu produktu.
Související dokumenty - PCIe 5.0 NVMe Heatsink
 |
JEYI M2-PC5.0Pro PCIe 5.0 to M.2 NVMe Adapter Card Installation Guide Learn how to install the JEYI M2-PC5.0Pro, a high-performance PCIe 5.0 to M.2 NVMe adapter card featuring an aluminum heatsink for Gen5 SSDs. This guide details the steps for seamless integration into your system. |
 |
JEYI SK4 M.2 NVMe to PCIe 4.0 Adapter Installation Guide Step-by-step installation guide for the JEYI SK4 M.2 NVMe to PCIe 4.0 adapter card. Learn how to easily connect your NVMe SSD to PCIe x4, x8, or x16 slots for enhanced desktop PC storage performance. Supports PCIe Gen4 full speed. |
 |
JEYI P637 PCIe 5.0 Quad M.2 Expansion Card Installation Guide Step-by-step installation instructions for the JEYI P637 PCIe 5.0 X16 Quad M.2 Expansion Card. Learn how to properly install SSDs and mount the card into your system. |
 |
JEYI Starfish M.2 NVMe to PCIe Expansion Card Installation Guide A concise installation guide for the JEYI Starfish M.2 NVMe to PCIe expansion card, detailing the steps to mount an SSD, apply the thermal pad, and install the heatsink. |
 |
JEYI HY-2 PCIe 5.0 NVMe SSD Expansion Card Installation Guide Step-by-step installation instructions for the JEYI HY-2 2-Bay M.2 NVMe SSD PCIe 5.0 X16 Expansion Card, including heatsink assembly and PCIE slot insertion. |
 |
JEYI SK6 M.2 PCIe Adapter Installation Guide User manual for the JEYI SK6 M.2 Dual M.2 PCIe 4.0 Adapter, guiding users through the installation of NVMe (m Key) and SATA (b Key) SSDs into a PCIe slot. |
Ask a question about this manual
Ask about setup, troubleshooting, compatibility, parts, safety, or missing instructions. Manuals+ will review the question and use this page’s manual context to help answer it.