1. Úvod
This manual provides essential information for the safe and efficient operation of your POWLSOJX 40A MPPT Solar Charge Controller. Please read these instructions thoroughly before installation and use to ensure optimal performance and longevity of your solar power system.
The POWLSOJX MPPT Solar Charge Controller is designed to maximize power harvest from your solar panels and efficiently charge your battery bank. It features advanced Maximum Power Point Tracking (MPPT) technology, automatic voltage detection, and comprehensive protection functions for various battery types.
2. Bezpečnostní opatření
Failure to follow these safety instructions may result in personal injury, damage to the controller, or other equipment.
- Před připojením napájení se ujistěte, že jsou všechna připojení správná a bezpečná.
- Always connect the battery first, then the load, and finally the solar panel. Disconnect in the reverse order.
- Regulátor instalujte v dobře větraném prostoru, mimo dosah hořlavých materiálů a přímého slunečního záření.
- Use appropriate circuit breakers or fuses for all connections (battery, solar panel, load).
- Do not attempt to repair or modify the controller. Refer to qualified personnel for service.
- Během instalace používejte vhodné osobní ochranné prostředky (OOP), jako jsou rukavice a ochrana očí.
- Ověřte objem baterietage and type settings are correct to prevent overcharging or undercharging.
3. Konec produktuview
The POWLSOJX 40A MPPT Solar Charge Controller is equipped with a clear LCD display, USB charging ports, and robust terminals for reliable connections. Its transparent housing allows for visual inspection of internal components.
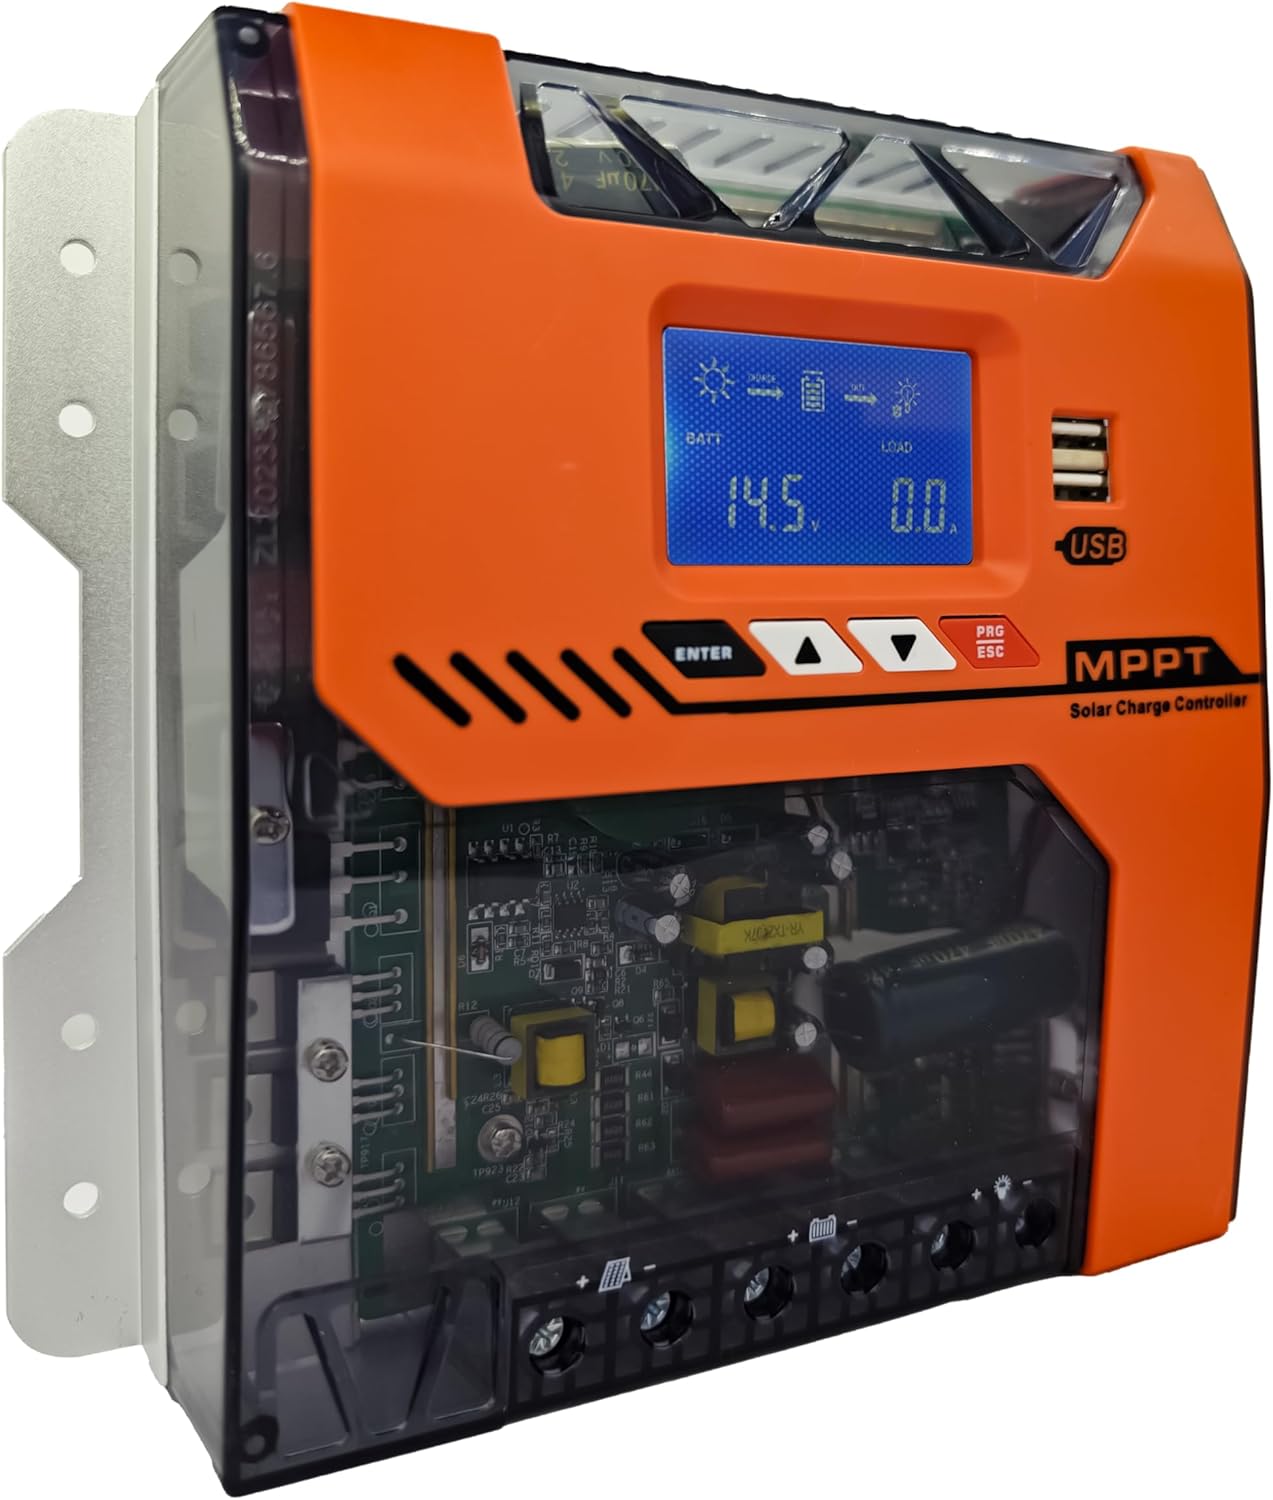
Obrázek: Přední strana view of the POWLSOJX 40A MPPT Solar Charge Controller, showing the LCD screen, control buttons, USB ports, and terminal block.
Klíčové vlastnosti:
- High MPPT Conversion Efficiency: Achieves up to 97% energy conversion with DSP chip precision, optimizing power harvest even in low-light conditions.
- 3-StagInteligentní nabíjení: Bulk, Absorption, and Float charging stages extend battery lifespan for lead-acid, GEL, and lithium batteries.
- Automatický svtage Detekce: Automatically recognizes 12V, 24V, 36V, or 48V battery bank voltages.
- Komplexní ochrana: Includes overcharge cutoff, PV reverse polarity auto-shutdown, thermal throttling, current limiting, PV over current, PV short circuit, battery over discharge, load over current, load short circuit, battery over voltage, and over temperature protection.
- Uživatelsky přívětivé rozhraní: LCD display and intuitive buttons for easy parameter customization and discharge scheduling.
- Trvanlivost průmyslové třídy: Aluminum alloy housing with IP32 waterproof rating, designed to withstand dust, humidity, and voltage hroty.
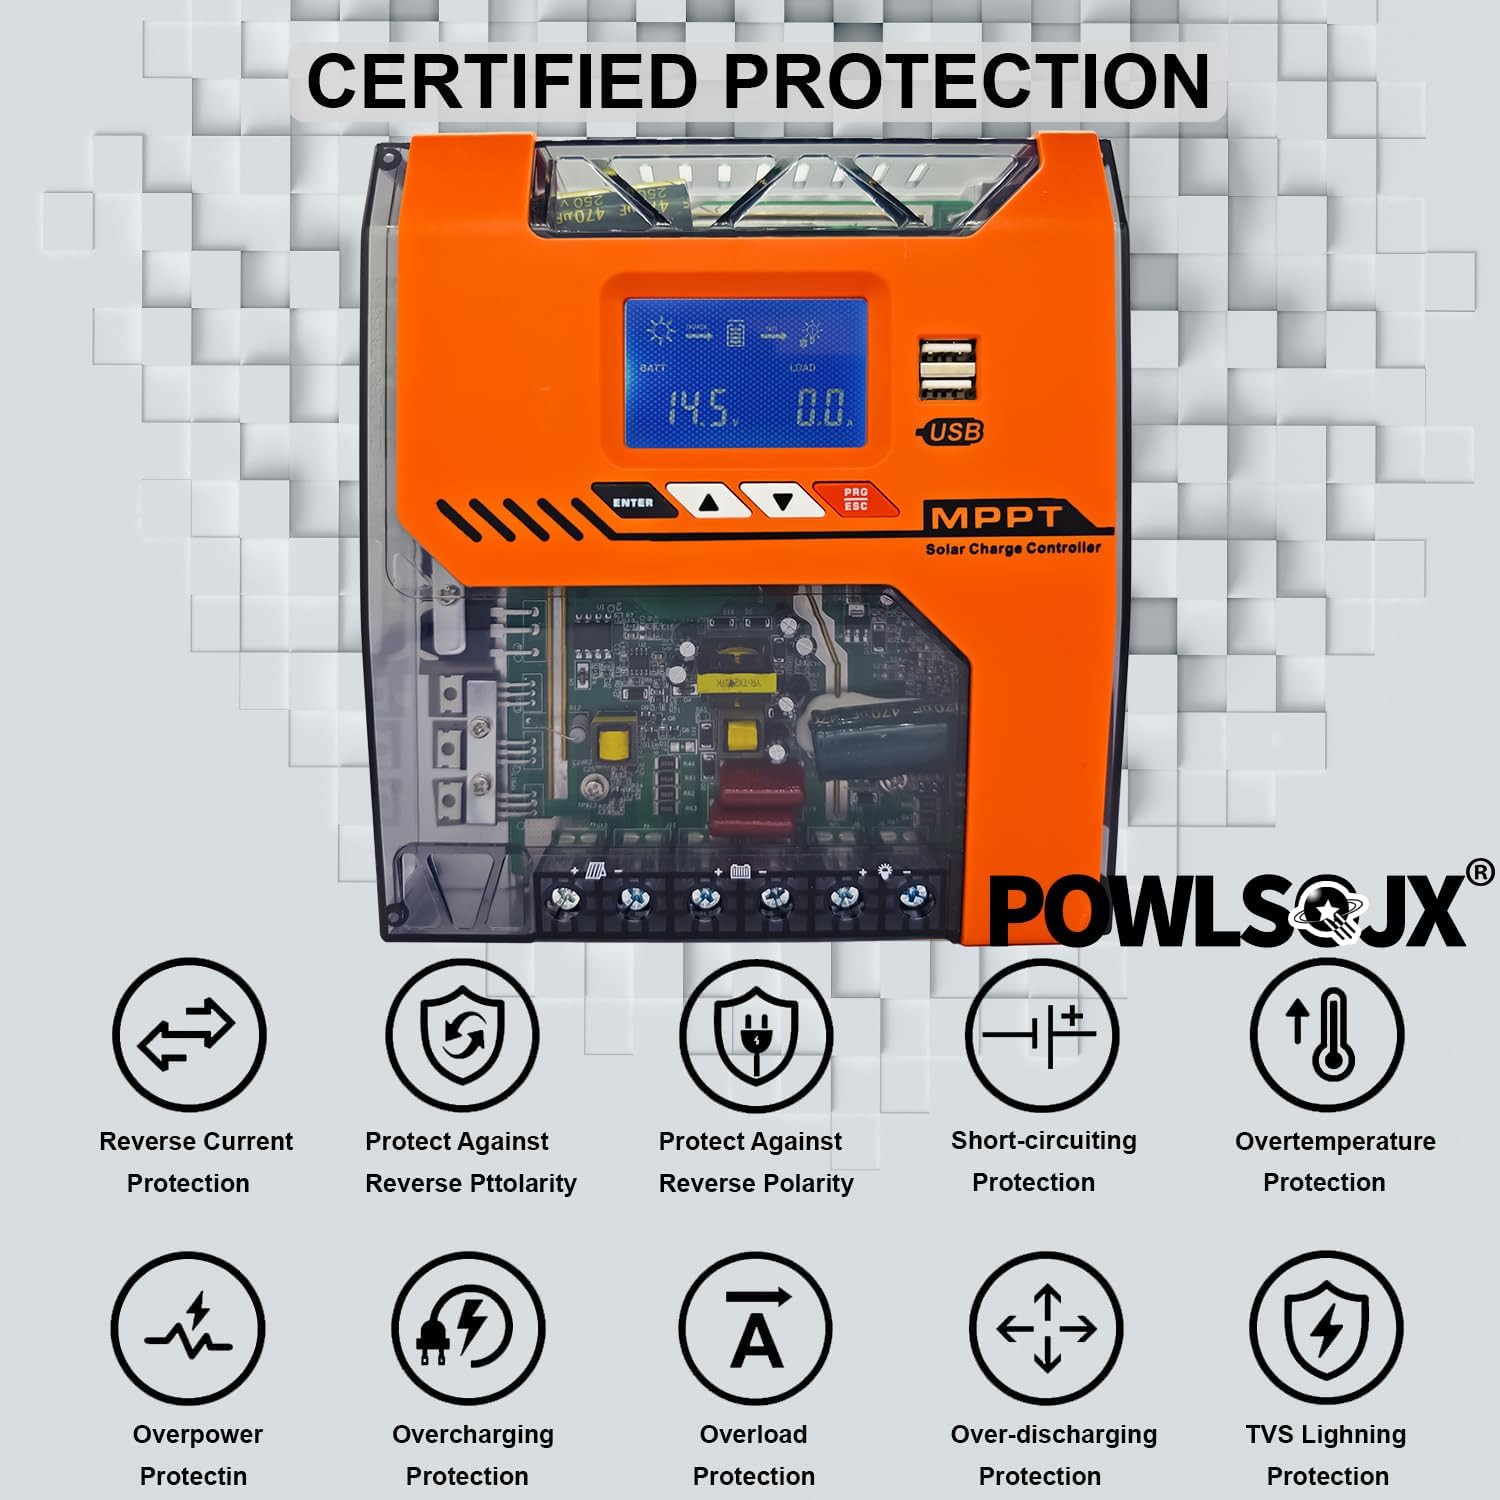
Image: Diagram illustrating various certified protection features of the controller, including reverse current, reverse polarity, short-circuiting, overtemperature, overpower, overcharging, overload, over-discharging, and TVS lightning protection.
4. Instalační příručka
Proper installation is crucial for the safe and efficient operation of your solar charge controller. Follow the steps below carefully.
4.1 Místo montáže
- Namontujte regulátor svisle na nehořlavý povrch.
- Ensure adequate airflow around the controller for heat dissipation.
- Avoid direct sunlight, high temperatures, and moisture.
4.2 Connection Steps (Critical Order)
Always connect in the following order to prevent damage to the controller or battery:
- Připojte baterii: Connect the battery to the controller's battery terminals. Ensure correct polarity (positive to positive, negative to negative). The controller will automatically detect the battery voltage.
- Připojení stejnosměrné zátěže: Connect your DC loads (e.g., lights, pumps) to the controller's load terminals. Ensure correct polarity.
- Připojte solární panel: Připojte solární panel(y) k FV svorkám regulátoru. Dbejte na správnou polaritu.
To disconnect, follow the reverse order: Solar Panel → DC Load → Battery.

Image: Detailed wiring diagram showing the correct connection order for the battery, DC load, and PV panel to the solar charge controller, including an optional inverter and fuse.
4.3 Supported Battery Types and PV Input Ranges
The controller supports various battery types and automatically detects system voltage. Ensure your PV input voltage falls within the recommended range for your battery system.
- Podporované typy baterií: Lead-acid, GEL, Lithium (LiFePO4, Li-ion), and User-defined.
- PV vstup Voltage Rozsahy:
- When battery 12V: Suggested input solar voltage range DC20V-DC80V; Solar power 240W
- When battery 24V: Suggested input solar voltage range DC37V-DC105V; Solar power 480W
- When battery 36V: Suggested input solar voltage range DC60V-DC150V; Solar power 720W
- When battery 48V: Suggested input solar voltage range DC80V-DC160V; Solar power 960W

Image: Chart detailing recommended PV input voltage and maximum solar power for 12V, 24V, 36V, and 48V battery systems.
5. Návod k obsluze
The controller features an LCD display and four buttons for navigation and parameter settings: ENTER, UP, DOWN, and PRG/ESC.
LCD displej 5.1
The LCD displays real-time system status, including battery voltage, charging current, load status, and error indicators.
5.2 Nastavení parametrů
- Použijte UP a DOLŮ tlačítka pro navigaci v možnostech nabídky.
- Stiskněte ENTER pro výběr možnosti nebo potvrzení nastavení.
- Stiskněte PRG/ESC to exit a menu or cancel an action.
- Ukládání nastavení: After adjusting parameters, ensure you press the designated save button (often the leftmost black button, as per FAQ) to store the changes. Failure to save will result in lost settings.
5.3 režimy nabíjení
Regulátor využívá 3-stage charging algorithm to optimize battery health:

Image: Graph illustrating the 4-stage MPPT charging process: Bulk Charge, Constant Charging (Absorption), Float Charge, and Equalize Boost/Float Recharge, designed to prolong battery lifespan.
- Hromadný poplatek: Charges the battery at its maximum current until voltage rises to the absorption level.
- Absorpční poplatek: Udržuje konstantní objemtage, postupně snižující proud, jak se baterie blíží plnému nabití.
- Plovoucí poplatek: Snižuje objemtagna nižší úroveň, aby se baterie udržela plně nabitá a kompenzovalo se tak samovybíjení.
- Equalization (for compatible batteries): Pravidelně přebíjí baterii pro vyrovnání objemu článkůtaga zabraňují sulfataci.
5.4 Discharge Scheduling
The controller allows programming of load runtime for connected DC devices. Refer to the on-screen menu for specific settings to manage your load output.
6. Údržba
Pravidelná údržba zajišťuje dlouhou životnost a optimální výkon vašeho solárního regulátoru nabíjení.
- Čištění: Pravidelně čistěte vnější povrch ovladače suchým hadříkem, abyste odstranili prach a nečistoty. Ujistěte se, že jsou větrací otvory čisté.
- Kontrola připojení: Annually inspect all wiring connections for tightness and corrosion. Loose connections can cause overheating and power loss.
- Kontrola prostředí: Zajistěte, aby teplota a vlhkost vzduchu v instalačním prostředí zůstaly v rámci specifikovaného rozsahu.
- Aktualizace firmwaru: Zkontrolujte výrobce webwebové stránky s dostupnými aktualizacemi firmwaru.
7. Řešení problémů
Tato část se zabývá běžnými problémy, se kterými se můžete setkat. V případě problémů, které zde nejsou uvedeny, kontaktujte zákaznickou podporu.
7.1 Běžné problémy a řešení
- Ovladač se nezapíná:
- Zkontrolujte připojení baterie a ujistěte se o správné polaritě.
- Ověřte objem baterietage je nad minimálním provozním objememtage.
- Inspect battery fuses or circuit breakers.
- Bez solárního nabíjení:
- Zkontrolujte zapojení a polaritu solárních panelů.
- Ensure solar panels are receiving adequate sunlight.
- Ověřte vstupní objem FV panelutage je v provozním rozsahu regulátoru.
- Check PV fuses or circuit breakers.
- Načtení nefunguje:
- Zkontrolujte připojení zátěže a polaritu.
- Verify load settings and ensure the load output is enabled.
- Check for overcurrent or short-circuit protection activation.
- Nastavení se neukládá:
- After adjusting parameters, ensure you press the designated save button (e.g., the leftmost black button) to confirm and store the changes.
- Voltage Charging / Incorrect Voltage Výstup:
- Verify the battery type and voltage settings in the controller's menu match your actual battery bank. Incorrect settings can lead to improper charging voltages.
- Ensure the controller's auto-detection is functioning correctly. If issues persist, manually set the battery voltage if the option is available.
- If the controller consistently outputs incorrect voltages despite correct settings, discontinue use and contact customer support.
- Overheating / Burning Smell:
- Immediately disconnect all power sources (solar, battery, load).
- Check for proper ventilation around the controller.
- Inspect wiring for loose connections or short circuits.
- If a burning smell or visible smoke/flames occur, the unit is likely damaged. Do not attempt to re-power. Contact customer support immediately.
7.2 Error Diagnostics
The LCD display or LED indicators may show error codes or warnings. Refer to the specific error code meanings in the full product manual (if available) or contact support with the displayed code.
8. Specifikace
| Parametr | Hodnota |
|---|---|
| Model | TN (40A variant) |
| System Voltage | 12V/24V/36V/48V Auto |
| Jmenovitý nabíjecí proud | 40A |
| Max. PV vstup Voltage | 150V |
| MPPT účinnost | až 97 % |
| Typ zobrazení | LCD |
| Provozní teplota | -25 ℃ až +55 ℃ |
| Hodnocení IP | IP32 |
| Rozměry (D x Š x V) | 9.26 cm x 2.76 cm x 7.49 cm |
| Hmotnost položky | 2.5 libry |
| Materiál | Kov, Plast |
9. Informace o záruce
Please refer to the product packaging or the official POWLSOJX website for specific warranty terms and conditions. Typically, products are covered against manufacturing defects for a defined period from the date of purchase.
10. Zákaznická podpora
For technical assistance, troubleshooting, or warranty claims, please contact POWLSOJX customer support through their official website or the retailer where the product was purchased. Have your model number (TN) and purchase details ready.