POWLSOJX 30A
POWLSOJX 12V/24V Auto Solar Charge Controller 30A Instruction Manual
Model: 30A
Zavedení
This manual provides detailed instructions for the installation, operation, and maintenance of your POWLSOJX 12V/24V Auto Solar Charge Controller. This device is designed to efficiently manage power flow from your solar panels to your battery system, ensuring optimal charging and extending battery life. It features automatic 12V/24V battery detection, a multi-stage PWM charging algorithm, an LCD display for real-time monitoring, and USB quick charge ports.
Bezpečnostní informace
Please read all safety instructions carefully before installation and operation. Failure to follow these instructions may result in damage to the controller, battery, or solar panels, and could lead to personal injury.
- This solar charge controller is designed for pouze pro vnitřní použití. Do not expose it to water, moisture, or direct sunlight. Ensure installation in a dry, well-ventilated area.
- Always connect the battery first, then the solar panel, and finally the load. Disconnect in the reverse order: load, then solar panel, then battery. This sequence prevents damage to the controller.
- Ensure all wiring connections are tight and secure to prevent loose connections that can cause excessive heat.
- For 24V systems, note that input voltage values (e.g., equalization, discharge stop, discharge reconnect) displayed on the controller or in specifications should be doubled. For example, a 25V setting for a 12V system corresponds to 50V for a 24V system.
- The controller is suitable for lead-acid and GEL batteries. Verify battery compatibility before connection.
- Do not attempt to repair or modify the controller. Refer all servicing to qualified personnel.
Konec produktuview
The POWLSOJX Solar Charge Controller is a robust device designed for efficient solar power management. It features a clear LCD display and intuitive controls.
Obrázek: Přední strana view of the POWLSOJX Solar Charge Controller, showing the LCD screen, control buttons, and terminal blocks.
Klíčové vlastnosti:
- Smart 3-Stage PWM nabíjení: Automatically detects 12V/24V battery systems and optimizes charging with Bulk, Absorption, and Float stages to prolong battery life for lead-acid and GEL batteries.
- LCD Real-Time Monitoring: A backlit screen displays solar input voltage, objem baterietage, charging current, discharge current, and load status.
- Přizpůsobitelná nastavení: Allows adjustment of light/time control modes (e.g., 24H for continuous output, or timed modes for streetlights), and voltage thresholds. Settings are retained even after power loss.
- USB Quick Charge Ports: Equipped with 5V/2.5A USB outputs for charging small electronic devices while prioritizing battery charging.
- Komplexní ochrana: Built-in safeguards against overcurrent, short circuits, reverse polarity, and overcharging.

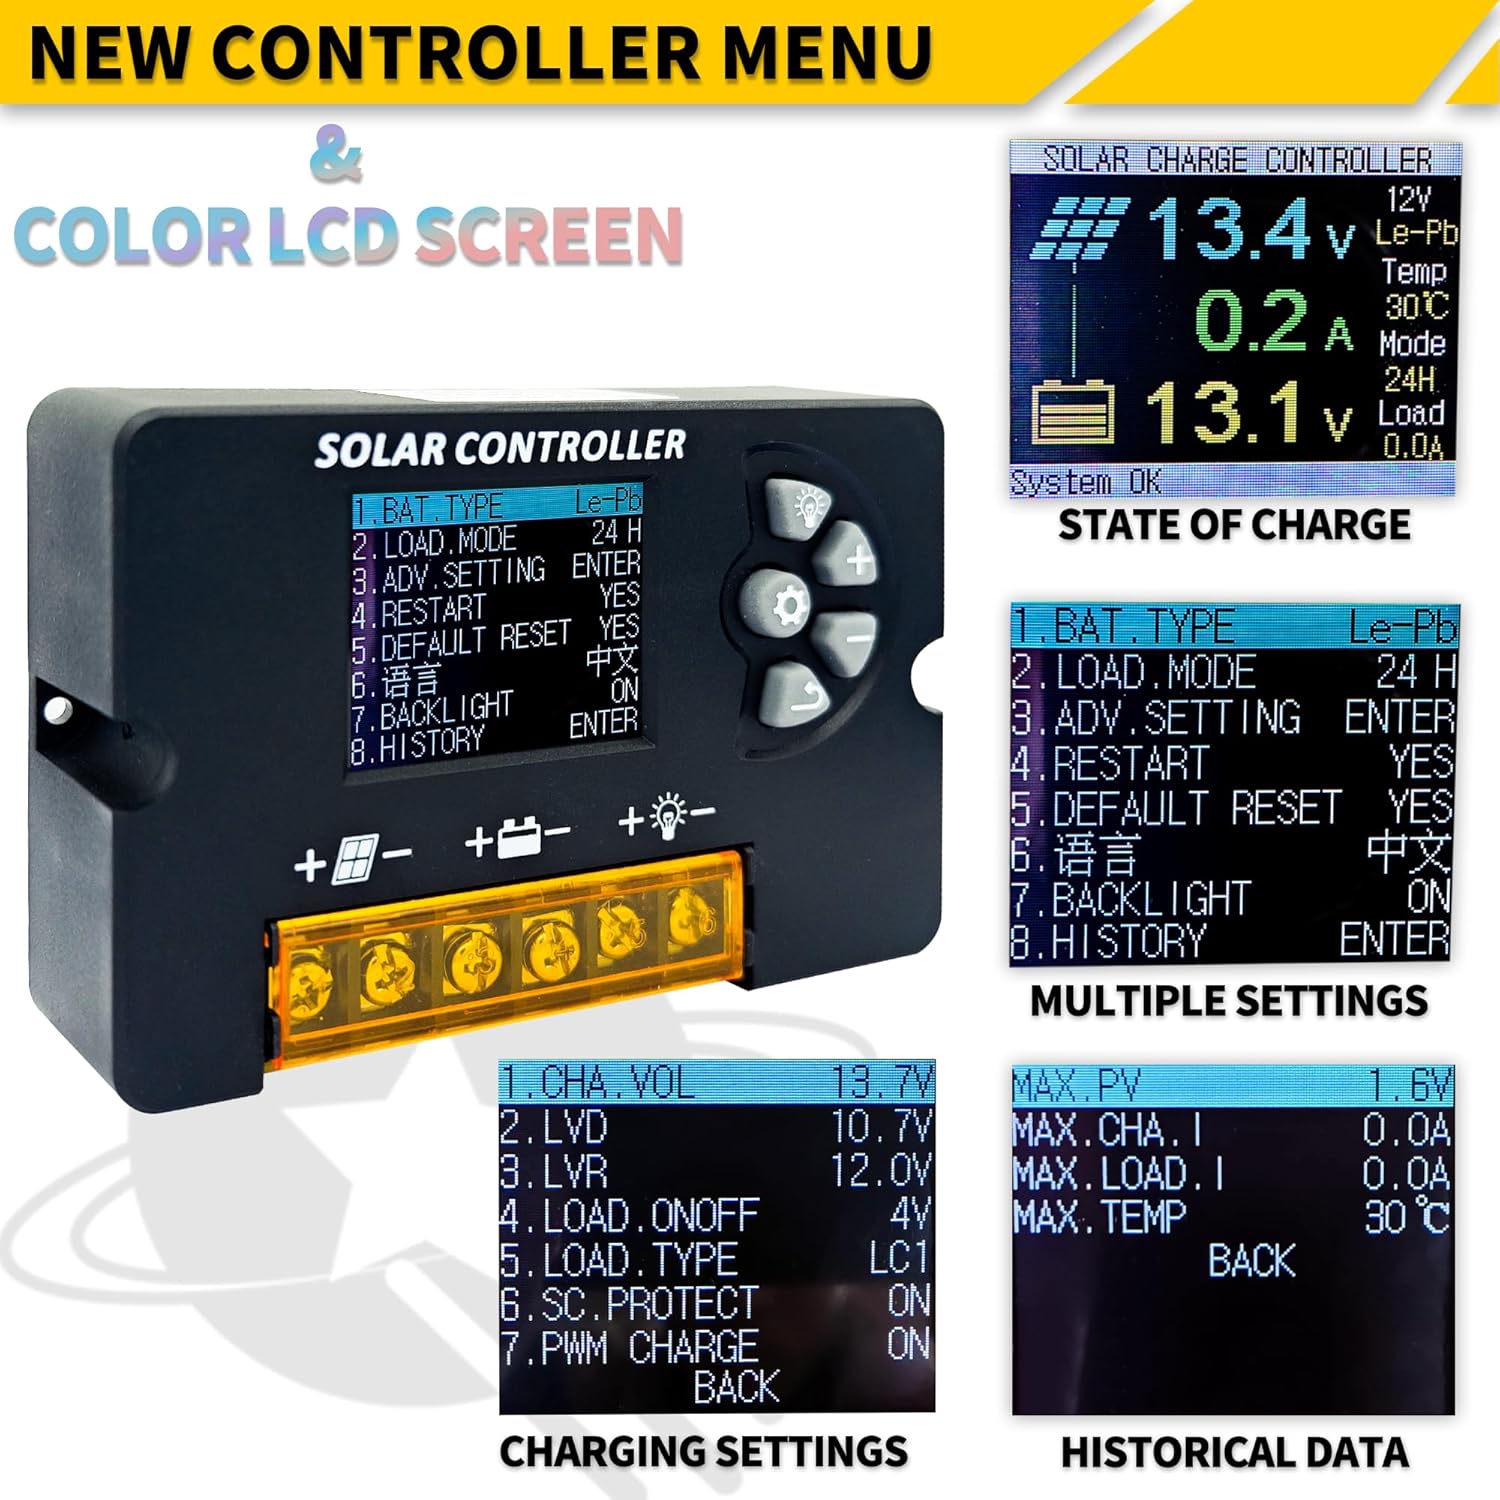
Image: The POWLSOJX PWM Solar Charge Controller highlighting its color LCD screen and 12V/24V 10/20/30A capabilities.

Obrázek: Detailní záběr view of the controller's side, showing the 5V/2A USB interface and highlighting the use of high-quality materials for electrical conductivity.
Nastavení a instalace
Proper installation is crucial for the safe and efficient operation of your solar charge controller. Follow these steps carefully.
Pořadí připojení:
- Připojte baterii: First, connect the battery to the controller's battery terminals. Ensure correct polarity (+ to + and - to -). The controller will automatically detect the battery voltage (12V nebo 24V).
- Připojte solární panel: Next, connect the solar panel to the controller's PV terminals. Ensure correct polarity.
- Připojení stejnosměrné zátěže: Finally, connect your DC load (e.g., lights, fan) to the controller's load terminals. Ensure correct polarity.
Důležité: Always follow this connection order to prevent damage to the controller. Disconnect in the reverse order: Load, then PV Panel, then Battery.

Image: A wiring diagram illustrating the correct sequence for connecting the battery, solar panel, and DC load to the solar charge controller. It also shows an optional inverter connection.
Ensure that the total power of your solar panels does not exceed the controller's maximum input capacity for your system voltage (e.g., for the 30A model: 360W for 12V systems, 720W for 24V systems).
Návod k obsluze
The controller features an intuitive LCD display and control buttons for easy operation and monitoring.
LCD Display and Menu Navigation:
The backlit LCD screen provides real-time information about your solar power system. Use the control buttons to navigate through menus and adjust settings.

Obrázek: Podrobný view of the controller's LCD screen, showing various menu options for battery type, load mode, advanced settings, charging settings, and historical data.
- Úvodní obrazovka: Displays current solar input voltage, objem baterietage, nabíjecí proud a stav zátěže.
- Navigace v nabídce: Použijte Up a Dolů buttons to scroll through menu options. Press the Vstupte button (often represented by a gear icon or similar) to select an option or confirm a setting.
- Parametry nastavení: You can customize parameters such as battery type (Lead-Acid, GEL), load control modes (e.g., 24H for continuous output, or timed modes for streetlights), and voltage prahy.
- Funkce paměti: All customized settings are retained even if power is lost, eliminating the need for repetitive configurations.
USB Quick Charge Ports:
The controller includes two 5V/2.5A USB ports. These ports can be used to charge mobile phones, tablets, or other low-wattage USB-powered devices. The controller prioritizes solar energy for battery charging, then allocates remaining power to the USB outputs.
Údržba
To ensure optimal performance and longevity of your solar charge controller, follow these simple maintenance guidelines:
- Udržujte v čistotě: Periodically wipe the controller with a dry cloth to remove dust and dirt. Do not use liquid cleaners.
- Zkontrolujte připojení: Regularly inspect all wiring connections (battery, solar panel, load) to ensure they are tight and free from corrosion. Loose connections can lead to power loss or overheating.
- Větrání: Zajistěte dobré větrání instalačního prostoru, aby se zabránilo přehřátí regulátoru.
- Podmínky prostředí: Confirm the controller is not exposed to moisture, extreme temperatures, or direct sunlight, as it is designed for indoor use.
Odstraňování problémů
Pokud narazíte na problémy se solárním regulátorem nabíjení, podívejte se na následující běžné problémy a jejich řešení:
- Žádný displej/Žádné napájení:
- Check battery connections and ensure the battery has sufficient charge. The controller draws power from the battery to operate its display.
- Verify correct polarity of battery connections.
- Baterie se nenabíjí:
- Ujistěte se, že jsou solární panely správně připojeny a dostávají dostatek slunečního světla.
- Check solar panel polarity.
- Verify that the solar panel voltage is within the controller's operating range (e.g., for 12V battery, max 23V; for 24V battery, max 46V).
- Načtení nefunguje:
- Zkontrolujte připojení zátěže a ujistěte se o správné polaritě.
- Verify that the load control mode is set correctly (e.g., 24H for continuous power).
- Ensure the battery has sufficient charge; the controller may cut off load output if battery voltage je příliš nízké.
- Zkontrolujte zkraty v obvodu zátěže.
- Nesprávný svtage Readings (24V System):
- Remember that for 24V systems, certain voltage settings (Equalization, Discharge Stop, Discharge Reconnect) need to be manually doubled in the controller's settings if they are displayed as 12V equivalents.
Pokud problémy přetrvávají, požádejte o pomoc zákaznickou podporu.
Specifikace
Technical specifications for the POWLSOJX 30A Solar Charge Controller.

Image: A table detailing various technical specifications including battery voltage, charge/discharge current, max solar input, battery types, and operating temperatures.
| Parametr | Value (30A Model) |
|---|---|
| Baterie Voltage | 12V / 24V Auto |
| Nabíjecí proud | 30A |
| Vybíjecí proud | 10A |
| Max Solar Input (12V Battery) | 23V (up to 360W) |
| Max Solar Input (24V Battery) | 46V (up to 720W) |
| Podpora typů baterií | Lead-acid (B1), GEL (B2), Lithium-ion (B3) |
| Vyrovnávací objemtage (B1) | 14.4V |
| Zastavení vypouštění Objemtage (B1) | 10.7V |
| Vybití Objem opětovného připojenítage (B1) | 12.6V |
| USB výstup | 5V/2.5A (max.) |
| Vlastní spotřeba | <10 mA |
| Provozní teplota | -35°C až +60°C |
| Rozměry | 10.3 cm x 6.6 cm x 2.6 cm (4.05 palce x 2.59 palce x 1.02 palce) |
| Hmotnost položky | 4.9 uncí (0.14 kg) |
Poznámka: Celá červená barva svtage values in the image should be multiplied by 2 when using a 24V system. Product specifications are subject to change without prior notice.
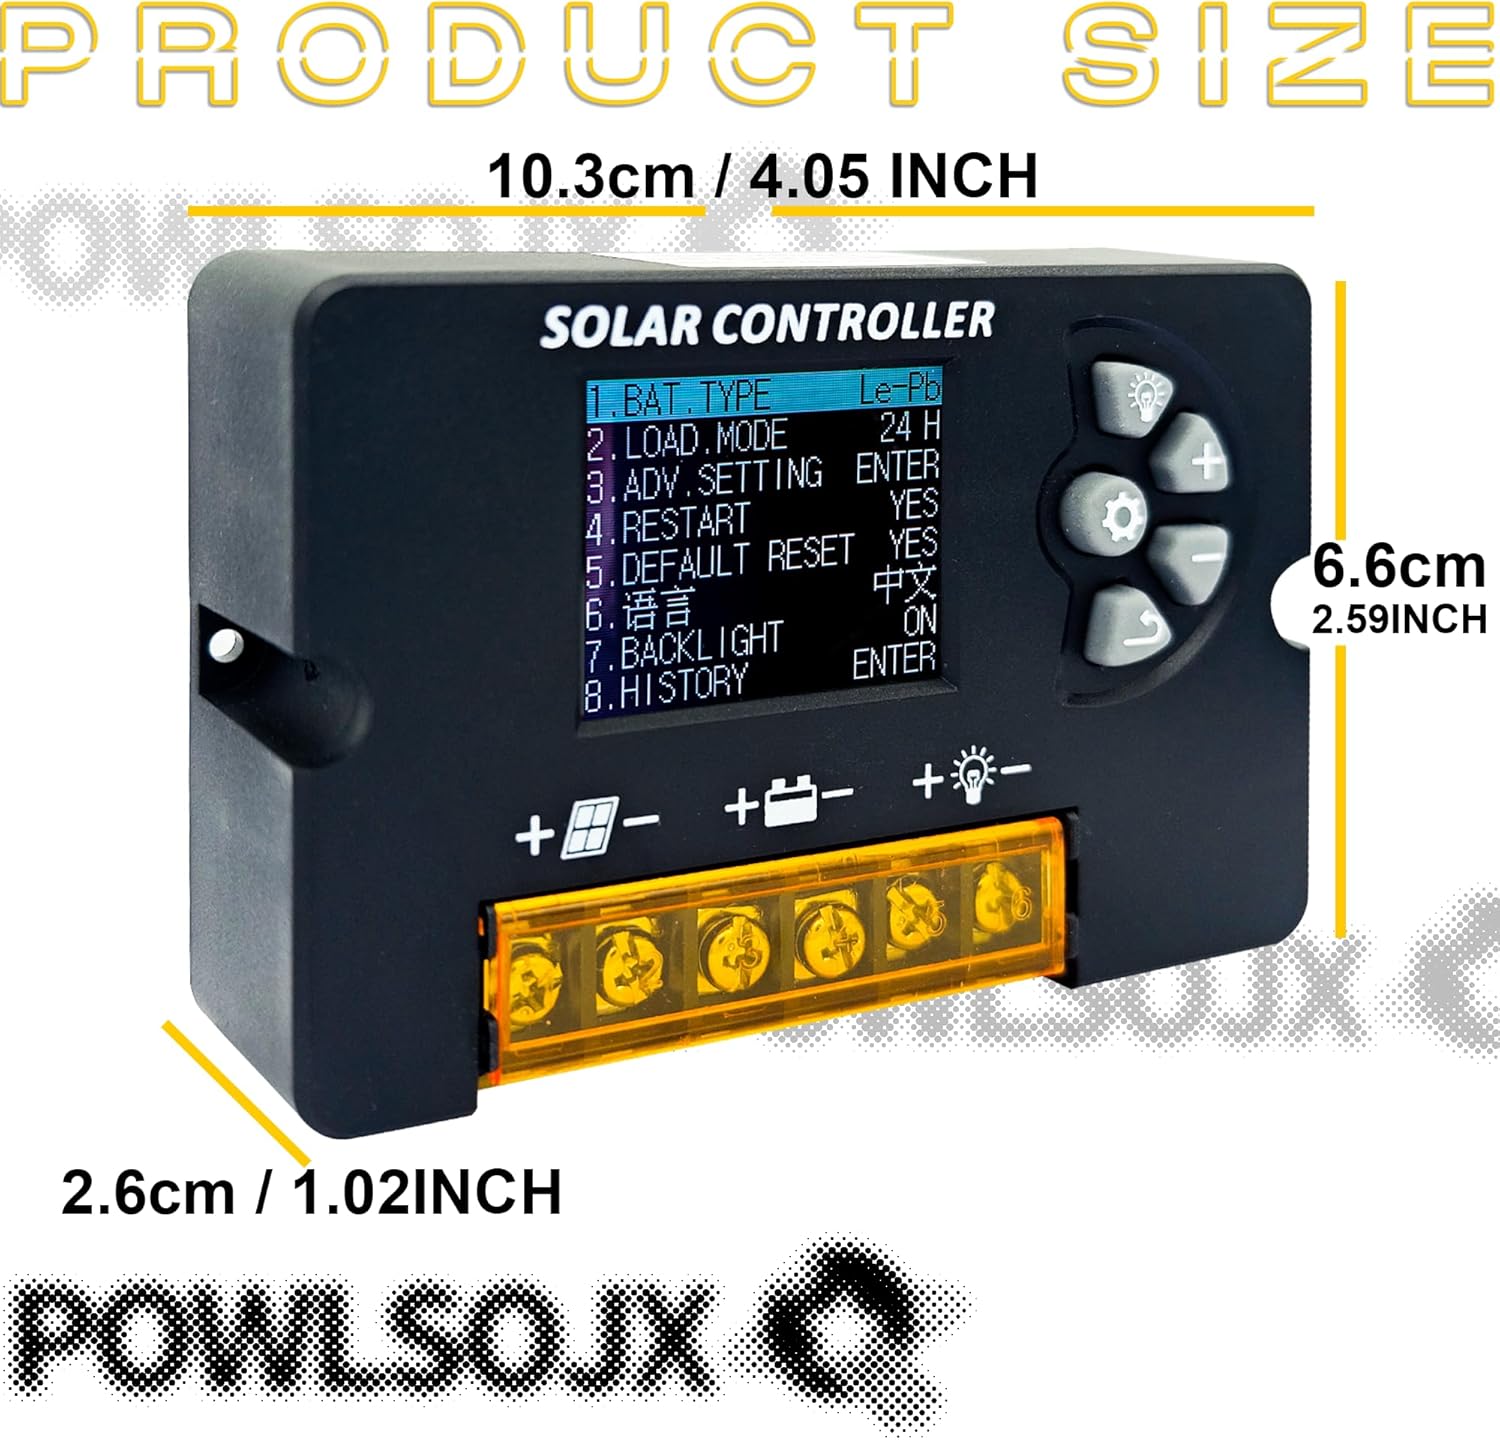
Image: The POWLSOJX Solar Charge Controller with its dimensions labeled: 10.3cm (4.05 inches) length, 6.6cm (2.59 inches) width, and 2.6cm (1.02 inches) thickness.
Záruka a podpora
Your POWLSOJX Solar Charge Controller comes with a Záruka 12 měsíců from the date of purchase, covering manufacturing defects. Additionally, lifetime technical support is provided.
For warranty claims, technical assistance, or any questions regarding your product, please contact POWLSOJX customer service through the retailer where you purchased the product or refer to the contact information provided on the product packaging.
Ask a question about this manual
Ask about setup, troubleshooting, compatibility, parts, safety, or missing instructions. Manuals+ will review the question and use this page’s manual context to help answer it.