ETA ETA251590000
ETA Falco Smart Robot Vacuum Cleaner with Mopping Function User Manual
Model: ETA251590000
1. Úvod
Thank you for choosing the ETA Falco Smart Robot Vacuum Cleaner with Mopping Function. This manual provides essential information for the safe and efficient operation, maintenance, and troubleshooting of your device. Please read this manual thoroughly before using the product and keep it for future reference.
Důležité bezpečnostní informace
- Always ensure the robot is placed on a stable, level surface.
- Udržujte zařízení mimo dosah vody a vlhkosti.
- Do not allow children or unauthorized persons to operate the robot.
- Use only the original charging adapter and accessories provided.
- Before cleaning or maintenance, ensure the robot is powered off and unplugged from the charging station.
- Avoid operating the robot near open flames or flammable materials.
2. Konec produktuview
Komponenty a ovládací prvky
Familiarize yourself with the main parts and controls of your ETA Falco Smart robot vacuum cleaner.
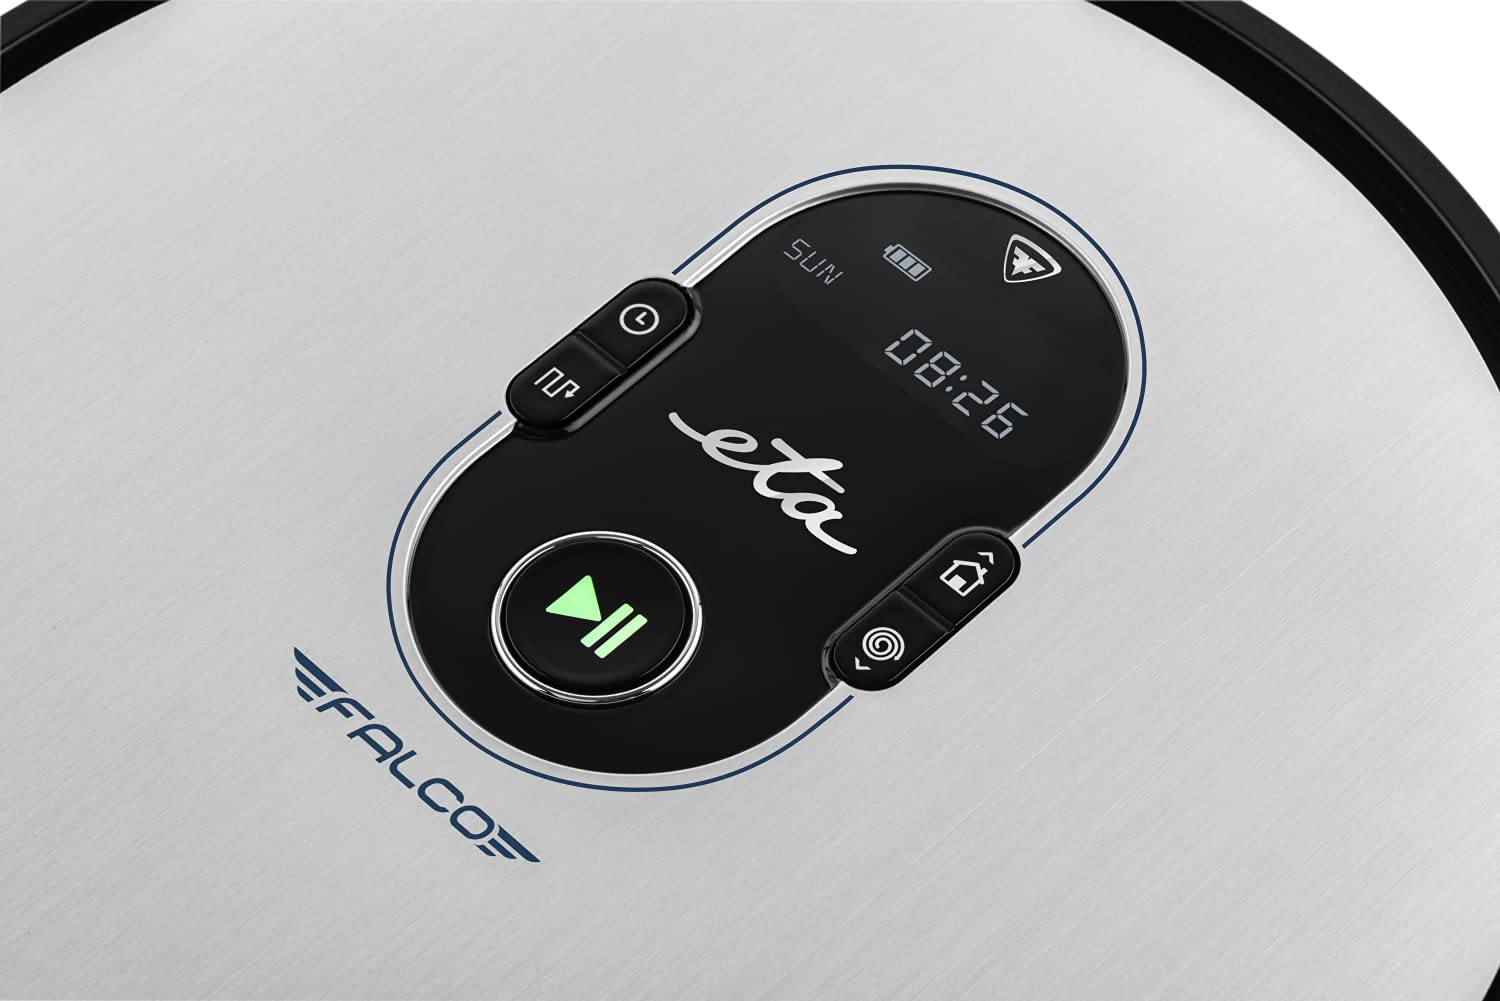
Obrázek 2.1: Top panel controls. This image shows the main control panel on the top of the robot, including buttons for power, scheduling, and return to charging station, along with a digital display.

Obrázek 2.2: Spodní strana view. This image displays the bottom of the robot, highlighting the main brush, two side brushes, and the mop attachment.

Obrázek 2.3: Underside diagram. This diagram labels the key components on the robot's underside, including the side brushes, main brush, and mop attachment.
3. Obsah balení
Po vybalení se prosím ujistěte, že jsou přítomny všechny následující položky:
- ETA Falco Smart Robot Vacuum Cleaner
- Nabíjecí stanice
- Nabíjecí adaptér
- Dálkové ovládání
- 2x Spare Side Brushes
- Special Rotary and Lamella Brush
- 2x Cleaning Cloths (Mop Pads)
- Náhradní HEPA filtr
- Mop Attachment with 300 ml Water Tank
- Virtuální zeď
4. Nastavení
4.1 Počáteční nabíjení
- Umístěte nabíjecí stanici ke zdi v otevřeném prostoru a ujistěte se, že do vzdálenosti 1 metru po stranách a 2 metrů před ní nejsou žádné překážky.
- Connect the charging adapter to the charging station and plug it into a power outlet.
- Place the robot vacuum cleaner on the charging station. Ensure the charging contacts align. The robot will begin charging automatically. A full charge takes approximately 5 hours.
4.2 Instalace bočních kartáčů
Attach the side brushes to the designated posts on the underside of the robot by pressing them down until they click into place. Ensure the 'L' and 'R' markings on the brushes match the corresponding markings on the robot.
4.3 Connecting to the ETA SMART App
The ETA SMART app enhances the functionality of your robot. Download the app from your smartphone's app store. Follow the in-app instructions to connect your robot to your home Wi-Fi network and pair it with the app.
4.4 Setting up the Virtual Wall
The virtual wall creates an invisible barrier to restrict the robot's access to certain areas. Place the virtual wall device on the floor where you want to create a boundary. Ensure the infrared beam is directed towards the area you wish to block. The robot will detect this beam and avoid crossing it.

Obrázek 4.1: Robot with charging station and virtual wall. This image shows the robot positioned near its charging station, with a virtual wall device placed nearby to illustrate its function.
5. Návod k obsluze
5.1 Režimy čištění
The ETA Falco Smart offers four distinct cleaning modes:
- CHYTRÝ: General cleaning mode for optimal coverage.
- KLASICKÝ: Standardní čisticí vzorec.
- OKRAJ: Čistí podél stěn a hran nábytku.
- BOD: Koncentrované čištění v určité oblasti.
You can select these modes via the ETA SMART app or the remote control.
5.2 Plánování úklidu
Use the ETA SMART app to set a cleaning schedule for your robot. You can program specific times and days for the robot to automatically start cleaning.
5.3 Ruční ovládání
You can manually control the robot's movement and functions using the remote control or the ETA SMART app. The app also allows you to monitor cleaning activity, battery charge, and view cleaning routes.

Obrázek 5.1: ETA Smart App features. This image displays the ETA Smart App interface on a smartphone, highlighting features such as remote control, cleaning history, activity monitoring, battery status, cleaning modes (SMART, CLASSIC, EDGE, SPOT), cleaning schedule, mopping intensity control, and suction power adjustment.
5.4 Funkce mopování
- Fill the 300 ml water tank with clean water. Do not use detergents or cleaning solutions that are not approved for robot vacuums.
- Attach a clean mop pad to the mop attachment.
- Slide the mop attachment into the designated slot on the underside of the robot.
- Spusťte úklidový cyklus. Robot bude současně vysávat a vytírat.
6. Údržba
Pravidelná údržba zajišťuje optimální výkon a prodlužuje životnost vašeho robotického vysavače.
6.1 Cleaning the Dust Bin and Filter
- Stiskněte tlačítko pro uvolnění nádoby na prach a vyjměte nádobu na prach.
- Open the dust bin and empty its contents into a trash can.
- Remove the HEPA filter and primary filter. Tap them gently to remove dust. If washable, rinse under running water and allow to air dry completely before reinserting.
- Wipe the inside of the dust bin with a dry cloth.
- Reassemble the filters and dust bin, then reinsert into the robot.
6.2 Čištění hlavního kartáče
- Otočte robota.
- Remove the main brush cover by pressing the release tabs.
- Vyjměte hlavní kartáč.
- K odstranění vlasů a nečistot zamotaných kolem kartáče použijte čisticí nástroj (pokud je součástí dodávky) nebo nůžky.
- Clean the brush compartment.
- Znovu vložte hlavní kartáč a zajistěte kryt.
6.3 Čištění bočních kartáčů
Periodically check the side brushes for tangled hair or debris. If necessary, remove them by gently pulling upwards and clean them. Replace worn or damaged brushes with the spare ones provided.
6.4 Čištění mopovací podložky a nádržky na vodu
After each mopping session, remove the mop pad and wash it thoroughly. Empty any remaining water from the water tank and rinse it. Allow both to air dry completely before storing or reusing.
6.5 Čištění senzorů
Wipe the anti-drop sensors, bumper sensors, and charging contacts on the robot and charging station with a clean, dry cloth to ensure proper function.
7. Řešení problémů
Pokud se u vašeho robotického vysavače vyskytne problém, podívejte se na následující běžné problémy a jejich řešení:
| Problém | Možná příčina | Řešení |
|---|---|---|
| Robot se nezapne | Slabá baterie; Vypínač vypnutý | Nabijte robota; Ujistěte se, že je vypínač zapnutý. |
| Robot se nenabíjí | Charging contacts dirty; Charging station unplugged | Clean charging contacts; Ensure charging station is plugged in |
| Špatný čisticí výkon | Plná nádoba na prach; Zamotané kartáče; Ucpaný filtr | Vyprázdněte nádobu na prach; Vyčistěte kartáče; Vyčistěte/vyměňte filtr |
| Robot se často zasekává | Překážky na podlaze; Znečištěné senzory | Clear floor of cables/small items; Clean sensors |
| Virtual wall not working | Virtual wall batteries low; Incorrect placement | Replace batteries; Adjust virtual wall position |
Pokud problém přetrvává i po vyzkoušení těchto řešení, kontaktujte zákaznickou podporu.
8. Specifikace
Technical specifications for the ETA Falco Smart Robot Vacuum Cleaner (Model ETA251590000):
| Funkce | Detail |
|---|---|
| Výrobce | ETA |
| Rozměry produktu (D x Š x V) | 32.5 x 33.5 x 7.5 cm |
| Hmotnost | 250 gramů |
| Číslo modelu položky | ETA251590000 (T2261) |
| Barva modelu | Modrý |
| Materiál | Plast |
| Typ napájení | Napájení z baterie |
| svtage | 3 Volts (14.4V Li-ion battery, 2400 mAh) |
| Počet položek v balení | 1 |
| Speciální funkce | Pet brush compatibility, Smart App control, Floating brush system, HEPA filter, Virtual wall |
| Zahrnuté komponenty | Battery, Filter, Charging station, Adapter, Remote control, Side brushes, Rotary brush, Cleaning cloths, Mop attachment, Virtual wall |
| Složení baterie | Lithium-iontová |
| Životnost baterie | Až 120 minut |
| Doba nabíjení | Přibl. 5 hodin |
| Doporučení pro povrch | Laminát |
| Typ ovladače | Ovládání aplikací |
| Dostupnost náhradních dílů | Informace o náhradních dílech nejsou k dispozici |
9. Záruka a podpora
For warranty information, product support, or to inquire about spare parts, please refer to the warranty card included with your purchase or visit the official ETA webUschovejte si doklad o koupi pro případ reklamace.