CONSORT HRXSL Wireless Controller

Product Information
Specifications
- Product Name: HRXSL Controller
- Manufacturer: Consort Equipment Products Limited
- Model Number: 13984168 Iss 01
- Operating Modes: BOOST, MANUAL, FROST PROTECT, AUTO
- Special Modes: MANUAL CONTROL MODE, LOCAL TEMPERATURE CONTROL MODE
Product Usage Instructions
Pairing the Heater to the HRXSL
The HRXSL wireless controller must be paired with each heater to enable operation. Ensure the heater is within range and follow the pairing instructions provided in the user manual.
Basic Operation
The HRXSL has a STANDBY MODE which can be entered or exited by pressing the standby button. Different operating modes can be selected by pressing the MODE button to cycle through options.
Boost Mode
In BOOST mode, the room temperature is increased for 15 minutes. To adjust the set temperature, activate the display, press TEMP, and use the + and – buttons. The boost period can also be increased up to 4 hours by pressing the PROG button.
Auto Mode
In AUTO mode, the HRXSL follows the week’s time/temperature program. The set temperature can be temporarily overridden by using the + and – buttons on the display.
Manual Temperature Mode and Fan Only Control
When the room temperature reaches the set temperature in MANUAL mode, heating is disabled. The fan only function can then be used by toggling it on/off with the PROG button. Fan speed adjustments can be made in the setup menu.
FAQs
- Q: How do I pair the HRXSL wireless controller with a heater?
A: To pair the HRXSL with a heater, follow the pairing instructions provided in the user manual. Ensure the heater is within range for successful pairing. - Q: How can I adjust the boost period in BOOST mode?
A: In BOOST mode, activate the display and press the PROG button to increase the boost period. The boost period can be extended up to 4 hours.
All electrical appliances produced by the Company are guaranteed for one year against faulty materials or workmanship. This applies only if the appliance has been used for purposes in accordance with the instructions provided and has not been connected to an unsuitable electricity supply, or subject to misuse, neglect, damage or modified or repaired by any person not authorised by us. This guarantee is offered to you as an extra benefit and does not affect your legal rights.
The correct electricity supply voltage is shown on the rating label attached to the appliance. Reasonable care has been taken to ensure that this guide is accurate at the time of printing. In the interests of progress the Company reserve the right to vary specifications from time to time without notice.
CUSTOMER HELPLINE
Should you need any advice on the use of your new Consort product please contact our Helpline:
Consort Equipment Products Limited
Thornton Industrial Estate, Milford Haven, Pembrokeshire, SA73 2RT
Tel: 01646 692172
Fax: 01646 695195
Email: technical@consortepl.com
Web: www.consortepl.com
Operation hours: Mon to Thu 8.30am to 4.30pm | Fri 8.30am to 3.30pm
BS EN ISO 9001 Registered Company No FM12671
WARNINGS
- Keep the batteries out of reach of children
- Do NOT use if the battery compartment is not secure
- Dispose of used batteries correctly and safety
- Operating temperature range -10 to +40ºC.
Overview
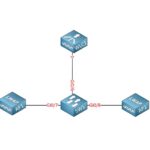
The HRXSL wireless controller can control an unlimited number of SL and RX heaters provided they are within range. To do this, the controller must be paired with each heater. The heater will not operate until it has been paired to the controller.

Pairing the heater to the HRXSL
In order to pair your appliance with the controller you must:
- Ensure power to the appliance is OFF.
- Turn power to the appliance ON.
- Within 20 seconds, press and hold the PROG and MODE buttons on the controller until the display shows ‘PAIR’
- The heating will switch on. If the heating is set to off, after 4 seconds the heating will turn off.
- The appliance is now ready to be used.
Basic operation
The HRXSL also has a STANDBY MODE. To enter/exit this mode, press the standby button. In STANDBY MODE, the heating will not be activated and the display will be blank.
The HRXSL has 4 standard operating modes:
BOOST, MANUAL, FROST PROTECT and AUTO. Each mode can be selected by pressing the MODE button to cycle through the options. The cycle sequence will always start with BOOST mode followed by MANUAL, FROST PROTECTION and AUTO.
The HRXSL also has two special operating modes. These are MANUAL CONTROL MODE and LOCAL TEMPERATURE CONTROL MODE. These are accessed via setup menu.
To adjust the operating mode/settings of the HRXSL, the display must first be activated. If the controller is in STANDBY MODE, press the power button. The controller will exit standby mode and the display will be activated for 10 seconds. If the controller is not in STANDBY MODE, press any of the TIME, TEMP or MODE buttons once. The display will be activated for 10 seconds.
MODE
Boost mode
The boost feature increases the room temperature for 15 minutes.
To amend the set temperature when in BOOST mode, activate the display and then press TEMP. Next, use the + and – buttons to change the temperature. Once the temperature is set, you can leave the display to return to the main screen and the settings will be saved. After 15 minutes, the HRXSL will return to the previous operating mode. Whilst in boost mode, activate the display and press the PROG button to increase the boost period. The boost period can be increased up to 4 hours. This will reset back to 15 minutes once you exit boost mode.
Manual temperature mode and fan-only control
In MANUAL mode, the heater maintains a chosen set temperature between 15°C and 35°C. To amend the set temperature when in MANUAL mode, activate the display and then press TEMP. Next, use the + and – buttons to change the temperature. Once the temperature is set, you can leave the display to return to the main screen and the settings will be saved.
When the room temperature reaches the set temperature, the heating is disabled. When the heating is disabled in manual mode, the fan-only function can be used. Use the PROG button to toggle this on/off. The fan speed can be adjusted in the setup menu. This will only work on select heaters.
Frost protection mode
In FROST PROTECT mode, the heater maintains a chosen set temperature between 4°C and 15°C. To amend the set temperature when in FROST PROTECT mode, activate the display and then press TEMP. Next, use the + and – buttons to change the temperature. Once the temperature is set, you can leave the display to return to the main screen and the settings will be saved.
Auto mode
In this mode, the HRXSL will follow the week’s time/temperature program.
The temperature can be temporarily overridden in AUTO mode by simply activating the display and using the + and – buttons to set the new temperature. The new set temperature will be then maintained until the next program step.
Advance mode can be used to advance to the next program. To do this, press PROG whilst in AUTO mode. To clear advance mode, press PROG. The program currently active is indicated in the top left of the display.
Information on how to set up the program schedule.
Manual control mode
MANUAL control mode allows the heat and fan settings to be selected manually regardless of the room temperature. Refer information on how to access manual control mode.
To operate manual control mode, activate the display and press the PROG button. The fan speed can now be set using the + and – buttons. Press the PROG button again. The heat setting can now be set using the + and – buttons. Manual control mode has 3 fan speeds and 3 heat settings available. Not all products have multiple fan and heat settings. Please refer to the heaters user manual to check how many heat/fan settings it has available. Refer information on how to access manual control mode.
Local temperature control mode
Local temperature control mode is only compatible with certain heaters. Unlike normal temperature control mode, the temperature measured on the controller does not affect the heater output. Instead, the HRXSL simply sends the target temperature to the heater. The heater uses this as the set temperature. It uses a local temperature sensor to measure the room temperature at the heater location itself. When the local temperature reaches the set temperature, the heater will switch off.
Refer information on how to access manual control mode.
Heat symbol
Every time there is a demand for heat, the display will show the heat icon.
Keys locking
Press and hold TIME and TEMP together for 5 seconds. The display will show the ![]() symbol. Repeat the step to unlock.
symbol. Repeat the step to unlock.
Open Window Detection
Ensuring you don’t waste energy on heating the outside world, the heater is equipped with optional open / closed window detection. The heater recognises sudden drops in temperature when a window or a door is opened and turns the heating off to save energy. When the window is closed, the heater will automatically detect a temperature rise, and switch itself back on. Once enabled in the setup menu, the open window detection is fully automatic and does not require any human intervention to be activated. When open window detection has been triggered, the heat symbol will flash on/off as shown below.
Setting up Open Window Detection
The system has been factory set to default time and temperature values. If necessary, all values can be adjusted. When the heating is on, open window detection sensor will automatically switch the heater off when it detects a fall in temperature of 2°C in less than 10 minutes (this temperature can be changed in menu 8 and time in menu 7). If a temperature rise of 2° C in less than 30 seconds is detected, the heater will switch itself back on (this temperature can be changed in menu A and time in menu 9).
Displaying the time/temperature
The HRXSL can display either the time & day or the room temperature when in one of the 4 standard operating modes.
Press the TIME button to alternate between the two options.
Setting the time and day
To set the time and day, follow the steps below;
- Step 1: Press and hold the TIME button for 5 seconds. The minutes will flash. Use the + and – buttons to adjust the minutes.

- Step 2: Press the TIME button. The hours will flash. Use the + and – buttons to adjust the hours.

- Step 3: Press the TIME button. The day will flash. Use the + and – buttons to change the day. Once set, press the TIME button to return to the main screen.

Setting the automatic program schedule
An example of one day program on HRXSL

This section provides an example of how to set the 7-day program for one day. The example will program the timer to maintain 21°C from 08:00 until 16:00. It will maintain 4°C from 16:00 onwards. It does this by setting the programs as follows;
- Prog 1 – Set to 08:00 and 21°C
- Prog 2 – Set to 16:00 and 4°C
- Prog 3, 4, 5, 6 – Set to inactive
The steps to program this are shown below;
- Step 1: Press and hold the PROG button. The display below should show with Monday flashing.

- Step 2: Press the PROG button. Prog 1 in the top left of the display should flash. This represents the program number. Each day has 6 programs.

- Step 3: Press the PROG button. The time should flash. Use the + and – buttons to set the time you want the heating to switch on.

- Step 4: Press the PROG button. The temperature should flash. Use the + and – buttons to set the temperature you want to maintain.

- Step 5: Press the PROG button. Monday should flash again.

- Step 6: Press the PROG button. Prog 1 in the top left of the display should flash. Use the + button to increment this to Prog 2. (Note: you can cycle between the different programs using the + and – buttons)

- Step 7: Press the PROG button. The time should flash. Use the + and – buttons to select the time you want the heating to switch off.

- Step 8: Press the PROG button. The temperature should flash. Use the + and – buttons to select a frost protection temperature.

- Step 9: Repeat these steps for programs 3-6 if additional time periods are required. Any programs not being utilized must be deactivated. To do this, simply select the program in question as per step 6 and press the TIME button. The time should change
to dashes as shown below. To reactivate the program, simply press the TIME button again.

Automatic program overview
The HRXSL has a 7-day, 5-day 2-day and a 24 hour timer available. This can be chosen in the setup menu. Up to 6 programming steps are available for each day. In the programming you can set a start time and a temperature for each program.
Basic operation
- Press and hold PROG for 5 seconds to enter the program setting.
- The day will be flashing. Use + and – to navigate day, press PROG to select day.
- PROG 1 will be flashing. Use + and – to navigate program, use PROG to select program.
- The time will be flashing. To set time, use + and – , press PROG to set the time.
- The temperature will be flashing. To set temperature, use + and – to change temperature, press PROG to set temperature.
To add another program repeat steps 2-10.
Set program inactive
If you do not require the use of all 6 programs they can be deactivated. When in programming mode select the program you want to make inactive and press the TIME button. To activate the program again, press the TIME button.
Copy day function
If you require the same set of programs throughout the week, a 24 hour timer is available. This will use the same program every day. A 5-day + 2-day timer is also available. This will use the same programs Monday-Friday, and the same programs Saturday and Sunday. These modes are enabled in the setup menu, as explained.
Alternatively, it is possible to copy a program from one day to another.
To do this, follow the steps below;
- Step 1: Press and hold PROG for 5 seconds to enter the program setting.

- Step 2: Press and hold TIME for 5 seconds to enter the copy day setting.

- Step 3: Use the PROG button to select the day to copy the programs from. 1= Monday, 2 = Tuesday and so on.

- Step 4: Use the + and – buttons to select the day to copy the programs to.

- Step 5: Press the TIME button to copy the programs. The ‘TO’ will flash to confirm the programs have been copied.

- Press and hold TEMP and MODE together for 5 seconds.
- The display will enter the setup menu.
- Use + and – to change a value.
- Use TIME to scroll between the settings.
- Use PROG to exit the setup menu
- 1 – temperature calibration
The temperature reading is factory calibrated but if for any reason it needs adjusting (better accuracy required, to suit different position in the room etc.), the reading can be recalibrated in 0.5 degree steps.
- 3 – Adjust fan speed (Select models only. Does not apply in manual control mode)

- 4 – Set minimum temperature

- 5 – Set maximum temperature

- 6 – Enable/disable open window detection

- 7 – Open window detection time

- 8 – Temperature drop in open window detection time

- 9 – Closed window detection time

- A – Temperature rise in closed window detection time

- B – Program mode select. Choose between a 7-day, 5-day 2-day or a 24 hour timer.

- C – Select operating mode:

- 1 = temperature control
- 2 = manual control
- 3 = local temperature control (Specific heaters only)
- D – Enable/disable SL wireless signal

- E – Compatibility modes:

- 0 = Normal operation,
- 1 = For use with RXREC
- 2 = For use with RX heaters from revision 01 to 09
Choosing a position in a room
When using the HRXSL for temperature control, a suitable position in the room should be chosen. Avoid areas with draught or direct sun. Do not position HRXSL above or close to the heaters or other heat sources. Damp areas or areas where HRXSL can be mechanically damaged should also be avoided.
Mounting the controller
The controller can be left free-standing or mounted to the wall in a suitable location. To mount the controller to the wall, the supplied wall bracket should be used. Install the bracket using the 2 screw holes provided as shown in the image below. The bracket acts as a holder for the controller. The controller can be removed from the bracket easily to operate as a handheld device. Alternatively, a locking screw can be attached from the bottom of the device to permanently fix the controller to the bracket.
Declaration Of Conformity
In accordance with UK Government Guidance.
WE HEREBY CERTIFY THAT THE APPLIANCES DETAILED HEREON HAVE BEEN INSPECTED AND TESTED, AND CONFORM TO THE REQUIREMENTS OF THE FOLLOWING UK STATUTORY INSTRUMENTS WHERE APPLICABLE:
Electrical Equipment (Safety) Regulations 2016 SI. 2016 1101
Electromagnetic Compatibility Regulations 2016 SI. 2016 No. 1091
Radio Equipment Regulations 2017 SI. 2017 No. 1206
The Ecodesign for Energy Related Products and Energy Information (Amendment) (EU Exit)
Regulations 2019. SI. 2010 2617
The Restriction of use of Certain Hazardous Substances. SI. 2012 No. 3032
The Waste Electrical and Electronic Equipment Regulations 2013. SI. 2013 No. 3113
Security Requirements for ‘Connectable Products’ PTSI ACT 2022
The Product Security and Telecommunications Infrastructure (Security Requirements for Relevant Connectable Products) Regulations 2023
Transposed standards used:
- BS EN 55014 (2006)
- BS EN 301489.1 & .3
- BS EN 300220.1 & .2
- BS EN 60730.2.9
- BS EN 60335.1 (2012 )
- BS EN 60335.2.30 (2009)
- ETSI BS EN 303645
- EN 50663 (2017)
- EN 60730-2-9 (2010)
- EN 60730-1 (2011)
- ETSI EN 300 220-1 V3.1.1 (2017-02)
- ETSI EN 300 220-2 V3.2.1 (2018-06)
- ETSI EN 301 489-1 V2.2.2 (2019)
- ETSI EN 301 489-3 V2.1.1 (2019)
PART NUMBER AND DESCRIPTION OF APPLIANCE: HRXSL
NAME OF RESPONSIBLE PERSON: DAVID O’SULLIVAN
POSITION: OPERATIONS MANAGER
DATE: 24/06/24
CONSORT EQUIPMENT PRODUCTS LTD.
THORNTON INDUSTRIAL ESTATE, MILFORD HAVEN, PEMBROKESHIRE, SA73 2RT. UK
TEL: +44 1646 692172
FAX: +44 1646 695195.
E-MAIL: ENQUIRIES@CONSORTEPL.COM
WWW.CONSORTEPL.COM
Documents / Resources
 | CONSORT HRXSL Wireless Controller [pdf] Instructions HRXSL Wireless Controller, HRXSL, Wireless Controller, Controller |