1. Introduzione
This manual provides detailed instructions for the safe installation, operation, and maintenance of your Yardenaler 10x8 FT Manual Retractable Patio Awning. Please read all instructions carefully before assembly and use to ensure proper function and longevity of the product.
2. Informazioni di sicurezza
- Always retract the awning during storms, heavy rain, or high winds (exceeding 30 MPH) to prevent damage to the awning and property.
- Do not install the awning on ceilings, RVs, or any inclined walls. Installation is only recommended for vertical solid hard siding walls.
- Ensure all mounting hardware is securely fastened to a structurally sound surface.
- Mantene i zitelli è l'animali domestici luntanu da a tenda da sole durante u funziunamentu.
- Regularly inspect the awning for any signs of wear, damage, or loose components.
3. Cuntenutu di u pacchettu
Verify that all components are present before beginning installation. If any parts are missing or damaged, contact customer support.
- Awning frame assembly (aluminum supports and arms)
- Tessutu di baldacchinu in poliestere
- Manivella à manivella
- Supporti di montaggio (x2)
- Wall mounting hardware (screws, anchors, etc.)
- Manuale d'istruzzioni
4. Specificazioni
| Marca | Yardenaler |
| Numero di mudellu | PG0205-01GY-K |
| Dimensioni totali (H x L x P) | 59" x 116.3" x 96.8" |
| Dimensione di a tenda | 10x8 piedi |
| Culore | Grisgiu |
| Materiale | Aluminum, Polyester |
| Tipu di tela | 280 GSM Yarn-Dyed Polyester with PU Coating |
| Prutezzione UV | 30+ UV Protection |
| Fading Resistance | Level 4+ Fading-Resistant |
| Classificazione di u ventu | Finu à 30 MPH |
| Range di regulazione d'angolo | 45° - 85° |
| Modu di funziunamentu | Manual (Crank Handle) |
| Altezza d'installazione cunsigliata | Più di 8.2 FT |
| Pesu di l'articulu | 47 liri |
5. Setup è Installazione
This awning is designed for installation on vertical solid hard siding walls. Do not attempt to install on ceilings, RVs, or inclined surfaces. All necessary hardware for wall mounting is included.
5.1 Cuntrolli Pre-Installazione
- Ensure the installation surface is a vertical, solid hard siding wall capable of supporting the awning's weight and operational forces.
- Verify that the recommended installation height of more than 8.2 feet is met.
- Cunfirmate chì tuttu u cuntenutu di u pacchettu hè presente è senza danni.
5.2 Mounting the Awning
- Determina u locu di muntazione: Choose a location on a vertical solid hard siding wall that provides adequate clearance and desired shade coverage.
- Marca i punti di perforazione: Use the mounting brackets as a template to mark the precise drilling points on the wall. Ensure the marks are level and correctly spaced according to the awning frame.
- Perforà i fori pilota: Drill pilot holes at the marked locations. Use a drill bit appropriate for your wall material and the provided hardware.
- Attaccà i supporti di montaggio: Securely fasten the two mounting brackets to the wall using the provided wall mounting hardware. Ensure they are firmly attached and can support the awning's weight.

Image: Mounting brackets securely attached to a vertical solid wall. Note that trailers, RVs, roof-mounting, or inclined walls are not recommended for installation.
- Attach Awning Frame: Carefully lift the awning frame and attach it to the mounted brackets. Secure the frame to the brackets using the appropriate fasteners.
- Install Crank Handle: The crank handle can only be installed on the left side of the awning. Attach the crank handle mechanism as per the diagram.

Image: Illustration of the adjustable pitch mechanism and the crank handle, which must be installed on the left side.
5.3 Adjusting the Awning Angle (Pitch)
The angle of the awning can be adjusted during installation to customize shading coverage. The adjustable range is between 45 and 85 degrees.
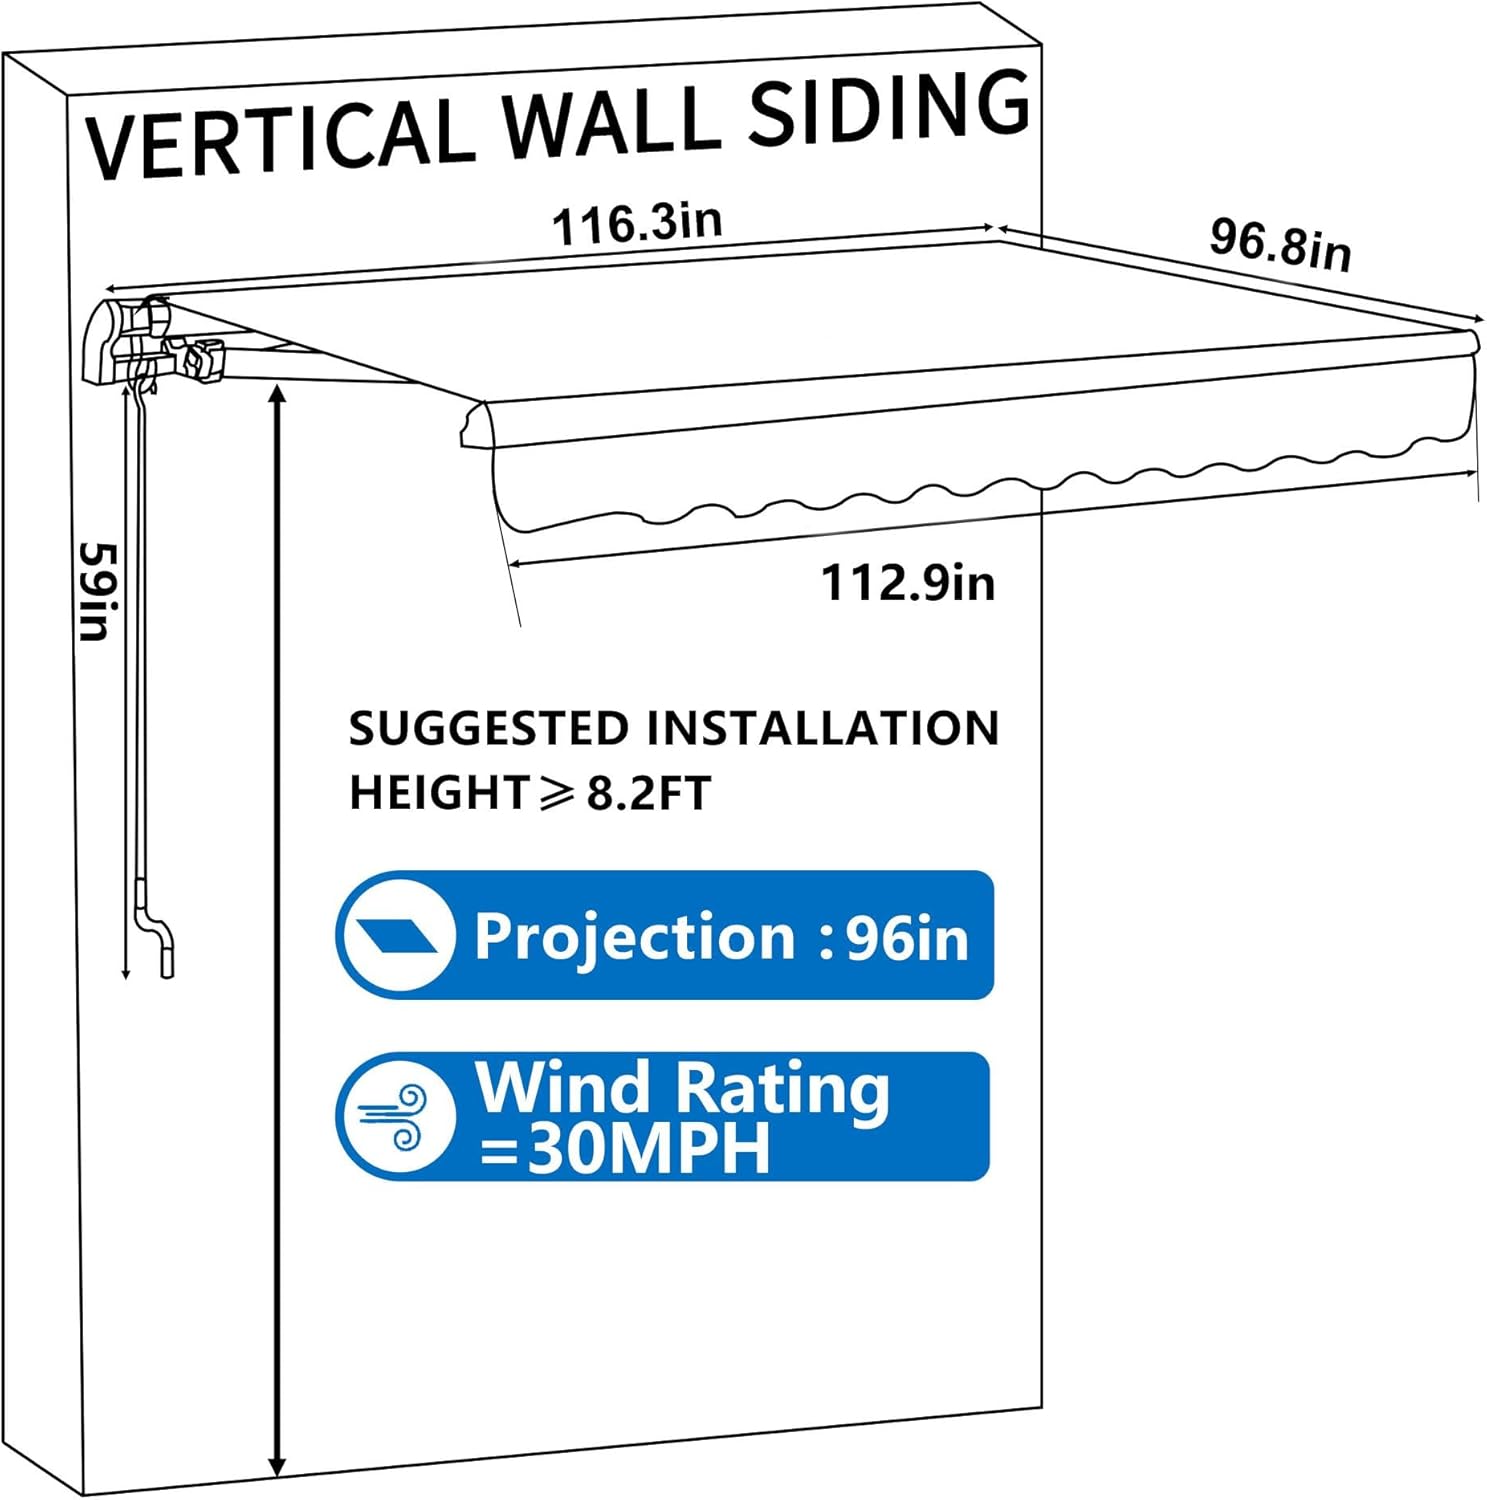
Image: Technical diagram illustrating the awning's dimensions (116.3in width, 96.8in projection, 59in height) and the suggested installation height of 8.2 feet or more.
6. Operating Instructions
6.1 Estensione di a tenda
To extend the awning, turn the crank handle clockwise. Continue turning until the awning reaches the desired extension. The awning can be extended to any length with tension.
6.2 Ritrazione di a tenda
To retract the awning, turn the crank handle counter-clockwise. Continue turning until the awning is fully retracted against the wall. This protects the canopy from weather elements when not in use.

Image: The Yardenaler awning fully extended, providing shade over an outdoor deck area.
7. Mantenimentu
7.1 Canopy Care
- The canopy is made of water-resistant, UV-protected, and fading-resistant polyester fabric (280 GSM yarn-dyed with PU coating).
- Clean the canopy regularly with mild soap and water. Avoid harsh chemicals or abrasive cleaners.
- Allow the canopy to dry completely before retracting to prevent mildew growth.
- The canopy is replaceable. Contact customer support for replacement options.
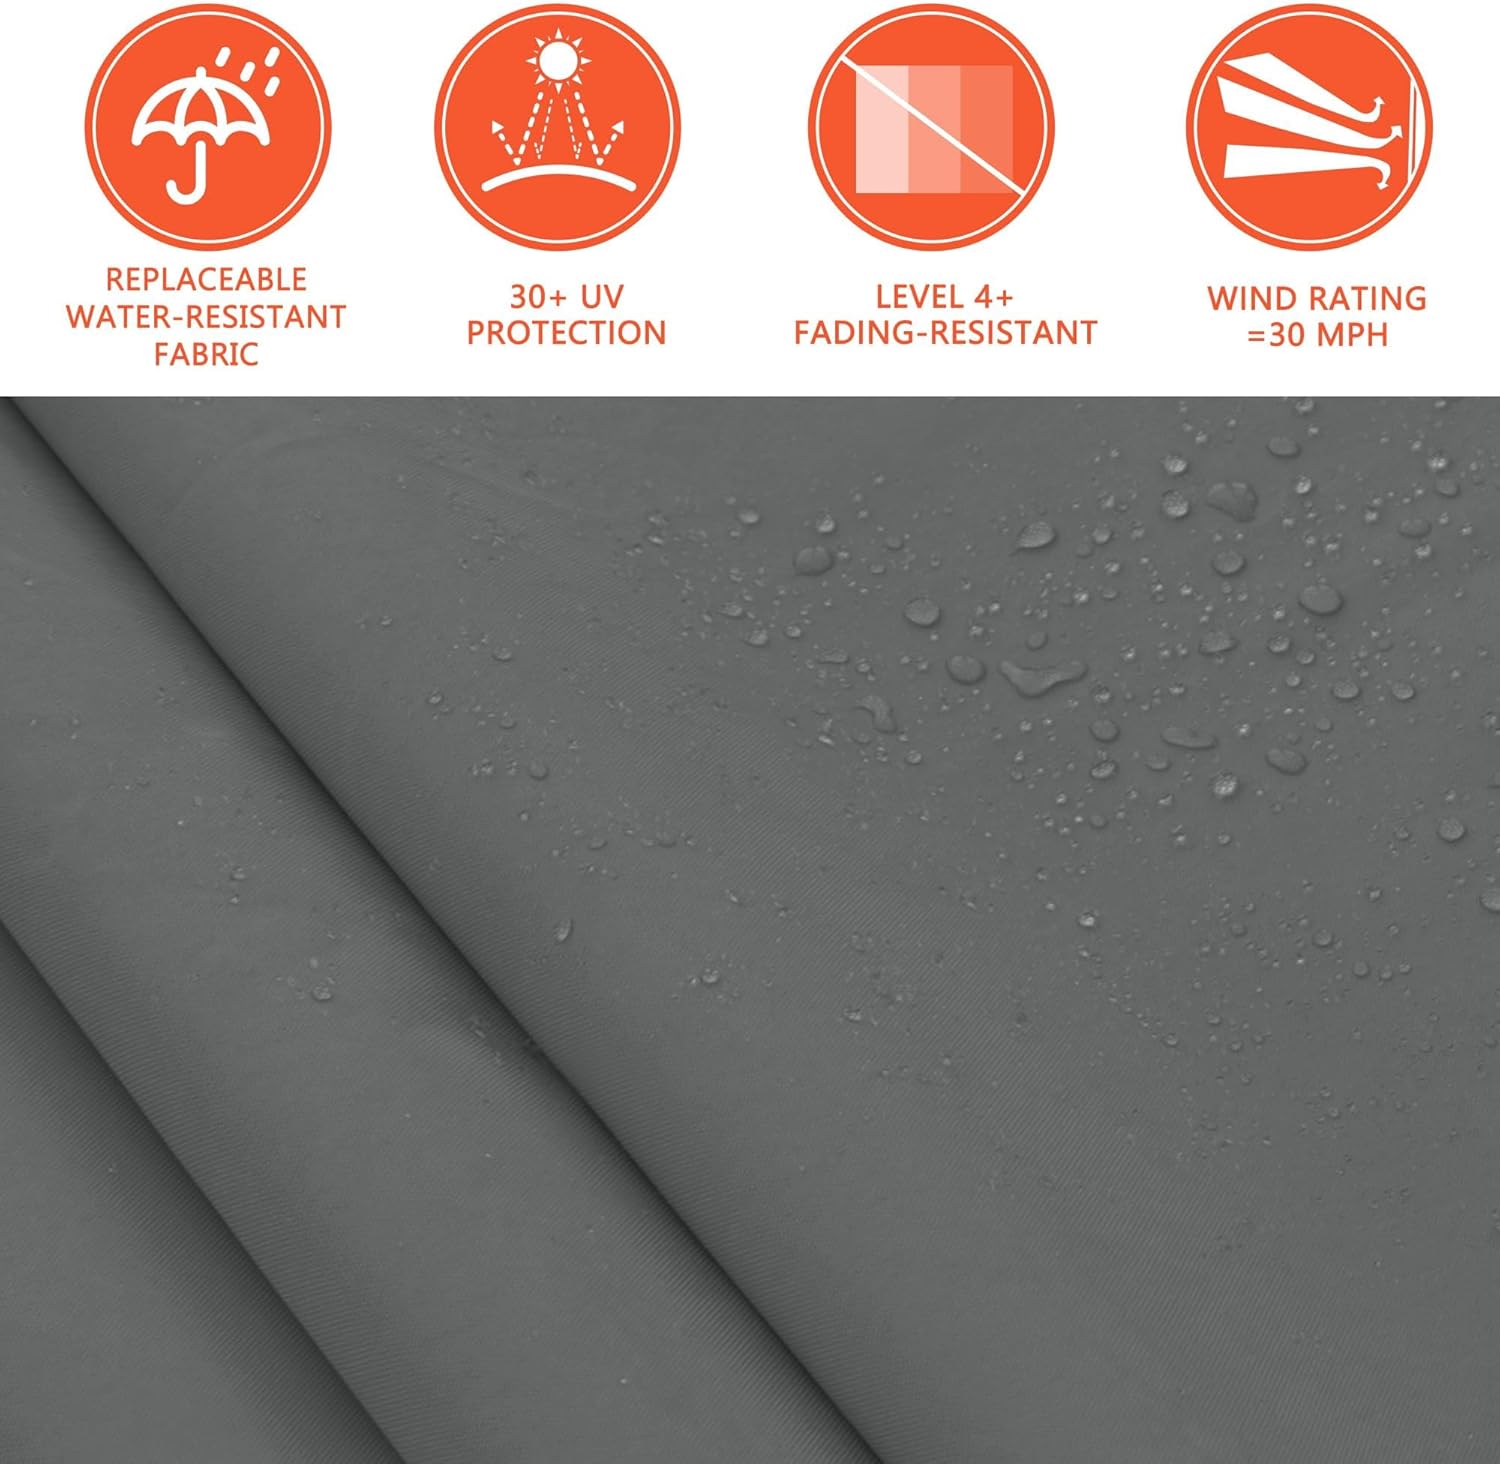
Image: Features of the awning fabric, highlighting its water-resistant, 30+ UV protection, Level 4+ fading-resistant, and 30 MPH wind rating properties.
7.2 Cura di u quadru
- The frame is constructed with heavy-duty aluminum supports and arms.
- Asciugate u quadru d'aluminiu cù a publicitàamp tela per caccià a terra è i detriti.
- Periodically check all bolts and fasteners to ensure they remain tight. Tighten any loose connections.

Imagine: Dettagliata view of the heavy-duty aluminum supports and arms, designed for durability.
8. Risoluzione di prublemi
| Prublemu | Causa Possibile | Soluzione |
| A tenda da sole ùn si stende nè si ritrae senza intoppi. | U mecanismu hè rigidu o ostruitu. | Check for any obstructions in the arm mechanism. Apply a silicone-based lubricant to moving parts if necessary. Ensure the crank handle is properly engaged. |
| A tenda da sole s'affloscia o pare instabile. | Loose mounting hardware or damaged frame components. | Inspect all mounting bolts and frame connections. Tighten any loose fasteners. If frame components are bent or broken, contact customer support for replacement parts. |
| U tissutu di u baldacchinu hè sporcu o macchiatu. | Exposure to elements. | Clean with mild soap and water. For stubborn stains, a soft brush can be used gently. Rinse thoroughly and allow to air dry completely. |
| Awning damaged by wind or storm. | Awning was not retracted during adverse weather. | Damage from high winds or storms is not covered under normal warranty. Inspect for repairable parts or contact customer support for replacement components. Always retract the awning in strong winds. |
9. Garanzia è Support
For warranty information, replacement parts, or technical assistance, please contact Yardenaler customer support through the retailer where the product was purchased or visit the official Yardenaler store online.
Please have your model number (PG0205-01GY-K) and purchase date available when contacting support.