1. Introducció
This user manual provides essential information for the safe and efficient operation of your Bokman Portable Level 2 EV Charger. This device is designed to provide convenient and flexible charging solutions for electric vehicles compatible with the SAE-J1772 standard. Please read this manual thoroughly before using the charger to ensure proper setup, operation, and maintenance.
2. Producte acabatview
The Bokman Portable Level 2 EV Charger offers adjustable current settings and a 25-foot charging cable, making it suitable for various home charging environments. It supports both Level 1 (120V) and Level 2 (240V) charging through included adapters.
2.1 Contingut del paquet
En desempaquetar, comproveu que tots els elements que s'enumeren a continuació hi són presents i en bon estat:
- 1x Caixa de control
- 1x Charger Holder
- 1x EV Charger (with 25ft cable)
- 1x Box Holder
- 1x Bossa d'emmagatzematge
- 1x NEMA 5-15 Adapter
- 1 x manual d'usuari
- 1x Double Sided Microfiber Towel

Figure 2.1: Included components of the Bokman Portable EV Charger package.
3. Configuració
Before initial use, ensure the charging environment is safe and the electrical outlets meet the required specifications.
3.1 Choosing a Charging Level (Level 1 vs. Level 2)
The charger supports two charging levels based on the power outlet used:
- Level 2 Charging: Use the NEMA 14-50 plug with a 240V outlet for faster charging.
- Level 1 Charging: Use the included NEMA 5-15 adapter with a standard 120V household outlet for slower charging.

Figure 3.1: Dual Charging Mode options for the EV Charger.
3.2 Passos d'instal·lació
- Muntatge del carregador: If desired, use the provided charger holder and box holder to mount the control box and charging connector securely to a wall. Ensure the mounting location is dry, well-ventilated, and away from direct sunlight or heat sources.
- Connecteu-vos a la presa de corrent: Insert the appropriate NEMA plug (14-50 or 5-15 with adapter) into the corresponding electrical outlet.
- Select Charging Current (Before Connecting to Car): Before plugging into your vehicle, you can adjust the charging current. Press the "Current" button on the control box to cycle through available amperage settings (6A to 40A). This allows you to match the charger's output to your electrical circuit's capacity.
- Connect to Electric Vehicle: Insert the SAE-J1772 charging connector into your electric vehicle's charging port.

Figure 3.2: Basic steps for connecting the EV charger.
4. Instruccions de funcionament
The Bokman EV Charger features an intuitive control box with an LCD display and physical buttons for easy operation.
4.1 Control Box Functions
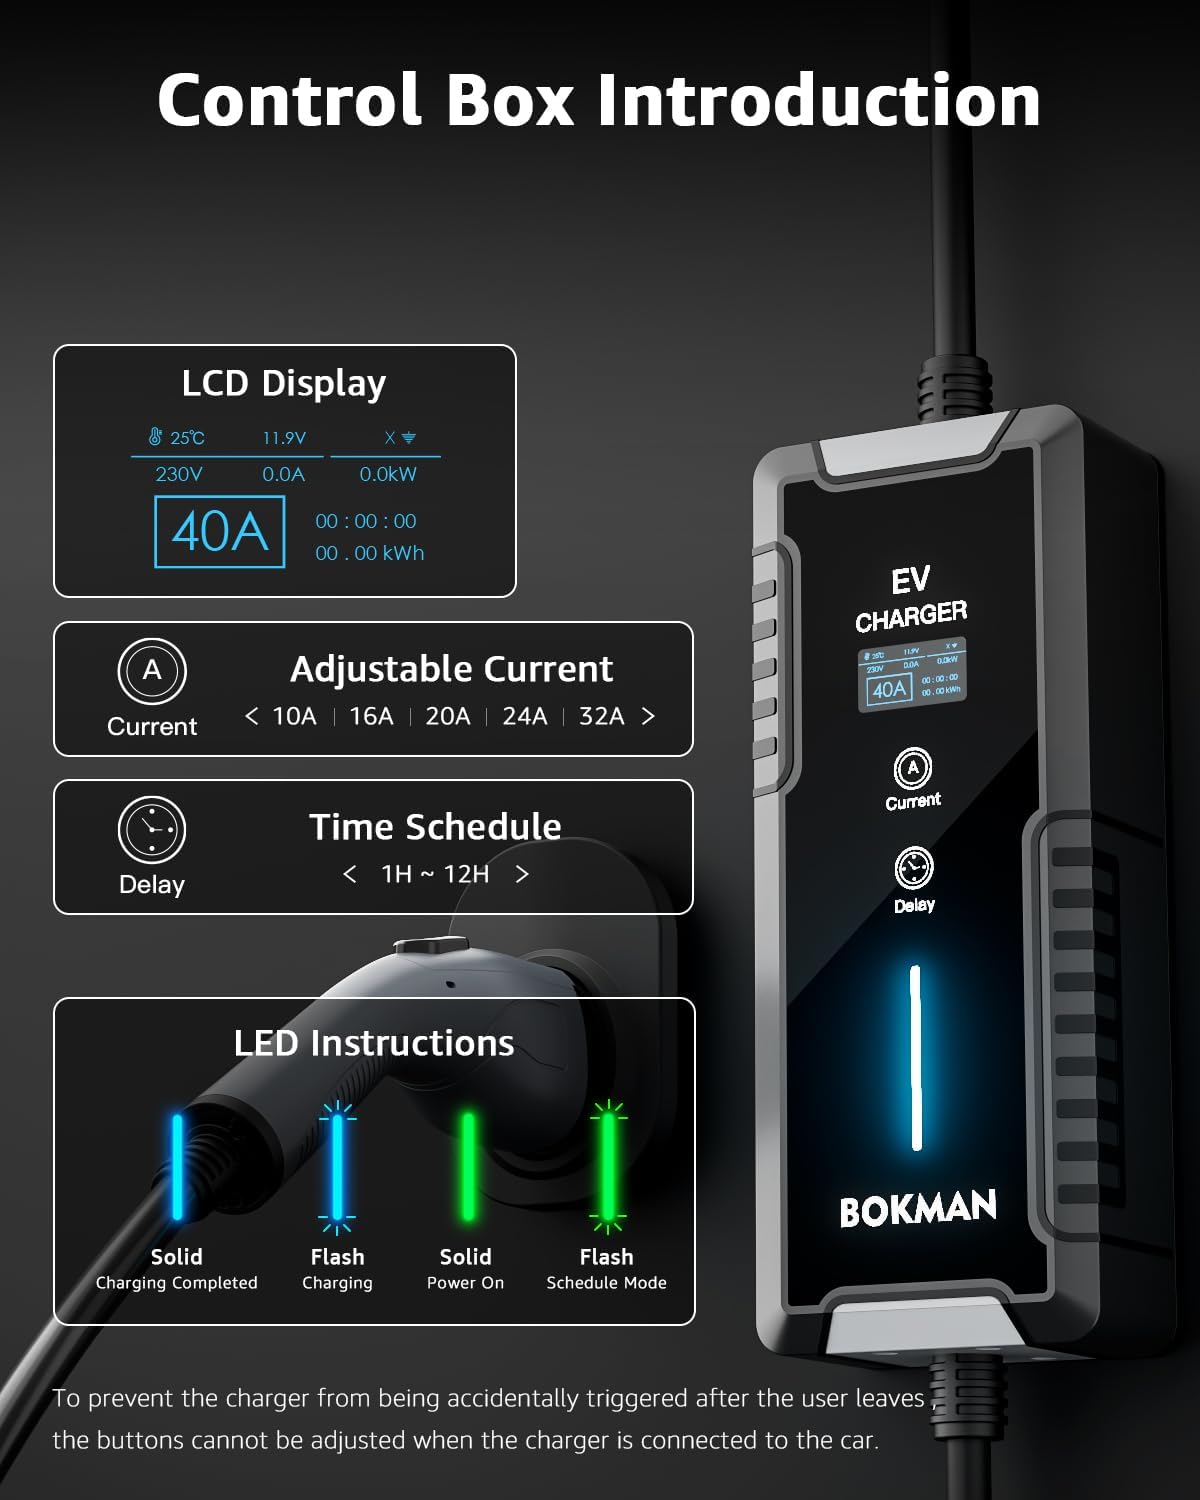
Figura 4.1: Mésview of the Control Box and its features.
- Pantalla LCD: Shows real-time charging status, including temperature, voltage, current, power, and total energy charged.
- Current Button (A): Press to adjust the charging current. Available settings range from 6A to 40A. Note: Current can only be adjusted when the charger is NOT connected to the vehicle.
- Delay Button (Clock Icon): Press to set a delay for the charging start time, allowing for reservation charging during off-peak hours (1H to 12H).
- Indicador LED:
- Solid Blue: Charging Completed
- Flashing Blue: Charging in Progress
- Verd continu: encès
- Flashing Green: Schedule Mode (Delayed Charging)
4.2 Smart Charging Schedules
Utilize the delay charging function to optimize charging costs by scheduling charging sessions during off-peak electricity hours. Press the 'Delay' button to set the desired delay time before charging begins.

Figura 4.2: Example of using delay function for smart charging.
4.3 Característiques de seguretat
The charger is equipped with multiple protection functions to ensure a safe charging experience:
- Protecció contra fuites
- Protecció de sobrecàrrega
- Sota el voltage Protecció
- Protecció contra sobreintensitat
- Protecció contra la temperatura
- Protecció contra curtcircuits
For safety, the control box buttons are disabled once the charger is connected to the vehicle to prevent accidental changes during charging.
Figure 4.3: Anti-Accidental Touch feature.
5. Manteniment
Proper maintenance ensures the longevity and optimal performance of your EV charger. The Bokman charger is built with durable materials designed to withstand various environmental conditions.
5.1 Atenció general
- Keep the charger and cables clean. Use the provided microfiber towel for cleaning.
- Avoid exposing the control box to direct impact or excessive force.
- Ensure the charging cable is not kinked or twisted during storage or use.
- Store the charger in its storage bag when not in use, especially during travel.
5.2 Environmental Resistance
The charger is designed for robust performance in various conditions:
- Waterproof Ability (IP65): The charger is rated IP65, providing protection against dust and low-pressure water jets. This allows for safe outdoor use in most weather conditions.
- Resistència a la temperatura: The charger is built to operate reliably in a wide range of temperatures, from as low as -22°F (-30°C) to as high as 130°F (55°C).
- Material resistent: The charger's construction is designed to withstand significant pressure, capable of enduring a car crushing at a weight of 2.5 tons.
- Durable Outer Cover: The charging cable features a robust outer cover that prevents damage when dragged on rough surfaces.

Figura 5.1: Classificació d'impermeabilitat IP65.

Figure 5.2: Performance in cold weather.

Figure 5.3: Performance in high temperatures.

Figure 5.4: Durability against physical stress.

Figure 5.5: Cable durability on rough terrain.
6. Solució De Problemes
If you encounter issues with your Bokman EV Charger, refer to the following common problems and solutions:
| Problema | Causa possible | Solució |
|---|---|---|
| El carregador no s'encén. | No hi ha corrent a la presa de corrent; connexió fluixa. | Ensure the power plug is fully inserted into the wall outlet. Check the circuit breaker for the outlet. |
| Charging does not start when connected to EV. | Vehicle not ready to charge; charger not fully connected to EV; current setting too low. | Ensure your EV is ready to accept a charge. Verify the SAE-J1772 connector is fully seated in the vehicle's port. Check the current setting on the control box (adjust before connecting to car). |
| Cannot change current setting. | Charger is connected to the vehicle. | Disconnect the charger from the vehicle first. Then, use the "Current" button to adjust the amperage. Reconnect to the vehicle to begin charging with the new setting. |
| Cannot stop charging from control box. | Buttons are disabled when connected to the vehicle. | To stop charging, first press and hold the "A" button on the control box for several seconds until a prompt appears (if available), then confirm. Alternatively, unplug the charger from the vehicle, or use your vehicle's internal controls to stop charging. |
| L'indicador LED mostra un error. | Internal fault; protection activated (e.g., over-temperature, over-voltagi). | Unplug the charger from both the wall and the vehicle. Wait a few minutes, then reconnect. If the error persists, contact customer support. |
7. Especificacions
Key technical specifications for the Bokman Portable Level 2 EV Charger:
| Característica | Detall |
|---|---|
| Marca | bokman |
| Número de model | BKL24025 |
| Entrada Voltage | 240 Volts (Level 2), 120 Volts (Level 1 with adapter) |
| Vol. De sortidatage | 240 Volts |
| Valoració actual | 40 Amps (Adjustable) |
| Longitud del cable | 25 peus |
| Tipus de connector | SAE-J1772 |
| Tipus d'endoll | NEMA 14-50 (with NEMA 5-15 adapter) |
| Pes de l'article | 13.79 lliures |
| Dimensions del paquet | 14.53 x 13.27 x 5.67 polzades |
| Classificació impermeable | IP65 |
| Temperatura de funcionament | -22 °F a 130 °F (-30 °C a 55 °C) |
8. Informació de la garantia
Specific warranty details for the Bokman Portable Level 2 EV Charger are not provided in the product information. Please refer to the warranty card included with your product or contact Bokman customer support for detailed warranty terms and conditions.
9. Atenció al client
For technical assistance, product inquiries, or warranty claims, please contact Bokman customer support through the following channels:
- Fabricant Weblloc: Visit the official Bokman weblloc web per a recursos de suport i informació de contacte.
- Botiga Amazon: You can also reach out through the Bokman store on Amazon: Visit the Bokman Store
- Correu electrònic/Telèfon: Refer to the contact details provided in the product packaging or on the official weblloc.