1. Uvod
The Cooler Master 240 Core II White CPU Liquid Cooler is an all-in-one (AIO) liquid cooling solution designed to provide efficient thermal management for your CPU. It features a G9R dual-chamber pump, customizable aRGB lighting, and is engineered for quiet operation and easy installation. This manual provides detailed instructions for the proper installation, operation, and maintenance of your liquid cooler.

Image 1.1: Cooler Master 240 Core II White CPU Liquid Cooler with RGB fans and pump head.
Video 1.1: Overview of the Cooler Master MasterLiquid Core II features and design.
2. Sigurnosne informacije
Please read and understand all safety instructions before installing or operating this product. Failure to follow these instructions may result in damage to the product, personal injury, or voiding of your warranty.
- Prije instalacije provjerite je li vaš računar isključen iz napajanja i iskopčan iz zidne utičnice.
- Pažljivo rukujte komponentama kako biste izbjegli oštećenja.
- Wear anti-static gloves or use an anti-static wrist strap to prevent electrostatic discharge (ESD) damage to sensitive components.
- Do not open the liquid cooler's pump or radiator. It is a sealed, maintenance-free unit.
- Držite proizvod dalje od tečnosti i vlage.
- Ensure all cables are properly connected and routed to avoid interference with moving parts (e.g., fans).
3. Podešavanje i instalacija
3.1. Sadržaj paketa
Provjerite da li su sve komponente prisutne u paketu:
- Cooler Master 240 Core II AIO Liquid Cooler (Radiator, Pump, Fans, Tubing)
- Mounting Hardware for AMD (AM5/AM4) and Intel (LGA 1851/1700) sockets
- CryoFuze termalna pasta
- Tube Clips
- Uputstvo za upotrebu
Video 3.1: Unboxing the MasterLiquid 240 Core II, showing included components and mounting hardware.
3.2. Koraci prije instalacije
- Pripremite svoju matičnu ploču: Install your CPU, RAM, and M.2 SSDs onto the motherboard before installing the cooler. Refer to your motherboard's manual for specific instructions.
- Nanesite termalnu pastu: Apply a small amount of the included CryoFuze thermal paste to the center of your CPU's integrated heat spreader (IHS). A pea-sized dot is generally sufficient. Do not spread it manually; the pressure from the cold plate will distribute it evenly.
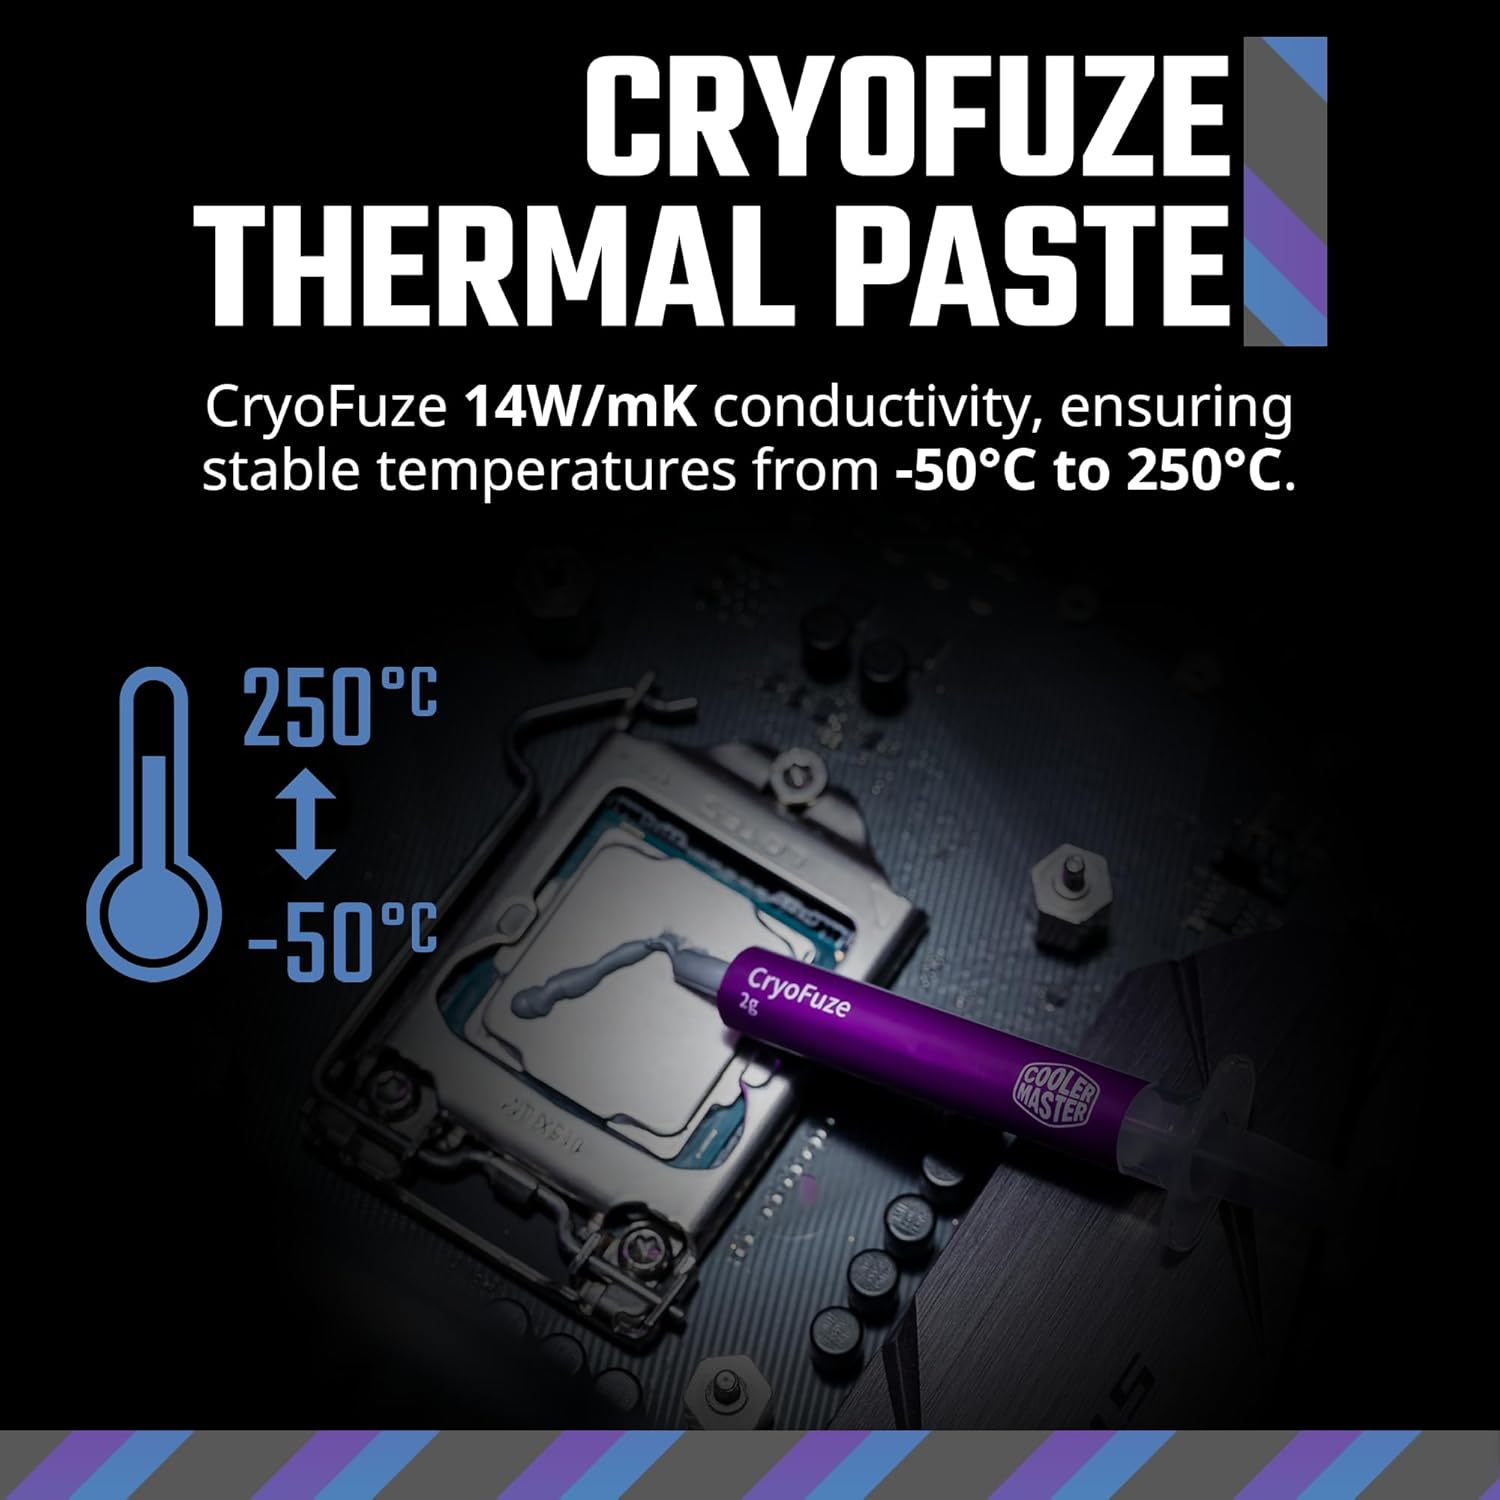
Image 3.2: Illustration of applying CryoFuze thermal paste to the CPU.
3.3. Ugradnja radijatora i ventilatora
The 240mm radiator is designed to fit most standard PC cases that support 240mm AIOs. It is typically mounted at the top or front of the case.
- Pričvršćivanje ventilatora na radijator: Secure the two 120mm fans to the radiator using the provided screws. Ensure the fan airflow direction is appropriate for your case's cooling strategy (e.g., exhaust out the top, intake from the front).
- Montirajte radijator u kućište: Position the radiator assembly in your desired mounting location (e.g., top panel) and secure it with the appropriate screws.

Image 3.3: Diagram showing the compact fin array and dimensions of the radiator (277 x 119.2 x 27.2 mm).
3.4. Pump/Cold Plate Installation
The pump/cold plate assembly connects directly to your CPU.
- Select Mounting Brackets: Choose the correct mounting brackets for your CPU socket (AMD AM5/AM4 or Intel LGA 1851/1700).
- Attach Brackets to Pump: Secure the chosen brackets to the pump head.
- Install Pump onto CPU: Carefully align the pump/cold plate assembly with the CPU and secure it using the appropriate screws and backplate (if required for your socket). Ensure even pressure is applied.

Image 3.4: Visual guide for selecting and installing mounting brackets for AMD AM5/AM4 and Intel LGA 1851/1700 platforms.
3.5. Kabelske veze
Proper cable management is crucial for aesthetics and airflow.
- Priključci ventilatora: Connect the fan cables to the CPU_FAN header or a dedicated fan controller on your motherboard. The fans feature a daisy-chain design for simplified connection.
- Priključak pumpe: Connect the pump power cable to the AIO_PUMP or CPU_OPT header on your motherboard.
- ARGB rasvjeta: Connect the aRGB cables from the fans and pump to a compatible 3-pin 5V aRGB header on your motherboard or an aRGB controller.
- Tube Clips: Use the included tube clips to manage the tubing for a cleaner look and to prevent interference.

Slika 3.5: Primjerample of using tube clips to secure the liquid cooler's tubing.
Video 3.6: A build video demonstrating the installation of various PC components, including the Cooler Master AIO liquid cooler.
4. Operacija
4.1. Početno uključivanje
After completing the installation, double-check all connections before powering on your system. Upon first boot, monitor your CPU temperatures to ensure the cooler is functioning correctly.
4.2. ARGB kontrola rasvjete
The Cooler Master 240 Core II features customizable Addressable RGB (aRGB) lighting on both the fans and the pump head's infinity mirror design. Control is typically managed through your motherboard's aRGB software (e.g., ASUS Aura Sync, GIGABYTE RGB Fusion, MSI Mystic Light Sync, ASRock Polychrome RGB) or a dedicated aRGB controller (not included).

Image 4.1: Close-up of the pump head showcasing the infinity mirror design with vibrant ARGB lighting.

Image 4.2: The frosted fan blades diffusing ARGB lighting for a dynamic glow.
4.3. Kontrola brzine ventilatora
The fans are Dynamic PWM (Pulse Width Modulation) controlled, allowing for adjustable fan speeds from 650 to 1,750 RPM. This balance between noise and airflow can be configured via your motherboard's BIOS settings or fan control software.

Image 4.3: Specifications of the MF120 Lite fan, including speed (1750 RPM), noise level (30 dBA max), airflow (70.5 CFM), and air pressure (2.0 mmH2O).

Image 4.4: Visual representation of the dynamic PWM fan speed range from 650 to 1,750 RPM.
5. Održavanje
The Cooler Master 240 Core II is designed to be a maintenance-free closed-loop liquid cooler. No refilling of coolant is required.
- Čišćenje prašine: Periodically clean the radiator fins and fan blades to prevent dust buildup, which can impede airflow and reduce cooling performance. Use compressed air or a soft brush.
- Pregledajte cijevi: Occasionally check the tubing for any signs of wear, kinks, or leaks. While rare, early detection can prevent potential issues.
- Monitor temperature: Regularly monitor your CPU temperatures using system monitoring software to ensure optimal performance.
6. Otkrivanje problema
6.1. Visoke temperature procesora
- Provjerite priključak pumpe: Ensure the pump is correctly connected to the AIO_PUMP or CPU_OPT header and receiving power.
- Verify Cold Plate Contact: Confirm that the cold plate is making full and even contact with the CPU's IHS. Re-seat the pump if necessary, ensuring thermal paste is properly applied.
- Funkcionalnost ventilatora: Check if the fans are spinning. Ensure they are connected correctly and configured to an appropriate speed in BIOS/software.
- Protok zraka u radijatoru: Ensure the radiator fins are not clogged with dust. Clean if necessary.
6.2. ARGB osvjetljenje ne radi
- Check ARGB Connections: Ensure all aRGB cables are securely connected to a compatible 3-pin 5V aRGB header on your motherboard or controller.
- Konfiguracija softvera: Verify that your motherboard's aRGB software is installed and configured correctly.
- Ciklus napajanja: Sometimes a full system power cycle can resolve minor lighting glitches.
6.3. Neobični zvukovi
- Buka ventilatora: Check for any cables interfering with fan blades. Ensure fans are securely mounted and not vibrating against the case.
- Buka pumpe: A slight gurgling sound upon initial startup is normal as air bubbles clear. If persistent or loud, ensure the radiator is mounted higher than the pump to allow air to collect in the radiator.
7. Specifikacije
| Feature | Detalj |
|---|---|
| Broj modela | MLW-D24M-A18PA-RW |
| Dimenzije proizvoda | 277 x 119.2 x 27.2 mm (10.9 x 4.7 x 1.1 mm) |
| Brand | Cooler Master |
| Metoda hlađenja | Fan, Water |
| Kompatibilni uređaji | CPU, Desktop (AMD Ryzen 7 AM5|4, Intel Ultra 7 LGA 1851|1700) |
| Nivo buke | 30 decibela (maks.) |
| Materijal | Aluminij, Bakar, Plastika |
| Maksimalna brzina rotacije | 1750 RPM |
| Kapacitet protoka zraka | 70.5 kubnih stopa u minuti (CFM) |
| Vrsta konektora za napajanje | 3-Pin (Fans), Specific Pump Connector (refer to motherboard manual) |
| Termalna pasta | CryoFuze (14W/mK conductivity) |
8. Jamstvo i podrška
8.1. Informacije o garanciji
Cooler Master products come with a limited warranty. The specific warranty period and terms may vary by region and product type. Please retain your proof of purchase for warranty claims. For detailed warranty information, please visit the official Cooler Master website.
8.2. Tehnička podrška
If you encounter any issues or have questions not covered in this manual, please contact Cooler Master technical support. You can find support resources, FAQs, and contact information on the official Cooler Master webstranica:
Cooler Master Official Webstranica: www.coolermaster.com
For additional product information and community support, you may also visit the Cooler Master Store on Amazon: Cooler Master Store