
1. Product Overview
The N E X SPB4K is a high-performance dual channel power amplifier designed for professional audio applications. It delivers 2 x 2000 watts per channel at a 2 ohms load, making it suitable for large venues, live performances, and sound reinforcement systems. The amplifier features a robust rack-mountable chassis with efficient cooling and comprehensive protection circuits to ensure reliable operation.
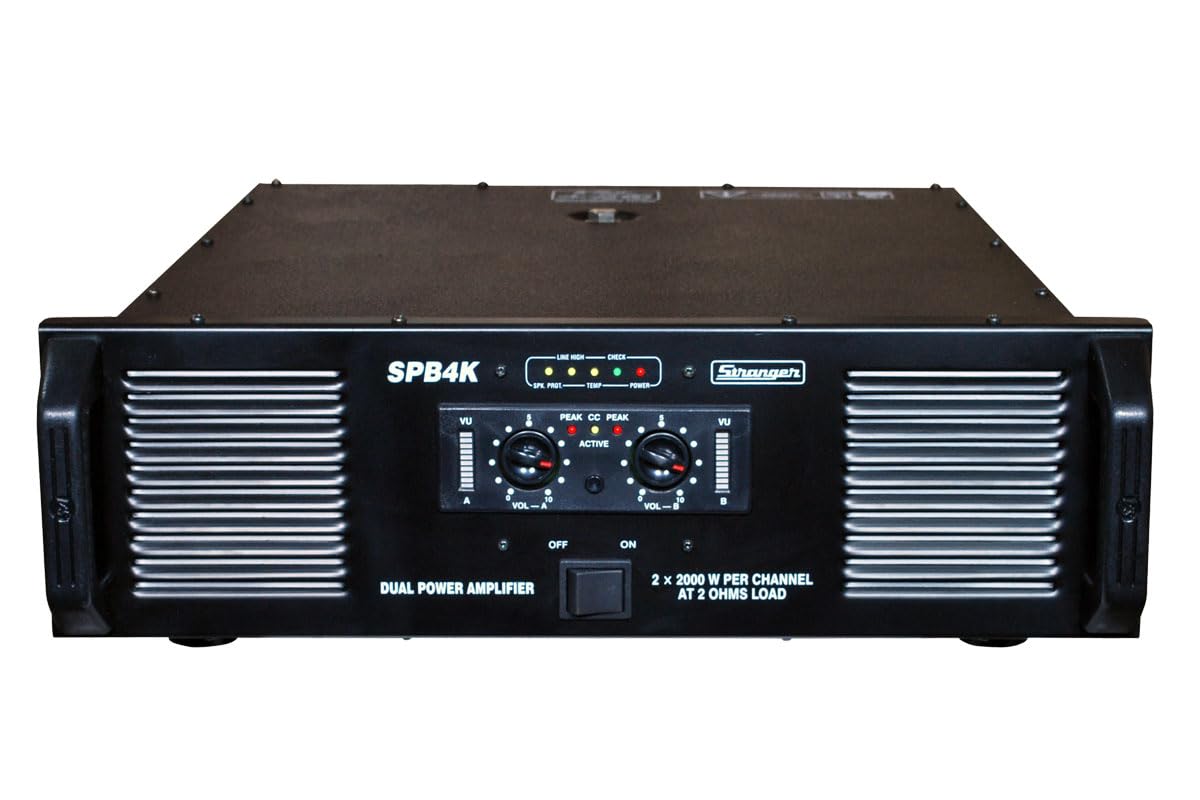
Image 1.1: Front panel of the N E X SPB4K Dual Channel Power Amplifier, showing dual VU meters, volume controls for Channel A and B, and various indicator LEDs.
Key features include:
- Dual Power Amplifier: Delivers 2 x 2000W per channel at 2 ohms load.
- Powerful Output: Ideal for demanding audio setups requiring high power.
- Intuitive Controls: Individual volume knobs for each channel (VOL-A and VOL-B), VU meters, and Peak/CC indicator LEDs for precise monitoring.
- Protection Features: Equipped with speaker protection, temperature monitoring, and power status indicators to safeguard equipment.
- Rack-Mountable Design: Sturdy chassis with ventilation grilles for efficient heat dissipation during extended use.
2. Package Contents
Please check the box for the following items:
- N E X SPB4K Dual Channel Power Amplifier (Solid Body)
- Power Cable (not explicitly mentioned but implied for an amplifier)
- User Manual (this document)
Note: If any items are missing or damaged, please contact your dealer or N E X customer support immediately.
3. Safety Instructions
Read all instructions carefully before operating the amplifier. Keep this manual for future reference.
- Power Source: Connect the amplifier only to the type of power supply indicated on the unit.
- Grounding: Ensure the amplifier is properly grounded to prevent electric shock.
- Ventilation: Do not block ventilation openings. Ensure adequate airflow around the unit to prevent overheating. Maintain at least 10 cm (4 inches) of clear space around the amplifier.
- Water and Moisture: Do not expose the amplifier to rain, moisture, or excessive humidity. Do not place objects filled with liquids on the unit.
- Heat: Keep the amplifier away from heat sources such as radiators, heat registers, stoves, or other heat-producing appliances.
- Cleaning: Unplug the unit from the power outlet before cleaning. Use a dry cloth only.
- Servicing: Do not attempt to service this product yourself. Refer all servicing to qualified service personnel.
- Overload: Do not overload power outlets or extension cords, as this can result in a risk of fire or electric shock.
- Speaker Connections: Ensure all speaker connections are secure and correctly polarized before powering on the amplifier.
4. Setup
4.1 Unpacking
Carefully remove the amplifier from its packaging. Retain the packaging materials for future transport or storage.
4.2 Placement
The SPB4K amplifier is designed for rack-mounting. Install it in a standard 19-inch equipment rack. Ensure sufficient space for ventilation, especially around the side ventilation grilles. Avoid placing the unit in direct sunlight or near heat sources.
4.3 Connections
Before making any connections, ensure the amplifier is powered off and unplugged from the mains supply.
- Input Connections: Connect your audio source (mixer, preamplifier, etc.) to the amplifier's input jacks. The SPB4K supports both balanced and unbalanced inputs. Use appropriate cables (XLR for balanced, 1/4" TS for unbalanced).
- Output Connections: Connect your loudspeakers to the amplifier's output terminals. Ensure correct polarity (+ to + and - to -) for each channel. Verify that the impedance of your speakers matches the amplifier's specifications (2 ohms minimum).
- Power Connection: Connect the supplied power cable to the amplifier's AC inlet and then to a suitable grounded power outlet.
5. Operating Instructions
5.1 Powering On/Off
- Ensure all connections are secure and volume controls are set to minimum.
- Press the power toggle switch on the front panel to turn on the amplifier. The Power indicator LED will illuminate.
- To power off, set volume controls to minimum and press the power toggle switch.
5.2 Controls and Indicators
- VOL-A / VOL-B Knobs: Adjust the output volume for Channel A and Channel B independently.
- VU Meters: Provide visual indication of the output level for each channel. Aim to keep levels within the optimal range, avoiding consistent peaking.
- Peak Indicator LEDs: Illuminate when the signal approaches clipping. Reduce input or output volume if these LEDs frequently light up.
- CC Indicator LEDs: (Clip/Compress) Indicate when the amplifier is operating near its maximum output or engaging protection circuits.
- Status Display LEDs:
- Line High: Indicates high input signal level.
- Speaker Protection: Illuminates when speaker protection is active.
- Temperature: Illuminates if the amplifier is overheating.
- Power: Indicates the unit is powered on.
Gradually increase the volume controls to the desired listening level. Monitor the VU meters and indicator LEDs to ensure proper operation and prevent clipping.
6. Maintenance
6.1 Cleaning
Unplug the amplifier before cleaning. Use a soft, dry cloth to wipe the exterior. Do not use liquid cleaners or aerosols, as they may damage the finish or internal components. Periodically clean the ventilation grilles to ensure unobstructed airflow.
6.2 Ventilation
Regularly check that the ventilation grilles on the sides of the unit are free from dust and debris. Proper ventilation is crucial for preventing overheating and ensuring the longevity of the amplifier.
6.3 Storage
If storing the amplifier for an extended period, disconnect it from power, clean it, and store it in a cool, dry place, preferably in its original packaging.
7. Troubleshooting
| Problem | Possible Cause | Solution |
|---|---|---|
| No power | Power cable disconnected; Power outlet faulty; Amplifier fuse blown. | Check power cable connection; Test power outlet; Contact service personnel for fuse replacement. |
| No sound output | Input cables disconnected/faulty; Speaker cables disconnected/faulty; Volume controls set to minimum; Mute function active (if applicable); Speaker protection active. | Check all audio input and output connections; Increase volume; Check for active protection LEDs and resolve underlying issue (e.g., overheating, short circuit). |
| Distorted sound | Input signal too high (clipping); Speaker impedance mismatch; Faulty cables/speakers. | Reduce input or output volume; Verify speaker impedance; Check cables and speakers for damage. |
| Amplifier overheats (Temperature LED on) | Insufficient ventilation; Excessive load; Prolonged high-power operation. | Ensure clear ventilation paths; Reduce load or volume; Allow amplifier to cool down. |
If the problem persists after attempting these solutions, please contact N E X customer support. Do not attempt to repair the unit yourself.
8. Specifications
| Brand | N E X |
| Model Name | SPB4K |
| Type | Dual Channel Power Amplifier |
| Output Power | 2 x 2000W RMS @ 2 Ohms (per channel) |
| Inputs | Balanced & Unbalanced |
| Cooling | Dual 4" Fan Cooling |
| Indicators | LED VU Meter, Peak/CC, Line High, Speaker Protection, Temperature, Power |
| Protection Circuit | Multi-Protection Circuit |
| Colour | Black |
| Material | Aluminium, Steel |
| Item Weight | 10 Kilograms |
| Manufacturer | N E X |
9. Warranty and Support
This N E X SPB4K Dual Channel Power Amplifier is designed for durability and performance. N E X provides spare part availability for 7 years from the date of purchase within the EU.
For technical support, service, or warranty inquiries, please contact your authorized N E X dealer or refer to the contact information provided by NX AUDIO.
Packer Contact Information: NX AUDIO
Please retain your proof of purchase for warranty claims.

