
1. Safety Instructions
Please read all instructions carefully before operating this appliance and retain for future reference. Failure to follow these instructions may result in electric shock, fire, or serious injury.
- Ensure the power supply matches the voltage specified on the rating label.
- Always plug the unit into a grounded electrical outlet. Do not use extension cords or multi-sockets.
- Do not operate the unit if the power cord or plug is damaged. Contact qualified service personnel for repair.
- Keep the air inlet and outlet clear of obstructions to ensure proper airflow.
- Do not insert fingers or objects into the air inlet/outlet.
- Unplug the appliance before cleaning, maintenance, or moving.
- This appliance is not intended for use by persons (including children) with reduced physical, sensory, or mental capabilities, or lack of experience and knowledge, unless they have been given supervision or instruction concerning use of the appliance by a person responsible for their safety.
- Do not use the appliance in wet environments such as bathrooms or laundry rooms.
- Place the unit on a flat, stable surface.
- Do not spray water directly onto the unit.
2. Product Overview
The SereneLife Portable Air Conditioner is a versatile 3-in-1 unit designed for cooling, dehumidifying, and fan operation. It features a compact design with casters for easy mobility and a digital control panel with remote access.
2.1 Package Contents
- SereneLife Portable Air Conditioner Unit
- Remote Control
- Window Mounting Exhaust Kit (Exhaust Hose, Window Slide Kit, Adapter)
2.2 Unit Components
Familiarize yourself with the main parts of your air conditioner:
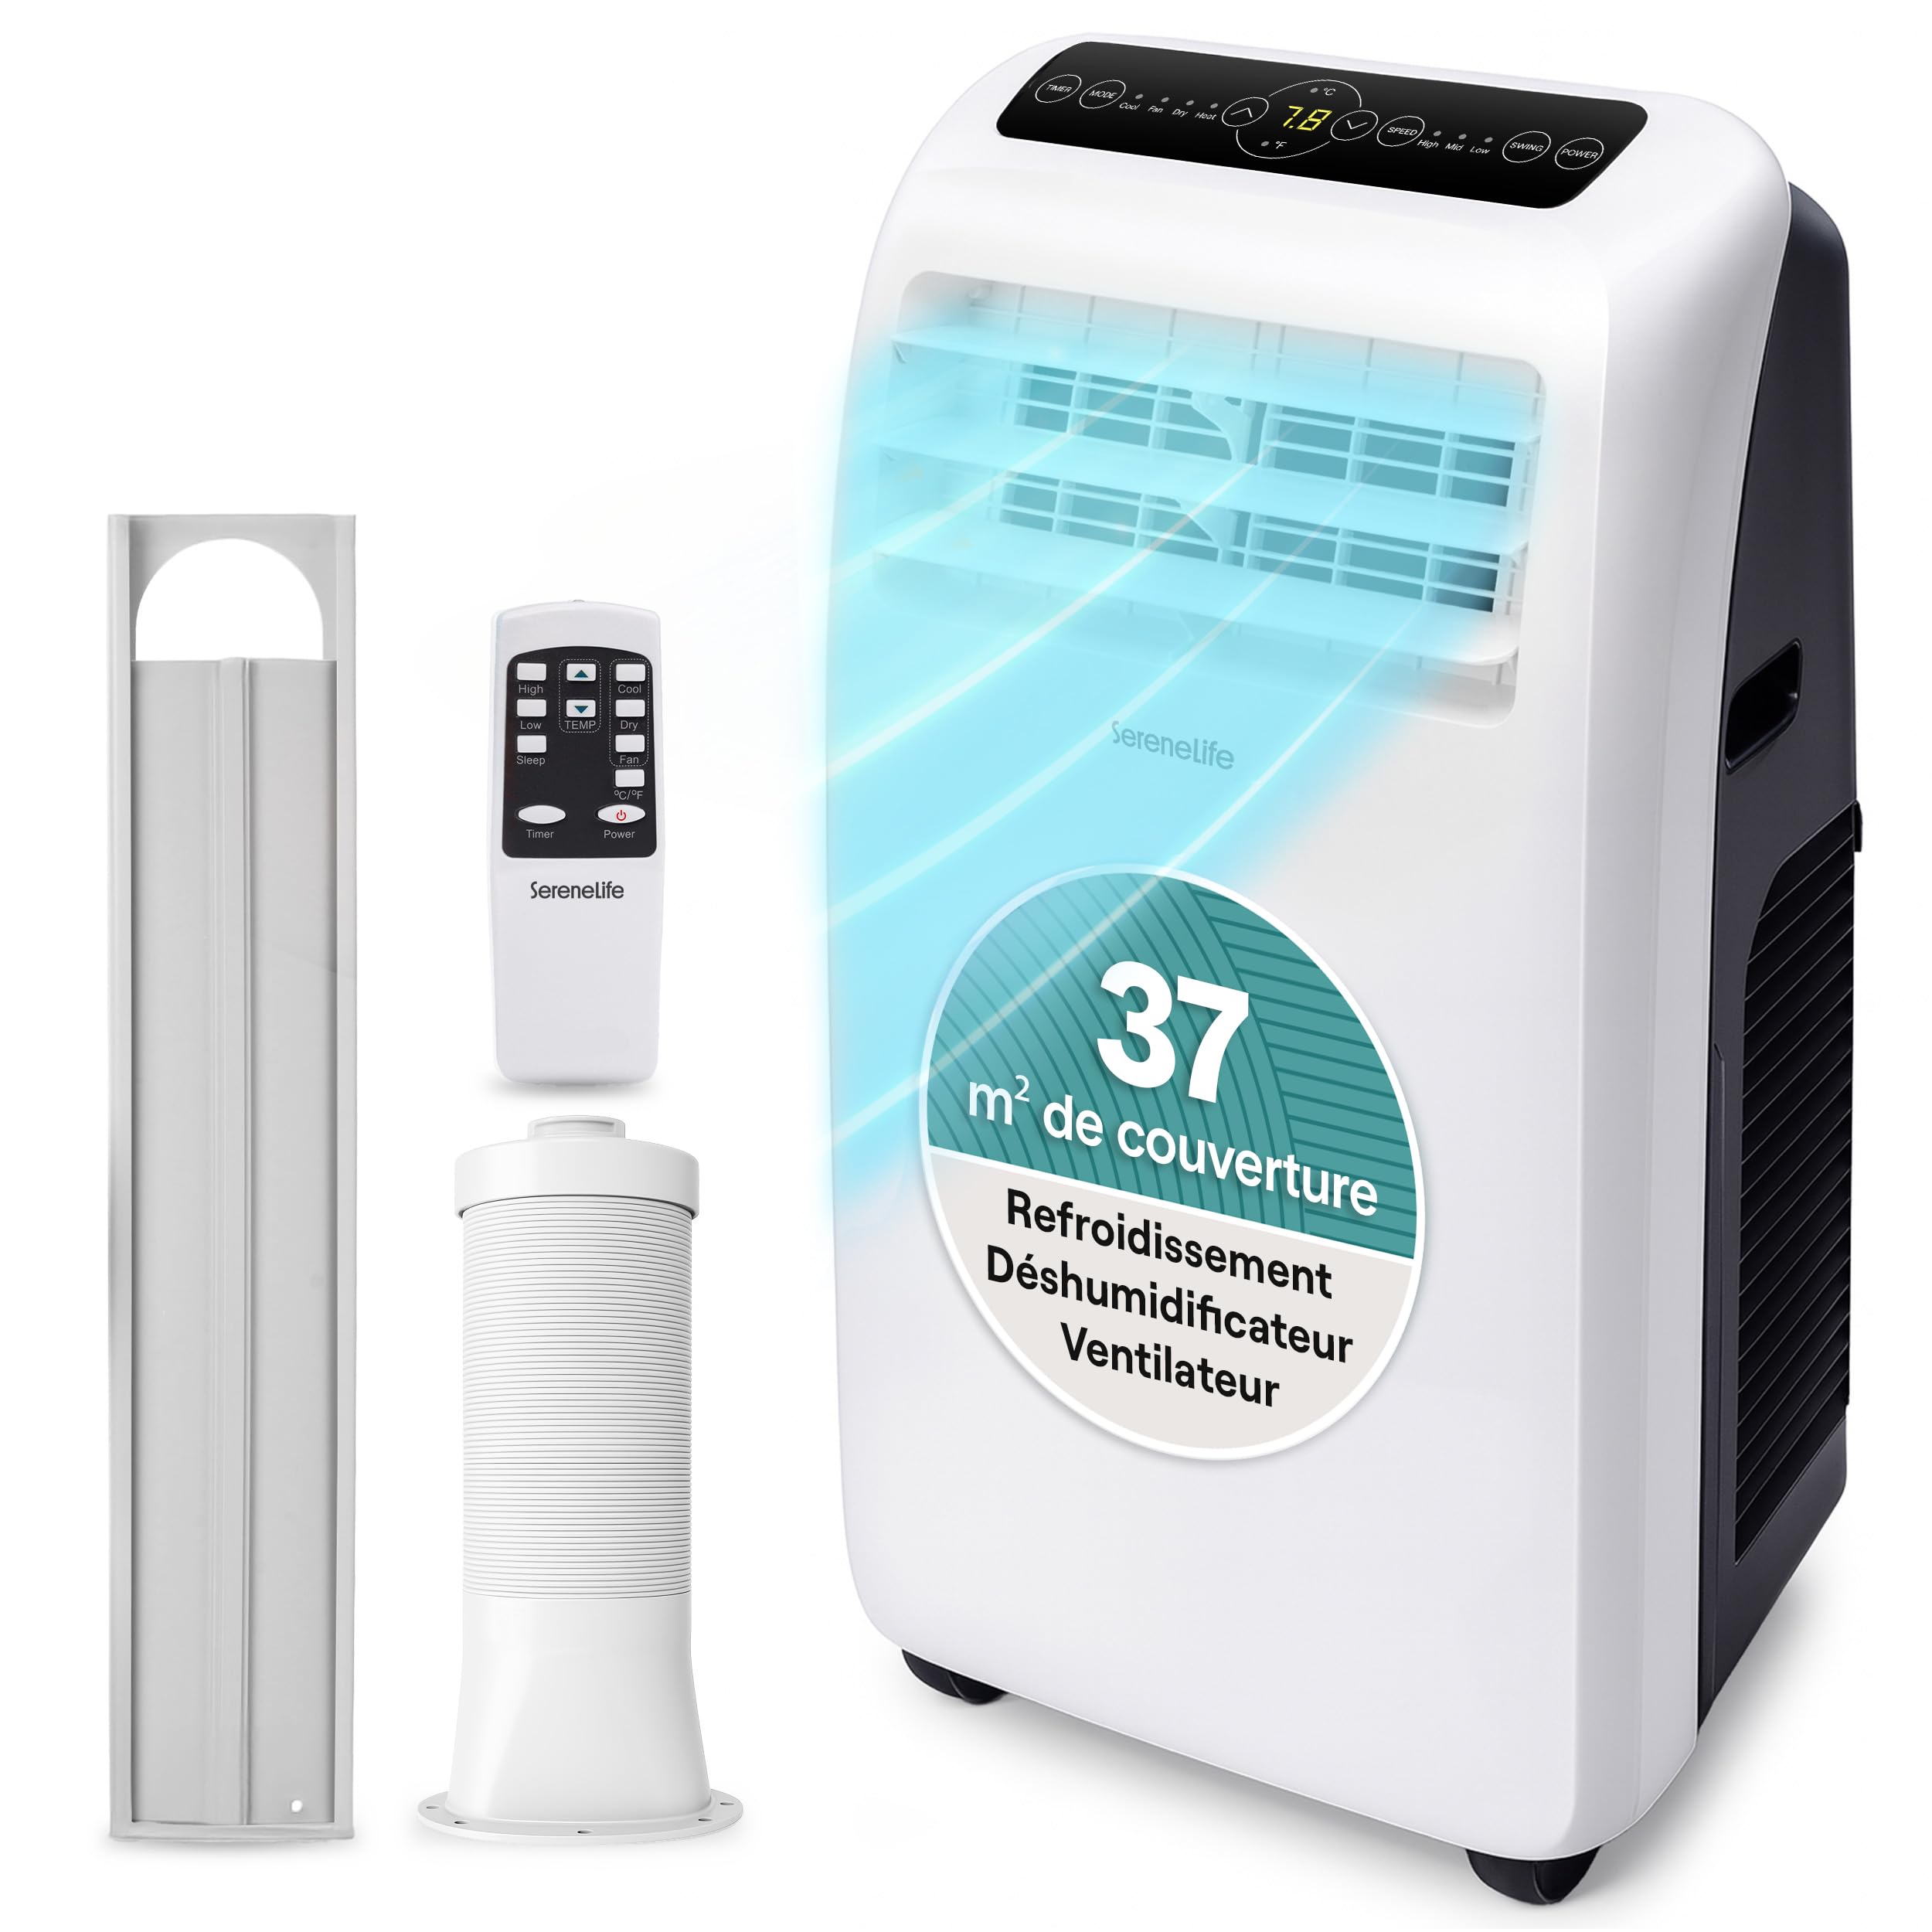
Figure 1: Front view of the SereneLife Portable Air Conditioner, showing the air outlet and control panel.
- Control Panel: Located on the top of the unit for manual operation.
- Air Outlet: Adjustable louvers for directing airflow.
- Air Inlet (with Filter): Located on the rear/side, where air is drawn in.
- Exhaust Air Outlet: Connection point for the exhaust hose.
- Drainage Port: For continuous drainage or manual draining.
- Casters: Wheels at the base for easy movement.
3. Setup and Installation
Proper installation is crucial for efficient operation. Follow these steps to set up your portable air conditioner.
3.1 Unpacking
- Carefully remove the unit from its packaging.
- Remove all packing materials and ensure no components are missing.
- Allow the unit to stand upright for at least 2-4 hours before use if it was not stored upright. This allows the refrigerant to settle.
3.2 Window Kit Installation
The window exhaust kit is essential for expelling hot air outside, ensuring effective cooling.

Figure 2: Visual guide for installing the window exhaust kit, showing hose connection to the unit and window panel.
- Assemble the Exhaust Hose: Attach the hose adapter to one end of the exhaust hose and the window exhaust adapter to the other end.
- Install Window Slide Kit: Adjust the window slide kit to fit your window opening. Secure it in place.
- Connect Exhaust Hose to Window Kit: Insert the window exhaust adapter into the opening of the window slide kit.
- Connect Exhaust Hose to Unit: Attach the hose adapter to the exhaust air outlet on the back of the air conditioner unit.
- Ensure all connections are secure to prevent hot air from re-entering the room.
3.3 Drainage Setup
For dehumidifier mode or continuous use in cooling mode, you may need to set up drainage.
- Manual Drainage: When the internal water tank is full, the unit will stop operating and display an indicator. Carefully move the unit to a suitable drain area, remove the drain plug, and allow water to empty.
- Continuous Drainage: For prolonged use, connect a drain hose (not included) to the continuous drainage port and direct it to a floor drain or bucket. Ensure the hose is sloped downwards for proper flow.
4. Operating Instructions
Your SereneLife Portable Air Conditioner offers multiple modes and settings for optimal comfort.
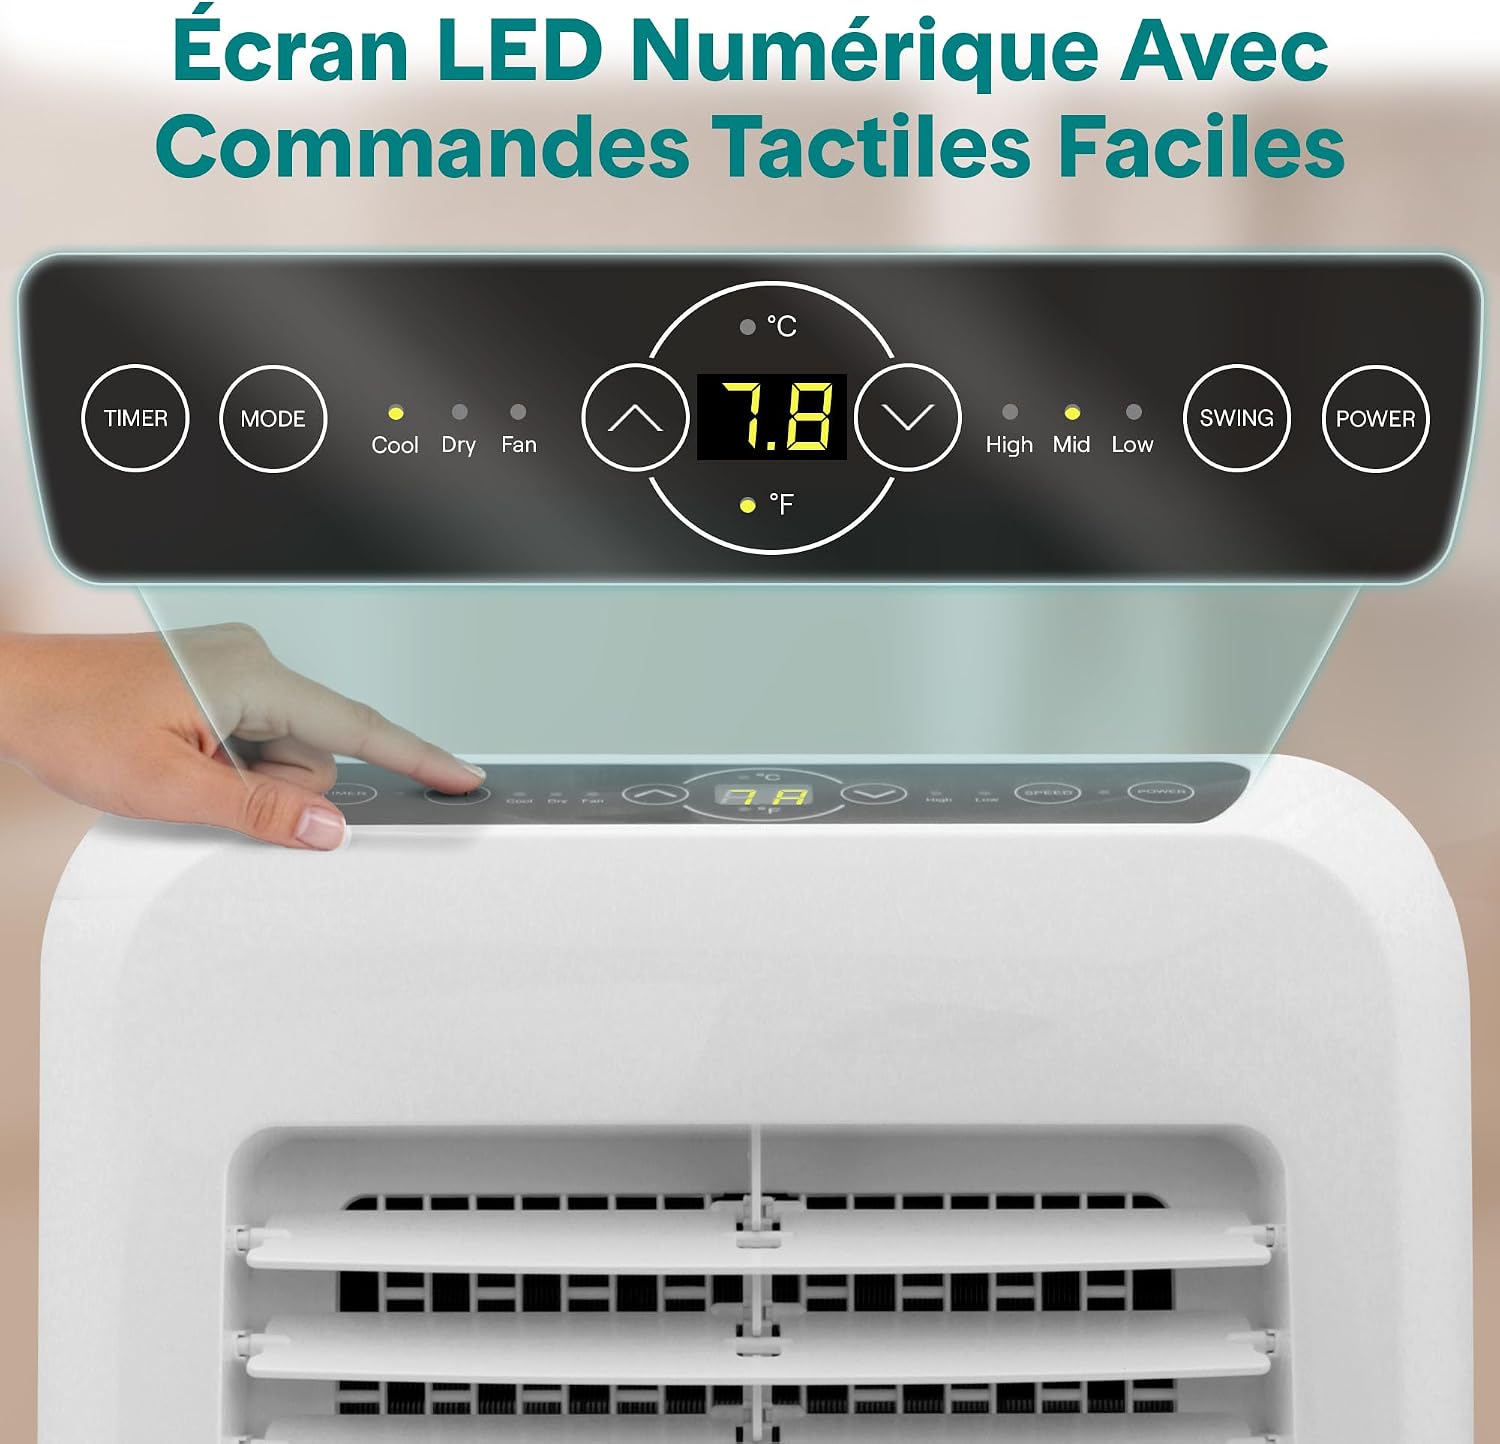
Figure 3: Close-up of the digital LED control panel with touch buttons for various functions.
4.1 Control Panel and Remote Control
The unit can be operated via the touch control panel on top or the included remote control. The remote control offers additional functions like unit selection (Celsius/Fahrenheit) and Sleep mode.
4.2 Basic Functions
- Power On/Off: Press the POWER button to turn the unit on or off.
- Mode Selection: Press the MODE button to cycle through Cooling, Dehumidifier, and Fan modes.
- Temperature Adjustment: In Cooling mode, use the UP and DOWN arrows to set the desired temperature (16°C - 30°C / 61°F - 86°F).
- Fan Speed: Press the FAN SPEED button to select Low, Medium, or High fan speed. (Not available in Dehumidifier mode).
- Timer Function: Press the TIMER button to set an auto-on or auto-off time (1-24 hours). Use the UP/DOWN arrows to adjust the time.
- Swing Function: Press the SWING button to activate or deactivate the automatic oscillation of the air louvers.
4.3 Operating Modes

Figure 4: Illustration of the 3-in-1 comfort modes: Cooling, Fan, and Dehumidification.
- Cooling Mode: Provides powerful cooling for rooms up to 51 square meters. Set your desired temperature and fan speed. Ensure the exhaust hose is properly installed.
- Dehumidifier Mode: Reduces humidity levels in the room. The fan speed is fixed to low in this mode. Continuous drainage is recommended for extended use.
- Fan Mode: Circulates air without cooling. You can select different fan speeds. No exhaust hose is required in this mode.
4.4 Special Features
- Sleep Mode: (Accessible via remote control) In cooling mode, activates a quiet operation and gradually increases the set temperature by 1°C (2°F) after 30 minutes, and another 1°C (2°F) after another 30 minutes, maintaining it for 7 hours before returning to the original setting.
- Portability: The unit is equipped with casters for easy movement between rooms.

Figure 5: The unit features casters and an integrated handle for easy movement.
5. Maintenance
Regular maintenance ensures optimal performance and extends the lifespan of your air conditioner. Always unplug the unit before performing any maintenance.
5.1 Cleaning the Air Filter
The air filter should be cleaned every two weeks or more frequently depending on usage and air quality.
- Unplug the air conditioner from the power outlet.
- Locate and remove the air filter from the back or side of the unit.
- Wash the filter under running water (preferably warm, not hot) or use a vacuum cleaner to remove dust.
- Allow the filter to dry completely before reinstalling it. Do not expose to direct sunlight.
- Reinstall the dry filter into the unit.
5.2 Draining Water
The unit will accumulate condensed water during cooling and dehumidifying operations.
- Manual Drainage: When the internal water tank is full, the unit will stop and indicate a full tank. Turn off the unit, unplug it, and carefully move it to a drain area. Remove the drain plug from the bottom rear of the unit and allow all water to drain. Replace the plug firmly.
- Continuous Drainage: If using continuous drainage, ensure the drain hose is not kinked or blocked and that water flows freely to the drain.
5.3 Cleaning the Exterior
- Wipe the surface of the unit with a soft, damp cloth.
- Do not use harsh chemicals, abrasive cleaners, or solvents, as these may damage the surface.
5.4 Storage
If the unit will not be used for an extended period:
- Drain all accumulated water from the unit.
- Clean the air filter and reinstall it.
- Run the unit in fan-only mode for a few hours to dry the interior.
- Unplug the power cord and coil it neatly.
- Store the unit in a cool, dry place, away from direct sunlight and extreme temperatures.
6. Troubleshooting
Before contacting customer support, please refer to the following troubleshooting guide for common issues.
| Problem | Possible Cause | Solution |
|---|---|---|
| Unit does not turn on. | No power supply. Water tank is full. Timer function is active. | Check power cord and outlet. Drain the water tank. Deactivate the timer function. |
| Unit cools insufficiently. | Windows/doors open. Room too large. Air filter dirty. Exhaust hose blocked or disconnected. Temperature setting too high. | Close all windows and doors. Ensure unit is suitable for room size. Clean the air filter. Check and secure exhaust hose. Lower the set temperature. |
| Unit is noisy. | Unit not on a flat surface. Air filter dirty. | Place unit on a flat, stable surface. Clean the air filter. |
| Water leaks from unit. | Drain plug loose. Continuous drain hose kinked/blocked. | Ensure drain plug is firmly in place. Check drain hose for obstructions or kinks. |
| Remote control not working. | Batteries dead or incorrectly inserted. Obstruction between remote and unit. | Replace batteries, check polarity. Remove any obstructions. |
7. Specifications
Key technical details for the SereneLife Portable Air Conditioner Model FR-SLPAC12.5EU.
| Feature | Detail |
|---|---|
| Model Number | FR-SLPAC12.5EU |
| Cooling Capacity | 12000 BTU (ASHRAE) / 7000 BTU (SACC) |
| Power Consumption | 1150 W (Cooling) |
| Voltage | 230V |
| Noise Level | 56 dB |
| Air Flow | 290 m³/hour |
| Dehumidification Capacity | 1.8 liters/hour |
| Recommended Room Size | Up to 51 m² |
| Dimensions (D x W x H) | 80P x 50l x 55H cm |
| Weight | 21 kg |
| Control Method | Remote Control, Touch Panel |
| Refrigerant | R290 (or as specified on unit label) |
8. Warranty & Support
8.1 Warranty Information
This product comes with a limited warranty. For specific details regarding the warranty period and coverage, please refer to the warranty card included in your product packaging or contact SereneLife customer support. Keep your purchase receipt as proof of purchase.
8.2 Customer Support
If you encounter any issues not covered in this manual or require further assistance, please contact SereneLife customer support. You can typically find contact information on the SereneLife website or on your product packaging.
When contacting support, please have your model number (FR-SLPAC12.5EU) and purchase date ready.