
Introduction
Thank you for choosing the BIGASUO Spy Hidden Camera Pen TMY-10. This manual provides detailed instructions for the proper setup, operation, maintenance, and troubleshooting of your device. Please read this manual carefully before using the product to ensure optimal performance and longevity.
Product Overview
Package Contents
- BIGASUO Spy Hidden Camera Pen (TMY-10)
- 32GB Micro SD Card
- USB Charging/Data Cable
- User Manual
Component Identification
Familiarize yourself with the various parts of your camera pen:
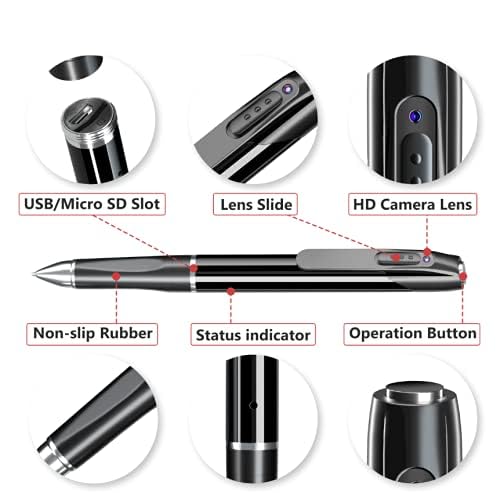
Image: Detailed diagram of the BIGASUO Spy Hidden Camera Pen TMY-10, highlighting components such as the USB/Micro SD Slot, Lens Slide, HD Camera Lens, Non-slip Rubber, Status Indicator, and Operation Button.

Image: "Key Analysis" diagram of the pen camera, showing the Switch, Camera, Camera Slider, Reset Button, TF Card Slot, and USB port. The signature pen rotary switch is also indicated.
- Operation Button: Used to power on/off and initiate recording.
- HD Camera Lens: Captures video footage.
- Lens Slide: Covers and uncovers the camera lens.
- Status Indicator: LED light indicating device status (e.g., charging, recording, standby).
- USB/Micro SD Slot: Port for charging, data transfer, and Micro SD card insertion.
- Non-slip Rubber: Provides a secure grip.
- Reset Button: Small button for factory reset (located near the TF card slot).
- Signature Pen Rotary Switch: Mechanism to extend/retract the pen tip for writing.
Setup
1. Charging the Device
Before first use, fully charge the camera pen. Connect the USB charging cable to the pen's USB port and the other end to a USB power adapter (not included) or a computer's USB port. The status indicator light will show the charging status. A full charge typically takes approximately 1.5 to 2 hours and provides up to 100 minutes of recording time.
2. Inserting the Micro SD Card
The device comes with a pre-installed 32GB Micro SD card. If you need to replace or reinsert it:
- Gently unscrew the upper part of the pen to reveal the USB/Micro SD slot.
- Insert the Micro SD card into the designated slot with the gold contacts facing down, until it clicks into place.
- Screw the upper part of the pen back on securely.
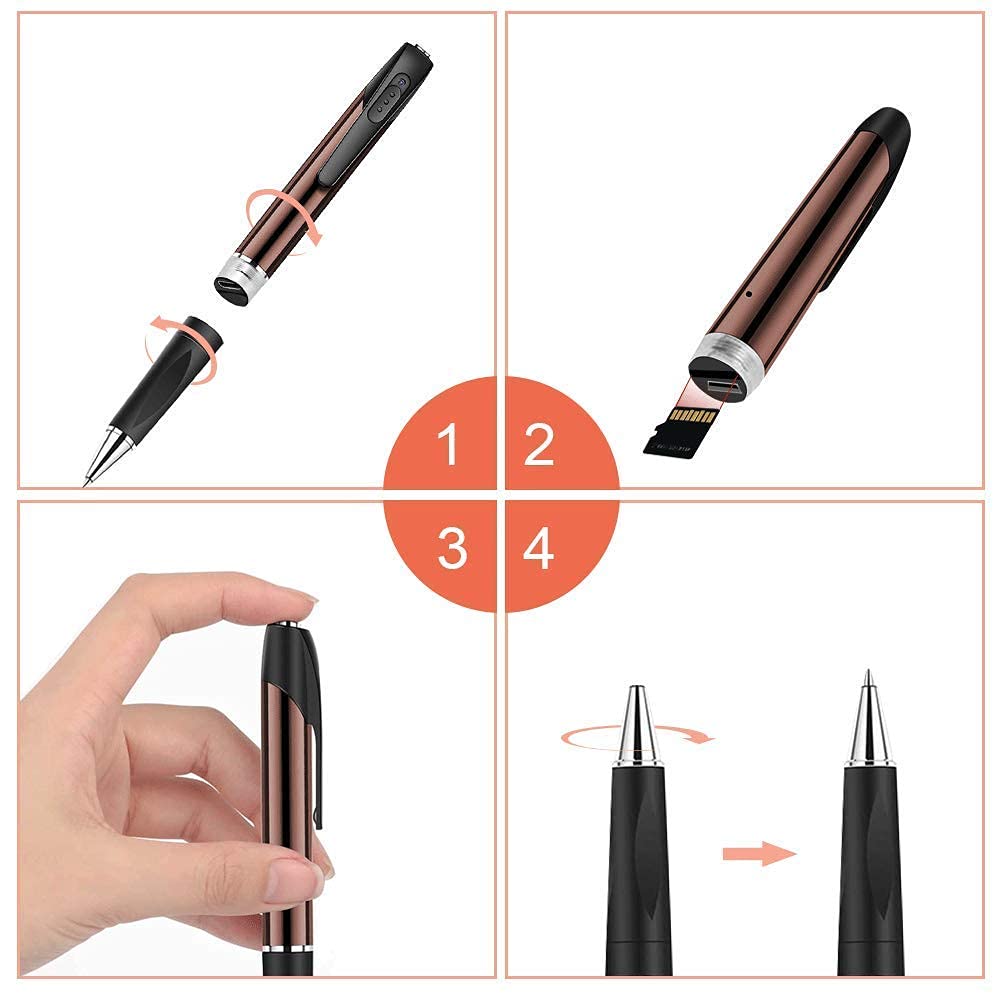
Image: Four-step visual guide showing the process of disassembling the pen, inserting the Micro SD card into the slot, reassembling the pen, and extending the pen tip.
Note: Ensure the Micro SD card is formatted to FAT32 for optimal compatibility. The device supports up to 32GB Micro SD cards.
3. Powering On/Off
- Power On: Press and hold the Operation Button for approximately 2-3 seconds until the status indicator light illuminates. The pen will enter standby mode.
- Power Off: Press and hold the Operation Button for approximately 5 seconds until the status indicator light turns off.
Operating Instructions
1. Video Recording (1080P HD)
To start recording video:
- Ensure the pen is powered on and in standby mode (status indicator light is steady).
- Slide the Lens Slide to expose the camera lens.
- Press the Operation Button once. The status indicator light will flash a few times and then turn off, indicating that video recording has started.
- To stop recording, press the Operation Button once again. The status indicator light will turn back on, indicating the device is in standby mode.

Image: A hand holding the BIGASUO Spy Hidden Camera Pen, with a thumb pressing the operation button located on the top side of the pen. A magnified inset shows the blue indicator light.
Loop Recording: The device supports loop recording. When the Micro SD card is full, the oldest video files will be automatically overwritten by new recordings. This ensures continuous recording without manual deletion.
2. Connecting to a Computer
To view or transfer recorded files:
- Ensure the pen camera is powered off.
- Connect the pen camera to your computer using the provided USB cable.
- Your computer will recognize the pen camera as a removable disk.
- Open the removable disk to access the recorded video files. You can copy, move, or delete files as needed.
- Safely eject the removable disk from your computer before disconnecting the pen camera.
Note on Wi-Fi Connectivity: While the product specifications mention "Wi-Fi Connectivity Technology," this model primarily functions as a standalone recording device. Wi-Fi functionality, if present, is typically for specific data transfer or remote viewing features not detailed in this manual. For standard operation, use the USB connection for file transfer.
Maintenance
- Cleaning: Use a soft, dry cloth to clean the pen's exterior. Do not use liquid cleaners or solvents. For the camera lens, use a specialized lens cleaning cloth.
- Battery Care: To prolong battery life, avoid fully discharging the battery frequently. Charge the device regularly, even if not in use, to maintain battery health. Store the device in a cool, dry place.
- Storage: When not in use for extended periods, store the pen camera in a dry environment away from direct sunlight and extreme temperatures.
- Data Management: Regularly back up important recordings to your computer and format the Micro SD card periodically to maintain optimal performance and prevent data corruption.
Troubleshooting
| Problem | Possible Cause | Solution |
|---|---|---|
| Device does not power on. | Low battery. | Charge the device fully. |
| Device does not record. | Micro SD card full or not inserted correctly; device not in recording mode. | Check Micro SD card insertion and free space. Ensure the device is in recording mode (indicator light off after initial flash). |
| Computer does not recognize the device. | Loose USB connection; device not powered off before connecting. | Ensure the USB cable is securely connected. Power off the pen camera before connecting it to the computer. Try a different USB port or cable. |
| Poor video quality. | Dirty lens; insufficient lighting. | Clean the camera lens. Ensure adequate lighting in the recording environment. |
| Device unresponsive. | System error. | Locate the Reset Button (refer to Component Identification) and gently press it with a thin object (e.g., a paperclip) to restart the device. |
Specifications
- Model: TMY-10
- Video Resolution: 1080P Full HD
- Storage: Supports up to 32GB Micro SD Card (32GB card included)
- Battery Life: Up to 100 minutes of continuous recording
- Dimensions (L x W x H): 11 x 11 x 2.5 Centimeters
- Weight: 200 Grams
- Color: Black
- Connectivity: USB 2.0 for data transfer and charging. (Note: "Wi-Fi Connectivity Technology" is listed in general product specifications but is not a primary operational feature for this model's recording function.)
Warranty and Support
Warranty Information
This BIGASUO product comes with a 1-month manufacturer warranty from the date of purchase. This warranty covers manufacturing defects. It does not cover damage caused by misuse, accidents, unauthorized modifications, or normal wear and tear. Please retain your proof of purchase for warranty claims.
Customer Support
For technical assistance, warranty inquiries, or any questions regarding your BIGASUO Spy Hidden Camera Pen TMY-10, please contact our customer support team:
- Phone: 9891407331
- Brand: BIGASUO
Please have your product model (TMY-10) and purchase details ready when contacting support.