
1. Introduction
This manual provides detailed instructions for the TFZSRFFAX RC7 RC-7 Air Conditioner Remote Control. This remote is designed to be a compatible replacement for various air conditioner models, including those originally using RC3, RC4, and RC5 remote controls from brands such as Electra, Airwell, Emailair, and Elco. Please read this manual carefully before use to ensure proper operation and to maximize the lifespan of your device.
2. Product Overview
The RC7 RC-7 remote control features a clear LCD display and an intuitive button layout for easy control of your air conditioning unit. Its ergonomic design ensures comfortable handling.

Image 2.1: Front view of the RC7 RC-7 remote control, showing the display and all buttons.
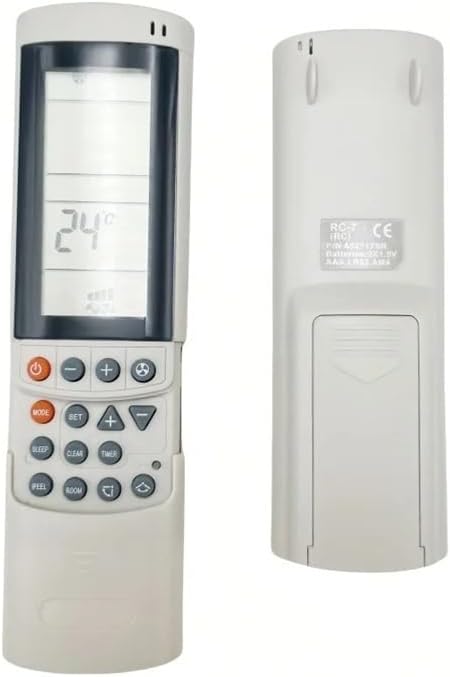
Image 2.2: Front and back views of the RC7 RC-7 remote control.

Image 2.3: Angled view of the RC7 RC-7 remote control.
3. Setup
3.1 Battery Installation
The remote control requires two AAA 1.5V batteries (LR03.AM4) for operation. Ensure correct polarity when inserting the batteries.
- Locate the battery compartment cover on the back of the remote control.
- Slide the cover downwards to open the compartment.
- Insert two AAA 1.5V batteries, matching the (+) and (-) terminals as indicated inside the compartment.
- Slide the battery compartment cover back into place until it clicks securely.

Image 3.1: Back view of the RC7 RC-7 remote control, showing the battery compartment.
Note: If the remote control is not used for an extended period, remove the batteries to prevent leakage and damage.
4. Operating Instructions
Familiarize yourself with the buttons and their functions to effectively control your air conditioner.
- Power (Orange Button): Turns the air conditioner ON or OFF.
- Mode: Cycles through operating modes (e.g., Cool, Heat, Fan, Dry, Auto).
- SET: Used to confirm settings or enter setup menus.
- Sleep: Activates or deactivates the sleep mode for quiet operation and energy saving.
- Clear: Clears current settings or cancels a function.
- Timer: Sets the ON/OFF timer for the air conditioner.
- I FEEL: Activates the 'I Feel' function, which senses the temperature at the remote's location for more precise comfort.
- ROOM: Displays the current room temperature.
- Temperature Up (+) / Down (-): Adjusts the desired temperature setting.
- Fan Speed (): Adjusts the fan speed (e.g., Low, Medium, High, Auto).
- Swing (): Controls the louver swing function for air distribution.
5. Maintenance
Proper maintenance ensures the longevity and optimal performance of your remote control.
- Cleaning: Wipe the remote control with a soft, dry cloth. Do not use liquid cleaners or abrasive materials.
- Battery Replacement: Replace batteries when the display becomes dim or the remote control stops responding. Always replace both batteries at the same time with new ones of the same type.
- Storage: Store the remote control in a cool, dry place away from direct sunlight and extreme temperatures.
6. Troubleshooting
If you encounter issues with your remote control, refer to the following common problems and solutions:
| Problem | Possible Cause | Solution |
|---|---|---|
| Remote control not responding. | Dead or incorrectly inserted batteries. | Replace batteries with new ones, ensuring correct polarity. |
| Air conditioner not responding to remote. | Obstruction between remote and AC unit; remote out of range; AC unit's IR receiver blocked. | Ensure clear line of sight to the AC unit. Move closer to the unit. Check if anything is blocking the AC unit's IR receiver. |
| Display is dim or blank. | Low battery power. | Replace batteries. |
| Remote control functions are erratic. | Interference; faulty batteries. | Move away from strong electromagnetic sources. Replace batteries. |
7. Specifications
- Brand: TFZSRFFAX
- Model: RC7 (RC-7)
- Battery Type: 2 x AAA 1.5V (LR03.AM4)
- Compatibility: Electra, Airwell, Emailair, Elco (replaces RC3, RC4, RC5)
- Part Number: TFZSRFFAX
- ASIN: B0H1B7CZNX
8. Warranty and Support
For any issues not covered in this manual or for warranty inquiries, please contact the seller or manufacturer directly. Keep your purchase receipt as proof of purchase.