
1. Introduction
Thank you for choosing the KOVVORA Sunbuck SK-790.4 Car Audio Amplifier. This 4-channel amplifier is designed to enhance your in-car audio experience with powerful and clear sound. This manual provides essential information for proper installation, operation, and maintenance of your amplifier. Please read it thoroughly before use to ensure optimal performance and safety.
2. Safety Information
Always observe the following safety precautions during installation and operation:
- Disconnect the vehicle's negative battery terminal before starting any electrical work to prevent short circuits.
- Ensure all wiring is properly insulated to prevent short circuits and electrical hazards.
- Mount the amplifier securely in a dry, well-ventilated area, away from direct sunlight, heat sources, and moisture.
- Use appropriate gauge wiring for power, ground, and speakers as recommended in the specifications.
- Do not operate the amplifier if it is damaged or malfunctioning. Seek professional assistance.
- Avoid placing objects on top of the amplifier that could obstruct ventilation.
- Keep the volume at a safe level to prevent hearing damage and maintain awareness of road conditions.
3. Product Features
The KOVVORA Sunbuck SK-790.4 amplifier offers a range of features designed for high-quality car audio:
- Robust Power and Construction: This Class A/B 4-channel amplifier delivers a maximum output of 7900W. Its aluminum alloy body features an external heat sink for enhanced durability and efficient thermal dissipation.
- Immersive Sound: Designed for car audio enthusiasts, it powers four vehicle doors with precise bass via a passive subwoofer and provides immersive stereo sound without distortion.
- Universal 12V Compatibility: Operates with a standard 12V DC voltage, compatible with most automotive electrical systems, offering direct and accessible installation to expand any existing audio system.
- High-Fidelity Audio Chip: Incorporates a high-fidelity chip that enhances sound quality details, resulting in a more refined and layered audio experience.
- Pure Copper Transformer: Equipped with a high-power pure copper transformer for continuous improvement in sound quality.

Image: Front view of the KOVVORA Sunbuck SK-790.4 Car Audio Amplifier, highlighting its 7900W power capability and slim design.

Image: Diagram illustrating 360-degree stereo surround sound within a car, indicating that four speakers can be connected to the amplifier.

Image: Internal view of the amplifier's circuit board, showcasing the high-power pure copper transformer and other components.
4. Package Contents
Please check the package for the following items:
- 1 x KOVVORA Sunbuck SK-790.4 Car Audio Amplifier
- 1 x User Manual (this document)
5. Setup and Installation
Proper installation is crucial for the performance and longevity of your amplifier. If you are unsure about any steps, consult a professional car audio installer.
5.1. General Wiring Overview

Image: Rear panel of the amplifier detailing power, ground, remote, and speaker output connections, as well as RCA inputs and various audio control knobs.
- Power Connection (B+): Connect a heavy-gauge power cable directly from the positive (+) terminal of your car battery to the amplifier's B+ terminal. Install an appropriate fuse (not included) within 18 inches (45 cm) of the battery.
- Ground Connection (GND): Connect a heavy-gauge ground cable from the amplifier's GND terminal to a clean, unpainted metal surface on the vehicle's chassis. Ensure a solid, low-resistance connection.
- Remote Turn-On (REMOTE): Connect a remote turn-on wire from your head unit's remote output to the amplifier's REMOTE terminal. This wire turns the amplifier on and off with your car's stereo.
- RCA Input: Connect RCA cables from your head unit's pre-amp outputs to the amplifier's RCA input jacks (IN CH1/CH2, IN CH3/CH4).
- Speaker Output: Connect your speakers to the amplifier's speaker output terminals (SPEAKER OUTPUT CH1, CH2, CH3, CH4). Observe correct polarity (+ to + and - to -). For bridging, refer to the diagram on the amplifier or consult a professional.
5.2. Step-by-Step Installation Process
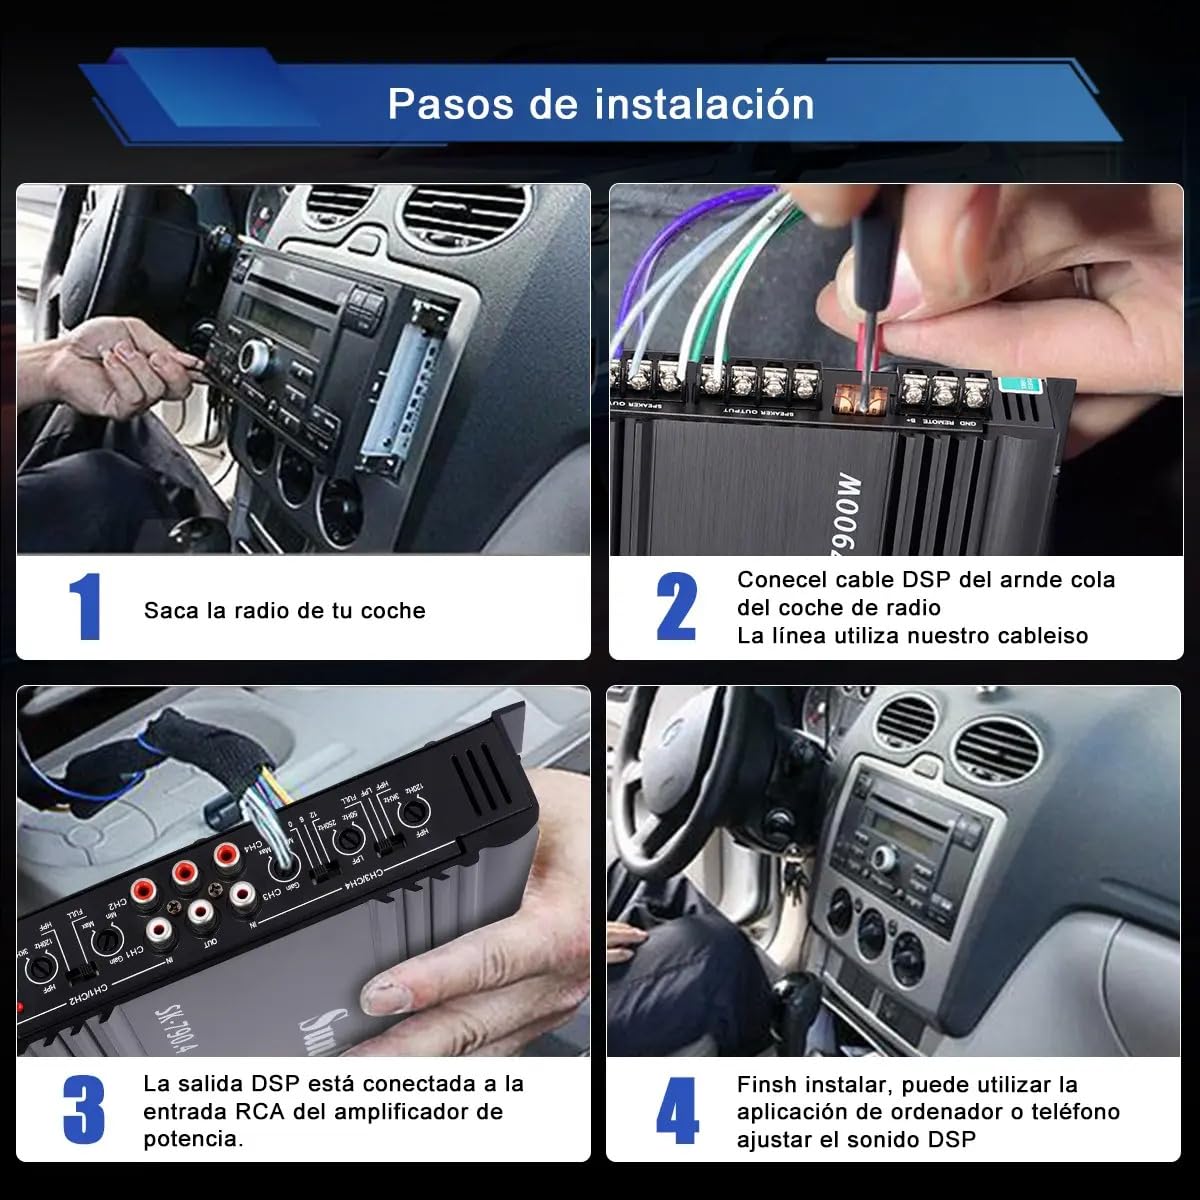
Image: A visual guide demonstrating the four key steps for amplifier installation, from removing the car radio to final sound adjustment.
- Step 1: Remove Car Radio: Carefully remove your car's existing radio or head unit to access the wiring harness.
- Step 2: Connect DSP Cable: Connect the DSP cable from the car's wiring harness. Ensure proper connections for signal transfer.
- Step 3: Connect RCA Output: Connect the DSP output to the RCA input of the power amplifier. This transmits the audio signal to the amplifier.
- Step 4: Finalize Installation and Adjust Sound: Once physical installation is complete, you can use a computer or a dedicated phone application to adjust the DSP sound settings for optimal audio performance.
6. Operating Instructions
After successful installation, follow these steps to operate your amplifier:
- Power On: Turn on your car's ignition and head unit. The amplifier should power on automatically via the remote turn-on wire. The power indicator light on the amplifier should illuminate.
- Adjust Gain: Start with the amplifier's gain (input sensitivity) knobs set to minimum. Play a familiar piece of music at a moderate volume from your head unit. Slowly increase the amplifier's gain until you hear a slight distortion, then back off slightly. This matches the amplifier's input to your head unit's output.
- Set Crossover Filters (HPF/LPF):
- HPF (High Pass Filter): If connecting full-range speakers, set the HPF to filter out low frequencies that speakers cannot reproduce effectively (e.g., 80Hz-120Hz).
- LPF (Low Pass Filter): If connecting a subwoofer, set the LPF to allow only low frequencies to pass through to the subwoofer (e.g., 80Hz-120Hz).
- Balance and Fade: Use your head unit's balance and fade controls to fine-tune the sound distribution within your vehicle.
- Listen and Adjust: Listen to various types of music and make small adjustments to the gain and crossover settings until you achieve your desired sound quality.
7. Maintenance
To ensure the longevity and optimal performance of your amplifier, follow these maintenance guidelines:
- Cleaning: Periodically wipe the amplifier's exterior with a soft, dry cloth. Do not use harsh chemicals or abrasive cleaners. Ensure no dust or debris accumulates in the heat sink fins.
- Check Connections: Regularly inspect all power, ground, remote, and speaker connections to ensure they are secure and free from corrosion. Loose connections can lead to poor performance or damage.
- Ventilation: Ensure that the amplifier's ventilation areas are not blocked. Proper airflow is essential for heat dissipation.
- Fuse Replacement: If the amplifier's fuse blows, replace it only with a fuse of the exact same type and rating. Using an incorrect fuse can cause serious damage or fire.
8. Troubleshooting
If you encounter issues with your amplifier, refer to the following troubleshooting guide:
| Problem | Possible Cause | Solution |
|---|---|---|
| No Power / Amplifier does not turn on |
|
|
| No Sound Output |
|
|
| Distorted Sound |
|
|
| Amplifier Overheating |
|
|
If the problem persists after trying these solutions, please contact customer support or a qualified technician.
9. Specifications
| Feature | Specification |
|---|---|
| Model | SK-790.4 |
| Material | Aluminum Alloy |
| Channels | 4 |
| Operating Voltage | DC 12V |
| Maximum Power Output | 7900 W |
| Maximum Power Output (2 ohms) | 2000 W x 4 channels |
| Bridged Peak Power Output (4 ohms) | 3900 W x 2 channels |
| RMS Power Output (4 ohms) | 100 W x 4 channels |
| Total Harmonic Distortion (THD) RMS Output | <0.01 % |
| Signal-to-Noise Ratio (SNR) | >95 dB |
| Sensitivity | 150 mV |
| Impedance | 2 ohm - 4 ohm |
| Frequency Response | 20 Hz - 40 KHz |
10. Warranty and Support
This product comes with a 2-month warranty from the date of purchase. Please retain your proof of purchase for warranty claims.
For technical support or warranty inquiries, please contact your retailer or the KOVVORA customer service department.