1. Introduction
This manual provides essential information for the safe and efficient use of your MELLCOM Motorized Louvered Pergola 12x20. This outdoor shelter features a solar and electric powered adjustable louvered roof, integrated LED lighting, and six side screens for enhanced comfort and privacy. Please read these instructions thoroughly before assembly and operation to ensure proper functionality and longevity of your product.
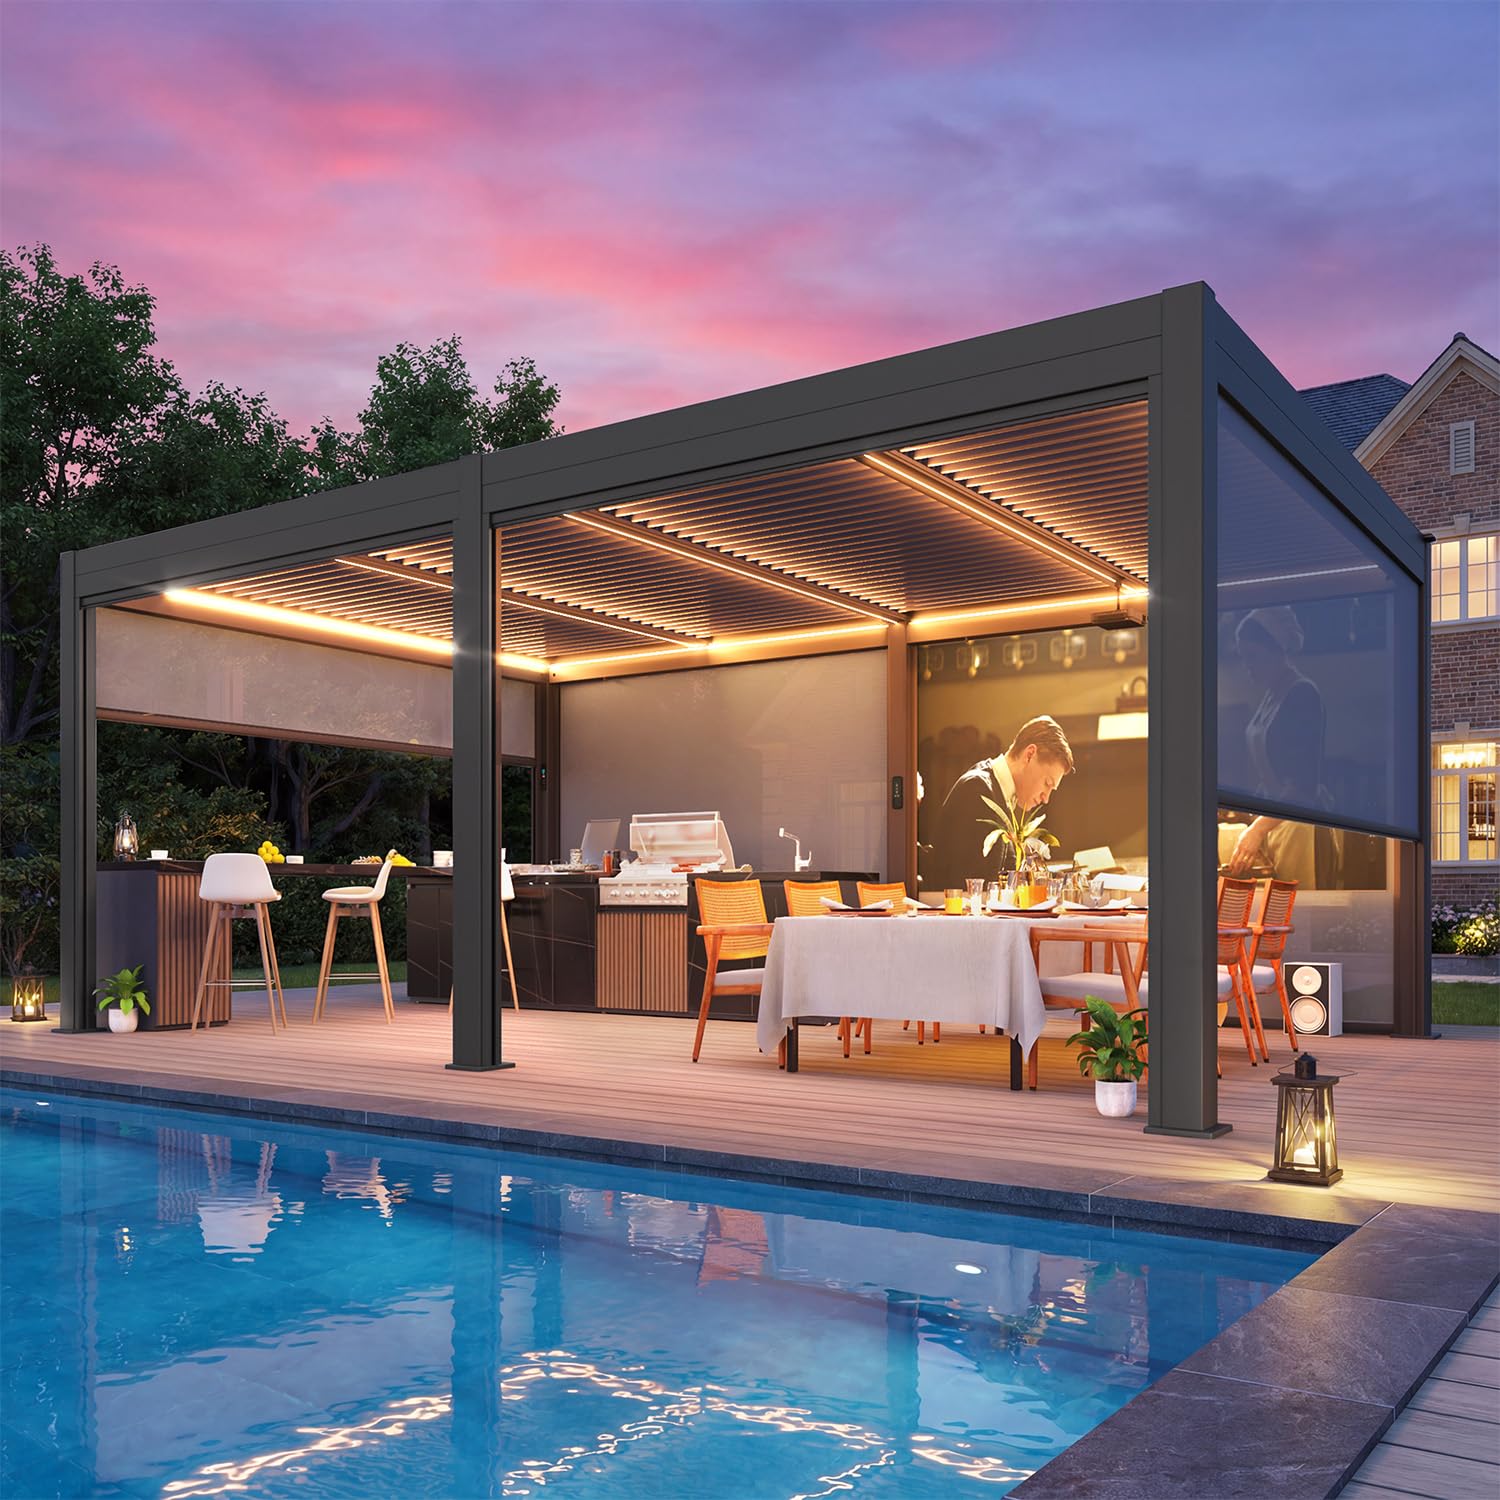
Image 1.1: The MELLCOM Motorized Louvered Pergola 12x20 provides a versatile outdoor living space.
2. Safety Information
- Ensure all components are securely fastened during assembly and before use.
- Do not operate the motorized features during strong winds or severe weather conditions.
- Keep children and pets away from moving parts during operation.
- Regularly inspect the pergola for any signs of damage or wear. Discontinue use if damage is found and contact customer support.
- Ensure the pergola is installed on a level, solid surface and properly anchored to prevent tipping.
- Avoid climbing on the pergola structure or roof.
3. Package Contents
Before beginning assembly, verify that all parts are present and undamaged. The package typically includes:
- Aluminum Frame Components (beams, posts)
- Louvered Roof Panels
- Motorized Control Unit and Remote
- LED Light Strips
- Side Screens (6 units)
- Solar Panels and Energy Storage Cells
- Pre-drilled Bases and Anchor Bolts
- Assembly Hardware (screws, nuts, washers)
- Detailed Instruction Manual
4. Setup and Assembly
Assembly of the MELLCOM Motorized Louvered Pergola requires two people and typically takes 4 to 8 hours. It is crucial to assemble the pergola on a level, solid surface. Recommended tools include a drill, wrench, ladder, and gloves.
4.1 Site Preparation
- Choose a flat, stable area for installation.
- Clear the area of any obstructions or debris.
- Ensure adequate clearance around the pergola for future maintenance and screen operation.
4.2 Assembly Steps
- Unpack all components and verify against the parts list.
- Assemble the main frame structure (posts and beams) according to the detailed instruction manual provided in the package.
- Install the louvered roof panels, ensuring they are correctly aligned for motorized operation.
- Mount the solar panels and connect them to the energy storage cells.
- Install the LED light strips within the frame.
- Attach the six side screens to the designated tracks.
- Securely anchor the pergola bases to the ground using the provided anchor bolts.

Image 4.1: Dimensions and structural overview of the pergola.
5. Operating Instructions
Your MELLCOM Motorized Louvered Pergola offers advanced control over its features for optimal comfort and ambiance.
5.1 Smart Electric Control System
The pergola's functions are controlled via the included remote or built-in post controls. This system allows for individual or group control of various features.
- Louver Adjustment: Use the remote or post controls to adjust the angle of the louvered roof from 0 to 90 degrees, providing customizable sun or shade.
- Side Screen Operation: The 480GSM side screens can be lowered or raised (0-100%) to provide bug protection, filter sunlight, reduce glare, offer light rain protection, and ensure privacy. These screens are tear-resistant.
- LED Lighting: Switch between 13 LED colors and adjust brightness levels to set the desired atmosphere.

Image 5.1: Remote control for louver, screen, and LED light adjustments.

Image 5.2: The pergola features 13 adjustable LED colors and brightness control.
5.2 Solar & Electric Hybrid Power
The pergola operates using a dual-power system, combining solar charging with plug-in electricity. Built-in solar panels charge during the day, storing energy for use during evenings or cloudy conditions, reducing reliance on grid power.

Image 5.3: Dual-power energy system with solar panels and energy storage.
5.3 Integrated Drainage System
The louvered roof is designed to close tightly, providing waterproof protection. When fully closed, rainwater is directed into built-in beam gutters and channeled down through the posts, away from the seating area. This system minimizes leakage and standing water.

Image 5.4: Integrated drainage system for effective water management.
5.4 Motorized Louvered Roof Operation
The electric louvered roof offers one-touch control for instant adjustment, providing convenience compared to manual systems that require physical effort.

Image 5.5: Electric motorized louver control for effortless adjustment.
6. Maintenance
Regular maintenance ensures the longevity and optimal performance of your pergola.
- Cleaning: Clean the aluminum frame and louvers with mild soap and water. Avoid abrasive cleaners. The side screens can be wiped down with a damp cloth.
- Drainage System: Periodically check the gutters and posts for debris (leaves, dirt) and clear them to ensure proper water drainage.
- Electrical Components: Inspect all electrical connections and wiring for any signs of wear or damage. Ensure solar panels are clean for efficient charging.
- Fasteners: Annually check all bolts and screws for tightness and re-tighten if necessary.
- Screens: Ensure side screens move smoothly in their tracks. Clean tracks if necessary.
7. Troubleshooting
If you encounter issues with your pergola, refer to the following common problems and solutions:
| Problem | Possible Cause | Solution |
|---|---|---|
| Louvers not moving | No power; remote battery low; obstruction | Check power connection; replace remote batteries; inspect for obstructions and clear them. |
| LED lights not working | No power; loose connection; remote battery low | Check power supply; inspect wiring connections; replace remote batteries. |
| Side screens not moving smoothly | Debris in tracks; damaged screen mechanism | Clean tracks thoroughly; inspect mechanism for damage. |
| Water leakage from roof | Louvers not fully closed; drainage system clogged | Ensure louvers are completely closed; clear any blockages in the drainage channels. |
If these solutions do not resolve the issue, please contact MELLCOM customer support.
8. Specifications
| Feature | Specification |
|---|---|
| Brand | MELLCOM |
| Model | 12x20 |
| Material | Aluminum |
| Product Dimensions (L x W x H) | 228.9" x 144.3" x 94.3" |
| Item Weight | 825 Pounds |
| Water Resistance Level | Waterproof |
| Ultraviolet Light Protection | 100% |
| Assembly Required | Yes |
| Color | Black |
| Floor Area | 240 Square Feet |
9. Warranty and Support
For warranty information, technical support, or to order replacement parts, please refer to the warranty card included with your purchase or visit the official MELLCOM website. Please have your model number and purchase date available when contacting support.
MELLCOM Customer Service: [Insert Customer Service Contact Information Here, e.g., Phone Number, Email, Website]


